
By PATRICK DAVILA
MythTV is a collection of software tools for TV in Linux. The MythTV website [1] calls MythTV "a GPL-licensed suite of programs that allow you to build a mythical home media convergence box on your own using Open Source software and operating systems." MythTV provides an interface from your computer to your cable or satellite television service. You can use MythTV to pause, rewind, or fast forward television programs. MythTV with a video capture card lets you record TV programs. And MythTV runs on a network-ready Linux system, so you can configure several front-end devices in your house to view and access a common set of video resources.
At first glance, MythTV looks like nothing more than a Open Source clone of Tivo - a hard-disk-based video recorder that's basically a digital version of a VCR. But MythTV offers much more functionality than Tivo. Yes, it can record, pause, and playback your favorite TV shows, but it also offers a huge suite of add-on applications that can do much more. Also, because MythTV is an Open Source project, it is not feature-encumbered like many of the commercial DVR systems. For example, MythTV provides automatic commercial skipping. On the other hand, although you used to be able to hack your Tivo to skip commercials, Tivo is now implementing flash-based pop-up advertisements that will display when the user is fast forwarding.
The MythTV project was started by Isaac Richards in 2002 and has developed into a very active community that is constantly implementing new features and add-ons. (See the box titled "MythTV Add-ons.") These features make MythTV the first true home media center. Best of all it, was developed and implemented entirely on Linux. Ports of MythTV also exist for Apple OSX and FreeBSD.


| MythTV Add-ons |
|
The current list of MyTV add-on applications is quite impressive:
|
The MythTV suite is modular in design. The main application includes a front end and a back end. The back end is where the scheduling of recordings takes place. A MySQL database houses programming information and catalogs recordings currently residing on the system. A user interacts with the application through the front-end GUI. The front end may or may not reside on the same computer as the back end database. You could build one master MythTV server that holds all of your digital media. Multiple clients could then access the server over the network. Some creative MythTV client setups have included X-boxes and bootstrapped diskless set top devices.
You can set up a dedicated MythTV server, or you can even set up MythTV on your main workstation and let it act as the server portion of your home digital media center. You'll find numerous HowTo documents on configuring MythTV with almost all of the popular Linux distributions (Debian, Fedora, Gentoo, Slackware, Suse, Ubuntu, etc.). For this article, I will build a dedicated MythTV box that will act as both a client and server. For this purpose, I will use a small, specialized PC that will reside with the rest of the audio/video equipment inside of a stereo component rack.
The heart of a MythTV box is the TV tuner card. MythTV is flexible enough to use anything from raw video capture cards (that do not encode the video) to high definition cards. Although raw tuners cards such as those based on the BT878 chipset are the cheapest, they will be the most taxing to your system. All the encoding will be done by the CPU. This may be an issue if you want to watch a previously recorded show while recording another program.
The solution to this problem is to use a hardware-based encoder card that will encode the captured video signal on the fly to a standardized video format. MPEG2 is the current standard video compression format used around the world. The biggest drawback of MPEG2 files is that they are quite large. 1 hour of high quality standard definition video will be about 1 Gig in size. The biggest plus for hardware-based encoder cards is that they will only use about 4--8% of the CPU. Thus you can continue to use your system for other tasks while it's recording TV programs. Currently, high definition TV sets and recorders are still fairly expensive, even though high definition capture cards are relatively cheap. (See the box titled "High Definition Capture Cards.")
Since I currently don't own a high definition TV set, I chose to go the standard definition route. Unlike the commercial DVR products currently available on the market, you can upgrade your MythTV system to a high definition setup when it becomes feasible.
The most popular brand of standard definition encoder cards is Hauppauge. The Hauppauge 500 comes with two encoder chips and sells for about US$ 160. Two encoder chips are useful if you want to watch a program that is different from the one you're recording. The Hauppauge 250 comes with a single encoder chip and sells for about US$ 130. In addition to one encoder chip, the Hauppauge 350 also comes with a decoder chip. This saves considerable resources when playing back recordings. The 350 model also comes with a combined A/V connection, breakout cable (with S-Video, composite video, and stereo audio out) and FM radio receiver and antennae. The 350 sells for about US$ 160. The newest model from Hauppauge is the 150, which is very similar in function to the 250 and sells for about half the cost.
All of the aforementioned Hauppauge cards are extensively supported in Linux by the ivtv driver. With the exception of the MCE version of the Hauppauge 150, all Hauppauge cards usually come with remote controls, along with an infrared receiver for the encoder card.
One of the main requirements for my MythTV box is that it's the center of my home theater setup. Yes, you can use a standard PC tower case, but it won't be very aesthetically pleasing. Therefore, the case should look like it belongs in the stereo cabinet with rest of your A/V components. I settled on a black Cooler Master ATC-620 case, which fits perfectly in my component stereo rack. Since I decided on a Mini-ATX case, I went and purchased an MSI 651M motherboard.
The next question is how much horsepower do you need to run MythTV? The very first time I tried out MythTV, I used a Hauppauge 350 card with an 800 Mhz Intel Pentium 3. I was able to get away with this because of the decoder chip the 350 uses. These days, processors are relatively inexpensive. If you're going to have the CPU handle playback, you should get at least a 1.5 GHz processor.
I installed 512 MB memory on my system even though the minimum requirement is 256 MB. One area where you shouldn't hold back in spending is hard drive capacity. Basically, more is better. I recommend getting at least a 200 GB hard drive - especially since hard drive prices are dropping quickly. 1 GB video files will chew up your hard drive space fairly quickly.
The good news is you can always add more hard drives later. Although a DVD burner is not required, a burner will come in handy if you'd like to archive some of your favorite recordings. Another area where you shouldn't be miserly is a higher quality silent power supply. This is especially true if you need to power multiple drives. In my past experiences, a cheap power supply is usually the first component to fail in a system.
Video card requirements are fairly light with MythTV. I picked up a used NVidia card for about US$ 20. The card has an S-video out for my TV connection. If you're using a Hauppauge 350 card and don't need any 3D acceleration, stick with the motherboard's on-board video. If you plan on connecting your MythTV box to your home network wirelessly, use at least a 802.11g network card. 802.11b will not be fast enough to stream large video files.
| Buying the Box |
|
Cost of MythTV box components:
Total cost: US$ 435 (EUR 339) Costs of comparable commercial offerings:
|
| High Definition Capture Cards |
|
Some examples of high definition capture cards include:
|
You'll need a service on the Internet that provide television programming information. If you are located in North America, for instance, you may want to set up an account with zap2it [2]. This account will be used by MythTV to pull down all the TV programming information that is stored in the database. zap2it is kind enough not to charge anything to the MythTV community for this service, but in fact, zap2it provides the same service to many of the commercial DVR products for a fee.
Go to the website http://labs.zap2it.com and enter the following code:
'ZIYN-DQZO-SBUT'
You will then be prompted to create a user name and password. Write these down, as you will need them during the installation process.
If you live outside of North America you will need to setup XMLTV, and you may have to do additional configuration, depending on the country where you reside. Please check the MythTV wiki on XMLTV for your options [3].
KnoppMyth is the easiest way to setup a dedicated MythTV box [4]. The KnoppMyth distribution is based on Debian and uses the auto-detection scripts based on the Knoppix live CD distribution. Before starting the installation process, it is very important to investigate how you will import TV listings into your system.
At the first prompt, you can get the option of doing an auto install, running as a front end, doing an upgrade, or doing a manual install. For most people, the auto install is sufficient. On multiple occasions, you will be presented with a warning that your hard drive will be completely re-written. The installer will then ask you to set up a regular user ID in addition to a root password.
Another final warning gives you the option to quit the install. The installer scripts then start off by partitioning your hard drive and setting up a customized version of Debian running the 2.6 kernel. After the initial installation, the system reboots. At this point, the driver has been set up for your Hauppauge capture card along with accelerated 3D drivers for NVidia graphics card owners.
Upon the first login, you are prompted to sign on as root and complete the MythTV configuration process. You first need to finish your network configuration by deciding if you want static or dynamic IP addresses. You are then presented with the option of configuring your remote control. You can select from 42+ brands of remote controls, including the ones bundled with the Hauppauge capture cards. If you make a mistake configuring your remote, you can simply rerun the setup script at anytime by typing:
#: /usr/local/bin/lirc-reconfig.sh
You are then asked if you want to add additional i686 modules; if not, you can go with the default settings. The script then goes about installing the main MythTV add-on modules.
The main myth-setup script starts up and asks you to enter your language preferences. You then need to do some general MythTV configuration:
European Users will have to make several key changes in the mythtv-setup:
You need to adjust the screen size from the recording profiles setup screen: Main Menu | Setup | TV | Recording profiles.
The profiles need to have the height changed from 576 to 480 and the width changed from 480 to 720. In the /etc/mythtv/modules/ivtv file, tuner type=1 has to be replaced with tuner type=5. You'll also need to add the following entry:
rmmod tveeprom modprobe tveeprom dmesg
And /etc/sysconfig/ivtv/cfg should have the following:
IVTV_TUNER=X IVTV_TYPE='PAL'
X is the tuner type and should be replaced with the appropriate value.
After the initial setup is complete, you will see a message about running mythfilldatabase to populate your back end database. Knoppmyth then automatically tries to configure your Mythweather settings based upon your provider's system area. The installer will then automatically run the mythfilldatabase command, which fills the database with two weeks worth of programming schedules.
Once that's done, MythTV will startup for the first time. You will then see a message about pre-scaling theme images and the front-end GUI becomes active. You are now ready to start using MythTV. At anytime, you can rerun the MythTV setup interfaces by issuing the following command:
mythtv-setup
| TV Standards |
|
Depending on your location, you may wish to try one of the following "TVStandard" values:
|
The quality of the signal is determined by the quality of the TV capture card you purchased for your system. If you decide to purchase the more expensive Hauppauge 350, you will have a very good video connection that will need some manual configuration. Basically you will need to have the video piped out to a frame buffer device [5] [6].
If you purchase the less expensive Hauppauge 250 or 150, you will need a video card with a video out connection. The low end NVidia MX420/440 is relatively cheap. You will have to slightly modify your Xorg/XF86 configuration file. My file has the following settings:
Section "Device"
Identifier "Videocard0"
Driver "nvidia"
VendorName "EFX"
BoardName "nVidia GeForce 4 MX 420"
#TV Out
Option "TVStandard" "NTSC-M"
Option "TVOutFormat" "SVIDEO"
EndSection
My file also contains the settings shown in Listing 1 to specify a television set.
| Listing 1: Specifying a Television Set |
01 Section "Screen" 02 Identifier "Screen0" 03 Device "Videocard0" 04 Monitor "Monitor0" 05 DefaultDepth 24 06 SubSection "Display" 07 Depth 24 08 Modes "1024x768" "800x600" "640x480" 09 EndSubSection 10 EndSection 11 Section "Monitor" 12 Identifier "Monitor0" 13 VendorName "Monitor Vendor" 14 ModelName "32in Analog TV" 15 HorizSync 30.0 - 50.0 16 VertRefresh 60.0 - 60.0 17 Option "dpms" 18 EndSection |
If you use a digital cable or satellite television system, you will have to configure a serial port infrared blaster. An IR-blaster tricks the cable/satellite box into thinking the user is changing the channels via the receivers remote control. You can construct your own IR-blaster if you're moderately handy with a soldering gun, or you can purchase a pre-assembled IR-blaster at a minimal cost from [7].
The current version of KnoppMyth (R5B7) has an option to configure an IR-blaster. Unfortunately, this feature does not work correctly. To remedy this, Greg Frost has posted a work around in the mysettopbox forums [8].
An out-of-the-box solution to this problem is in development for the next release of KnoppMyth.
In a nutshell, you will need to create a second instance of LIRC or some equivalent script to run at startup. You will then need to create a script that will change the channels on the receiver. Different cable/satellite boxes will require slightly different configurations, depending on the manufacturer make and model.
For non KnoppMyth setups, you can follow the guide at [9], which is fairly distribution neutral.
If you've familiar with Tivo or other commercial DVR systems, the menus in MythTV look very familiar. From the main menu (Figure 3), you can go watch live TV, schedule upcoming recordings, and go into the different add-on applications.

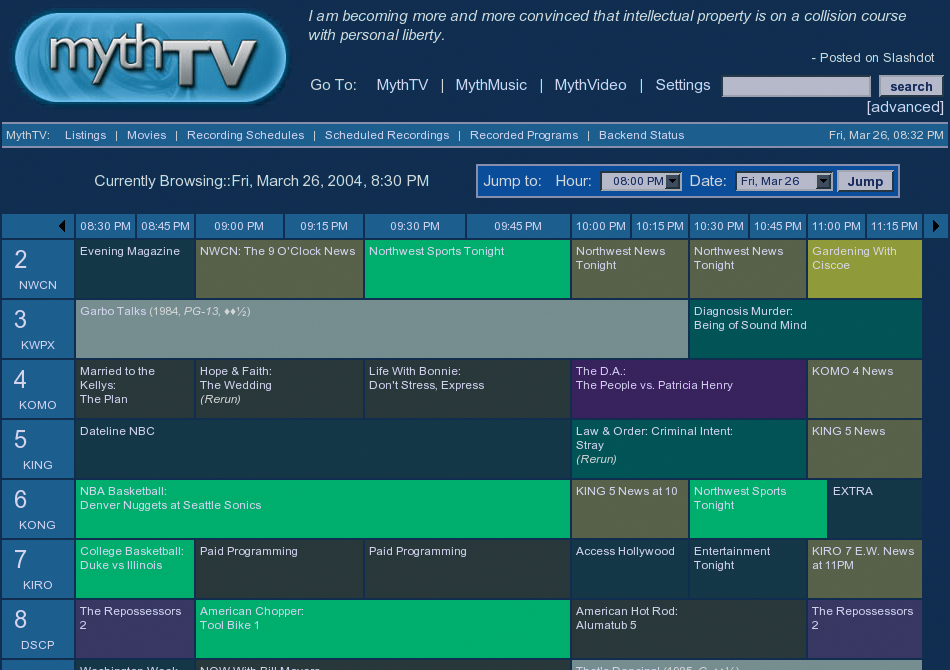
When watching live TV, you can pull up the system menu with the m key and browse what's on other channels. You will then be able to view the transparent on-line guide while your show is still viewable. You can scroll right and see what will be the channel you're currently viewing. You can also move up and down to see what's on the other channels. This is similar to viewing programming guides on a digital cable or satellite system.
Scheduling recordings is very easy. Go into the Schedule Recordings menu item and browse the program guide. The database typically holds two weeks worth of programming information, so setting up recordings for while you're on vacation shouldn't be a problem.
You can also find a particular show by using the search function. When you select a program to be recorded, you have the option of making it record at regular intervals (similar to the season pass feature in Tivo) or as a one time instance.
For setting up your audio collection, you start by listing the default directory where your audio files will reside MythTV/Utilities/Setup/Media Settings/Music Settings. You can then copy your music collection into the music directory remotely via SSH or fish in Konqueror.
You can also rip and encode new CDs by selecting import CD from the main music menu. You have the option of encoding your ripped songs to either OGG, MP3 or FLAC. You can also create music play lists or have MythMusic play random songs. MythWeather will display your local weather forecast, along with screen captures of Doppler radar for your local region (Figure 4). (This feature is based on an interface with the Weather Channel website.)

If the location is incorrect, you can change it in the setup menu Utilities/Setup | Setup | Info Center Settings | Weather Settings. MythVideo allows the playback of a multitude of video codecs (mpeg, avi, divx, xvid, qt, wmv, etc..) by using Mplayer on the back end. MythDVD allows you to rip and store your DVD collection to your hard drive. This feature is convenient if you hate having to go searching for the same DVDs over and over again. For the retro gaming enthusiasts, there's MythGame, which allows you to run old ROM images of Atari and NES games via the MAME and SNES emulators. Legally you are required to own the actual ROM cartridges, even though there are numerous websites allowing downloads of all your favorite classic games.
One of the newest add-on applications is MythStreamTV, which allows you to stream your videos over the network. Streaming is great if you want to take a break from a long night of coding and watch a recorded program from your workstation.
By far the most impressive of the add-on applications is MythWeb. MythWeb allows you to interface with your MythTV box over the Internet (Figure 5). Basically, an Apache web server is setup with access given only to your regular user ID. You can view the program schedule, delete old shows, schedule new shows, and even control streaming video via MythStreamTV. The only caveat to external access is forwarding port 80 through your network firewall. This feature is especially useful if you're on the road and want to make sure your favorite TV shows will be recorded for you. MythTVBurn is a fairly new add-on application that is especially useful if you have a DVD burner in your Myth box. The program lets you take previously recorded programs and burn them to DVD.

If you get to the point where you're running out of disk space and refuse to archive old shows to DVD, you can add an additional hard drive. The best solution for adding more hard drive space is using LVM (Logical Volume Manager). For all intents and purposes, hard drives set up with LVM will be treated by the system as single hard drive partitions. You will have to backup any programs you've recorded, as they will be wiped out when setting up LVM. This is because you are reformatting the partitions where your video files will reside. Setting up LVM would normally involve many steps, but the developers of KnoppMyth have created a script to simplify the process. To set up LVM, log into a console session as root and use cfdisk to create a partition on your new hard drive called /dev/hdb1. Then run the create_lvm.sh script and pass the partition names you want to combine:
create_lvm.sh /dev/hda3 /dev/hdb1
For SCSI disks, use the following command:
create_lvm.sh /dev/sda3 /dev/sdb1
The script will create disk volumes and modify the /etc/fstab file with the new partitions. This script should be started by the command create_lvm.sh followed by the list of devices (partitions) to be included in the volume group.
The next step is to umount the /dev/vg/myth partition:
umount /myth
Then format the /dev/vg/myth partition with the file system of your choice :
mke2fs -j -O sparse_super -m0 -i8000000 -L myth /dev/vg/myth
Remount the /myth partition:
mount /myth
And restore any files that were destroyed in the LVM formating process.
MythTV is an incredibly powerful application that let's you do everything a commercial DVR can do and much more. The power of MythTV lies in the fact that MythTV enables users and developers to come up with new and innovative ways to improve and extend its functionality. The MythTV project is not limited by corporate monetary interests or constrained by development teams who are told what to work on. The only possible obstacle is small minded legislation paid for by the entertainment industry that would outlaw digital recordings for personal fair use. But alas, that is an argument for another day.
| INFO |
|
[1] MythTV: http://www.mythtv.org/
[2] Zap2It: http://www.zap2it.com/ [3] MythTV wiki on XMLTV: http://www.mythtv.org/wiki/index.php/XMLTV [4] KnoppMyth: http://knoppmythwiki.org [5] Hauppauge 350 with KnoppMyth: http://knoppmythwiki.org/index.php?page=HauppaugeThreeFiftyInstallation [6] IVTV driver install: http://mythtv.org/wiki/index.php/IVTV_Installl [7] IR-blaster: http://www.irblaster.info/ [8] IR-blaster workaround: http://mysettopbox.tv/phpBB2/viewtopic.php?t=9352&postdays=0&postorder=asc&start=0 [9] MythTV with LIRC: http://losdos.dyndns.org:8080/public/mythtv-info/MythTV_DISH_IR_LED_TX_via_Modified_LIRC.html [10] Linux HTPC Howto: http://www.linuxis.us/linux/media/howto/linux-htpc |