
By Michael Nerb
Encrypting individual filesystems is no big deal; in fact, some distributions allow you to encrypt directories as part of the installation routine. But encrypting the home directory on your laptop is a job half done. Dishonest finders can still draw conclusions from log and configuration files. If you're serious about providing security through encryption, you need to protect the whole hard disk against spying - something that no distribution can do out of the box.
Things start to become more complex if you need to protect the root filesystem. Neither Suse nor Debian Linux give users a tool to help encrypt the root filesystem during the install (or later). That means you'll need to roll up your shirt sleeves for some hands-on configuration.
In this workshop, we will start by installing a standard Linux system and then progress to encrypting the existing filesystems one at a time. We will finish off by deleting the unprotected partition and using the space for other tasks, such as swapping out the /home directory to an encrypted partition of its own.
Our goal is to encrypt the entire hard disk (with the exception of the partition table in the Master Boot Record). Because it isn't possible to encrypt the boot partition, we will move /boot to an external medium - a USB stick, in this case. To boot from the stick, we will need to modify the BIOS and GRUB bootloader settings. The USB stick then creates an additional layer of security by serving as a kind of "key" that the thief will need to possess in order to gain access to the laptop. If this approach seems impractical for your purposes, you can keep the boot partition on your hard disk. However, /boot must be on an unencrypted partition of its own.
In this article, we'll use DM-Crypt [1] for our filesystem encryption. DM-Crypt has been the tool of choice for encrypting filesystems since kernel 2.6.4. It uses the device mapper infrastructure [2], and it encrypts block devices transparently, relying on the kernel's Crypto API to do so. Linux Unified Key Setup (LUKS) adds some enhancements, which were discussed in a previous issue of Linux Magazine [3]. The LUKS design is implemented as the cryptsetup-luks [4] configuration tool.
As an alternative to a fresh installation, you can modify an existing system, assuming you have enough free space on the disk to create a new partition for the data you are encrypting.
Don't worry! After you finish encrypting, the disk patches and kernel updates should not cause any problems, and your backup and recovery tools should work like they always did.
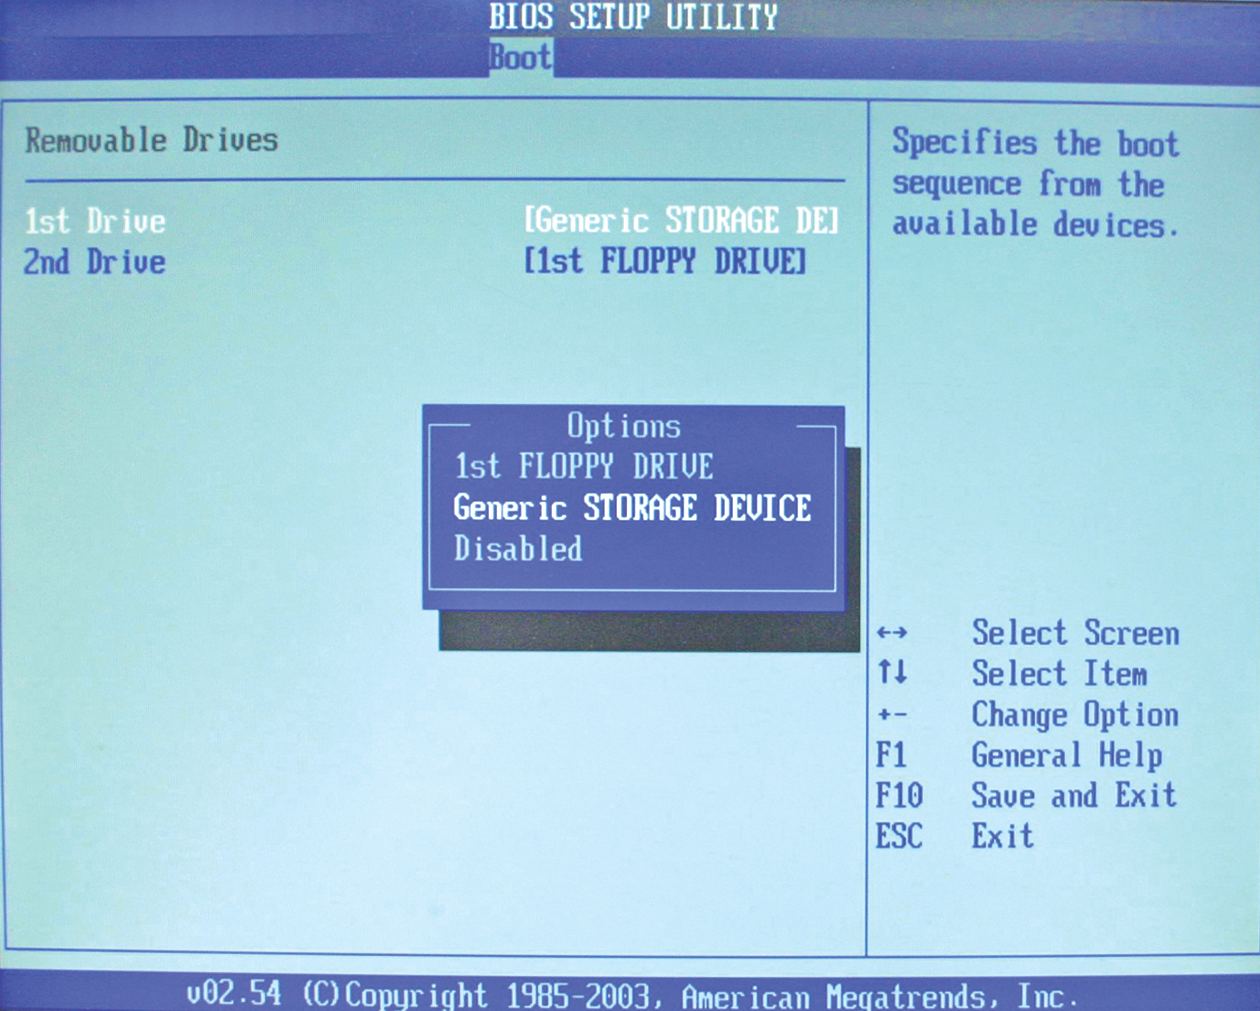
The equipment you need for this lab is a suitable laptop, a USB stick with a capacity of about 64 Mbytes, and your favorite Linux distribution (kernel 2.6.11 or newer) - we tested Suse Linux 9.3 / 10.0 and Debian Sarge. Check the laptop BIOS to see if it supports booting from USB (Figure 1). Use a Live CD to ensure that Linux supports your laptop; you might like to take this opportunity to erase the laptop disk (see the "Secure data erasure" box).
For the initial install, divide the hard disk into four partitions, as shown in column 1 of Table 1. This configuration puts an unencrypted version of the Linux system on /dev/hda4. (If you prefer not to boot from a USB stick, use the alternative partitioning suggestion shown in column 2 of the table.)
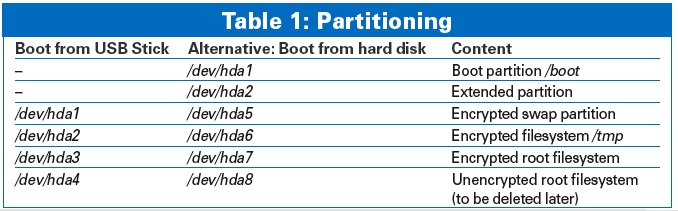
Set up the size and number of partitions to match your laptop's hard disk and intended use - dual or multiple boot configurations are possible. Do not create a user at this phase of the installation; you can do so later on the encrypted system.
After completing the installation, you should have a working Linux system on /dev/hda4. If you have a kernel version older than 2.6.11 (with Debian Sarge, for example), you will need to update the kernel now. For the following steps, you also need the cryptsetup-luks configuration tool.
The "Updates for Debian Sarge" box describes how to update a Sarge system; for Suse Linux, you just need to add cryptsetup-luks. The LUKS homepage at [4] has a prebuilt, statically linked version that you can copy to /sbin/cryptsetup-luks.
| Updates for Debian Sarge |
|
To prepare Debian Sarge for encrypting the root partition, complete the standard installation, and then do this: add the following Apt source (and comment out all other sources in /etc/apt/sources.list): deb http://http.us.debian.org/debian unstable contrib main Then run apt-get update and apt-get install -f to update the package database, and do the following: apt-get install yaird linux-image-2.6.17-2-686 apt-get install cryptsetup This installs a current kernel version, cryptsetup, and yaird, a tool for creating initial RAM disks (like mkinitrd). (Note that the kernel image version number may have changed since this issue went to press - version 2.6.17-1 was available on the servers when we started initial testing.) Now boot your computer with the new kernel. |
| Secure Data Erasure |
|
Whenever files are deleted by running rm against the filenames, Linux simply removes the inodes for the files from the directory. The data stays on the disk and can be reconstructed with a little effort. Reformatting with mkfs will not overwrite the partition. To permanently remove the data, you need to actively modify the magnetization of the sectors (in an appropriate way). The simplest way of doing this is with a command such as dd if=/dev/zero of=/dev/hda. But just as a regular fall of snow will not cover the outlines of the landscape, some residual magnetization will remain after overwriting a file with null bytes. An attacker with the right kind of equipment might be able to reconstruct the original data. A more time consuming approach, but one that is ultimately far more secure, uses /dev/urandom instead of /dev/zero. Depending on how paranoid you are, you can do this between three and 35 times [5] to be "fairly certain" that you have removed the data. The shred and wipe [7] tools will help you do so. But you should be aware that these tools assume a few basic conditions that may not apply to RAID systems, journaling filesystems (such as ReiserFS or Ext3), or certain hard disk drivers and firmware components that buffer data and perform multiple write operations at a single pass. To be absolutely safe, you would need to destroy the hard disk and dispose of it somewhere where it will never be found. But you can save yourself all that trouble by implementing the mechanisms described in this article, and then just forgetting the passwords. |
Linux typically detects USB sticks as SCSI devices and addresses them as the SCSI hard disk /dev/sda (unless you have some other SCSI devices). Use fdisk to create a partition table with at least one partition and format the partition (mkfs.ext2 /dev/sda1). Then do:
mount /dev/sda1 /mnt
cp -ax /boot/* /mnt
This copies the /boot directory to the USB stick. If it does not already exist, give the ln -s . boot command to create a symbolic link in the /mnt directory, to avoid a hitch with grub-install later on.
Now modify the GRUB bootloader configuration on the USB stick: /mnt/grub/device.map states how GRUB maps BIOS and Linux device names; you need an entry of (hd0) /dev/sda.
Change the entries for the BIOS device names from (hd0,3) to (hd0,0) (this corresponds to /dev/sda1) in the /mnt/grub/menu.lst configuration file:
title Suse Linux 9.3 (USB-Boot)
   kernel (hd0,0)/vmlinuz root=/dev/hda4
   initrd (hd0,0)/initrd
Finally, run grub-install --root-directory=/mnt /dev/sda to install GRUB on the Master Boot Record of your memory stick. If everything works, you can boot the laptop from the USB stick - to do so, set the BIOS boot order to boot the computer from external boot media first.
For security reasons, either change to single user mode, or close any unnecessary applications, stop all unnecessary services, and shutdown any user sessions.
We will be using the Linux system we just installed to encrypt the partitions on the laptop step by step; the partitions in question are /dev/hda1 through /dev/hda3. Partition /dev/hda4, which holds the root filesystem right now, will not be needed later. You can recycle it and create a partition for the /home directory if you like.
The basic steps (see the "Device Mapper, DM-Crypt, and Cryptsetup" box) are always the same: use cryptsetup-luks to create a virtual block device with integrated AES encryption, and map it to an appropriate block device (on the laptop hard disk). While doing so, you need to enter a passphrase, which the program will use to create a symmetric key. The key is then used for data encryption. Finally, format the virtual block device with a filesystem, and mount the filesystem.
| Device-Mapper, DM-Crypt, and Cryptsetup |
|
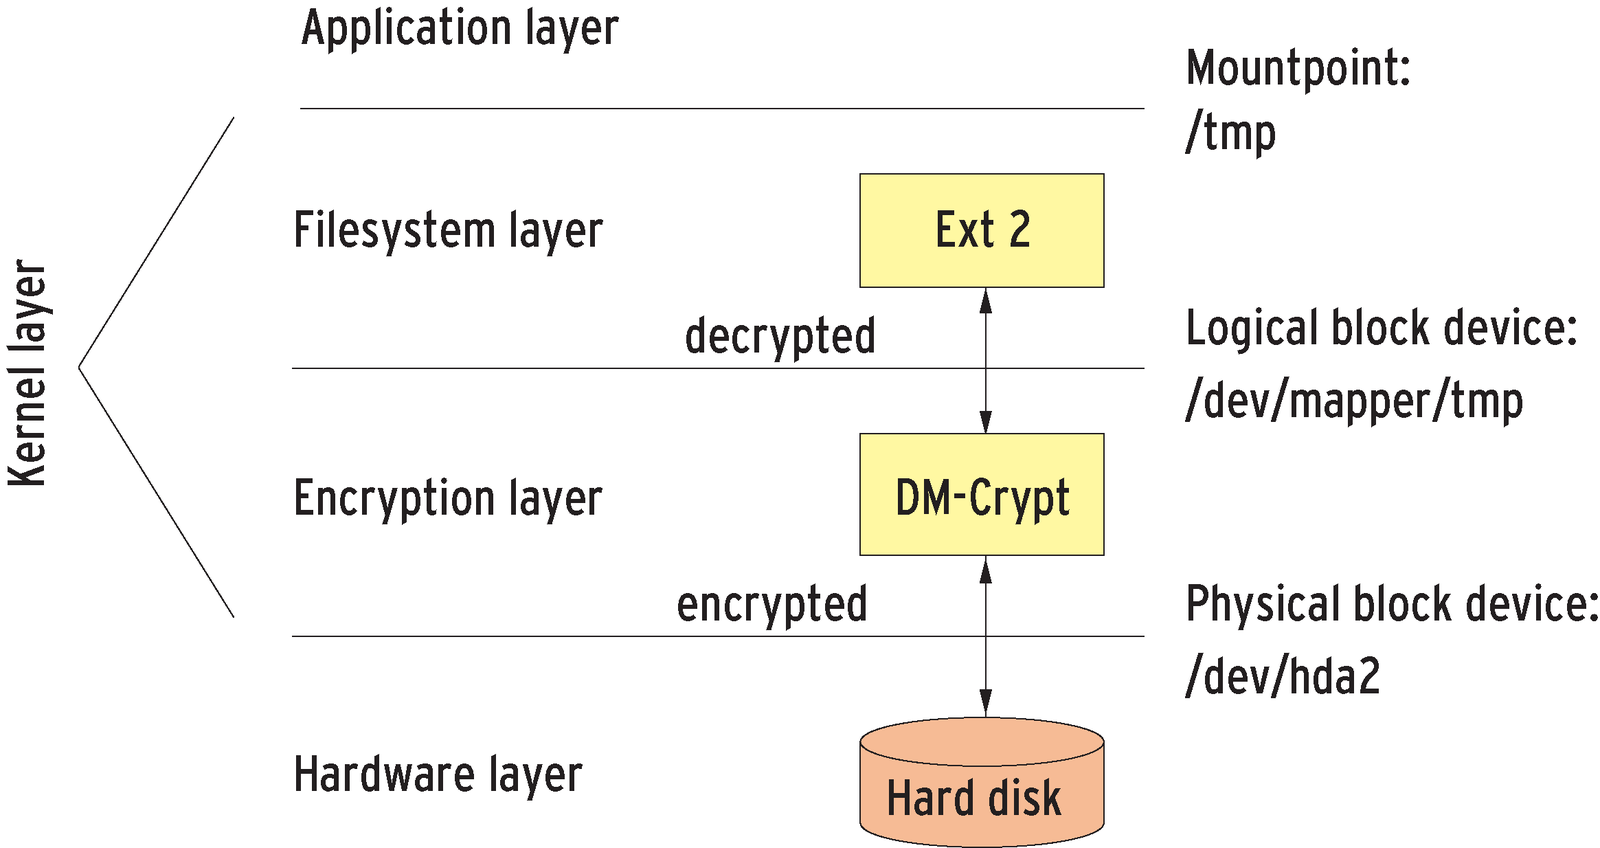
Just like loop devices, the device mapper infrastructure [2] unhitches physical block devices from virtual block devices (Figure 2). This virtualization creates an abstraction layer that is leveraged by various applications, DM-Crypt [1] being just one of them. DM-Crypt transparently encrypts data passed in by the virtual block device and stores the data on the physical block device - and vice-versa. The physical block device appears to contain garbage - you need to supply the correct passphrase to mount a filesystem via the virtual block device to be able to use the data in a meaningful way. The cryptsetup userspace tool is required to configure DM-Crypt; the virtual block devices are set up in the /dev/mapper/ directory. cryptsetup-luks is an extension of cryptsetup, and offers enhancements, which we discussed in greater detail in [3] - but to summarize:
|
The swap partition and the /tmp directory are useful candidates for our first experiments with cryptsetup-luks: these filesystems contain temporary data and are no big loss if something goes awry.
Listing 1 shows the command sequences for manually enabling and disabling encryption for swap and /tmp. For swap, you need to set up a virtual block device, /dev/mapper/swap, using cryptsetup-luks, then initialize the device by running mkswap and enable the device by running swapon. In the same way, create another virtual block device, /dev/mapper/tmp, format it with the Ext2 by running mkfs.ext2, and then mount the device as /tmp. For Debian, replace the cryptsetup-luks commands with cryptsetup or create a suitable link.
In both cases, cryptsetup-luks uses random passphrases from /dev/urandom; the passphrases reside in the laptop's main memory and disappear when you power down the laptop. As nobody knows the passphrases, the data stored on swap and /tmp is irretrievably lost, but this is intended. Swap contains memory dumps and is reinitialized whenever you boot your computer. There are no benefits from keeping swap readable, and there are a number of security risks. Every distribution has its own approach to handling temporary files. As a rule, programs should not rely on data in /tmp surviving a reboot.
| Listing 1: Creating Swap and /tmp |
01 # swapoff -a 02 # cryptsetup-luks -s 256 -d /dev/urandom create swap /dev/hda1 03 # ls -l /dev/mapper/ 04 total 124 05 crw------- 1 root root 10, 63 Apr 3 2006 control 06 brw-r----- 1 root root 253, 0 Apr 2 23:53 swap 07 # mkswap /dev/mapper/swap 08 Setting up swapspace version 1, size = 1019895 kB 09 # swapon /dev/mapper/swap 10 # cat /proc/swaps 11 Filename Type Size Used Priority 12 /dev/mapper/swap partition 995988 0 -3 13 # swapoff /dev/mapper/swap 14 # cryptsetup-luks remove swap 15 # cat /proc/swaps 16 # 17 # cryptsetup-luks -s 256 -d /dev/urandom create tmp /dev/hda2 18 # mkfs.ext2 /dev/mapper/tmp 19 mke2fs 1.36 (05-Feb-2005) 20 [...] 21 # mount /dev/mapper/tmp /tmp 22 # ls -l /tmp/ 23 total 17 24 drwx------ 2 root root 12288 Apr 2 23:55 lost+found 25 # umount /tmp 26 # cryptsetup-luks remove tmp 27 # ls -l /dev/mapper/ 28 total 124 29 crw------- 1 root root 10, 63 Apr 3 2006 control |
It makes sense to recreate these filesystems every time you boot. Debian makes this simple: just set the CRYPTDISKS_ENABLE=Yes parameter in /etc/defaults/cryptdisks (if it is not already set), and add the following to /etc/crypttab:
#<target dev> <source dev><key> <options>
swap /dev/hda1 /dev/urandom swap
tmp /dev/hda2 /dev/urandom tmp
You also need to modify /etc/fstab; remove the existing entry for swap, or modify the entry:
/dev/mapper/swap none swap sw,pri=1 0 0
/dev/mapper/tmp /tmp ext2 defaults 0 0
Suse Linux also has an /etc/cryptotab file - but it uses loop devices. For Suse, it makes sense to use an init.d script to enable /tmp and swap. A shell script that does this for you (cryptfs), and which is based on [8], is available from the Linux Magazine website [9]. After downloading the script (to /etc/init.d/) create symbolic links in /etc/rcX.d to call the script in the required runlevels. Finally, delete the line for the previous, unencrypted swap partition from /etc/fstab.
Let's reboot, just to make sure that Linux creates and enables the filesystems. If everything works out, we can move on to our major task, encrypting the root filesystem.
In contrast to /tmp and swap, the root filesystem is permament: that is, it is not recreated whenever you reboot. Root is created once and mounted at boot time. We need some extended LUKS functionality (from cryptsetup-luks) at this point, and the procedure is slightly different:
The following parameters create a LUKS header on /dev/hda3; LUKS uses the AES encryption algorithm with a key length of 256 bits and sets a passphrase:
cryptseup-luks -c aes-cbc-essiv:sha256 -y -s 256 luksFormat /dev/hda3
Now create a virtual block device, /dev/mapper/dm-root, which will map to the /dev/hda3 partition. cryptsetup will prompt you for the passphrase you just specified. Then go on to format the virtual block device (Ext3 format in our example) and mount the device:
cryptsetup-luks luksOpen /dev/hda3 dm-root
mkfs.ext3 /dev/mapper/dm-root
mount /dev/mapper/dm-root /mnt
The newly encrypted root filesystem is now mounted below /mnt, and it is still empty. You will need to insert your bootable memory stick for the following steps. Copy the complete installation from the /dev/hda4 partition to /mnt - this process encrypts and stores the data on /dev/hda3. Do not copy the /boot, /lost+found, /proc, /sys, /tmp, and /mnt directories. The copy command looks like this:
cd /; cp -ax bin dev etc home lib media opt root sbin usr var /mnt/
The copy can take awhile, as two to three Gbytes need to be run through the encryption layer. This leaves you with an image of the root filesystem from /dev/hda4 on /dev/hda3. You can manually umount (umount /mnt; cryptsetup-luks luksClose dm-root), and remount (cryptsetup-luks luksOpen /dev/hda3 dm-root; mount /dev/mapper/dm-root /mnt) now.
Now use chroot to work with the encrypted system. Start by setting up the missing mountpoints, and mount the memory stick as /boot.
chroot /mnt
mkdir -p /boot /proc /sys /tmp /mnt
mount -t proc proc /proc
mount -t sysfs sysfs /sys
mount /dev/sda1 /boot
If you attempted to boot from the memory stick with the root filesystem on /dev/hda3, or /dev/mapper/dm-root, would fail right now, as the init program (which is part of initrd) would not be able to handle the root filesystem in either case: partition /dev/hda3 would seem to contain garbage, and the virtual device, /dev/mapper/dm-root, does not exist at this point.
To let Linux boot from the encrypted root filesystem, we need to modify initrd as follows:
The cryptsetup-luks program, and the required kernel modules, must be referenced in initrd.
init has to load the kernel modules, and mount the virtual block device, /dev/mapper/dm-root, as the root filesystem.
Depending on the integration status of cryptsetup for your distribution, there are different approaches to doing this.
Debian Sarge has some fairly useful support here. Add the aes-i586 and sha256 modules to /etc/mkinitd/modules (each in a separate line); add the following line to the existing /etc/crypttab file:
dm-root /dev/hda3 none luks,cipher=aes-cbc-essiv:sha256
In a similar way, change the root filesystem in /etc/fstab to point to /dev/mapper/dm-root:
/dev/mapper/dm-root / ext3 defaults 0 1
Then run yaird -o /boot/initrd to create a working initrd on the memory stick. yaird (yet another initrd) replaces the standard mkinitrd tool, which can't handle encrypted root filesystems in the Debian version.
For Suse Linux, you'll need to add the required kernel modules dm-mod, dm-crypt, aes-i586, sha256, and ext3, using the INITRD_MODULES parameter to the /etc/sysconfig/kernel file. (The module names must be separated by blanks.)
More changes are required to the /sbin/mkinitrd program: you might like to create a backup copy before you continue. In the mkinitrd_kernel function, look for the lines that copy /sbin/insmod to the ramdisk; depending on your Suse version, they may look slightly different. For Suse Linux 10.1 the lines look like:
if ! cp_bin $initrd_insmod $tmp_mnt/sbin/insmod 2>/dev/null ; then
   error 5 "no static insmod"
fi
Add the following two lines immediately below this:
cp_bin /sbin/cryptsetup-luks $tmp_mnt/sbin/ 2>/dev/null \ || error 5 "no static cryptsetup-luks"
In the udev_discover_root function, add the following as the first command:
| echo "Setting up LUKS device $rootdev. Provide pass phrase now."
| /sbin/cryptsetup-luks luksOpen /dev/hda3 dm-root
Then you just need to change the entry for the root filesystem to /dev/mapper/dm-root (for the ext3 filesystem) in /etc/fstab. Finally, give the /sbin/mkinitrd -o /boot/initrd command to create a new initial RAM disk on the memory stick.
Before rebooting, modify the /boot/grub/menu.lst file on your memory stick. Change the root kernel parameter in the menu entry that launches the Linux system to point to the virtual block device, /dev/mapper/dm-root. You also need to modify the initrd entry (/boot/initrd). A typical entry will look like this:
title Suse Linux 10.0 (USB-Boot, Encrypted Root)
   kernel (hd0,0)/vmlinuz root=/dev/mapper/dm-root
   initrd (hd0,0)/initrd
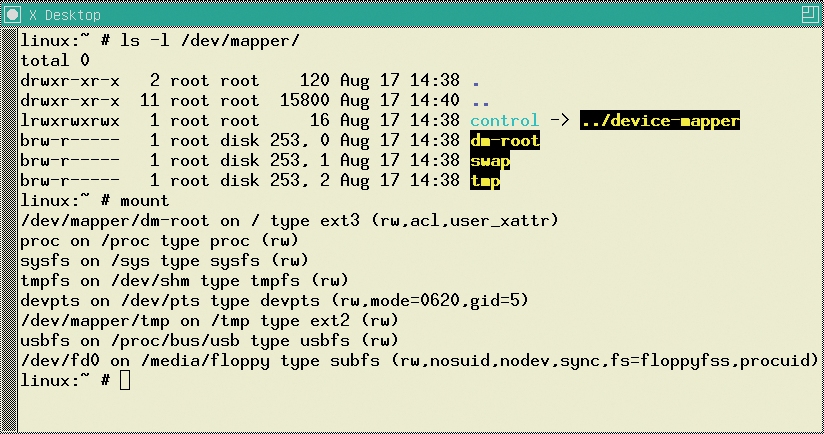
Reboot the laptop. Make sure you have set USB as the default boot device in the BIOS boot order. cryptsetup-luks will now prompt you for the passphrase for the root filesystem, and assuming that you provide the correct password, boot to the login screen. Calling mount removes any trace of doubt (Figure 3). If this does not work, try booting without the memory stick: you still have the unencrypted Linux system on the hard disk, and you can start troubleshooting from there.
If all of this works out, you no longer need the unencrypted root filesystem on /dev/hda4. Delete the data on the partition and use cryptsetup-luks to set up another encrypted filesystem called /dev/mapper/dm-home. Format the partition, and mount it as /home. Then create any users you need; their home directories are automatically encrypted on /dev/hda4.
One downside to this is that encrypted swap and suspend to disk are mutually exclusive - make sure to disable the latter for this reason (if it exists, remove the kernel parameter resume=/dev/hda1 from /grub/menu.lst.) Suspend2 [6] is an alternative that supports suspend to disk with an encrypted swap partition; however, this means patching and compling the vanilla kernel.
You will not need the memory stick while the laptop is running, however, it is essential to plug in the stick for kernel updates, as mkinitrd or yaird will want to install the new initrd on the stick. To be on the safe side, backup the memory stick before you update the kernel, or add an entry to the previous, working system to your GRUB configuration. Kernel 2.6.13 saw a few modifications to udev, and they may prevent the initrd you created from performing as desired. yaird does not share this problem. To be really safe, create a live CD with LUKS support. You can use the CD to manually mount and back up encrypted partions.
Suse users need to be careful if YaST updates the mkinitrd package. Back up the LUKS changes to the /sbin/mkinitrd script and compare them with the new version after updating mkinitrd.
During this workshop, we have encrypted the whole laptop hard disk except for the Master Boot Record. You need the memory stick to boot. This gives road warriors a high degree of passive security. But you should still be aware of common protective and security measures (see the "Security 101" box).
| Security 101 |
|
Encrypting your laptop hard disk is just one layer in an all-encompassing security policy - and it is no replacement for a security policy, as it only protects the data while the computer is switched off. If you lose your laptop after entering the correct pass phrases and with a user session running on the Linux system, an attacker would have the same access as to a completely unprotected machine. This warning also applies to threats from the Internet, assuming the laptop has an Internet connection. Malware has unrestricted access to your data once it gains access to the system. In other words, this workshop cannot give you absolute security; but following these rules will keep your laptop as secure as possible:
|
| INFO |
|
[1] DM-Crypt: http://www.saout.de/misc/dm-crypt
[2] Device Mapper Resource Page: http://sources.redhat.com/dm/ [3] "Secret Messages: Hard disk encryption with DDM-Crypt, LUKS, and cryptsetup," by Clemens Fruhwirth and Markus Schuster, Linux Magazine 12/05, pg. 65. [4] Linux Unified Key Setup (LUKS): http://luks.endorphin.org/dm-crypt [5] Peter Gutmann, "Secure Deletion of Data from Magnetic and Solid-State Memory": http://www.cs.auckland.ac.nz/~pgut001/pubs/secure_del.html [6] Suspend 2: http://www.suspend2.net [7] Wipe - Secure File Deletion: http://wipe.sourceforge.net [8] Luksopen script on the DM-Crypt Wiki: http://www.saout.de/tikiwiki/tiki-index.php?page=luksopen [9] Shell script cryptfs: http://www.linux-magazine.com/Magazine/Downloads/72/DM-Crypt [10] Clemens Fruhwirth: "New Methods in Hard Disk Encryption," http://clemens.endorphin.org/nmihde/nmihde-A4-ds.pdf |