
By Tobias Eggendorfer
When several users on the same network access the Internet multiple times for the same page, you pay a price in time and bandwidth. A caching proxy reduces traffic by storing web pages requested by users and serving them on request.
A caching HTTP proxy like Squid [1] runs in Layer 7 of the OSI (Open Systems Interconnection) model; in other words, the Squid proxy server speaks the application protocol and can recognize the payload data. The proxy is thus capable of checking the content of a page and providing content filtering. Depending on the target direction, a proxy can either block access to undesirable pages, such as adult content on school networks, or it can keep malware out of an enterprise network.
If you install a legacy proxy on your network, you can look forward to a pile of configuration chores. You have to enter the proxy details in each browser, or set the browsers to use proxy autoconfigure, and modify the firewall to deny attempts to route HTTP. As an alternative, you can install a transparent proxy using a firewall rule to redirect all outbound HTTP traffic to the proxy. But again, you still need to modify the firewall.
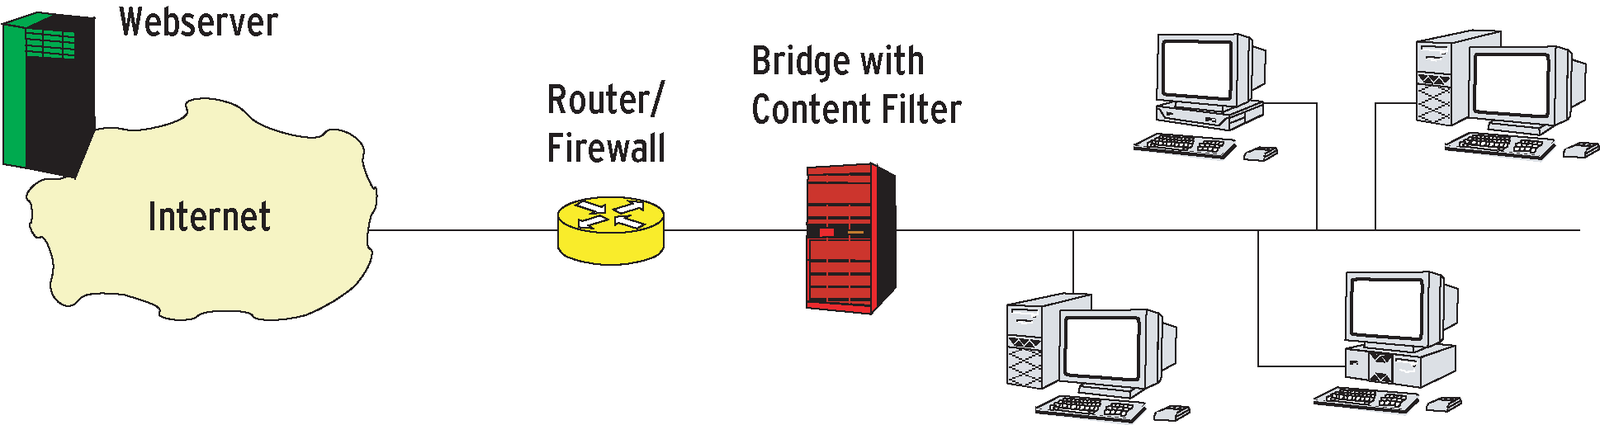
It would be far more elegant to simply plug the proxy into the network - behind the last switch and in front of the router. This solution, which eliminates the need to modify browsers or the router, is reminiscent of the role of a bridge or switch. The original purpose of a bridge was to organize network traffic based on MAC addresses, and thus to segment the network, but modern Linux kernels allow administrators to up the bridge's game by including invisible firewalling based on stateful filtering in the TCP Layer.
One logical approach is to run an Application Layer filter on a bridge (Figure 1). This odd couple can be seamlessly integrated into an existing network without the administrator, or users, needing to change the configuration of routers, clients, or applications. The only way to get past the proxy is to use a tunnel, such as SSH or OpenVPN. However, the tunneling option is always open, no matter what approach you choose, and it assumes major effort and knowledge. Whoever creates a tunnel to avoid the proxy needs an Internet-based server as the endpoint of the tunnel and has to have the ability to install software at the other end of the tunnel.
To install the proxy, you might like to start by setting up a minimal Linux system. The machine needs two NICs, which will not be assigned IP addresses for the time being. As you will typically need to recompile the kernel (to enable bridging), and as it is preferable to build Squid and DansGuardian from the source code (see below), you will need the corresponding developer packages on the system. Later on, before you put the bridge to production use, you should clean up the machine and remove any packages you no longer need.
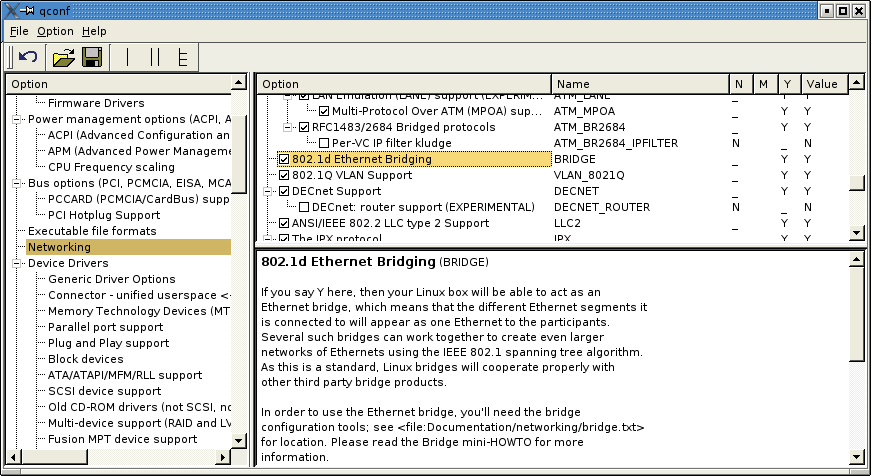
To make the system more secure, you will probably want to build a static kernel without support for modules. This configuration disables the module interface that many kernel rootkits exploit. When building the kernel, make sure you select the correct NIC and hard disk controller drivers. Additionally, make sure the kernel supports kernel bridging (Figure 2). Security conscious admins will probably also want to install patches such as GR Security [2].
After booting the system with the new kernel, you'll need to set up a bridge: The brctrl addbr br0 command adds a new network device titled br0. As a bridge requires two NICs, you will need to assign both cards to the bridge by running the following commands:
brctrl addif br0 eth0
brctrl addif br0 eth1
Then use the ip command to launch the NICs and the bridge:
ip link up eth0
ip link up eth1
ip link up br0
You can test the bridge now. Simply attach it to the network. It should pass data packets between two network segments, but you can use a network analysis tool such as tcpdump [3] to verify that this is working. If you prefer, you can now configure a firewall with iptables, and Physdev-Match or ebtables.
You need to install Squid first for the proxy. To download the source code from [1], the bridge system needs an IP address and a default gateway entry in the routing table. The following commands take care of this:
ifconfig br0 192.0.2.8 netmask 255.255.255.0
route add default gw 192.0.2.1
Then go on to unpack and configure Squid: ./configure --enable-linux-netfilter --disable-ident-lookups. The first of these parameters disables Linux Netfilter support in Squid. This step is required if you wish to use Squid as a transparent proxy. The second parameter disables client-side Ident service queries, although Ident is not typically installed, and it is blocked by most firewalls. Depending on your preferences, you could use the --prefix=/usr/local/squid parameter to put all of this into a directory. Then complete the hat trick of commands to build and install Squid: make && make install.
The next step is to modify the Squid configuration files to match your requirements. The above-mentioned prefix puts squid.conf into the /usr/local/squid/etc/ directory. Administrators will not have too much work to do on this file - the port you tell Squid to listen on is just a question of taste; Squid defaults to 3128. If you prefer to change the port, add the following to the Squid configuration:
http_port 127.0.0.1:65080
This tells the proxy to listen on port 65080. The command also configures Squid to ensure that only the proxy on localhost will react to connections. This is required for content filtering later.
Squid supports the Inter Cache Protocol (ICP), which allows proxies to exchange cache content. This support is irrelevant in our case, and it is easy to disable: icp_port 0. Additionally, an ACL (Access Control List) entry ensures that only localhost is allowed to access Squid: http_access allow localhost.
The proxy is still running without a content filter. You are spoiled for choice here, but the choices become easier when you realize what you want the filter to watch out for. The chore could be described as "protecting insecure Windows machines against malware attempting to reach the machines by means of HTTP responses."
In other environments, you might need a filter to block access to certain types of content and undesirable websites. For example, schools often stipulate that sites with adult or illegal content must be blocked. Let's not get involved in the discussion about how useful or effective this kind of protection is right now - the following example does without any kind of censorship and focuses on fighting malevolent viruses instead.
Again, your choice of virus scanner is a matter of taste. In an Open Source only environment, an Open Source scanner such as ClamAV [4] has a lot going for it. The steps for configuring other scanners are similar; but choosing a different scanner, or even using multiple scanners, should be simple enough.
You'll find several approaches to integrating the content filter with Squid: the redirector interface is a popular option. Squid passes the downloaded URL and all parameters to this script. Depending on the value returned by the script, Squid will then fetch the document the URL points to. This makes sense if the filter simply inspects the URL and not the document that it points to.
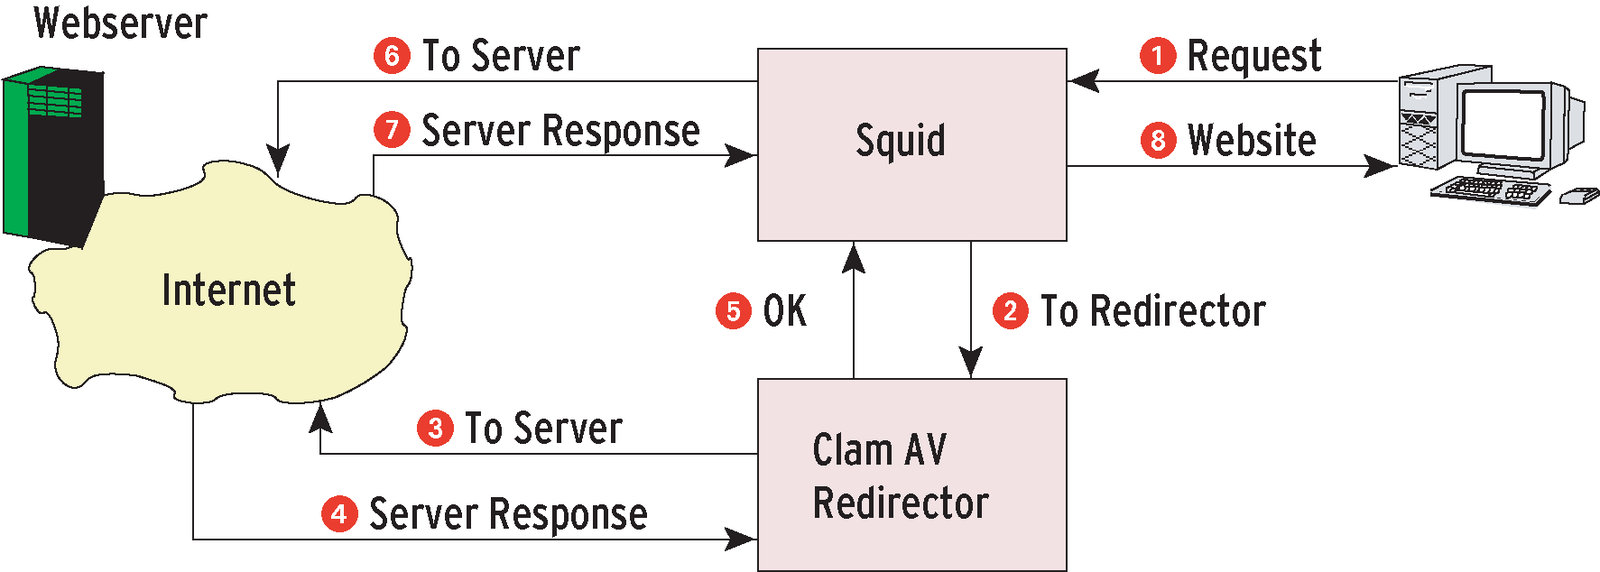
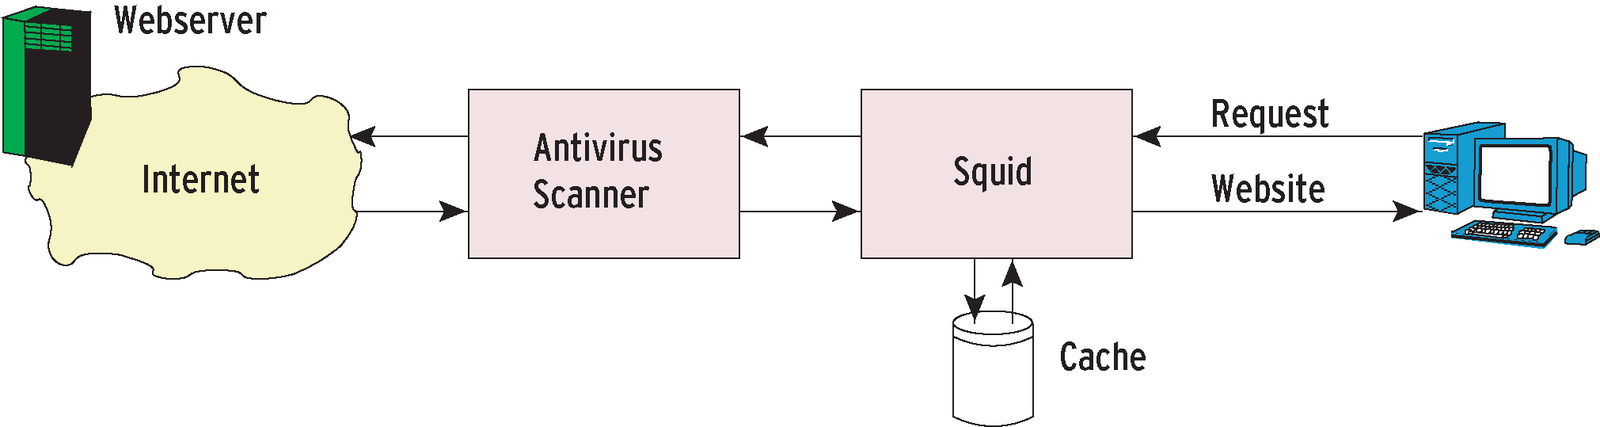
In the case of the virus scanner, for which SquidClamAVRedirector provides an interface, the redirector is not a good approach. First of all, the redirector downloads the URL, avoiding Squid in the process; it then analyzes the content and gives the thumbs up to Squid to request the page (Figure 3). In other words, every download creates twice the amount of traffic - and this is exactly what we wanted to avoid by using a caching proxy.
Using some trickery, we can talk the redirector into letting Squid handle the download. This step involves setting Squid up to avoid passing requests from localhost on to SquidClamAVRedirector, and thus crashing into an infinite loop. But this construct is problematic with a transparent proxy, as every request looks like it comes from localhost from Squid's point of view. Add this to the clumsy setup, and you will probably agree that the approach is not the way to go.
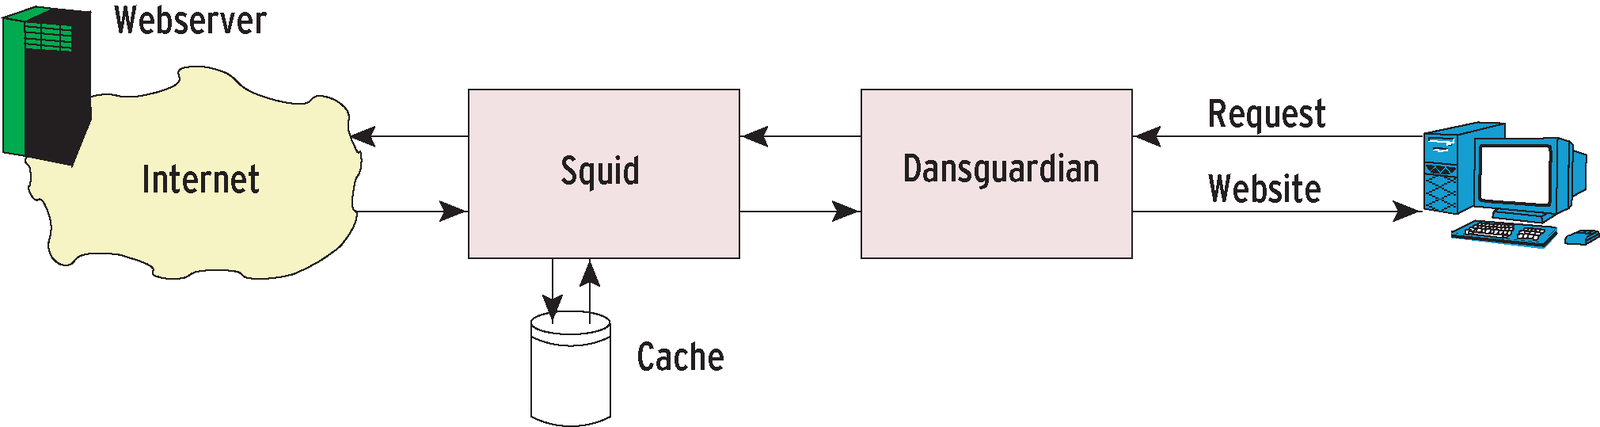
The alternative is to add a dedicated content filter proxy in front of or behind Squid. DansGuardian [5] is a likely candidate. The best place to put DansGuardian is between the proxy and the internal network (Figure 4a, although both tasks can run on a single machine). This means that requests from the internal network will first be sent to DansGuardian, which passes them on to Squid and receives a response from Squid - possibly from the cache, if Squid has seen the request before - and checks the response for viruses, worms, and other nasties.
In theory, you could reverse the order, putting the malware filtering proxy on the outside and the caching proxy on the inside (Figure 4b). The advantage of this approach is that the virus scanner only needs to check each downloaded file once. This configuration minimizes the malware scanning, but it also poses a security problem. If the scanner misses a virus, the virus lands in the proxy cache, where it is safe from future detection, even if a scanner signature update would expose the threat. If the filtering proxy is, instead, between the user and the caching proxy, it will scan any page request, regardless of whether the page is served out of the cache or by an external server.
Make sure you install ClamAV before starting to install DansGuardian. ClamAV is fairly easy to install. The ClamAV website has binaries for most major Linux distribution. If you prefer to build from scratch, the usual steps will suffice: ./configure && make && make install. When you install DansGuardian, you need to set an option for the Configure script to build in support for ClamAV. If you prefer, you can move the compiled package into a directory of its own. This leaves you with the following three commands for the install:
./configure --enable-clamav --prefix=/usr/local/dansguardian
make
make install
The setting proxyport=8080 in dansguardian.conf sets the filter to listen on port 8080. Additionally, the filter needs to know which port Squid is listening to: filterport=65080. Finally, you may also need to uncomment the contentscanner line that points to ClamAV and modify the ClamAV configuration if necessary.
The next step is the error message that users see if they request outlawed content. The easiest way of producing the message is to post a page on your Intranet webserver and redirect the browser to this page. As an alternative, you could use an external server to serve up a page with the message. DansGuardian gives you a sample page in share/dansguardian.pl. The accessdeniedaddress directive in the DansGuardian configuration file tells the tool which message to display.
At present, DansGuardian can't actually see any client requests - the requests go straight out the bridge to the target servers. A Netfilter rule will redirect the traffic to the filter:
iptables -t nat -A PREROUTING -m physdev --physdev-in eth0 -p tcp --dport 80 -j REDIRECT --to-port 8080
The physdev match restricts use of the proxy to clients on the inside of the bridge. If you didn't have a firewall protecting the bridge, it would otherwise be quite simple for an external attacker to exploit the proxy as an open proxy.
If all of this works, all web requests for external networks should be recorded in the proxy's logs. The system is completely transparent from the inside. The proxy establishes a new connection to request a page, providing its own IP address as the source. The developers are working on removing this telltale trace of an otherwise transparent proxy.
With malware filtering and a caching proxy on a bridge, the internal network is nicely protected against viruses and worms attempting to exploit HTTP. Simple deployment makes the bridge easy to use. After setting up the machine, simply plug it into any network without modifying the network configuration.
| INFO |
|
[1] Squid Web Proxy: http://www.squid-cache.org
[2] GR-Security: http://www.grsecurity.org [3] Tcpdump: http://www.tcpdump.org [4] ClamAV: http://www.clamav.net [5] DansGuardian: http://dansguardian.org/ |
| THE AUTHOR |
|
Tobias Eggendorfer is a freelance IT consultant and trainer based in Munich. He does not enjoy reconfiguring his own hardware, and expects new security features to support seamless integration. Although the Squid bridge is mainly there to protect Windows systems, which Tobias does not typically use, he does not intend to download and test malware to see if it does run on Qemu. |