
By Dmitri Popov
The Changes feature in OpenOffice.org is an essential tool for collaborative editing. Although it is easy to understand, this feature has a couple of serious drawbacks. First, Changes works best only when you are dealing with OpenOffice.org's native formats. If your peers are using Microsoft Office, there is no guarantee that changes will survive back-and-forth conversion. And if your colleagues are using any other word processor, such as AbiWord, TextMaker, or KWord, you are completely out of luck. Secondly, the Changes feature is not the most elegant solution out there, and it can sometimes be quite cumbersome.
Fortunately, you don't have to put up with these limitations. Instead, you can implement an alternative solution for marking changes in a document. This alternative is known as bracket notation. Although bracket notation is not a new idea, it is best explained and implemented by the people behind the Get Humanized blog [1].
The bracket notation solution relies on a simple set of rules that use brackets to mark changes. Bracket notation lets you track three types of changes: replacement, deletion, and comment. There is also insertion, but an insertion can be considered as a form of replacement, where you replace nothing with something. You can easily mark these modifications in a text using square brackets.
For example, to mark text for replacement, place the text you want to remove in brackets and the replacement text in brackets immediately after it:
mankey -> m[a][o]nkey -> monkey
To mark an insertion, place empty brackets where you want to place the new text, followed by the text you wish to insert:
mnkey -> m[][o]nkey -> monkey
To mark a deletion, place the text you want to delete in brackets:
an monkey -> a[n] monkey -> a monkey
And to add a comment, place the text in brackets after double empty brackets:
Comment: [][][Comments go here]
That's all fine and dandy, but there is a tiny fly in the ointment. While the bracket notation system is simple and elegant, typing all the brackets and keeping tabs on them can be a bit bothersome. But despair not; you can use a set of simple OOoBasic macros to turn the bracket notation system into a powerful, yet easy-to-use changes tracking tool.
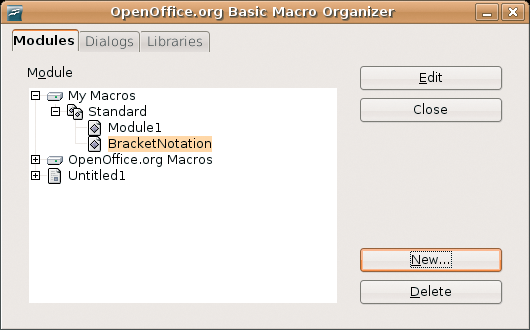
Let's start with the most basic macro that allows you to insert comments or mark the currently selected text segment as a comment. To keep things nice and tidy, start by creating a separate module for the bracket notation-related macros. In OpenOffice.org Writer, choose Tools | Macros | Organize Macros | OpenOffice.org Basic and press the Organizer button. In the Organizer window, select the My Macros | Standard folder and press the New button. Give the new module a name (for example, BracketNotation), press OK, and then Edit. This opens the OOoBasic IDE, where you write macros.
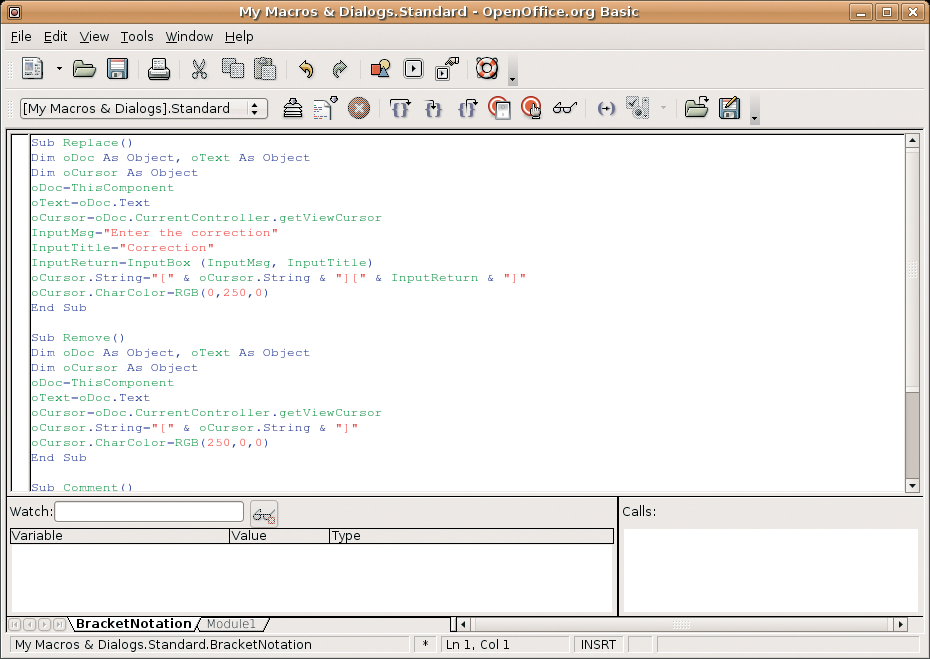
The first thing you have to do in the Comment macro is define three variables as objects: oDoc, oText, and oCursor:
Sub Comment()
Dim oDoc As Object, oText As Object
Dim oCursor As Object
Next, you should specify what these objects are:
oDoc=ThisComponent
oText=oDoc.Text
oCursor=oDoc.CurrentController.getViewCursor`
This code defines oDoc as the active document, oText as the text in the document, and oCursor as the currently selected text. After you have completed this definition, the next step is to convert the selected text into a comment:
oCursor.String="[][][" & oCursor.String & "]"
Finally, to make the comment easier to locate, you can change its color to blue:
oCursor.CharColor=RGB(0,0,250)
The complete Comment macro is shown in Listing 1.
| Listing 1: Comment macro |
01 Sub Comment() 02 Dim oDoc As Object, oText As Object 03 Dim oCursor As Object 04 oDoc=ThisComponent 05 oText=oDoc.Text 06 oCursor=oDoc.CurrentController.getViewCursor 07 oCursor.String="[][][" & oCursor.String & "]" 08 oCursor.CharColor=RGB(0,0,250) 09 End Sub |
The clever part is that if nothing is selected, the macro simply inserts the comment bracket, and you can add the text later on.
Now that you know the basics, you can easily create a macro that marks the delete operation. This macro is almost identical to the Comment code, with a different character color being the only exception (Listing 2).
| Listing 2: Deletion macro |
01 Sub Remove() 02 Dim oDoc As Object, oText As Object 03 Dim oCursor As Object 04 oDoc=ThisComponent 05 oText=oDoc.Text 06 oCursor=oDoc.CurrentController.getViewCursor 07 oCursor.String="[" & oCursor.String & "]" 08 oCursor.CharColor=RGB(250,0,0) 09 End Sub |
Finally, you have to write a macro that marks replacements. While it shares a lot of code with the previous two macros, it works in a slightly different way. Unlike the Delete and Comment macros, the Replace macro requires some user input: once you've marked the text segment you want to replace, you have to tell the macro what you want to insert instead. One way to do this is to add an input box to the macro containing a single field. When the user enters a correction in the field and presses OK, the macro inserts the appropriate brackets containing the correction. Adding an input box is easy, and it requires only three lines of code:
InputMsg="Enter the correction"
InputTitle="Correction"
InputReturn=InputBox (InputMsg, InputTitle)
The important bit here is the InputReturn variable, which contains the actual user input. The full Replace macro is shown in Listing 3.
Once all three macros are in place, save the macros and close the OOoBasic IDE.
| Listing 3: Replace macro |
01 Sub Replace() 02 Dim oDoc As Object, oText As Object 03 Dim oCursor As Object 04 oDoc=ThisComponent 05 oText=oDoc.Text 06 oCursor=oDoc.CurrentController.getViewCursor 07 InputMsg="Enter the correction" 08 InputTitle="Correction" 09 InputReturn=InputBox (InputMsg, InputTitle) 10 oCursor.String="[" & oCursor.String & "][" & InputReturn & "]" 11 oCursor.CharColor=RGB(0,250,0) 12 End Sub |
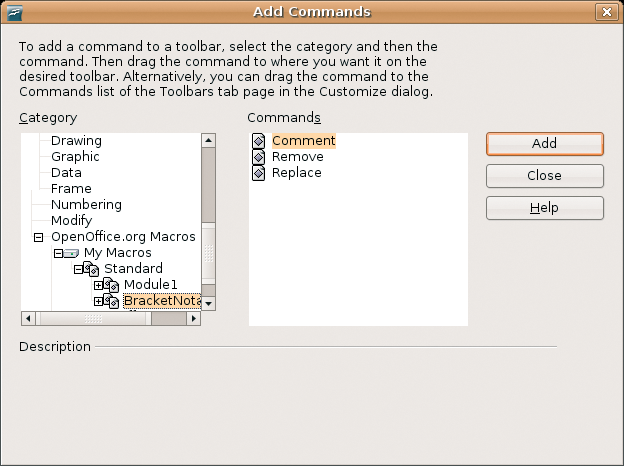
To make the macros easier to use, you can add a separate Writer toolbar with the appropriate icons. Choose Tools | Customize, and click on the Toolbar tab. Press the New button, give your toolbar a name (for example, "Bracket Notation"), and select OpenOffice.org Writer from the Save In list. To add a button to the new toolbar, press the Add button, select the BracketNotation macro module in the Category pane, select the desired macro from the Commands list, and press Add. Repeat this procedure with other bracket notation macros.
To make the toolbar look more professional and easy to use, you might want to add an icon to each button. Silk icons [2] are particularly suited for use in toolbars, since they are available in the 16x16 pixels format required by OpenOffice.org. To add an icon to one of the buttons, select the macro from the list of commands in the Bracket Notation toolbar, press and hold down the Modify button, then select Change Icon. Press the Import button, add the desired icon, select it in the icon list, and press OK. Once you are satisfied with the toolbar, press OK, and it's ready for use.
Using a simple set of macros, you can easily implement the bracket notation system in OpenOffice Writer. Because the edits are recorded through a system of ordinary brackets in the text, users with other word processing programs will be able to see the changes - and even implement equivalent macros for their own environments. But in order for this system to actually work, you have to agree on its rules with your peers. Make sure everyone in your workgroup understands the rules and their usage, and that the system itself is not open to interpretation. And, of course, use plain text as your working format.
| INFO |
|
[1] Bracket Notation: http://www.humanized.com/weblog/2006/06/30/collaboration_made_simple_with_bracket_notation/
[2] Silk Icons: http://www.famfamfam.com/lab/icons/silk/ |
| THE AUTHOR |
|
Dmitri Popov holds a degree in Russian language and computer linguistics. He has been working as a technical translator and freelancer contributor for several years. He has published over 500 articles covering productivity software, mobile computing, web applications, and other computer-related topics. His articles have appeared in Danish, British, US, and Russian magazines and websites. |