
By Heike Jurzik
The Vim [1] text editor, and its predecessor Vi (which is typically implemented as a link to, or an alias for, Vim) take some getting used to. And the unintuitive user interface prevents many users from trying this practical tool. But once you get to know the various operating modes, you will probably not want to do without the useful services this lean editor provides.
| NOTE |
|
The next issue of Linux Magazine features a more detailed discussion of Vim macros. |
Most users have some difficulty grasping the concept of the various operating modes provided by Vim. After all, Vim has no less than four of them.
Normal mode is the central mode from which you can switch to the other modes. This is the mode that Vim enters when launched; it is also known as command mode. Various keyboard shortcuts give users the ability to delete, copy, and move text. Entries always follow the same pattern: start by saying how often you want to execute the command (this defaults to exactly once), then type the command. To return to command mode from one of the other modes, press the [Esc] once, or multiple times, until you hear a beep telling you that you are back in normal mode.
To enter text, press the [I] ("insert") key to enter insert mode. Vim displays an - INSERT - message at the bottom left corner of the screen. Other methods for switching to insert mode are to press [A] (for "append") to insert text directly behind the cursor, [Shift]+[I] (which takes you to the start of the current line and switches to insert mode), and [Shift]+[A] (which takes you to the end of the line and switches to insert mode). You can also type [O] in normal mode to open a line below the cursor, or [Shift]+[O] to insert a line above the cursor.
You can type a colon in normal mode to change to command line mode. After changing to command line mode, you can type commands at the colon prompt to search and replace, for example. Type an exclamation mark after the colon to run shell commands.
Visual mode lets you select areas character by character, line by line, or block by block, to then copy or cut the selection. Pressing the keyboard shortcut, [Esc]+[V], takes you to visual mode. Vim displays a - VISUAL - label bottom left on the screen to tell you which mode you are in, and any text you select is highlighted.
The editor is launched by entering vim at the command line; you can optionally provide the name of the file you wish to edit:
vim linux-user/2006/08/ vim.txt
To quit the editor, change back to normal mode, and type :q!, to quit Vim and discard any changes you have made. Alternatively, you can type :wq, if you wish to save your modifications before quitting Vim. You can save a step if you type :x, or [Shift]+[Z] twice, instead.
To save changes without quitting Vim, type the :w command. You can also append a filename to the command to save your changes in a new file:
:w new_file.txt
Various command line parameters influence the way the editor launches. If you wish to open a file read-only, add the -R option. Vim also has a practical recovery function that lets you restore a session after a crash. To do this, type vim -r file at the command line.
You can undo a step by pressing [U]. To undo multiple steps, press the key multiple times. To discard all the modifications in the current line, press [Shift]+[U].
To display an overview of all command line parameters, with short explanations, type vim -help in the shell.
| TIP |
|
You can press [.] to repeat the last Vi(m) command. |
In contrast to the legacy Vi editor, the [Del] and [Backspace] keys both delete text in Vim's insert mode. However, the delete and modify functions in command mode are far more practical, and quicker. Just press [X] to delete the character under the cursor, add a number to delete a specific number of characters: for example, pressing 5x will delete exactly five characters.
To delete the word under the cursor, move the cursor to the first letter of the word you want to delete, and type dw. If you wish to replace a word, type cw instead - Vim will not only replace the word under the cursor, but automatically switch to insert mode so that you can enter the replacement text.
To delete a sentence, type the d) combination, and to delete the text from the current cursor position to the end of the line, type d$. Again you can type c instead of d to switch to insert mode directly after deleting the text. To delete a whole line, type dd; and in typical Vim fashion, if you wish to delete three lines at one fell swoop, just add a number, as in 3dd; 3cc will delete three lines, and - you guessed it - switch to insert mode.
Combinations with other commands are also possible. If you wish to delete from the current line to the end of the file, type dG, or type dgg to delete from the current line to the start of the file.
Vim gives you the ability to insert the text deleted by one of the previous commands at a different position in the document. To do so, press [P], to insert the clipboard in front of the cursor; or press [Shift]+[P] to insert the text behind the cursor.
Of course there is no need to delete text to store it in the clipboard, and then insert it at another postion - Vim also gives you a number of copying functions. To copy a line, just type yy, and then press [P] or [Shift]+[P]. Again, combinations of commands are supported: you can type a number to say how many lines you wish to copy. For example, typing 5yy will copy the current line, and the next four lines.
If you need to copy a more precisely defined selection, there are many approaches to doing so. Visual mode gives you a practical approach: press [Esc]+[V], then select a region of text with the arrow keys, and press [Y] to copy the text to the clipboard. You can then press [P] or [Shift] +[P] to insert at a different position.
To find a text string, press /, type the search key, and press [Enter]. [N] tells Vim to go on searching in the current direction, and [Shift]+[N] reverses the direction. You can also opt to search backwards by typing ?search_key. Vim also gives you two practical shortcuts: type * to search forwards for the word under the cursor, and # to search backwards.
Vim has another practical feature that helps programmers and LaTeX fans search for matching brackets. Go to an opening bracket , such as (, { or [, and type %. Vim will now automatically go to the closing bracket: pressing % again takes you back to the opening bracket.
To search and replace, you need to switch to command line mode. To replace a string of Vi with Vim, you would type :s/Vi/Vim. Vim will only replace the next instance of the search key. You can replace all the search keys in one line by typing :s/Vi/Vim/g, and all the search keys in the whole file by entering :%s/Vi/Vim/g
When launched, Vim looks for a setup file; by default this is ~/.vimrc in your own home directory. If you need a good template to copy and modify to match your own requirements, check out /etc/vimrc or /etc/vim/vimrc.
The configuration file for the editor (~/.vimrc) not only gives you scope for your own personal preferences, but also for macros, individual syntax highlighting, and many other things. The box titled "Your Own .vimrc" gives a couple of simple, commented examples (in Vim syntax following the " character).
| Your Own .vimrc |
01 "Switch syntax highlighting on: 02 syntax on 03 04 "Show line numbers: 05 set number 06 07 "Go to matching text while searching: 08 set incsearch 09 10 "Disable automatic indent: 11 set nosmartindent 12 13 "Map F2 to the shell fmt command: 14 map <F2> !}fmt<CR> 15 16 "Call ispell with parameters when F3 is pressed: 17 map <F3> :w!<CR>:!ispell -T latin1 %<CR>:e! %<CR> |
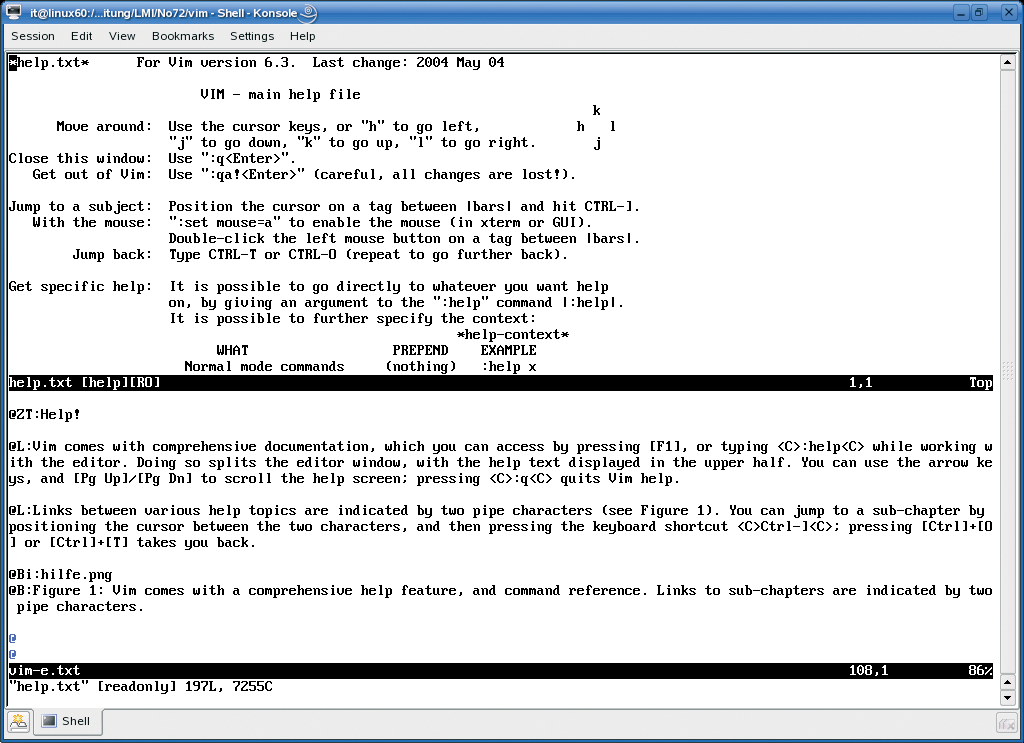
Vim comes with comprehensive documentation, which you can access by pressing [F1], or typing :help while working with the editor. Doing so splits the editor window, with the help text displayed in the upper half. You can use the arrow keys, and [Pg Up]/[Pg Dn] to scroll the help screen; pressing :q quits Vim help.
Links between help topics are indicated by two pipe characters (see Figure 1). You can jump to a sub-chapter by placing the cursor between the two characters, and then pressing the keyboard shortcut Ctrl-]; pressing [Ctrl]+[O] or [Ctrl]+[T] takes you back.
To search the help text for keywords, type :help topic; you can use wildcards, such as * (for any number of characters), and ? (for a single character). If Vim fails to find your search key, the editor will give you the next best thing. You can use a trick to display multiple topics, and then select the one you were looking for. Type :help, followed by the first few letters of the topic you are interested in, such as help syn, and then press [Ctrl]+[D]. Vim will give you a selection of help topics starting with the "syn" string.
The tutorial that comes with the Vim distribution is another useful source of information. Entering vimtutor at the command line launches the tutorial.
| INFO |
|
[1] Vim homepage: http://www.vim.org/
|