
By Florian Osses
A Samba file server on a heterogeneous network often stores files for a third party system called Windows that is prone to problems with viruses. Although most admins know it is a good idea to scan the files for malware, most configurations that scan the file server operate cyclically. Realtime scanners take a more elegant approach, cutting in whenever a file operation occurs and searching for undesirable elements on the fly.
However, technical elegance comes at the price of increased technical complexity. A realtime solution has to link up the scanner, Samba, and the local filesystem. This workshop provides a step-by-step guide to realtime scanning with Clam AV and Avira Antivir Personal Edition Classic.
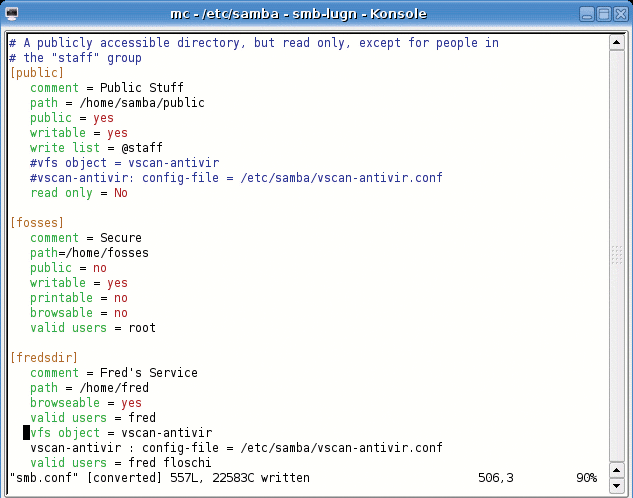
Our lab machine is a Pentium 4 D with 512MB RAM, a PATA hard disk, and Mandriva Linux. The distribution includes Samba 3.0.20. We have set up three shares: [public] and two others that require authentication. Apart from this, we have left the smb.conf file mostly unchanged (see Figure 1).
The easiest way to integrate a realtime virus scanner is to integrate a VFS object. A Virtual File System is a software module that provides new functionality, virus scanning in our case. The VFS object implements VFS as a separate module on Samba. To allow this, you need Samba-Vscan. Your favorite distribution will probably have a Samba-Vscan package somewhere in the repository. You need to install the virus scanner along with the package. I have successfully tested both Clam AV [1] and Avira Antivir [2]. I could probably have achieved similar results with Symantec [3], Bitdefender for Samba 3 [4], or a couple of other packages.
After installing Samba-Vscan and the Vscan-ClamAV package [1], go on to configure the virus scanner. To do so, uncomment the second and third lines in the /etc/clamav.conf or /etc/clamd.conf configuration file:
LocalSocket /var/lib/clamav/clamd-socket
# TCPSocket 331
# TCPAddr 127.0.0.1
The Clam-AV daemon typically runs on a non-privileged account, but the permissions associated with the account would not allow the daemon to write to all the directories on our Samba shares. You need to either assign more robust permissions to the Clam-AV user - this may not be easy - or change the Clam-AV user to root by setting the user line in /etc/clamd.conf to User root.
Now relaunch Clam AV, by typing /etc/init.d/clamav restart on most distributions; this is rcclamd restart on Suse Linux. If your setup routine has not already taken care of this, copy vscan-clamav.conf from /usr/share/doc/clamav to /etc/samba/. Now change the following line in the configuration file to this:
infected file action = nothing
If you don't do this, the virus scanner will still prevent access to suspicious files, but leave them where they are:
infected file action = quarantine
You can then assign a suitable path to replace the quarantine directory = /tmp parameter. The path to the scanner socket is important: clamd socket name = /var/run/clamd. Suse sets this to /var/lib/clamav/clamd-socket. If you need enhanced debugging, change
verbose file logging = no
to yes. I'll leave the other options to you; the file comes with useful comments.
Now configure /etc/samba/smb.conf to match the virus scanner. To do so, create the VFS object shown in Listing 1. The only thing left now is to relaunch Samba by running /etc/init.d/samba restart; for root on Suse, this is rcsamba restart. All done. You can move on to test the setup.
| Listing 1: smb.conf for Clam AV |
01 [share1] 02 comment = shared Samba directory 03 vfs object = vscan-clamav 04 vscan-clamav: config-file = /etc/samba/vscan-clamav.conf 05 read only = No 06 browseable = No 07 path = /home/foobar 08 valid users = foobar |
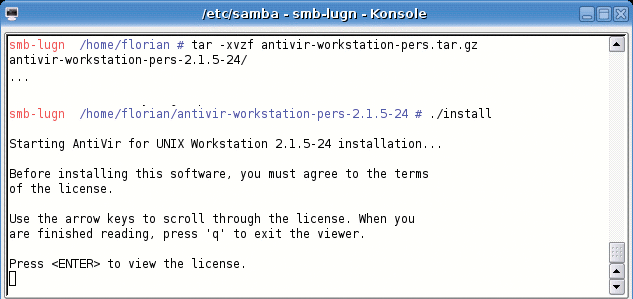
If you decide to use the free Antivir Personal Edition Classic by Avira instead of Clam AV, the steps are similar to the steps we just went through. However, our Mandriva-based lab system's package manager did not have the required packages, and this will be the case with many other distributions. To build the application from the source code, download the current version from [2] and extract the archive file by running tar -xvzf antivir-workstation-pers.tar.gz. Then change to the directory created at this step and run the ./install script (Figure 2).
After completing these steps, turn to Vscan Antivir [5], which you are already familiar with from the ClamAV solution. This time around, you will need the Samba sources - make sure you have the same version as the installed binaries. (This was version 3.0.20 on our Mandriva lab machine.) In the Samba source directory, first launch the ./configure script and then type make proto.
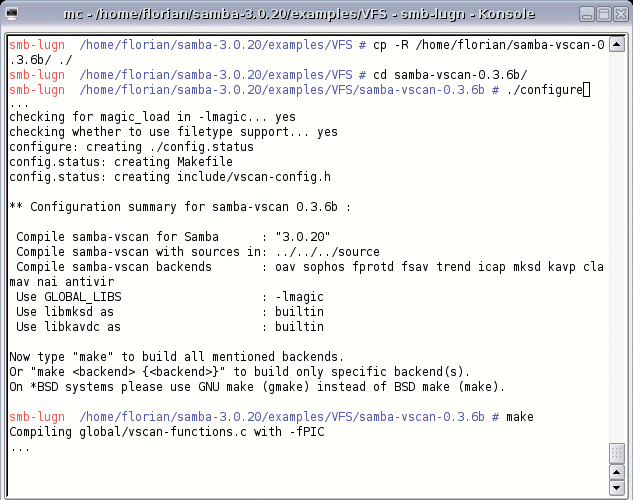
Copy the Vscan Antivir sources to Samba-Sourcen/examples/VFS/, and change to that directory. Now run ./configure and compile by running make (see Figure 3) and make install. (Instead of copying the Vscan Antivir sources to the Samba source directory, you could also run configure with the parameter --with-samba-source=path_to_Samba.) Copy the vscan-antivir.conf file from the source directory to /etc/samba. Then go on to modify the file as in Scenario 1, the major focus being the quarantine settings.
Enter the following for every share in smb.conf:
vfs object = vscan-antivir
vscan-antivir : config-file = /etc/samba/vscan-antivir.conf
You will also want to feed the latest virus signatures to Antivir with the antivir-update command. Before you enable Avguard, take a look at the /etc/avguard.conf control file. Find the scan entries specifying the directories that Vscan Antivir will want to access. If you forget to disable one of them, you will be bombarded with access denied errors. To finish off, launch Samba:
/etc/init.d/samba restart
When a user on an SMB client opens a file, the client sends a request to the Samba server. The Samba share is linked with a VFS object - and thus indirectly linked to the virus scanner. Vscan Antivir, and the virus scanner, which is running in a special server mode, communicates in parallel with the Samba access request (Figure 4).
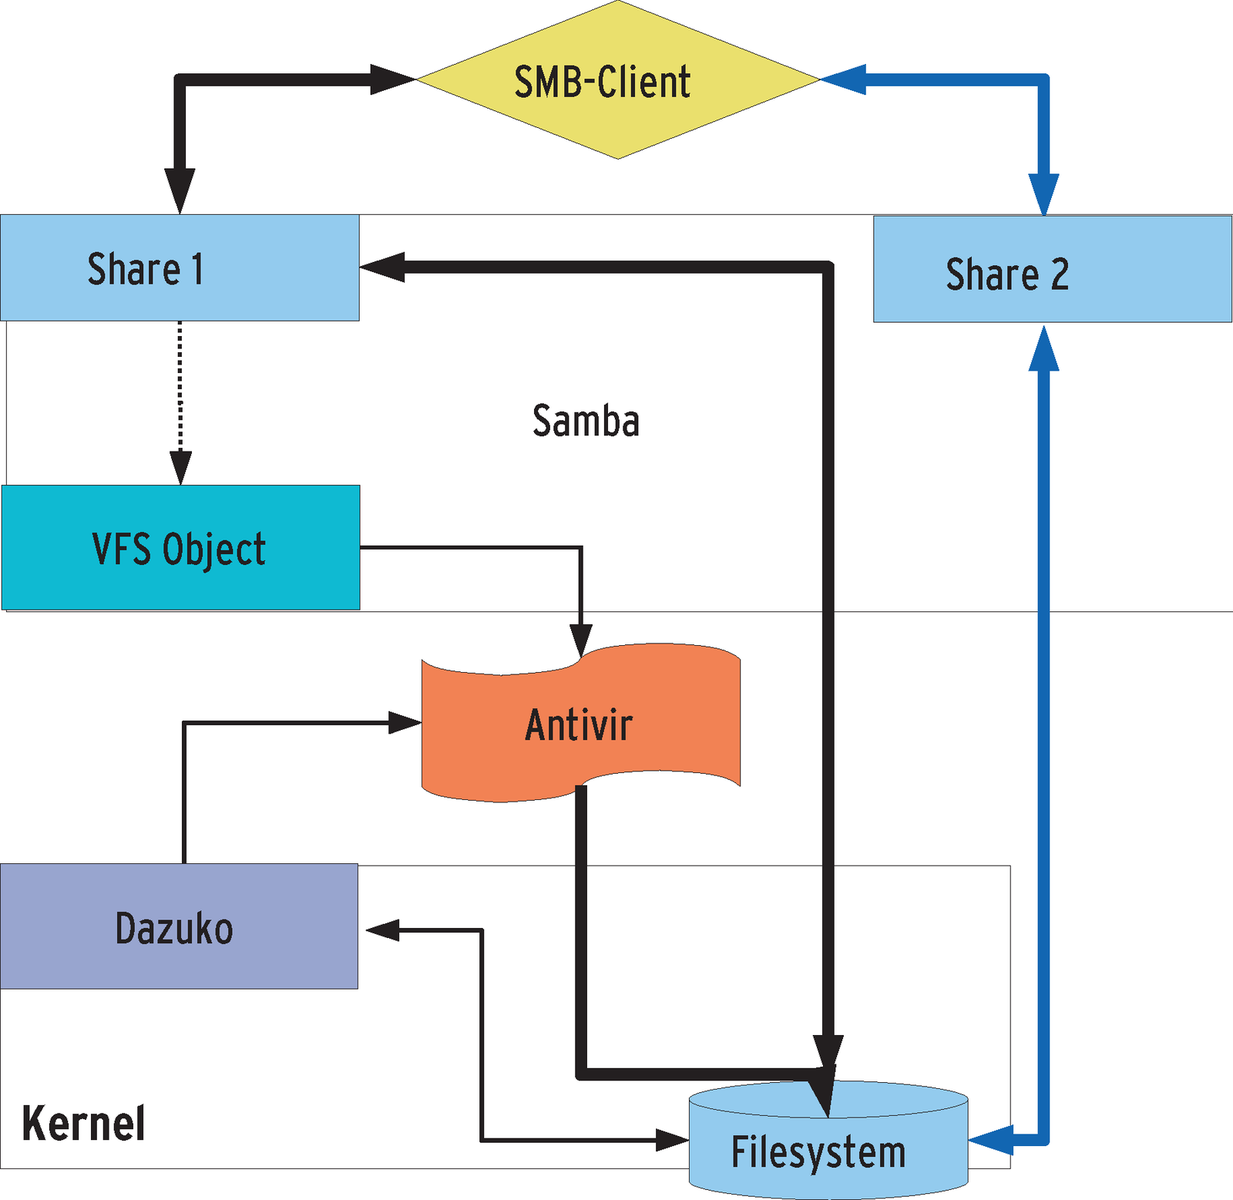
Before the normal Samba open operation reaches the filesystem, Antivir scans the file. If the test returns a positive result, that is, if the file includes malevolent code, the virus scanner sends an access denied message to the Samba server. In turn, the client system issues an access denied message to the user.
Depending on the virus scanner configuration, the file is either moved to the quarantine directory, or deleted, or the error is just ignored. Whatever happens, the server administrator is notified, and the message is logged in Dmesg and the Samba logfiles.
Scenario 2 suffers from a design-rooted performance disadvantage: components in kernel space and userspace need to talk about every single file operation - a time-consuming process. However, you can run Avira Antivir without the Vscan module. Dazuko is Linux kernel module, licensed under the GPL/BSD license, that provides file access control by setting up a device (/dev/dazuko) to provide on-access controls for SMB access. What makes the module fast is that it takes its information from inside kernel space.
For Scenario 3, you need to change your Avguard configuration and load the Dazuko kernel module, although this happens automatically when Avguard is launched. Unless you happen to have Suse Linux, your kernel will probably not have Dazuko support. The source code is available at [6], and you will also need the Linux sources.
Dazuko expects the kernel to support security mode. You will find the required setting, [M] for module, in the kernel make menuconfig process below Security Options | Enable different Security Models | Default Linux capabilities. The following commands build the kernel module into the system:
make modules
make modules_install
depmod
modprobe capability
If you have installed Dazuko, running ./install for Antivir should return the required results.
You now need to configure Avguard to monitor the Samba shares. To do so, change the IncludePath and ExcludePath parameters in /etc/avguard.conf. This gives Dazuko the ability to detect Samba access. The module will either allow or deny access and pass any open() requests directed to the filesystem into the virus scanner.
WhereasVscan antivir supports on-close, on-open, and on-exec actions, Dazuko only supports on-open operations. This means that files are not immediately scanned when an SMB client stores them on a Samba share. A file open() operation does not occur until the client reads, executes, renames, or moves the file. And it is not until this happens that Dazuko has an opportunity to hand the file over to Avguard. When malware is detected, Avguard reacts as defined in the configuration file; that is, it moves the file to the quarantine folder.
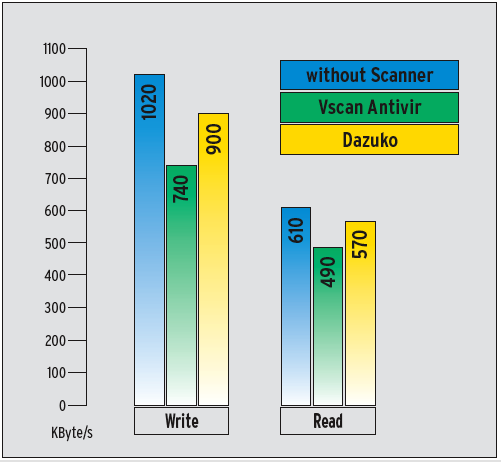
Monitoring file open() operations in Samba and scanning the file content can mean performance hits. We measured the transfer rate for a Samba client on the Samba server described previously (see the "Test Methods" box for details).
To keep the benchmark fair, we restricted the test to Scenarios 2 and 3, both of which use Avira Antivir. The comparative "No Scanner" values were achieved by disabling the virus scanner.
The results in Figure 5 show that the performance hits caused by using antivirus software are measurable, however, the differences between Vscan Antivir and Dazuko Antivir are minimal. It would seem that switching back and forth between kernel space and userspace does not make much difference under practical conditions, as is evidenced by write operations: 900 kbps to 740 kbps. For comparison's sake, the average rate without the on-access scanner was 1020 kbps. Generally speaking, these results depend on the scanner configuration, and you have to be skeptical about the results.
| Test Methods |
|
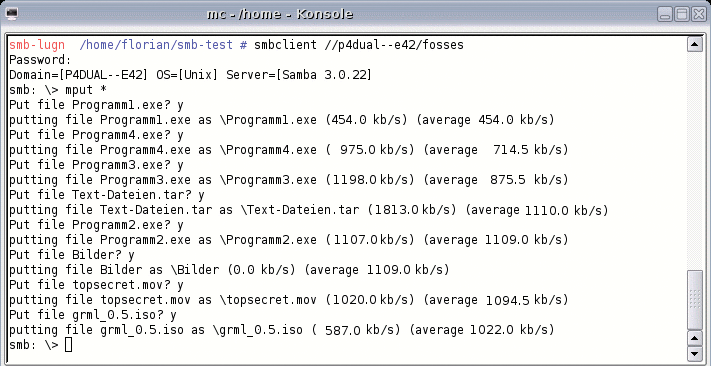
To rule out the influence of network effects, we used the Smbclient client tool, which is part of the Samba distribution, and ran it on the Samba server system. The program shows the transfer speed for each file, along with the average speed per session (see Figure 6). We ran the benchmark multiple times for each configuration (to rule out caching influences) before aggregating the results. For each test run, we gave Smbclient a directory for read and write operations with around 1 GB of data. The directory included a 600 MB CD ISO image, a tar archive with small test files, a number of image files, and some Windows binaries. The difference between the read and write access results can be attributed to the Samba write buffer. Samba fills the write buffer before allowing Linux to access the disk. However, read operations are performed directly from the disk. The write buffer size is configurable, although you will not want too large a buffer, as this will ultimately slow down the write process. |
Of all three scenarios, we preferred the third: Antivir without the Vscan module. Despite the gap in on-close scanning, Dazuko fulfilled our requirements for a realtime scanner, blocking access efficiently at the sign of malicious code.
| INFO |
|
[1] Clam AV for Linux: http://www.clamav.net
[2] Antivir Personal Edition Classic by Avira: http://www.free-av.com/ [3] Kaspersky Antivirus for Samba Server: http://www.kaspersky.com/lin_samba [4] Bitdefender for Samba 3 by Softwin: http://www.bitdefender.com/PRODUCT-11-en--BitDefender-for-Samba-File-Servers.html [5] Samba Vscan module, the Samba implementation for Clam AV and Antivir: http://www.openantivirus.org [6] Dazuko project: http://www.dazuko.org |
| THE AUTHOR |
|
Florian Osses is currently a trainee information technology engineer, specializing in system integration, and a member of the Linux user group Norderstedt e.V. This article arose from documentation efforts for a Samba project. |