
By Michael Schilli
What do you do when a hard disk crashes? Just buy a new hard disk and restore your most recent backup, of course.
But what happens if you had a configuration with multiple partitions on the disk? How much space was assigned to each partition, and what filesystems did you have on the disk?
Disaster recovery is a fairly easy process if the backup includes the complete partitions and you can restore the backup in a single operation.
But if the partitions in the backup set happen to contain the root directory of a Linux system, or if you happen to have Windows running on a laptop, you may not be able to create a copy while the system is running.
Sysresccd.org [2] has a rescue CD, from which you can boot any x86 machine into a minimal Linux system including critical tools such as partimage, sfdisk, fdisk, perl, and an NFS client. Thanks to the client, the system can then connect to an NFS-based backup server (see the "Installation" box below for details), and autonomously save both the partitioning layout, and the partitions.
Of course, no admin worth their salt will want to waste time typing backup commands. After inserting the CD in the machine you want to back up, the idea is for everything to run automatically. To allow this to happen, this month's column describes a slightly modified boot CD that simply inquires about which machine it is running on, and then backs up all the disks in that machine onto the backup server.
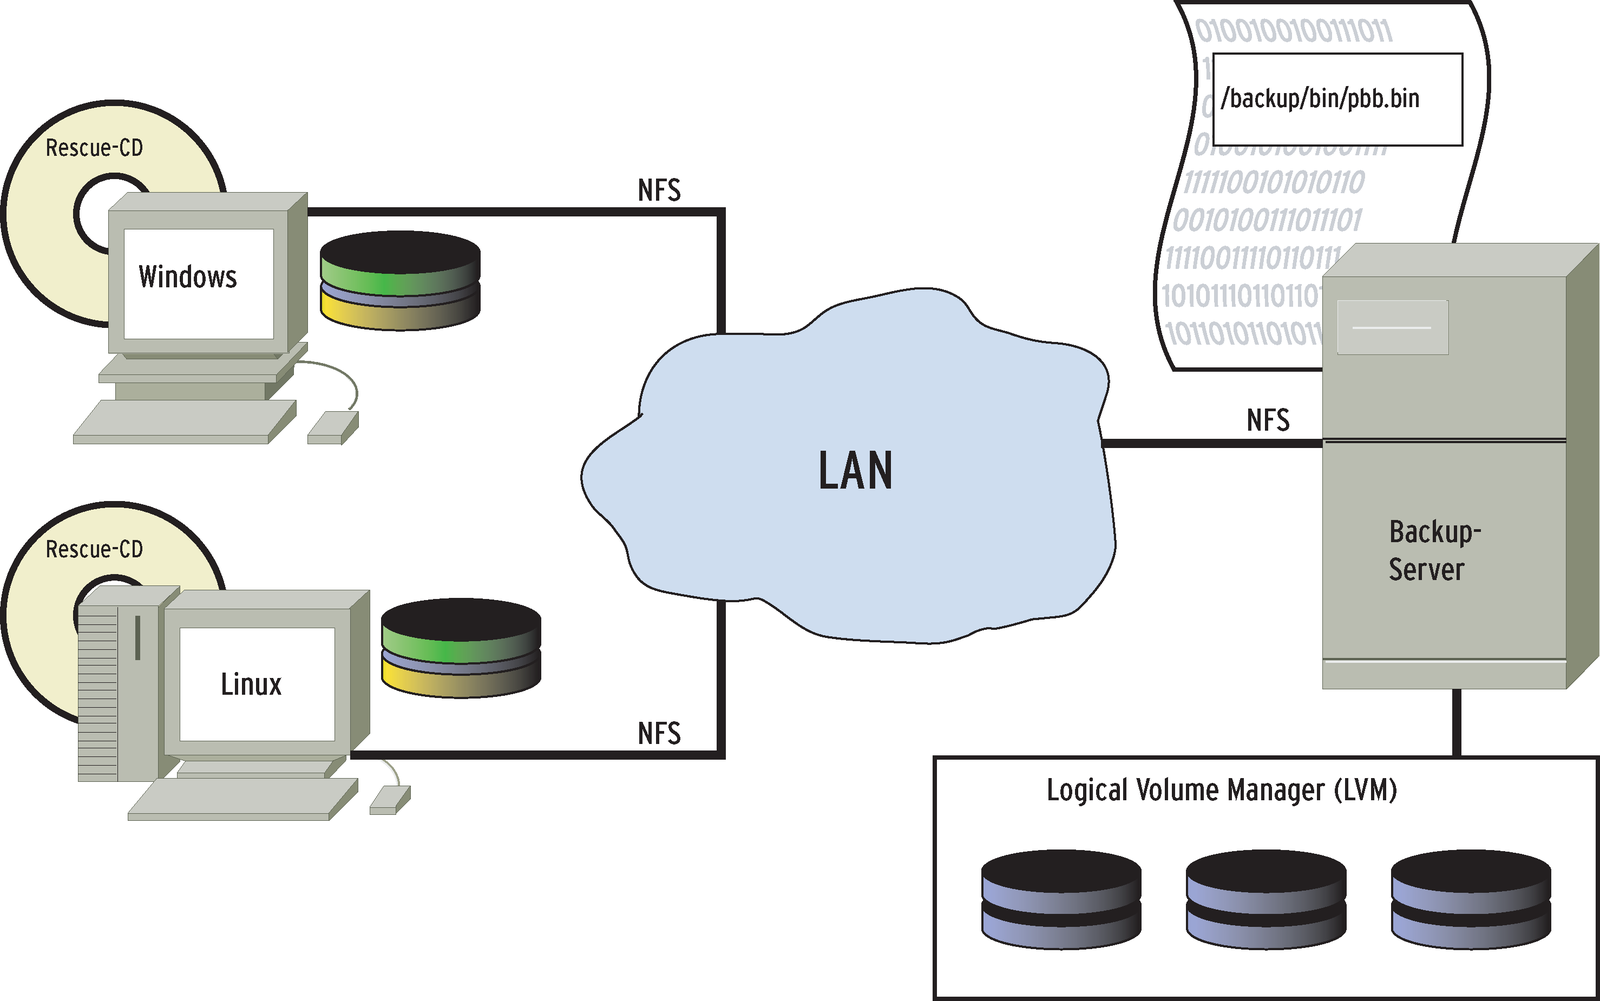
As the diagram in Figure 1 shows, if you boot a machine from the modified Sysresc CD, it runs the autorun script to contact the backup server (which has an IP address of 192.168.0.40 in our example). autorun (Listing 1) first initializes the network to do this, and then launches the NFS client with its lockd and portmap daemons, before going on to mount the backup server's /backup directory below /mnt/backup on the client to be backed up. A compiled binary Perl script titled bin/pbb.bin (for partition-based backup) is located in this directory. autorun calls the script via NFS to run the script against the client.
| Listing 1: autorun |
01 #!/bin/sh 02 # Sysresccd autorun script 03 IP=192.168.0.40 04 05 # Start network 06 /etc/init.d/net.eth0 start 07 /etc/init.d/nfs start 08 09 # Mount directory via NFS 10 mkdir /mnt/backup 11 mount $IP:/backup /mnt/backup || 12 (echo "Mount failed ($IP down?)"; exit 1) 13 14 # Run backup script over NFS 15 /mnt/backup/bin/pbb.bin 16 17 # Close NFS 18 umount /mnt/backup |
The script comes up with a simple text-based menu with names for the configured clients. The user can select an entry to launch into the backup. To restore instead of backing up, the user can just press [CTRL]+[C], and carry on working in the root shell that is then launched.
Listing 2 shows you the source code for the backup script pbb. The pick() function serves up a list of preset computer names, and sfdisk checks out all visible IDE disks on the current system, before going on to save the partition tables of these disks on the backup server. The script also copies the Master Boot Record from the first disk /dev/hda to the server. The backup data are stored in the /backup/data/[name] directory on the backup server.
| Listing 2: pbb |
01 #!/usr/bin/perl -w
02 use strict;
03 use Pod::Usage;
04 use Sysadm::Install qw(:all);
05 use Log::Log4perl qw(:easy);
06 use Log::Log4perl::Appender::Screen;
07
08 Log::Log4perl->easy_init(
09  $DEBUG);
10
11 my $MDIR =
12   "/mnt/backup/data";
13
14 my %ptypes =
15   map { $_ => 1 } qw(83 7);
16
17 my @machnames = qw(desktop1
18   desktop2 laptop1);
19
20 my %machnames =
21   map { $_ => 1 } @machnames;
22
23 my $mname = pick "Box",
24   \@machnames, 1;
25
26 my %drive_done;
27
28 my $bdir    = "$MDIR/$mname";
29 my $oldbdir =
30   "$MDIR/$mname.old";
31
32 # Move old backup aside
33 if (-d $oldbdir) {
34  LOGDIE
35    "$oldbdir already exists";
36 }
37 mv $bdir, $oldbdir
38   if -d $bdir;
39 mkd $bdir unless -d $bdir;
40
41 # Save the master boot record
42 # of the first IDE disk
43 tap qw(dd if=/dev/hda),
44   "of=$bdir/hda.mbr",
45   qw(count=1 bs=512);
46
47 my $sf = `sfdisk -d`;
48
49 while ($sf =~
50  /^(.*Id=\s*(\w+).*)/mg) {
51  my ($line, $id) = ($1, $2);
52
53  next
54    unless
55    exists $ptypes{$id};
56
57  my ($path) = split ' ',
58    $line, 2;
59  (my $dev = $path) =~
60    s#.*/##;
61  (my $drive = $dev) =~
62    s/\d//g;
63
64 # Save partition table
65  if (!$drive_done{$drive}++)
66  {
67   sysrun "sfdisk -d " .
68    "/dev/$drive " .
69    ">$MDIR/$mname/$drive.pt";
70  }
71
72  # Save partition
73  sysrun
74   "partimage -b -d -z1 -o " .
75   "save /dev/$dev " .
76   "$bdir/$dev.img.gz";
77 }
78
79 # Remove old backup
80 rmf $oldbdir if -d $oldbdir;
81
82 =head1 NAME
83
84 pbb - Partition Based Backup
85
86 =head1 SYNOPSIS
87
88     pbb
89
90 =head1 DESCRIPTION
91
92 Scans all IDE hard drives,
93 backs them up by partiion.
|
If you save a partition that isn't completely full, and just use dd if=/dev/hda1 of=backup.img to back up the raw data, the backup image backup.img will take up more space than needed. The partimage tool, on the other hand, recognizes the structure of popular filesystems such as ext2, ext3, or Windows NTFS. It will save only relevant data and compress it, with the progress indicated by a bar. So, a sparsely populated 30GB root partition might only occupy a couple of hundred MB as a backup file.
The partimage -b -d -z1 -o save /dev/hda1 /backup_path/hda1.img.gz command lauches partimage in batch mode (-b) to make sure it quits on finishing. The -d option prevents the user from being prompted for a description of the image file. -o overwrites an existing image file, and -z1 specifies gzip as the compression tool. partimage splits the resulting backup file into 2 GB segments, and enumerates them to tell them apart.
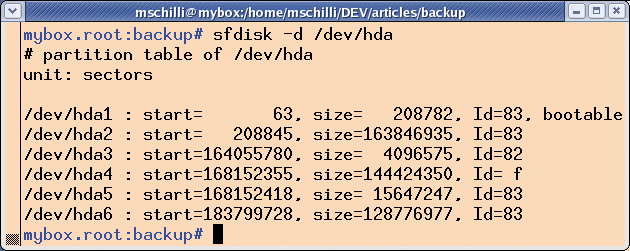
The sfdisk -d /dev/hda shell command launched by the root user reads the partition table on the first IDE hard disk, and outputs the table in a format that sfdisk will accept later on to restore it (Figure 3).
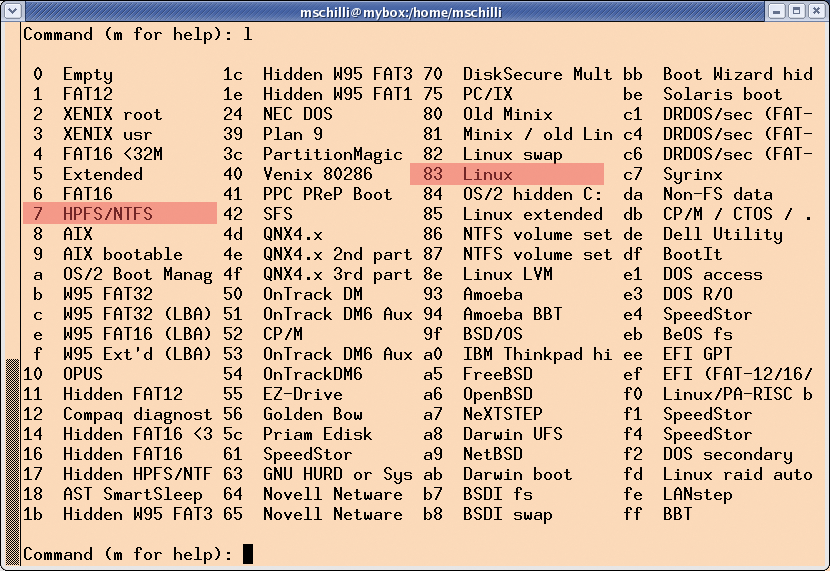
In order to find the hard disks installed on a system, call sfdisk -l helps pbb to list all the partitions on all the disks on the system. The backup script first navigates the list and runs a backup for all partition types contained in the @ptypes array. As Figure 4 shows, the current version of pbb only backs up type 7 (HPFS/NTFS) and type 83 (Linux) partitions. This way, unneeded swap partitions get left out. If you need to back up other partition types (W95 FAT32 is represented as c, for example), just modify line 15 in the listing. Although partimage claims that its NTFS support is still experimental, it worked perfectly in my lab.
Before the script creates a new backup, it renames the old backup directory with an .old extension. We need to keep the old backup, just in case the new one fails. However, if the script finds an .old directory, it will assume that something has gone wrong, and pbb will issue an error message.
pbb parses the output from sfdisk -l for the Id= string, which contains the type for each partition that has been found (for example 83 or c). The device path is at the start of the line (e.g., /dev/hda1), and pbb derives the disk path from it (/dev/hda). This will not work with SCSI disks.
After completing the backup, the autorun script calls umount to cut the tie to the NFS server; this ensures that the backup file is safely written at the other end before shutting down.
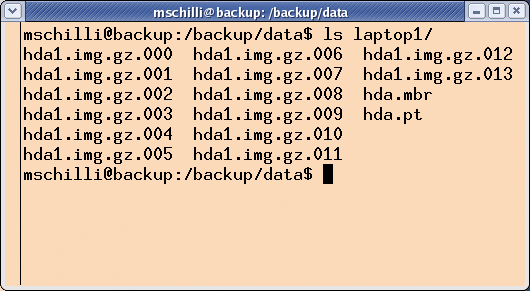
If worst comes to worst, and you need to restore your latest backup on a new drive, just boot the system you wish to install from the rescue CD, and then drop the backup copy of the partition table onto the system: # sfdisk </mnt/backup/data/laptop1/hda.pt.
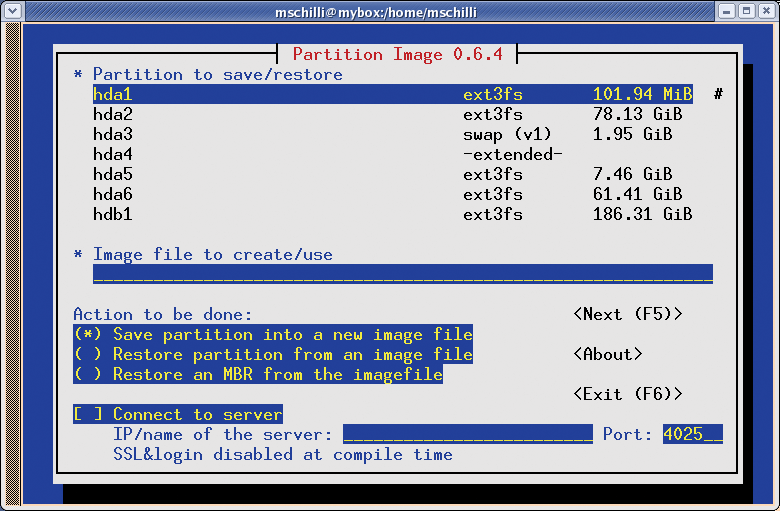
If, as in our example, this happens to be the disk with the Master Boot Record (which is stored in the first 512 bytes, and required to boot the machine), you can give the dd if=/mnt/backup/data/laptop1/hda.mbr of=/dev/hda command to restore the MBR on the first IDE disk hda. To restore the data on a partition, you need to launch partimage on the command line, select Restore a partition from an image file in the GUI, and enter the path to the first backup image, as in /mnt/backup/data/laptop1/hda.img.gz.000. partimage will automatically find the remaining segments in the same directory.
The rescue CD has a Perl installation, but unfortunately, it is missing some CPAN modules that the pbb script needs: Sysadm::Install, or Log::Log4perl, for example. Thanks to the Perl Archive Toolkit PAR, which we introduced in [4], you can create a binary executable, pbb.bin, including the script and any modules it uses (and a Perl interpreter) on a compatible Linux machine that has the required CPAN modules installed.
Note that the system where you create the binary package must have libc version 2.3.2 or older. After rebooting the system with sysresccd, it will have this version, and you can expect compatibility issues if you create the Perl bundle with a newer version.
Running the PAR compiler against the script, pp -o ppb.bin ppb, converts the pbb Perl script to an executable, pbb.bin, assuming you have the CPAN PAR package installed on the system. pbb explicitly includes Log::Log4perl::Appender::Screen, as pp would forget to do so. Log4perl uses this at runtime, but pp discovers the dependencies at compile time.
As my backup server, I went for an old PC with a couple of old 120 Gbyte disks and a new 400 Gbyte disk. I chose Debian Sarge as the operating system for the server.
To provide a large, contiguous area of storage, I linked the individual partitions on the various disks using the Logical Volume Manager (LVM). To set up the partition on a disk (such as /dev/hdc1) to be used by LVM, you need to run pvcreate /dev/hdc1.
You can then group the physical volumes created by this process to form a volume group, which is then assigned to a logical volume. The following creates a 600 GB virtual device:
# vgcreategiantvg /dev/hdc1 ...
# lvcreate -L 600G -ngiantlv giantvg
It goes by the name of /dev/giantvg/giantlv. mkfs.ext3 will let you install an ext3 filesystem on the device, which you can then easily mount onto an existing /backup directory by entering mount /dev/giantlv/giantvg /backup.
I created a 10 GB root partition for the Debian system on the first 120 Gbyte disk, and my LVM definition neatly assigned the remaining 110 GB as backup space on the giant LVM partition. The basic installation did not include an NFS server, so I entered apt-get install nfs-kernel-server nfs-common portmap to download and install NFS. To give the computers on the local network access to /backup, I added an export of /backup 192.168.0.*(rw,sync) to the /etc/exports file, and exported the changes by entering exportfs -a.
| Listing 3: mkcd |
01 CUST=/usr/sbin/sysresccd-custom 02 MNT=/mnt/backup 03 OUT=/mnt/custom 04 05 cd $MNT 06 07 dd if=/dev/zero of=fsimage bs=1M count=1000 08 mke2fs -F -q -N 50000 fsimage 09 mount -t ext2 -o loop fsimage $OUT 10 11 $CUST extract 12 $CUST cloop 300 20000 13 14 cp $MNT/bin/autorun $OUT/customcd/isoroot 15 16 $CUST setkmap speakup 17 $CUST isogen my_srcd 18 19 cp $OUT/customcd/isofile/sysresccd-new.iso /mnt/backup 20 |
As the rescue CD by Sysresccd.org boots the machine, and includes all programs visible after the boot in what is called a cloop, you need to follow the steps in the Howto at [2] when patching.
The shell script in the mkcd listing retrieves the autorun file from the bin directory on the backup server mount and copies it to the root directory on the new CD. You need to run the mkcd command on a system booted from the Sysresc CD to copy the active rescue CD to a temporary directory, before adding autorun, and then creating a modified ISO image file with the script on the CD. The new ISO file is stored on the root directory of the backup server, where you can burn it onto a CD by running cdrecord dev=/dev/cdrom speed=4 sysresccd-new.iso. Of course, if you have two CD drives plugged into your computer, you can do all of this on a single machine.
Before running the script, you need to modify the IP address for the backup server in autorun, along with the computer names in pbb, and compile pbb. You also can add data restore functionality. Your next hard disk crash will come, but you will be well prepared.
| INFO |
|
[1] Listings for this article: http://www.linux-magazine.com/Magazine/Downloads/73/Perl
[2] Rescue CD download from sysresccd: http://sysresccd.org [3] Partimage documentation: http://partimage.org [4] Michael Schilli, "Pack Your Bags", http://www.linux-com/issue/47/Perl_Portable_Archives.pdf |