By Yura Pachuchiy
The Linux-NTFS project is a team of developers dedicated to providing full-featured access to NTFS from Linux [1]. One of the goals of the project is to develop and support a collection of utilities for managing NTFS resources from the Linux command line. The ntfsprogs toolset offers a variety of tools for getting around in NTFS, including:
The ntfsprogs collection also includes other tools for managing ntfs disk resources [2]. Many of the ntfsprogs utilities are ready to use right now, and a few are still in development. This article describes some of the tools in the ntfsprogs toolset and shows how to use these tools to create, mount, recover, and resize NTFS volumes. As with any disk utilities, you should use these utilities with caution - and always back up any critical data before you begin.
| Device Files |
|
This article will use /dev/hd a1 when referring to NTFS volumes, but this may differ on your system. First of all, you should determine your hard drive name; this may be /dev/hdX (for PATA drives) or /dev/sdX (for SATA and SCSI drives):
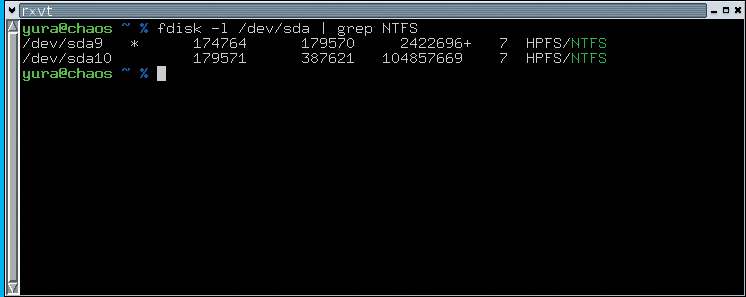
Then you need to know on which partitions you have NTFS: fdisk -l /dev/hda | grep NTFS (replace /dev/hda with your drive) This command will print a list of volumes on which you have NTFS (Figure 1). |
The first NTFS driver for Linux was created in 1995 by Martin von Loewis and others. In December 1997, the NTFS driver was merged into the mainline kernel (2.1.74). The driver provided safe read support, but experimental write support was unreliable and often corrupted filesystems. Because of these problems, NTFS under Linux received a bad reputation. But things changed a lot in 2001. Anton Altaparmakov, with the assistance of Richard Russon and others, created a new Linux NTFS driver absolutely from scratch. This new driver was merged into the mainline kernel in April 2002 (2.5.11).
The new NTFS driver is very stable for both read and write access, however, write capabilities are very limited and still under development. I joined the project in 2004 and started to implement write support in the libntfs library. Working in userspace is much easier than working in the kernel, thus I achieved a lot more progress in write support. In 2005, when FUSE (File System in Userspace) [3] was about to be included into the mainline kernel, I realized that it was much easier to write a new userspace driver based on libntfs and FUSE rather than porting new functionality into the current kernel driver; that's how ntfsmount appeared. Both the new kernel driver and ntfsmount are very stable and safe to use. We have not received any bug reports about volumes corrupted by our drivers. In addition to drivers, the Linux-NTFS project provides the ntfsprogs utilities for manipulating NTFS. Current core team members are (in alphabetical order): Anton Altaparmakov, Mario Emmenlauer, Yuval Fledel, Yura Pakhuchiy, Richard Russon and Szakacsits Szabolcs.
Source code for the ntfsprogs toolset (as well as other Linux-NTFS project tools and drivers) is available at the download page of the Linux-NTFS project website [4]. The download page also provides .rpm packages. Several popular Linux distributions makes their own ntfsprogs packages available to users, including Debian, Suse, Gentoo, and Ubuntu. You may find that your Linux distribution already includes some or all of the ntfsprogs utilities. Consult your vendor documentation, or visit the Linux-NTFS website for more information on downloading the ntfsprogs toolset.
You can create an NTFS volume using the ntfsprogs mkntfs command:
mkntfs -f -L 'Data' /dev/hda1
The -f option tells mkntfs to skip volume zeroing and skip the check for bad sectors. Eliminating the check is a good idea if you know that your hardware is OK, because this option makes mkntfs much faster.
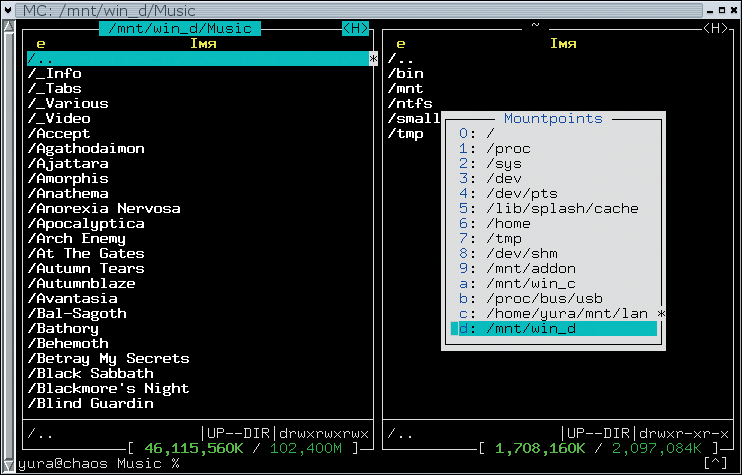
The -L switch sets the volume label. Do not be lazy and specify no volume label. Programs like ivman will mount your disks under /media with nice names if you set labels, but with no labels, you will have to remember which partition number contains the required files.
With the -N switch, you can select the NTFS version. mkntfs supports version 3.1 (default) and 1.2. However, using version 1.2 does not make any sense, because the versions are backwards and upwards compatible; thus, you can use any NTFS version in any Windows version.
After running mkntfs, you should update your partition table so that Windows will recognize the new NTFS volume:
fdisk /dev/hda
At the prompt, type t, then the volume number of the newly created volume, then 7.
ntfsmount is a userspace NTFS driver that comes with the ntfsprogs package. It relies on FUSE, so you need a kernel with FUSE support. (FUSE has been included in the Linux kernel since 2.6.14, so just switch on the option in the config file; for previous versions, you will need to build the module.)
After you install FUSE and ntfsprogs, you can mount your volumes by typing:
ntfsmount /dev/hda1 /mnt/win_c
Alternatively, you can add the following string to /etc/fstab:
/dev/hda1 /mnt/win_c ntfs-fuse defaults 0 0
You will probably want to add the following options:
The latest stable ntfsmount version (1.13.1) has some limitations, although the team is currently working on fixing some of these problems.
For now, the following facts give an indication on where we are with ntfsmount:
When an operation fails, it fails safely, with no damage to the volume.
The reason for these limitations is that creation and deletion of files in NTFS is very complex. The process can be divided into two parts: updating the MFT (Master File Table) file and updating the directory index. Current stable versions have fully implemented the step of updating the MFT, and they provide a proof of concept for updating the index. Obviously, if one of the subparts fails to do its job, performing the whole operation is impossible.
Since ntfsmount daemonizes after mount, it has no terminal to which it can print errors or other information. Thus, ntfsmount prints to syslog. You can type cat /var/log/messages | grep ntfsmount to see the output; or alternatively, you can use the root-tail program to create dynamic wallpaper with syslog content on your desktop (Figure 3).
![]()
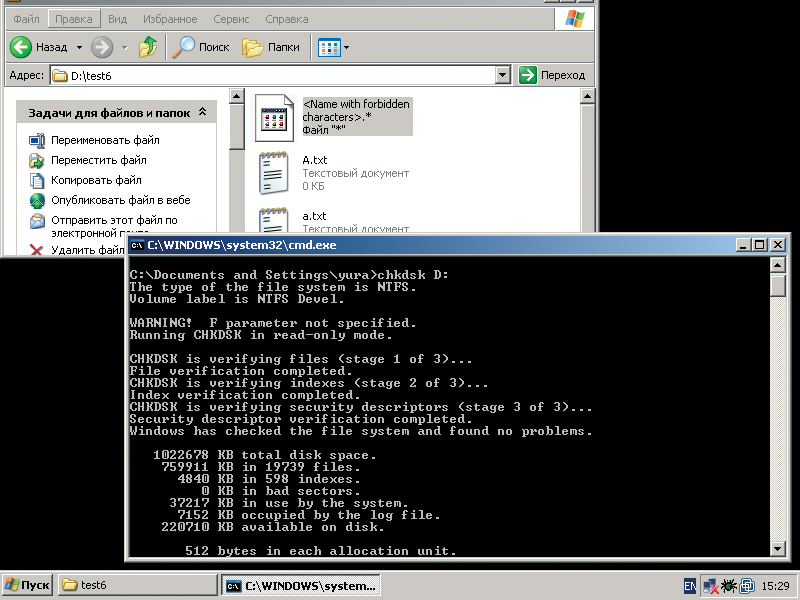
NTFS allows the existence of several data streams in a single file. By default, the only data stream is the file content itself. User can access named data streams under Windows by using the filename.txt:stream_name semantics. But standard Windows applications will prevent you from using this form and will claim that you are using the wrong filename. However, you can use the Cygwin command line utilities or FAR Manager to access NTFS data streams. ntfsmount provides two named data stream access interfaces. (See "man ntfsmount" for details.)
Win32 does not allow characters like <, >, *, ?, and so on, but NTFS supports any character in the filename except \0 (NULL) and /. Thus you can use ntfsmount to create NTFS filenames that you cannot access from Windows.
There are four kinds of namespaces for filenames: DOS, WIN32, WIN32_AND_DOS and POSIX. (The WIN32_AND_DOS namespace is for WIN32 filenames that also conform to DOS namespace rules.) The first three namespaces are case insensitive, but not POSIX. Windows uses POSIX only for hard links, but ntfsmount can create all files in POSIX namespace; thus, it is theoretically possible to have several files in one directory whose names differ only in case. Note, however, that the feature that allows special characters in filenames and case-sensitive filenames is not very usable at the moment.
| Other ntfsprogs Utilities |
|
The ntfsprogs collection contains several other utilities for managing NTFS resources. Some of the other tools are:
|
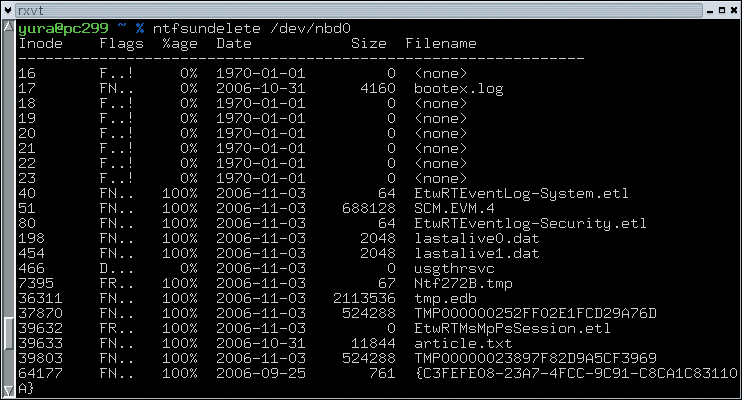
It sometimes happens that you delete some file by accident. This might not be a big problem if you delete a program you can reinstall, but things looks much worse if you delete some important document that you have been working on for several days. For this case, we provide the ntfsundelete utility. ntfsundelete will do its best to restore the deleted file, but it cannot do magic and will not help if clusters associated with the deleted file are overwritten.
ntfsundelete has two modes useful for end users: scan (the default) and undelete. At the beginning, you have to scan the volume for files that can be recovered:
ntfsundelete /dev/hda1
You can see the sample output in Figure 5.
If you want to recover a file named article.txt:
ntfsundelete /dev/hda1 -m article.txt -u
Or alternatively, you can use the inode number (the first column):
ntfsundelete /dev/hda1 -u -i 39633
These commands will create article.txt in the current directory with original content. Future versions of ntfsundelete may also support file undeleting to the file's previous location.
NTFS resizing using command line utilities is rather tricky, and an explanation of the resizing process from beginning to end would take much more than this article. Below is a brief overview of how to resize an NTFS partition. You should refer to the ntfsresize man page and the excellent FAQ written by Szakacsits Szabolcs [5] for details.
Resizing consists of two steps: resizing the device and resizing the filesystem. In the case where you are expanding a volume, you should:
In case you are shrinking a volume:
If you are doing backups of your NTFS volumes, and you want to clone operating systems on several machines or move your system to new hard drive, then ntfsclone is the tool you need.
If you want to clone your system from an old PATA drive to new SATA one:
ntfsclone --overwrite /dev/sda1 /dev/hda1
If the new partition is larger than the old one, you probably want to run:
ntfsresize /dev/sda1
Note that ntfsclone is designed to perform an exact copy of a volume, but sometimes it happens that not all parameters in the new environment are the same as the equivalent parameters in the old environment. To make Windows boot again, you can use the relocntfs utility [6].
Also, ntfsclone has a --metadata option that is very useful for submitting bug reports. In this mode, ntfsclone will copy only the volume structure, but not any contents of the files. If you are encountering problems with our software and you can reproduce this problem, please do the following:
ntfsclone --metadata --output ntfsmeta.img /dev/hda1
bzip2 ntfsmeta.img
You will receive rather small file (0.5-10 MB). Please host it somewhere and write email to us with a link to this file and steps for how to reproduce your problem.
In July 2006, Szakacsits Szabolcs completed functions for directory operations, performed several optimizations, and released a new ntfsmount version named ntfs-3g. Because of differing views on project maintenance, ntfs-3g recently became separate project [7].
I ported ntfs-3g functionality into the ntfsprogs CVS in August. Now Yuval Fledel and I are working on porting other minor changes, fixing problems, and adding some new features and enhancements.
We will release a stable snapshot with a new version of ntfsprogs as soon as it is ready. Check out our project website for updates (www.linux-ntfs.org). The snapshot may be ready by the time you read this article.
Anton Altaparmakov ia also working on write support for the kernel driver. But due to a commercial funding agreement, the code for this update will not be released until the Spring of 2008 at the earliest.
| INFO |
|
[1] Linux-NTFS Project: http://www.linux-ntfs.org/
[2] ntfsprogs: http://wiki.linux-ntfs.org/doku.php?id=ntfsprogs [3] FUSE: http://fuse.sourceforge.net/ [4] Linux-NTFS download page: http://sourceforge.net/project/showfiles.php?group_id=13956 [5] ntfsresize FAQ: http://mlf.linux.rulez.org/mlf/ezaz/ntfsresize.html [6] relontfs utility: http://wiki.linux-ntfs.org/doku.php?id=contrib:relocntfs [7] ntfs-3g: http://www.ntfs-3g.org/ |
| THE AUTHOR |
|
Yura Pachuchiy was born 2 September 1987 in Minsk, Belarus. He enjoys listening to metal and some latino music, riding his motorcycle, and hacking NTFS. He joined Linux-NTFS project in June 2004. At present, Yura is studying Computer Science at Belarusian State University and working at SaM-Solutions, a company that now sponsors his work for Linux-NTFS. |