
By Andreas Köller and Ian Travis
For many users of Linux, dual-booting has become part of the daily routine. No matter how hard you try, there will always be that final proprietary application that you or your customers rely on, and that means resorting to the Windows operating system on a regular basis. Exchanging data between two wildly different filesystems on a dual-boot machine can be a trying experience, however. Although users take mainstream Linux kernel read support for Windows-style NTFS partitions for granted, write support for the closed source filesystem is a more complex matter that has frustrated Linux programmers and users alike for many a year.
One of the most promising approaches to uniting the worlds of Linux and NTFS is the Captive project by Jan Kratochvil. Released early in 2005, Captive uses the original Microsoft Windows ntfs.sys driver, the NT kernel (ntoskrnl.exe), parts of ReactOs, and much programming by its author to ensure compatibility, and safety, for both read and write operations between the two systems. Open Source purists will object that this approach means owning a valid Windows NT, 2000, or XP license, and they are right, as Captive's author also points out. But if you don't have a Windows license, why bother with NTFS in the first place, unless you are involved in forensics? Linux has more than enough filesystems to keep users busy and happy.
We tried out Captive on a low-end system similar to the thousands of old computers that are kept in service to run legacy Windows apps.
Before you launch into the installation procedure, it makes sense to first back up any data on your NTFS partition, just in case disaster strikes, and to check if your computer fulfills the requirements. Captive supports Windows NT, Windows 200x, and Windows XP. (The project homepage at [2] has a list of Windows XP versions supported by the latest Captive 1.1.7 release.) We will assume you have Windows XP in the remainder of this article. You need the NTFS driver, ntfs.sys, and the NT/Windows XP operating system kernel, ntoskrnl.exe, along with a couple of other files (cdfs.sys, ext2fsd.sys, fastfat.sys), as well as FUSE (Filesystem in Userspace, see the FUSE box). Most recent distributions include FUSE [3], but if you are uncertain as to whether FUSE is installed on your machine, you can become root and issue the modprobe fuse command to find out. If you don't see an error message, you should be fine.
Users with RPM-based distributions can download the latest stable version of the RPM archive, capive-static-1.1.7-0.i368.rpm from the project homepage at [2] and unpack by entering rpm -ivh captive-static-1.1.7-0.i368.rpm. Users with non-RPM-based versions can download the captive-static-1.1.7-0.i368.tar.gz archive from the same address and upack by entering tar zxvf captive-static-1.1.7-0.i368.tar.gz. After unpacking the RPM file or tarball, become root and run the install script to install the binaries, automatically drop the captive-install-acquire tool, and the captive-install-fstab tool, into /usr/sbin/, and create a captive directory below /var/lib.
| FUSE |
|
FUSE, Filesystem in Userspace is a module for the Linux kernel that makes it possible to implement a fully functional filesystem in a userspace program. This gives non-privileged users the ability to access the filesystem. |
There are two basic approaches to finding suitable NTFS drivers. You can either copy the drivers directly to /var/lib/captive, and if you have your crystal ball handy, or know from previous experience that the drivers you are copying will work, this is probably your best option. The alternative is to run captive-install-acquire and let the tool search for Windows drivers. Note that the search will also include any network drives you have mounted, a process that can be fairly time-consuming. Even if you see the acquire tool start scouring your network drives, you can always press Skip to quit the scan phase and move on.
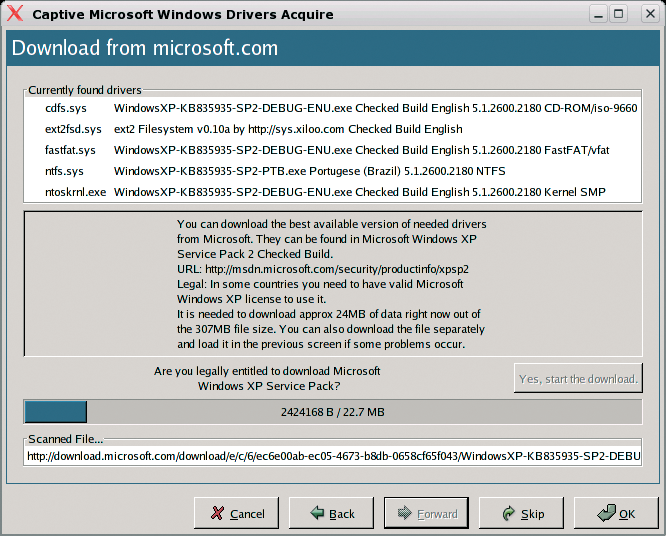
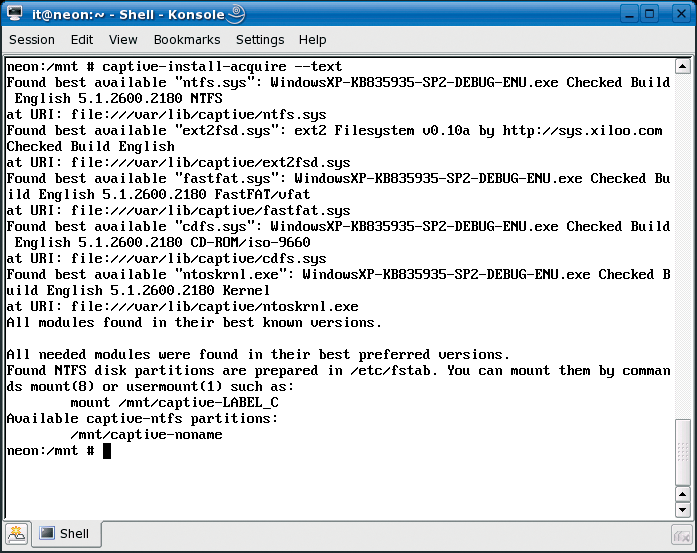
If you do not have suitable drivers, or if you prefer not to wait until the acquire tool has located them, acquire will open up an Internet connection and grab the required drivers off the msdn.microsoft.com website. Being a careful kind of person, Jan Kratochvil asks you to confirm that you are legally entitled to download the files (see Figure 1). The download size is fairly large (24 MB) so this approach is only recommended if you have a moderately fast Internet connection. The captive-install-acquire tool is GUI-based and self-explanatory. It does have a command line mode, just in case the GUI crashes. (You can enter captive-install-acquire --text to run the text-based install.) Check out Figure 2 for an example of an install-acquire GUI screen. After making sure that the drivers are in place below /var/lib/captive, the tool goes on to set up mount points in /etc/fstab. Your filesystem table file entry for Captive might look something like this:
/dev/hda1 /mnt/captive-system captive-ntfs defaults,noauto 0 0
If the acquire tool fails to set up appropriate mount points for some reason, you can run the captive-install-fstab tool to retry. After setting up the mount points, there is nothing to stop you from mounting the captive-ntfs partition by entering, for example, mount /mnt/captive-system/. Don't forget to check the final screen in the GUI tool to discover the correct mount point name, or read the final line of output from acquire in text-only mode. Assuming the mount command works, you now have read and write access to your NTFS partition. This simplicity is one of Captive's major strengths.

Often the office dual-boot system is an older PC that is kept around to run legacy Windows software. We lined up a similar system for our experiments with Captive. The test computer had a 2 GHz Pentium IV CPU, 256 MB RAM, and a 60 GB Seagate UDMA100 hard disk. The RAM was definitely low-end by modern standards, but as you'll see, we experimented with adding more memory as part of our test. Besides installing a legal version of Windows XP, Service Pack 2, we tested Captive with various Linux distributions: Suse 10.0, including the latest updates off the Web, Ubuntu Dapper Drake, and Fedora Core 6.
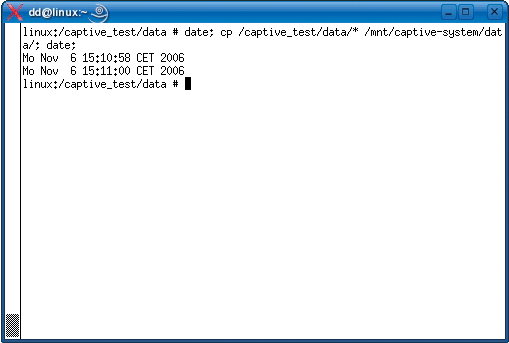
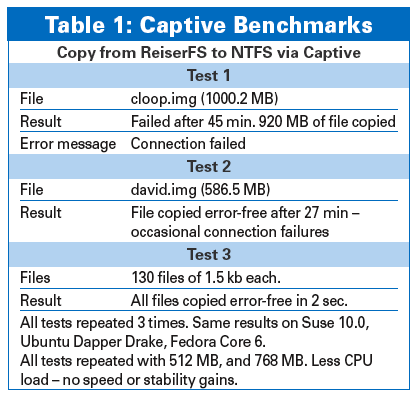
The results were a mixed bunch of encouraging and disappointing measurements that slightly dampened our original enthusiasm for Captive, and that remained puzzling to the end. Captive performed well for low-volume copies of individual files, such as a document saved by a single user using an office application. But for larger files, the tool ran into some problems. Our attempts to copy a file of 1002 MB from a Reiser partition to captive-ntfs failed, with Captive issuing an invalid argument message after taking 45 minutes to copy 912 MB of the file. This was followed by successful attempts to copy a 569 MB file - in 27 minutes no matter what distribution we used - interspersed with slightly confusing, if not annoying, connection refused messages accompanied by copy failures. For our third benchmark, we copied 130 small files with a total size of 193 KB from a Reiser partition to our captive-ntfs partition to discover how fast Captive is at creating directory table entries. The file copy time was a fairly impressive two seconds (Figure 4); and again our choice of distribution had no influence on the results. The table gives you an overview.
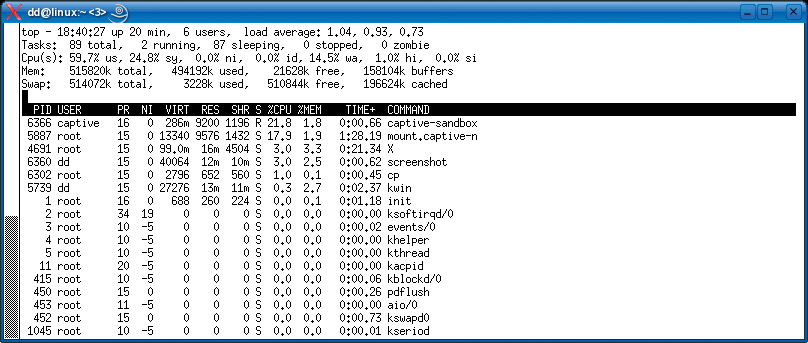
The CPU and memory usage statistics from our original benchmarks, with CPU load up to 97%, and memory consumption to match, suggested that adding memory might improve Captive's performance. To test this theory, we doubled our lab machine's memory and reran the benchmarks. CPU usage dropped slightly with memory usage in single figures, as the top screenshot (Figure 5) goes to prove, and you might expect the copy performance to benefit from this, but unfortunately, the copy took just as long as with 256 MB RAM.
To be double-sure, we upped the memory from 512 MB to 768 MB and repeated the benchmarks, but again this change had no effect on the copy success rate or speed no matter what distro we chose. More memory definitely helps by keeping the machine usable while copying is in progress, but it seems that Captive is simply not designed for large files.
Users from all over the world have sung Jan Krachotvil's praises for taking on the definitely non-trivial task of providing write access to NTFS partitions. Most of them have also commented on the pain-free installation routine that helps Linux newcomers get Captive up and running in a matter of minutes. And the importance of a simple installation procedure should not be underestimated; after all, nobody is more likely to dual-boot than a Windows user in the process of moving to Linux.
Captive is quite usable and perfectly suited to every day tasks, such as supporting low-volume file copies of, say, office documents that users might need on both operating systems. What Captive can't do is provide a solution for users who object to proprietary licenses or need to copy larger files.
Users have to accept the fact that lack of insight into the internal workings of the proprietary NTFS filesystem makes speed optimization difficult for volunteer programmers. However, if speed and file size are not your major concerns, Captive is an excellent choice for everyday use.
| INFO |
|
[1] "Going over: Accessing Partitions on Dual-boot Systems," Linux Magazine #57, August 2005, p. 26
[2] Captive project homepage: http://jankratochvil.net/project/captive/ [3] FUSE project homepage: http://fuse.sourceforge.net/ |
| THE AUTHORS |
|
Having completed his training as a technical assistant in information technology at college, Andreas Köller is now studying computer science and economics at B.A.O., a private university, in Leer, Germany. A sign on the back of his car reads "Linux is sexy." Besides being responsible for localization at Linux New Media, Ian Travis runs his own IT business, is a freelance translator, and teaches English and network management for the local Chamber of Commerce. |