
By Oliver Frommel
The inventors of Micky Mouse and Donald Duck had already set up a number of real-life theme parks by the time they decided to venture into the virtual world of the Internet. In the year 2000, programmers at the Disney VR Studios started to create a software application to help them develop their 3D online game, Toontown.
The result of this work is Panda3D [1], a game engine that supports the Python scripting language. In 2002, Disney published the package under a free license to make it easier for universities to contribute to the project.
A game engine like Panda3D takes repetitive work, such as loading characters and sounds, basic motion control, and many other things, off a game developer's hands. The fact that these functions are programmed in C++ guarantees the kind of performance you need for a smooth look and feel. Programmers who rely on the Panda3D game engine can access its infrastructure via Python, which is more intuitive and easier to use than C++.
The Panda engine is easy to install - provided you have an RPM or DPKG-based distribution. The Debian package from the project homepage was also easy with the latest Ubuntu. All it took to get Panda running was a symbolic link from /usr/lib/libssl.so.0.9.8 to /usr/lib/libssl.so.0.9.7. In all other cases you will need to build Panda from the source code. Although this is fairly trivial, it does take awhile, and there are a number of dependencies on developer packages to fulfill - OpenSSL and LibTIFF, for example. Change directory to panda3d-1.2.3 for the build, and run makepanda/makepanda.py --everything. If you leave out the last parameter, Makepanda will list the various build options. The doc/INSTALL-MK file has more details.
Virtual worlds basically comprise simple, geometric elements that appear more realistic when textures - that is, images of genuine objects - are applied to them. Realism is not always the goal. For example, Toontown uses comic-style characters (Figure 1), although this does not influence the distinction between geometry and surface properties in a 3D model.

Models are typically drawn in specialist programs and then converted into a format that the 3D engine can handle. There are export plugins to Panda3D format for the professional Windows tools Maya, Softimage XSI, and 3DStudio Max. A shareware program called Milkshape provides a useful alternative for home users; many people use it to edit Quake models.
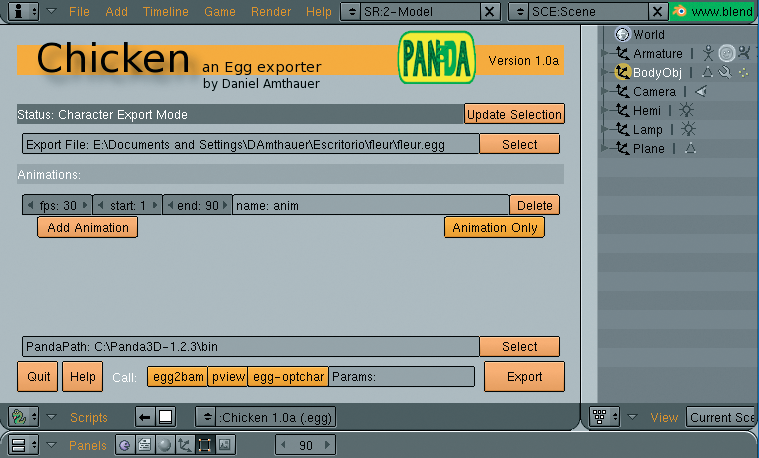
Linux users do not have any choice here, with the Blender 3D program being your only option. Blender does not support the Panda3D format, also known as Egg, by default. To add support for Egg, you will need to install one of three existing Blender plugins, all of which have limitations. The most mature of these plugins is Chicken [2] by Peruvian developer Daniel Amthauer. While I was writing this article, Daniel released the completely reworked and improved version 1.0a of the plugin, which now includes useful documentation (Figure 2).
To install Chicken, unpack the zip archive in your .blender/scripts directory. Now launch Blender, and you should find the Egg export feature below File | Export | Chicken.
The sample files will be fine for our first steps with the 3D engine; the default install places these files in /usr/share/panda3d/models. An extremely simple Panda3D script loads and displays a model (Listing 1). The results of this simple script are shown in Figure 3.

| Listing 1: A simple Panda3D Script |
01 import direct.directbase.DirectStart
02
03 panda = loader.loadModel("models/panda")
04 panda.reparentTo(render)
05 panda.setPos(0,30,-5)
06
07 run()
|
The script starts by loading the basic Python module direct.directbase.DirectStart. This makes a loader object available. The object provides the loadModel which finally loads the model. As you can see, I left out the .egg extension here, as the engine does not need the extension to find the model.
The load function returns a Python object which can be used to reference the loaded model in the course of the program. The setPos() changes the position of the model in 3D space. The first variable represents the X coordinates, followed by Y and Z. In a similar fashion, setScale() scales the object in three dimensions. In the Panda coordinate system, X points to the right, Z upward, and Y into the screen, from the user's point of view.
You can now use your mouse to rotate, move, and scale the model. Try all three mouse buttons. Rotation may seem a little strange at first. The reason for this is that the axis of rotation lies outside of the model.
I haven't yet explained Line 4 of Listing 1. It relies on a basic concept of three dimensional computer graphics, scene graphs. From a computer science point of view, this is a graph that contains and hierarchically organizes all the objects displayed in a scene. However, this theory is not important to the following discussion; instead, just imagine a scene tree.
The model of a human being can be portrayed in a scene tree in such a way that the rump is at the root of the tree, and the arms and legs are represented as branches of the tree. Hands and feet, fingers and toes would then be twigs. The advantage of this approach is that models with a hierarchical structure are easier to move in scripts. If the Python code moves the rump in our example, the limbs of the human model would automatically move with the rump.
The same principle also applies to rendering attributes, which describe the appearance of the model's surface. By default, the elements lower down the tree inherit the properties of their parent nodes. For example, you can simply define the skin color for the rump to apply the same color to the limbs. Of course, you can change the appearance of subordinate nodes however you like.
To make sure that Panda3D will display the models you load, you must insert them at a position below the render object in the scene tree. And this is what Line 4 in Listing 1 does. At the end of the script, you can see a run() instruction that starts the event loop; this is an infinite loop in which the program runs, updating the display, processing key-presses, and so on.
The camera defines the appearance of a scene on screen. Of course, the camera is a virtual object like all the others, however, it possesses similar properties to a real camera. The properties include the camera position in the scene, the angle on one or all three of the axes, the focal distance, and many other things. The example in Listing 2 shows how to move the camera to change the view of the model currently on display.
| Listing 2: Moving the Camera |
01 import sys
02 import direct.directbase.DirectStart
03 from direct.actor import Actor
04 from direct.showbase import DirectObject
05
06 class Game(DirectObject.DirectObject):
07     angle = 0
08     distance = 0
09   def __init__(self):
10     self.panda = loader.loadModel("models/panda")
11     self.panda.reparentTo(render)
12     self.panda.setPos(0, 1000, -100)
13     self.panda.setScale(0.5, 0.5, 0.5)
14
15     self.accept('escape' , sys.exit )
16     self.accept('arrow_right', self.spinCamera, [1])
17     self.accept('arrow_left', self.spinCamera, [-1])
18     self.accept('arrow_down', self.zoomCamera, [1])
19     self.accept('arrow_up', self.zoomCamera, [-1])
20
21     base.disableMouse()
22     base.camLens.setFar(10000)
23
24   def spinCamera(self, direction):
25     self.angle += direction * 1.0
26     base.camera.setHpr(self.angle, 0, 0)
27
28   def zoomCamera(self, direction):
29     self.distance += direction * 10.0
30     base.camera.setPos(0, self.distance, 0)
31
32 game = Game()
33 run()
|
At the same time, the example demonstrates how Panda3D processes user keypresses. As this is simpler to handle if your Panda program is based on a class that provides appropriate keyboard methods, this example is object-oriented, in contrast to the previous one.
To keep things simple, the whole function resides in the Game class, which inherits from the Panda DirectObject.DirectObject object (Line 6). To allow this to happen, Line 4 imports the required module. The code, which was previously listed top down in the script, now moves to the Game class __init__ constructor. Now, when a new Game object is created by a call to Game() in Line 32, Python will automatically call the constructor.
After loading, positioning and scaling the model, we need some instructions to handle keyboard input. The accept() method provided by the DirectObject class takes care of this. As the Game class is derived from this, the method is an instance method that can be addressed via the self keyword. The first parameter it expects is a string with the name of the key that was pressed. This is followed by the function that we want Panda3D to execute when the user presses the key. Thus, Line 15 quits the program when the user presses the Escape key.
The next four lines map camera movements to the cursor keys. The left and right arrow keys run the spinCamera() method; the up and down arrows call zoomCamera(). When this function is passed in by accept(), a list of additional parameters can be added for Panda to pass to the function in question.
In Listing 2, the only parameter passed to the camera functions is the camera motion direction (1 and -1), however, we still need list notation with square brackets. The disableMouse() with the Init method switches automatic camera motion off. The last instruction uses the camera lens object, base.camLens, to set the clipping plane (the level at which Panda3D will hide objects) to a value of 10,000. You could just as easily use the camera lens object to modify the focus, for example.
The functions for moving and rotating the camera are easily mastered. The angle and distance are multiplied by a fixed factor, and then added to, or subtracted from, the current value, depending on the direction. The camera methods setHpr() and setPos() assign the resulting value to the default camera, which you can reference as base.camera in your own scripts.
In our last example, we moved the camera round the panda bear, but the bear itself was stationary. Two options that compliment each other perfectly will add more action: moving the model itself, and moving the model through the scene.
Some motions, such as walking, jumping, etc., are best created in a 3D modeller like Blender. You should use Blender to design the phases of the movement, and assign armatures to the model to represent the bones of a living being. After doing so, you can animate the model via individual motion points just like a puppet.
After exporting your sequences via the Chicken plugin, load the motion phases to enhance the basic model. Panda3d provides the Actor class for this purpose; the class reacts more or less like a normal model, but it additionally processes motion phases. Listing 3 shows an excerpt from a program that draws on this ability.
| Listing 3: Working with Motion Phases |
01   def __init__(self):
02     self.panda = Actor.Actor("models/panda-model", {"walk":"models/panda-walk4"})
03     ...
04     self.panda.reparentTo(render)
05     ...
06
07     self.accept('a', self.animate_start)
08     self.accept('s', self.animate_stop)
09     ...
10
11   def animate_start(self):
12     self.panda.loop("walk")
13
14   def animate_stop(self):
15     self.panda.stop()
|
The first parameter of the Actor method, which specifies the basic model, is followed by a Python dictionary whose keys define the motion phase (walk), and whose values correspond to the model sequences (models/panda-walk4). You can then start the animation with the loop() method and repeat infinitely (Line 12). The stop() function stops the motion: in our example, Lines 7 and 8 map the [A] and [S] keys to the functions.
Motion in a scene can be implemented using the setPos() function referred to earlier, however, Panda has a far more powerful option: intervals. Intervals give programmers the ability to simply specify start and end values and the duration of the animations (that is positions, etc.). Panda3D automatically handles the intermediate values. Listing 4 demonstrates how you can use an interval to rotate the loaded model about its own axis.
| Listing 4: Working with Intervals |
01 def rotate(self): 02 hprInterval = self.panda.hprInterval(4, Point3(360,0,0), startHpr=Point3(0,0,0)) 03 hprInterval.start() 04 05 def createmenu(self): 06 text = OnscreenText(text = 'a: animate, s: stop, r: rotate, esc: exit', pos 07 = (-0.8, 0.9), scale = 0.07) |
The first parameter in the hprInterval method specifies the duration of the motion in seconds. This is followed by the end point and the starting point of the move; in this case, the rotation angle of 360 degrees. Additionally, Listing 4 in the createmenu() function demonstrates how to display help text with a single line of code (Figure 4).

Tasks are another Panda3D feature that save programmers work. The engine will execute any tasks you register with the global task manager object, taskMgr. The task can either be performed immediately or postponed to a later time using the doMethodLater() method.
I will just mention a couple of other features the Panda engine has; all of them are fairly complex. For example, Panda has basic collision detection functionality to prevent unrealistic overlapping of 3D models on screen.
Panda even has its own physics engine. The engine forms the basis for realistic object behavior by assigning a mass to the object. GUI functions that give programmers the ability to create menus are also available. And Panda3D has a shader, a feature that has become really popular, although currently, it only supports the Nvidia Cg shader language, rather than the OpenGL standard GLSL.
The final dampener for fans of free software is the internal sound engine. Panda3D relies on FMOD, which is not available under a free license. On a brighter note, as Panda3D works well with other frameworks; for instance, you can replace the sound function with the free Pygame package.
If you prefer not to use compiled languages such as C++, you can build 3D models using the very useful and powerful Panda3D engine. Panda3D takes the pain out of your first steps into 3D programming. Just a few lines of Python will let you load and animate models. The documentation on the website includes a simple tutorial and a manual that explains the most important concepts and functions.
In contrast, the class and method reference leaves much to be desired. Since Panda3D has a large user community, sensible questions posted in the web forum are typically answered quickly.
| INFO |
|
[1] Panda3D: http://www.panda3d.org
[2] Chicken, Egg exporter for Blender: http://damthauer.byethost32.com/panda [3] Pygame: http://www.pygame.org |