By Gaurav Nawani
Regardless of the advancements in photography, we still make some mistakes, and it is nice to be able to correct them in our photographs later. Thankfully, Linux users can harness the power of the GIMP.
The GIMP, or GNU Image Manipulation Program, is freely distributed software that allows you to retouch photos and much more. This article explains how to use the GIMP to correct colors and touch up your photo images.
The GIMP has a few corrective filters (Layers | Colors |Auto), which you can can use to apply automatic corrective alogrithms on your images.
Unfortunately, the results of these filters don't always work like we'd want them to, because they usually do the equalization to the extreme, rendering the resulting image almost useless.
The techniques described in this article offer better control in a few simple steps.
| Terms |
|
Histogram: The histogram is a graphical representation of the number of pixels for each intensity value in the image. It shows the spread of the intensity values of the pixels within the image. The left is the lowest value of pixel intensity (0), and the right is highest value of the pixel intensity (255). It is called the histogram distribution since it shows the distribution of the pixel intensity values over the interval 0-255. Each bar in the distribution shows the number of the pixels in the image for that particular intensity value. If the the bulk of the distribution is towards the left, it means that most pixels have lower intensities and the image will be dark. If the bulk of the distribution is towards right, then the image will be bright. F-stop: This is a photographic mechanism that determines the amount of light that will get to the film or CCD. It is dependent on other components of the camera, such as the aperture size, lens size, and shutter speed. White Balance: In photography, white balance refers to the color-neutral white point in the image. Photographs are affected with a color screen-like effect, if the white color in the photo is other than white, making them have a particular off-white color for every color in the photo. The off-white tone, if it can be identified, is replaced by white to get back the original colors in the image. |
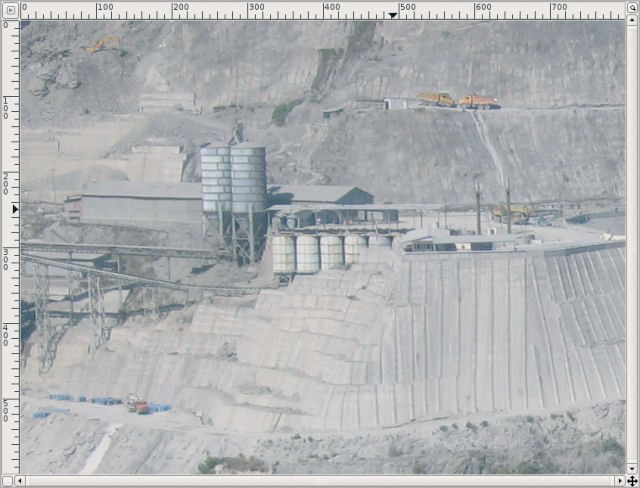
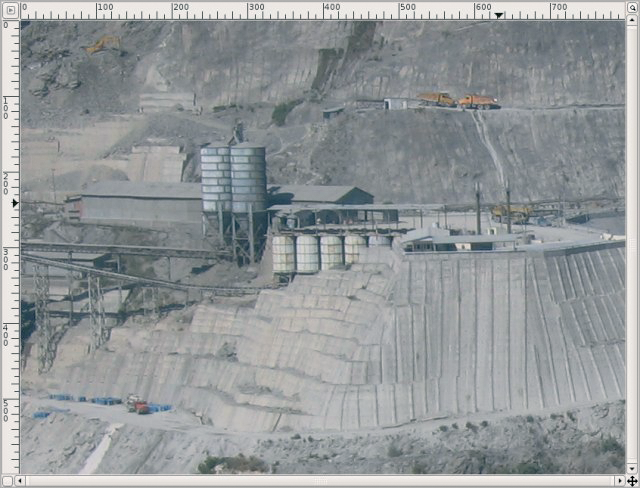
You've probably dealt with washed-out images before - images that lack depth of contrast. For example, Figure 1 shows a photograph of the construction site of the Tehri Dam in northern India.The photograph was taken with the camera's automatic mode on and also with full zoom, and it looks like the photograph was over exposed.
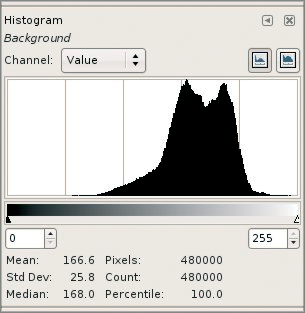
The LCD display, however, was misleading. It showed the photograph preview with good contrast. First, we should take a look at the image histogram. You can access the histogram from Layers | Colors | Histogram.
At the bottom of the histogram panel, notice that there is a little strip that goes from black to white in 256 steps. This strip illustrates the intensity levels in the photograph. Also, note the intensity distribution in the graph above it, which is separated into five intervals.
As you can see in Figure 2, the distribution is towards the white end, which means that the image contains more bright pixels.
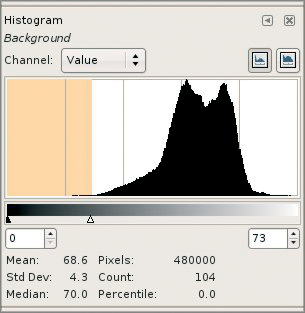
You can also see that the left part almost starts from near the end of the second interval (see Figure 3, yellow selection). That means the parts of the image that should have been dark are overly bright, which explains why the image looks washed out.
There is no way to recover the missing data because we don't have it in the image, but thanks to the GIMP, we can try to equalize it with a few simple steps to salvage the image.
First, duplicate the layer by going to Layers | Duplicate Layer. In the layers dialog box (Figure 4), change the mode of the layer to Multiply, and also reduce the opacity to about 30-35.
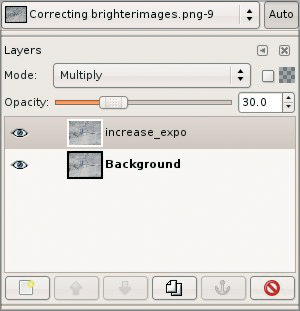
This opacity value at 30-35, along with the multiply mode, acts like a single stop for image correction.
You should be aware that this is not actually a calculated amount; this amount is just being used here for the sake of simplicity because it allows us to have discrete control.
For the example image, we needed 1/1/2 stops.
To achieve the half stop, you must duplicate the layer and reduce the layer opacity to 15, or to half of the number you initially used.
After you are satisfied with the result, you can apply Image | Flatten Image and save the copy of the image. After applying our corrective steps, we can see the initial results in Figure 5.
The improved example image still lacks some contrast, which can be corrected by going to Layers | Colors | Brightness-Contrast. In the pop-up window, you can play with the contrast slider and see the results in real time.
Adjust it until you are satisfied with the results. After a little bit of contrast enhancement on the example image, you'll get something like the result in Figure 6.
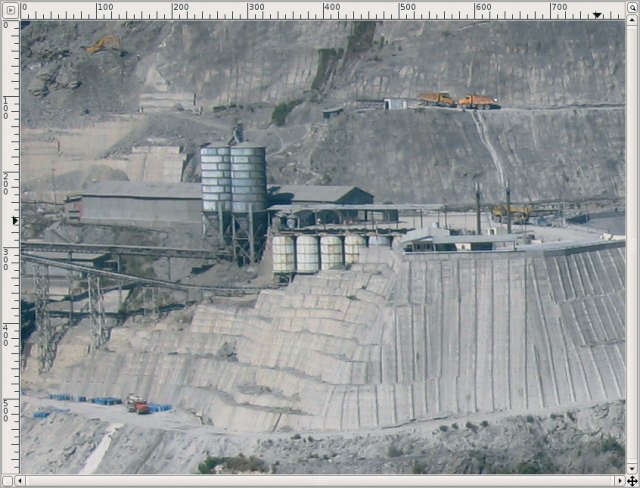
As you can see, the corrected image now contains improved color saturation and contrast.
Look at the histogram again to understand what we just did. If you look at the histogram panel, you will see that the graph has five intervals in it (shown by vertical gray lines). This is akin to the world of photography, in which an image with a range of five F-Stops is considered a well-balanced image.
Note that our photo was initially confined within approximately 2.5 stops (see Figure 2). We have managed to stretch it over to almost all five stops (see Figure 7).
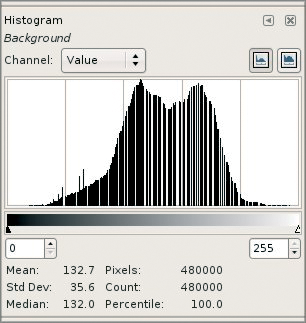
Essentially, we have stretched the range of pixel values from nearly zero all the way to 255, thereby enhancing the image contrast.
Like the washed out images, underexposed images are a relatively common problem. Figure 8 shows an image that suffers from underexposure in the bottom half. The photograph was taken in the evening against the setting sun. The auto mode reduced the aperture because the sun's bright light was striking the camera directly.
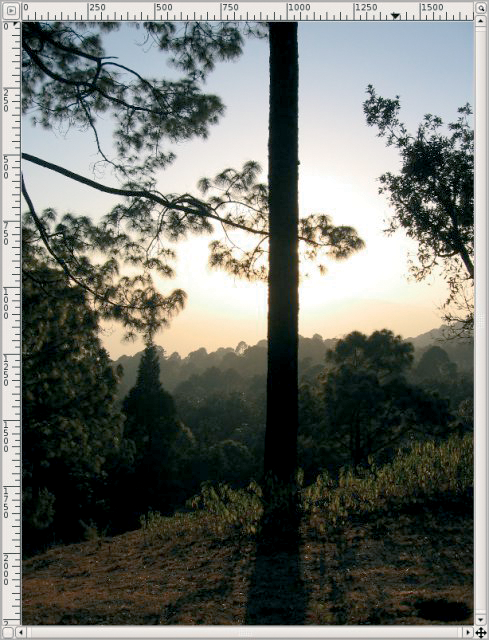
As a result, the darker areas in the image have become dark and are hardly visible. Again, looking at the histogram (Figure 9), we can deduce why the image appears so dark.
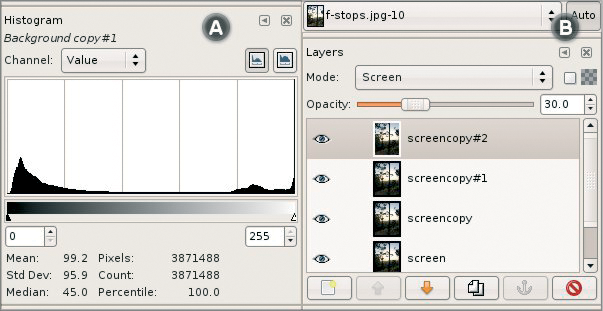
To correct an underexposed image, we will first duplicate the layer by going to Layers | Duplicate Layer.
Change the mode to Screen and the opacity to 30. For our example image, we needed about five stops, or five duplicates of the layer with Screen mode and opacity set to 30. The result is shown in Figure 10.

| Tips |
|
If your image contains noise, first try to remove the noise before using the methods defined in this article. If you don't remove the noise, you will very likely have problems with it later. To reduce noise in your photo images, use the GIMP's Selective Gaussian Blur filter. You can access the Selective Gaussian Blur filter from Filters | Selective Gaussian Blur. In the pop-up menu for the Selective Gaussian Blur filter, you can play with the radius value that applies blur to the pixels in the given radius. The Max Delta parameter is the important part of the Gaussian equation because it defines the edges between the parts you wish blur. If you increase the Max Delta too far, the result will be unsightly, so you should always check the preview while you play with with the blur feature. Finally, never apply sharpening before you correct the image, since the use of sharpening could affect the results. Always apply sharpening later, with some small discrete value, and repeat it to get the preferred results. |
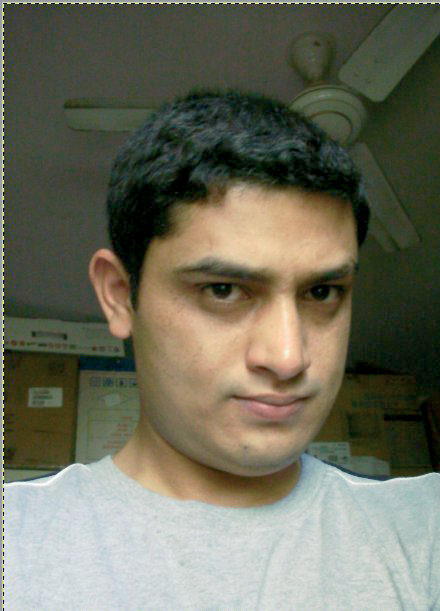
One of the most common problems with digital cameras is the white balance. Indoor shots are often affected by the white balance problem, especially if you forget to set the auto mode for incandescent lights. In this situation, we will first try out the Auto White balance filter of GIMP, which can be accessed from Layers | Color | Auto | White balance.
The resulting image is not much different than the image shown in the original (see Figure 11).
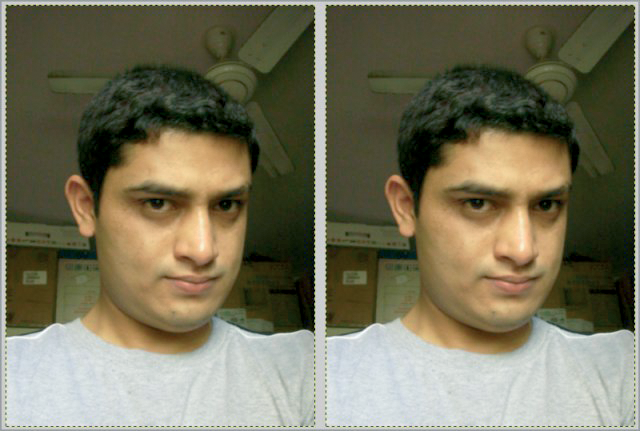
The only auto filter in GIMP that sometimes returns decent results doesn't work in our case. However, we can manually fix the problem with only a few simple steps.
We can trace back the steps the auto filter might use to correct white balance in the image. For this step, we must depend on our judgment.
First, go to the GIMP Toolbox and select the Color Picker. Zoom into the image to where you can find pure white or near white.
By observing the image, you can probably deduce which color has caused the screening or toning.
In our image, it looks like a shade of yellow (see Figure 12), so you should try to find an unnatural-looking shade of the color your photo seems affected with, then left click to pick it.
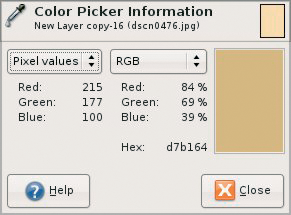
Once you are satisfied, you can then copy the color (RGB values) you have identified as the culprit.

Using the RGB values, you can double click on the Foreground Color plate, bring up the color dialog box, and fill in the RGB values you noted.
Now select that color and go to the Layers dialog box and create and new layer with "foreground color" as fill type.
We are assuming that you have selected that color as foreground in the color palette. If you haven't, then you should do so now.
We will again use a layer trick, but this time, our trick will use the layer mode Divide.
Change the layer opacity to 30 or so (see Figure 14).
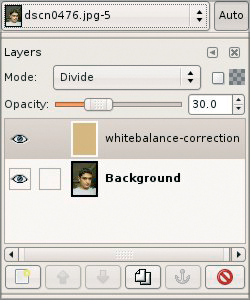
It should be sufficient to use only one stop this time. If it is not, you can use it discretely until you are satisfied with the final results.
As soon as we do this step, we can see that tone of that color has been removed from the image, and the image has been restored to the natural colors again (see Figure 15). One thing to note here is that you may or may not get the desired results in the first attempt.
The final result will depend upon whether you have found the bad tint that is affecting the image.
Various automatic tools are available to assist you with image correction, but nothing beats the manual correction option because an auto tool cannot see the final result, but a human eye can.
I hope this article gives you some useful insight into manual methods of correcting images with the GIMP.
| THE AUTHOR |
|
Gaurav Nawani is a graphic artist at IronCode Software. He is an open source enthusiast and loves writing articles as a freelance writer. Nawani is the editor and designer of Blenderart Magazine (http://blenderart.org). Apart from his usual hobbies of photgraphy and traveling, he also dabbles in cooking. |