
By Martin Loschwitz
Over the past few years, Apple's iPod has taken the market by storm, mutating from a simple MP3 player to a lifestyle object. Not all the standard firmware functions are popular with users, however. Something particularly annoying is that the iPod totally lacks some features, such as the ability to play Ogg Vorbis-formatted files.If you don't mind a little tinkering, you can talk your iPod into doing some things that Apple never intended it to do.
To help you rock your iPod, the Rockbox project offers a firmware product called Rockbox. Rockbox has several features that the iPod lacks, for example, the ability to play Ogg Vorbis files, the ability to customize the user interface, and the option of extending the default software portfolio with plugins.
The current crop of plugins includes a number of games, including one to help you run Gameboy games on your iPod. You'll even find a program for displaying text files and a JPEG viewer.
Amazingly, Rockbox also supports a number of other MP3 players, including models by Archos and iRiver. This article focuses on configuring Rockbox for the Apple iPod.
| Risks and Side Effects |
|
Before you start, be aware that the flash process does involve some inherent dangers. If the flash process is interrupted before the firmware has been fully loaded, you have just converted your iPod into a really expensive and stylish paperweight. This danger is inherent to any device that supports firmware upgrades by flashing memory. Try to remove the risk of a power outage as much as possible. |
The path to a Rockbox-powered iPod is not quite as stony as you might anticipate. The Rockbox program is made up of two components: the firmware itself, which you need to store on your iPod as a simple file; and also a small program (the bootloader), which loads the firmware file when you switch on your iPod.
Putting the bootloader on the iPod is the most difficult part of the install, especially considering the fact that it deletes part of the original Apple firmware, which you will not easily be able to restore on your iPod later.
For this article, we used an iPod Video in our lab, that is, a fifth-generation iPod. However, the Rockbox project homepage [1] has firmware image downloads for any iPod.
The installation basically follows the same steps, no matter which model of iPod you are using, although there might be a few minor differences in some cases (read the chapter in the online manual, if necessary).
In this article, we will assume that you are installing to the iPod from a Linux PC, and that the main partition of the portable player is formatted with the FAT32 filesystem.
Use the USB cable provided with your iPod to connect the your iPod to your PC. Then, check the output from dmesg to ensure that Linux has detected the iPod correctly and mounted its filesystem properly. Make a note of the device name the kernel uses for the iPod; it will be in the third line, which starts with SCSI device (see Listing 1).
| Listing 1: dmesg Output |
01 usb 4-1: new high speed USB device using ehci_hcd and address 7 02 scsi4 : SCSI emulation for USB Mass Storage devices 03 usb-storage: device found at 7 04 usb-storage: waiting for device to settle before scanning 05 Vendor: Apple Model: iPod Rev: 1.62 06 Type: Direct-Access ANSI SCSI revision: 00 07 SCSI device sdb: 58605120 512-byte hdwr sectors (30006 MB) |
Download the source code for ipod_fw off the web [2]; this is a tiny, but useful tool for modifying the firmware. Build the program by calling gcc -o ipod_fw ipod_fw.c.
Now extract the partition table information for your iPod by entering fdisk /dev/device name (Listing 2). Replace device name with the name in your dmesg output. Extract the current iPod firmware using the dd command:
dd if=/dev/partition name of=bootpartition.bin
It makes sense to burn the bootpartition.bin file onto a CD right after this step, and save the medium somewhere safe; this is your only way back if you would like to reinstall the Apple firmware on the iPod.
It's time to use the ipod_fw download to extract an image of the firmware from the partition you just grabbed. The command for doing this is:
./ipod_fw -o apple_os.bin -e 0 bootpartition.bin
The apple_os.bin should now contain part one of the original iPod firmware. Now run the next command:
./ipod_fw -o apple_sw_5g_rcsc.bin -e 1 bootpartition.bin
This unpacks the second part of the firmware and stores it in the image file.
| Listing 2: iPod Partition Table |
01 Device Boot Start End Blocks Id System 02 /dev/sdb1 1 10 80293+ 0 Empty 03 /dev/sdb2 11 3648 29222235 b W95 FAT32 |
The next step is to merge part one of the Apple firmware with a second file - the Rockbox bootloader - and to upload the new file to your iPod. To do this step, you'll need to download the Rockbox bootloader [3] and store it in your current directory.
Run the ./ipod_fw -g video -o rockboot.bin -i apple_os.bin bootloader -video.bin command to merge the two files.
After completing this step, you'll need to upload the new Rockbox-enhanced bootloader directly to the iPod boot record: dd if=rockboot.bin of=/dev/device name; of course, device name is the name mentioned previously from your dmesg output.
When you reboot your iPod, the iPod will automatically know that it is supposed to run Rockbox as a new system, however, the bootloader will draw a blank as you still need to upload the firmware file.
Next, you'll need to download the daily update [4] and the Rockbox font package. If you have not already done so, you should now mount the iPod on your filesystem, and also unpack the zip archive directly on the player.
Now unmount the drive and remove any cables that are still attached to the iPod. Switch the iPod off by holding down the lower button for a couple of seconds. When you switch the iPod back on, the Rockbox bootloader will then automatically launch your iPod's new operating system.
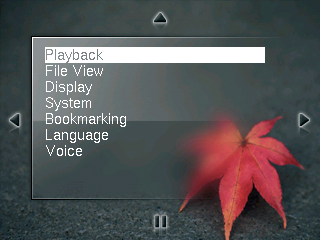
After the Rockbox splashscreen, you will not see a list of tracks on your iPod as you would normally expect. Instead, you'll see the Rockbox Filebrowser (Figure 1). This is the default Rockbox view, and it will appear until you run a command to display something else on the iPod's screen.
The Rockbox controls (that is, the way you navigate through the various folders and options) follow Apple's lead. The click-wheel will work as you would expect it to, the same way it was set up by Apple's firmware. For example, dragging your finger over the right side of the sensor pad will move the selection bar down the selections.
In the same way, the selection bar will move up if you press the left-hand side. To play an entry (for example, a track in the file view), just press either the bottom button on the click-wheel, or simply press the large center button.
Naturally, playing music will still be one of the iPod's most important tasks. Rockbox even offers you two different modes for finding and playing music files on your player. You can either launch directly from within the file browser, or you can change the Tag Cache Browser, to a style that is reminiscent of iTunes or the original iPod firmware to sort tracks by genre and other categories.
Moving to new firmware will not touch any of the MP3 files you had on your iPod before the change. However, Rockbox does not support the iTunes database format.
To add existing tracks to your tag cache, you'll need to launch a manual search; to do so, press the MENU button on the click-wheel and select the Tag Cache Menu entry. Now scroll down to Auto Update, and press the center button to tell Rockbox to rebuild the database automatically whenever you switch on your iPod. After you have completed this step, scroll down to Initialize Now and press the center select button once more. This tells the system to create the tag cache database. Depending on the number of tracks you have installed, this step can take a while. Move back to the root level in the menu tree (Figure 2), select General Settings | File View, and then navigate to Show Files. Set the value for this to ID3 Database.
Right now, there isn't a computer counterpart for Rockbox that does what iTunes does for the standard iPod. Such a standard would be redundant, of course, since Rockbox will play every track in memory, no matter from which directory. This makes it easy to load music onto your Rockbox iPod. Simply connect the device to your computer, and wait for Linux to mount the mobile sound machine on your filesystem; then copy tracks to the main iPod folder.
If you selected the Auto Update as described previously, all you need to do now is turn off your iPod and turn it back on again. Rockbox will now update your tag cache and the tracks you just loaded will be available for selection.
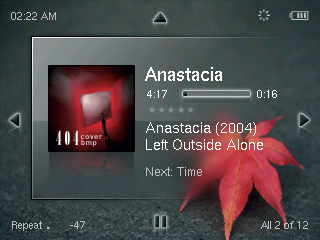
While the iPod is playing a track, it will display the details (just like with the standard firmware). The developers refer to this function as the Rockbox While Playing Screen (WPS).
The WPS gives you fast access to Rockbox functions. The WPS context menu, which you can access by holding down the "Select" button, takes you to the sound settings, for example. When you get to the sound settings, you can set the volume and various other audio output parameters.
Rockbox can change the iPod's appearance using themes; the distribution includes a couple of interesting ones. Launch themes directly on the Rockbox. The main menu has a Browse Themes item. Open this menu item to view a list of all the available themes. Toggling between the individual themes gives a realtime view of how changing the theme changes your iPod's look.
Interestingly, themes change more than just the Rockbox's looks. They give users the ability to control and modify displays, like the WPS. To design your own WSP with elements of your choice, Chapter 9.2.2 of the Rockbox Manual is recommended reading [4].
Rockbox has about 60 plugins, including games like Solitaire, Chess, Pong, or Minesweeper (Figure 3). Besides these golden oldies, you will also find a number of useful tools (one of which lets you use your iPod as a stopwatch for chess), along with complete applications like Rockboy, a Gameboy emulator.


Whenever the Rockbox Filebrowser finds a file for which a plugin exists, all you have to do is navigate to the filename and press the Select button. Rockbox automatically launches the matching plugin. For example, if you have uploaded a JPG image, just click on the image name and the plugin will pop the image up on your iPod's display.
Although it doesn't make much difference what language the iPod firmware speaks, you can change the menu language for Rockbox in General Settings | Languages in the main menu.
If you want the iPod to speak, for example, German by default, just copy the german.lng file from the /.rockbox/langs/ folder to the /.rockbox folder. Make sure you don't have multiple files with the .lng suffix in this folder.
Assuming you have the original firmware for your iPod, you can easily remove Rockbox from your iPod and reinstate the default status. To do so, connect your iPod to your PC and delete the rockbox.ipod file, as well as the .rockbox folder from your iPod's main directory.
Next, check the dmesg output to discover the device name that Linux has assigned to your iPod.
dd if=bootpartition.bin of=/dev/sdb1 restores the original firmware (however, you may see a different partition name). Then power the iPod off and back on again; the apple in the display tells you that your iPod is using the original software again.
Rockbox is an interesting option for the iPod, and you can easily revert to the original firmware if you don't enjoy this versatile alternative.
Support for Vorbis files is also a nice touch, as are the plugins. However, the fact that the Rockbox confronts users with a simple file browser after the installation can't be described as leading-edge technology. The only thing keeping users from dredging the depths of the filesystem for music is the tag cache function.
This said, you can use iTunes with a Rockboxed iPod to add simple and convenient track management. Gtkpod provides a free alternative that will also talk to Rockboxed iPods.
Regarding the iPod 5G, there is at least one function that the Rockbox system definitely does not support - the device will not play videos after you install the alternative firmware. A plugin to add this functionality to Rockbox is in the making; however, this plugin is currently regarded as experimental. If you regularly view videos on your iPod, you will want to avoid making this move for the time being.
| INFO |
|
[1] Rockbox website: http://www.rockbox.org
[2] Tool for extracting the firmware: http://www.rockbox.org/viewcvs.cgi/*checkout*/tools/ipod_fw.c [3] Rockbox bootloader: http://download.rockbox.org/bootloader/ipod/bootloader-video.bin [4] Sources for Rockbox firmware, fonts, and documentation: http://www.rockbox.org/daily.shtml |
| THE AUTHOR |
|
Martin Loschwitz is a Debian GNU/Linux developer, and he spends his leisure time working with Linux and listening to classical music. He's also a regular writer for Linux Magazine, and co-author of the Projects on the Move column. |