
By Karl Deutsch
Imagine you spent days tweaking a system until you finally have everything working perfectly. The partitions are exactly as you need them, the operating systems are installed, and everything is working to your satisfaction. Before you actually put the system to productive use, it might be a good idea to back up your dream machine so that you can quickly restore the system if disaster strikes.
The open source Mondo backup utility can back up a complete operating system configuration. Mondo can back up your whole Linux installation or even an entire hard disk - including partitioning and the boot manager - onto a DVD, CD, or external NFS server. You can use Mondo to make an easy-to-restore copy of your Linux system. One of the goals of Mondo is to allow changes to the underlying system - such as the hardware or the filesystem - and still preserve the previous system configuration.
Mondo lets you restore from a non-RAID filesystem to a RAID system (including the root partition). You can also shrink or enlarge partitions, change the filesystem, reassign devices or add drives, and Mondo will still preserve the previous system without the need for a fresh install.
Mondo is designed to work with another utility called Mindi. Mindi builds a live CD or DVD image with the Mondo system backup information.
You can use Mondo and Mindi together to save your Linux configuration to a bootable CD or DVD. If a complete backup is too big to fit on a single disk, you can back up your data across multiple disk images.
The Mondo backup utility lets you split large archives to fit on several disks. Alternatively, you can start the basic system from the boot medium and restore the rest of your data from a tape drive or NFS server.
| Windows |
|
Although Mondo was originally developed for backing up Linux systems, you can use Mondo to back up Windows systems. You should be aware of the following restrictions:
|
Mondo [1] is a fast and reliable backup solution used by corporations such as Siemens, HP, and IBM.
Because you can use program parameters or a text-based interface to control the program, even less-experienced Linux users are able to take advantage of the Mondo backup utility.
Mondo supports Logical Volume Manager 1 and 2, software and hardware RAID, Ext2/3, JFS, XFS, ReiserFS, and VFAT. During the restore step, you can modify the hard-disk geometry and filesystem if necessary.
Mondo also supports the migration of individual disks to RAID and the migration of RAID systems back to individual disks. Mondo does not store individual, physical hard-disk partitions, in contrast to Partition Image [2]; instead, you can either back up the whole disk or individual directories.
If a single medium is not large enough to store your entire backup, the Mondo utility will write the backup over multiple media.
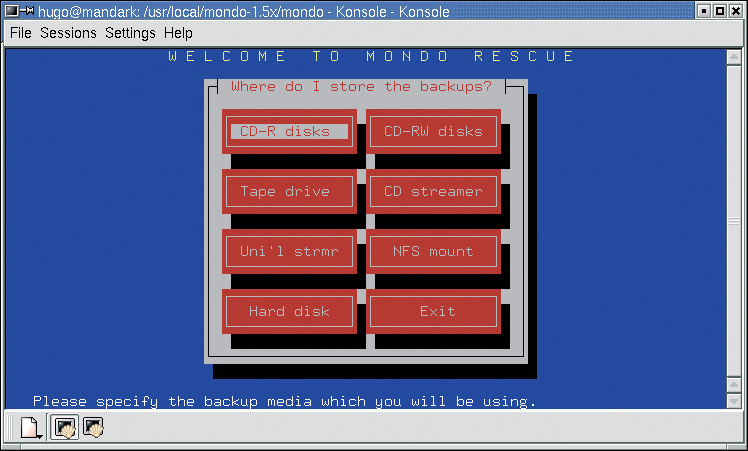
Mondo's hardware requirements are a PC with at least 128 MB RAM, 800 MB free disk space, and a backup drive, which can be an optical drive (CD R/RW, DVD R/RW), a tape streamer, an NFS directory, or just more disk space.
Kernel version 2.2.19 or newer is recommended. Mondo's software dependencies include the afio, gzip, mkisofs, and busybox packages.
Most distributions include these software dependencies by default, so you will probably be able to use your distribution's native package manager to install them.
Ubuntu users can use Synaptic; enable the Universe repository and type the following at the command line:
sudo apt-get install mondo mindi
Knoppix 5.0 includes Mondo. The Mondo FTP servers ([3],[4]) have the latest packages.
The Mondo backup utility relies on Mindi to create bootable media. You can use Mindi to create a rescue CD with the kernel, modules, tools, and libraries for your system.
Before you start using Mondo, you might like to make sure that Mindi really does create a bootable test CD for your system. To confirm that it does create the CD, work as root and type mindi to launch into the process.
A number of prompts follow. When you are asked Do you want to use your own kernel [...]?, press [Y] and say [N] when asked Would you like to use LILO [...]. Again press [N] for Would you like to create boot+data [...]?, and finally say yes to the question Shall I make a bootable CD image? The application will then store the mindi.iso image below /root/images/mindi.
Working as root, burn the image onto a disk using the command cdrecord -v -data/root/images/mindi/mindi.iso. Then boot your computer from the CD you just created, and you should be able to access a text-based console on the rescue system.
If the boot process works, you will now be able to safely use the Mondo backup utility on your system.
Close any active applications you do not need at present to avoid interrupting the backup - this is particularly important for databases and database connections. Create a directory such as /tmp/iso for the ISO files.
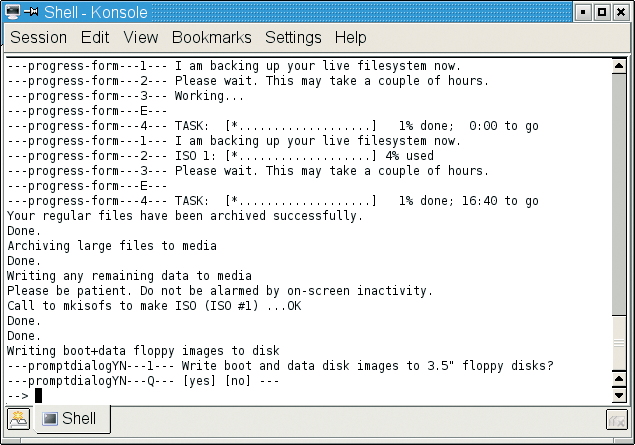
Next, run Mondo with root privileges in a terminal window using the mondoarchive command. If you do not enter any additional parameters, you should see the dialog-based text interface shown in Figure 1.
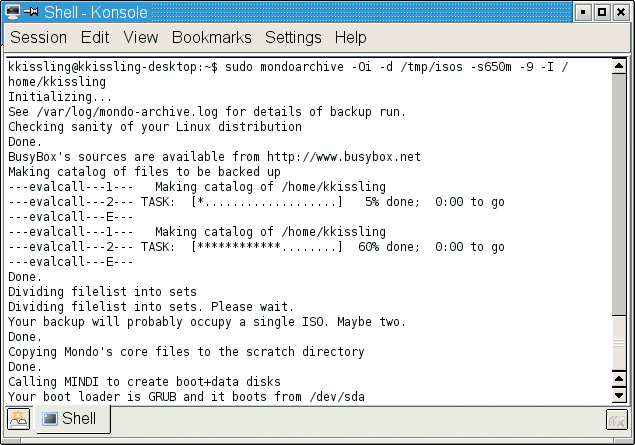
The command line is far more flexible. The following example shows how to set the maximum compression rate for ISO files (-9) and create a file of 650 MB or less in the /tmp/iso directory. The command does not back up the /proc, /tmp, and /home directories. Working as root, enter the following:
mondoarchive -Oi -d /tmp/iso -s 650m -9 -H -E /proc -E /tmp -E /home
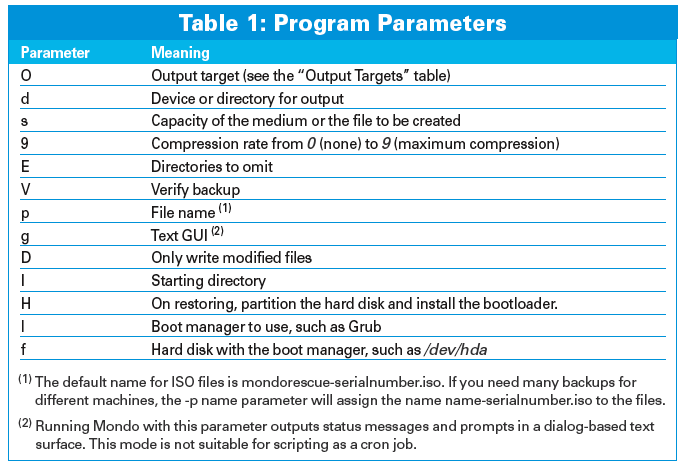
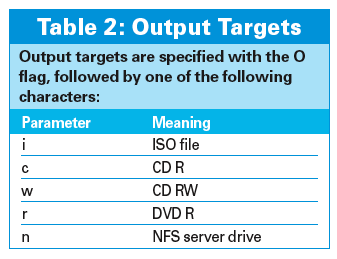
Check out the "Program Parameters" and "Output Targets" tables for additional details.
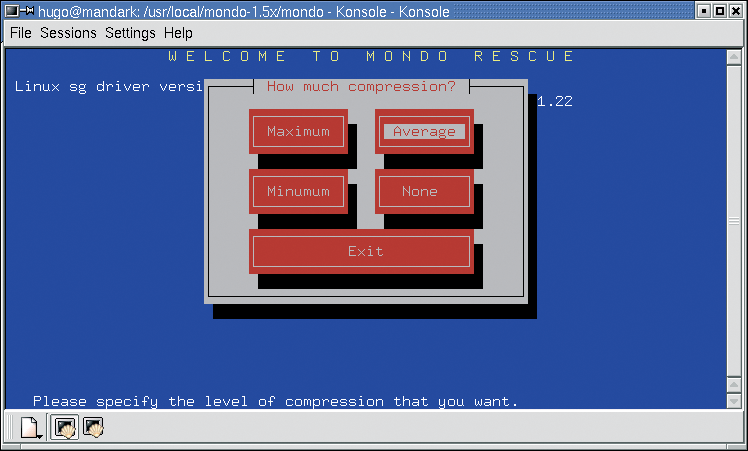
Mondo starts by analyzing your PC, and then it creates the ISO files with the full backup.
If your machine's disk has multiple systems in multiple partitions, Mondo will only save the one you are currently working in, along with any partitions you have mounted.
During an interactive restore, you can use the integrated tool to modify the partition table to ensure that Mondo will only restore the partitions that you backed up.
Note that if you use the Grub boot manager, you will need to add the following additional parameters to the command:
-l GRUB -f /dev/hda
Remember to replace /dev/hda with the disk containing your boot sector.
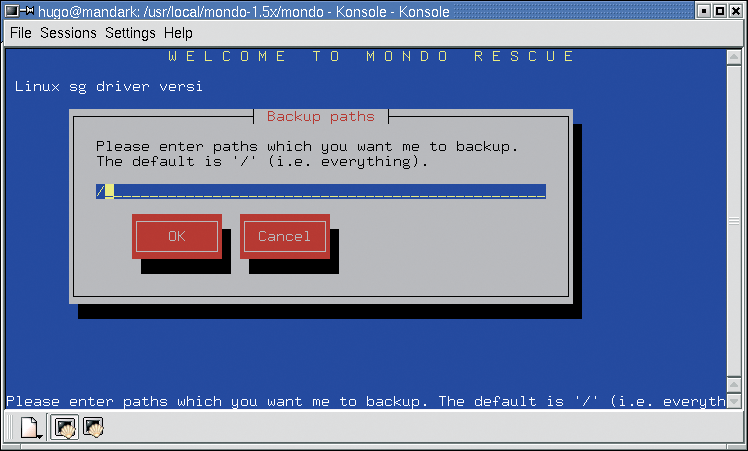
Mondo will then ask if you want to create a boot disk (Figure 3). You will only need the disk if your data is on a tape drive or NFS server.
Then burn your ISO files onto a CD/DVD; you can boot from the first medium later.
Although the issue the Mondo backup utility had hasn't created corrupt archives since May 2000, it still makes sense to verify your archives, rather than trusting your luck.
To verify your archives, boot your system from the first backup CD/DVD or the boot disk. At the boot prompt, type compare, follow the instructions on your screen, and wait for the results of the comparison.
Mondo logs changes in the /tmp/changed.txt file; you can expect differences for dynamic files such as log files, or entries below /var.
If you do not see any unusual discrepancies, you can assume that the backup is good.
After fitting a new disk, you will need to restore the complete system. It doesn't matter to the Mondo backup utility whether the total capacity of the new disk is larger or smaller than that of the original disk, as long as you have enough storage capacity.
Boot from the first medium (the CD/DVD or floppy). Then enter the restore command at the boot prompt to restore the system.
If you specified the -H parameter at the backup stage, Mondo will automatically partition and format the disk, and install the boot manager in the master boot record.
To customize the restore, omit this option, format the disk interactively, and then restore individual directories and files as needed.
Insert the next disk when prompted, then remove the final medium, and reboot your system.
To create an initial backup of your home directory, /home/user, become root and type the following command:
mondoarchive -Oi -d /tmp/iso-s 4200m -9 -I /home/User
Replace the user keyword with your username (Figure 4).
It makes sense to burn the ISO files with your user data onto a DVD. Mondo prompts you to specify the size of the ISO image.
After successfully navigating the first backup, you can set the -D option for successive back runs:
mondoarchive -Oi -d /tmp/iso -s 4200m -9 -D -I /home/User
To restore your home directory, boot from the first disk and, at the boot prompt, type interactive. A couple of prompts follow.
Say [N] for "no" to the first three prompts - you don't want to partition, format or fully restore your drive.
When you are asked Which path do you want to restore?, type the path to your home directory, /home/user.
Say no when asked Do you want ... to setup your boot sectors? Then wait for the restore to complete, remove the last disk, and reboot your machine.
Mondo typically backs up data and systems in interactive mode. If you omit the -g parameter when you launch the program, the application will run without user interaction.
Mondo supports cron jobs in interactive mode, although running the Mondo backup utility with cron only really makes sense under certain circumstances, for example:
To use the cron job interactively, you need to dig down into your bag of tricks. You will need both At and the Screen terminal multiplexer.
Check page 22 of the Mondo manual [6] for a HowTo.
If the MBR on your disk fails, boot from the first backup medium. Type expert at the boot prompt and wait for the program to launch. The command for repairing the MBR is mondorestore -mbr.
Mondo takes the headaches out of backing up your system. The comprehensive manual has additional application examples ([5], [6]). The FAQ and mailing lists are also useful if you need to solve a specific problem.
If you need to migrate the disk type from IDE to SATA or from SCSI to SATA during a restore, Mondo will help you do so. A guide by Francois-Xavier Horel [7] explains how. Additionally, professional support is available for Mondo.
If Mondo is not to your liking or if you are interested in similar open source projects, you might like to take a look at Mkcdrec ("Make CD-ROM Recovery") and Rear ("Relax & Recover").
| INFO |
|
[1] Mondo Project: http://www.mondorescue.org
[2] Partition Image: http://www.partimage.org [3] FTP download server: ftp://ftp.mondorescue.org [4] Download mirror: http://mondorescue.muskokamug.org [5] Mondo documentation: http://www.mondorescue.org/docs.shtml [6] Mondo manual (PDF): http://www.mondorescue.org/docs/mondorescue-howto.pdf [7] Francois-Xavier Horel, "Linux image deployment from SCSI server to SATA server", www.mondorescue.org/docs/HOWTO-_Deploy_Linux_from_SCSI_to_SATA.pdf |
| THE AUTHOR |
|
Karl Deutsch is the author of Linux für Windows-Administratoren, an IT trainer, and the proprietor of it-works.co.at. Karl has been using various Linux distributions for his daily work since 1997. |