By Ryan Paul
For even the most experienced developers, the drudgery of the edit-compile-test cycle can become very oppressive. Fortunately, an assortment of open source tools cuts the fat out of the development process by helping programmers focus on functionality instead of on all the arbitrary implementation details.
With dynamic programming languages and versatile interface design utilities, even relatively inexperienced programmers can build complex applications with little effort. One promising combination of tools is the Ruby language and the Glade interface development system.
The versatile and expressive Ruby language allows developers to make programs that do more with less code. Glade brings in the power of the Gtk toolkit, letting you easily create a graphic user interface for your Ruby application.
In this article, I will take you through all the steps of building an application with Ruby and Glade. You'll watch Ruby and Glade at work while we create an example screenshot application called Screenshooter.
Ruby's concise and expressive object-oriented syntax is highly conducive to rapid development. Well-written Ruby programs are easy to read, understand, and maintain. A wide variety of useful programming libraries are available for Ruby, so Ruby is often used to tie together functionality from disparate external sources. Ruby's scalability provides a graceful glide path that makes it easy for simple command-line scripts to evolve into graphical utilities with menus, toolbars, and text boxes.
Glade is an interface development system based on the Gtk toolkit. The Glade development system consists of an interface construction program and a set of programming libraries that facilitate interface loading and manipulation.
The Glade interface builder, which supports rapid point-and-click user interface design, produces simple XML interface description files. Developers use the Glade programming libraries to parse the XML files and automatically generate Gtk interfaces in memory at run time. The program can then display and manipulate these interfaces as if they were manually coded with Gtk.
Glade provides several unique advantages over other interface design tools. Because Glade uses runtime loading instead of code generation, it is language-neutral, which means that individual Glade files can be used with any programming language for which Glade library bindings are available. Runtime loading also makes testing less time intensive, since one doesn't need to perform any additional processing steps between modifying an interface and running the program in which it is used.
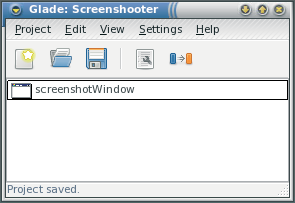
The Glade builder utility comprises four floating windows. The project window lists the forms associated with the current project, the Palette window provides access to all of the Gtk widgets and controls accessible in Glade, the Properties window displays various widget attributes, and the widget tree window displays a nested hierarchy of all controls used in the current project. When Glade starts, all of the windows are either empty or disabled until a project is created.
To start a new project, select New from the Project menu in the project window (Figure 1). When starting a new project, users must choose between Gtk and Gnome. Although Gnome projects have access to a broader selection of widgets, Gtk projects are more portable and have fewer dependencies. For this tutorial, create a Gtk project.
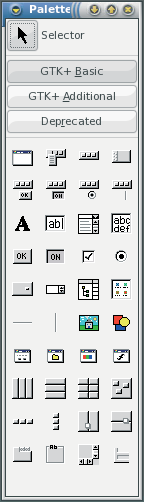
After you create a new project, the Palette window will become accessible. The Palette window (Figure 2) includes category and widget buttons. Each category contains a number of widgets that can be included in Glade programs. The user can switch between categories by clicking the category buttons. The Basic category includes a variety of widgets that are commonly used in simple applications. The Additional category contains widgets that are a bit more obscure, but still frequently used. The Deprecated category includes widgets that are no longer supported but are still occasionally used by legacy applications. To select a widget, click one of the widget icon buttons in any category.
To build our sample screenshot tool, we will start by designing the interface with Glade, and then we will use Ruby to associate actions with program events.
To create a window for the screenshot utility, select the window widget from the Basic category on the palette. The window widget button, which has an icon that looks like a window, is the first widget button in the Basic category. When you click the window widget button, a new window will appear immediately and the Properties window (Figure 3) will display the new window's attributes. The new window, which will be called Window1 by default, will be listed automatically in the project window and widget tree. When new Glade windows are created, they are drawn with a crosshatch background to indicate that they are empty.
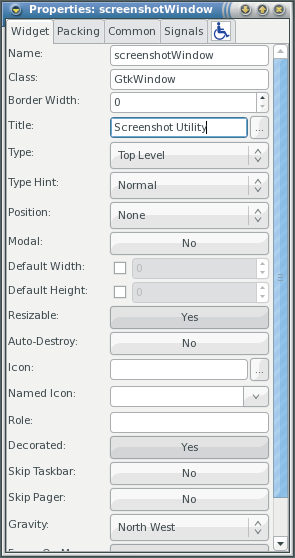
The first item in the properties window is the widget name. Ruby programs that load Glade user interfaces can access and manipulate individual widgets within the user interface by referring to widget names. As a result, it is important to specify meaningful names for widgets that the program will need to manipulate. To change the value of the Name property, simply type a new name into the Name property text box. For the screenshot utility, set the window Name property to screenshotWindow. The Title property is used to specify the text that will appear in the title bar of a window. For this example, change the value of the Title property to Screenshot Utility. Although many other window properties are available, in this article, I will only describe the properties that are relevant for the sample application. Users can get additional information about other widget properties by referring to the Gtk documentation.
In Gtk applications, widgets are stacked in nestable vertical, horizontal, and grid boxes. This approach to layout is referred to as the box model. To determine what kind of boxes should be used, one must first consider the structure of the application's user interface. The screenshot utility has a menubar, a toolbar, a file selection widget, and a preview pane. The widgets will be stacked vertically, and the preview pane will have to grow when the user resizes the window. To accommodate that layout, the screenshot utility will use a vertical box with four rows.
To add a vertical box to the window, select the vertical box widget from the Basic category of the Glade palette. The vertical box button, which has an icon with three stacked rectangles, is in the bottom half of the Basic palette. After you click the vertical box button, click anywhere inside the empty screenshot utility window. A dialog will appear to ask how many rows Glade should include in the box. Increase the number to four, since the screenshot utility will have four major widgets.
After you add the vertical box, the blank space in the screenshot utility window will be partitioned into four separate rectangles, and the widget tree window list will include the vertical box. When you add the vertical box to the window, the Properties dialog will change to show the properties of the new box widget. Vertical boxes have fewer properties than windows.
To add or remove rows from the vertical box, you can use the Size property, and to set the amount of blank space that the application should render between each row, you can use the Spacing property. To modify the properties of the window again, select the window in the widget tree. You can use the widget tree to select and manipulate any widget in the current program.
The menubar belongs in the first row of the vertical box. Select the menubar widget from the Basic category of the Glade palette. The menubar widget button is the second one in the first row of the Basic category, right after the window widget button. Next, click inside the top row of the vertical box. A default menubar will appear, with File, Edit, View, and Help menus. You will have to modify the menus to serve the needs of the screenshot utility program, so right-click the menubar and select Edit Menus from the right-click context menu to open up the Menu Editor (Figure 4). The left side of the Menu Editor is dominated by the menu item tree, which lists all of the menus and menu items on the active menubar. The right side of the Menu Editor shows the properties of the selected menu item and provides buttons for adding and removing menu items.
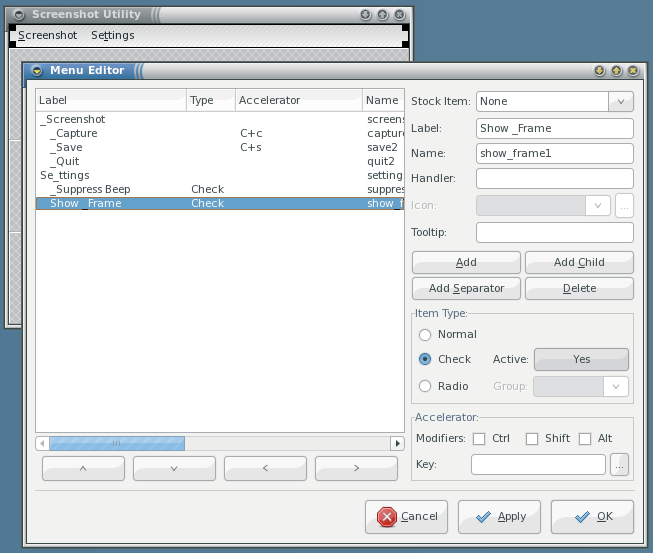
Before you can add the proper menu items, you have to delete the current ones. Select the very first item in the menu item tree and then hold down the Delete key on the keyboard or click the Delete button until all the menu items are gone. Now click the Add button to create a new menu. When the new menu item is added, it will be selected by default and its properties will be configurable with the controls on the right side of the Menu Editor.
You can use the Label property to set the text that will be visible on the menu to the user. The first item on our menubar will be the Screenshot menu, so type Screenshot into the Label text box. In many programs, each menu item has one underlined letter to indicate what the user can press in conjunction with the Alt key to activate the menu item. Gtk handles that keyboard functionality automatically, and you can use an underscore in widget labels to specify which key Gtk should be associated with the menu item. Type an underscore right before the S in Screenshot to make it so that users can hold the Alt key and hit S to activate the Screenshot menu. Gtk always uses the letter that immediately follows the underscore for keyboard menu selection.
To bind a function to the menu selection event, you can use the Handler property of menu items. The value of the Handler property is the name of the method that the application will invoke in the source code when the user selects the menu item. Because Settings is a menu and not a menu item, the Handler property should be empty. Delete the text in the Handler text box for the Image menu.
Next, we will add menu items to the Screenshot menu. Select the Screenshot item in the menu item tree and then click Add Child to add a new menu item. This new menu item will enable users to initiate the screenshot capture. Set the value of the Label property to _Capture and set the Handler to on_capture. When you write the source code for the screenshot utility, you will implement the on_capture instance method to perform the actual screenshot capture. Because users will probably use the capture feature frequently, it should have an accelerator. Accelerators are the keyboard shortcuts used to activate menu items. Select Capture in the menu item tree and click the Ctrl checkbox in the Accelerator property group in the bottom right corner of the Menu Editor. Then, type the letter c in the Key text box.
Now click the Add button to add the next menu item. This menu item will allow the user to save the captured screen image. Next, set the value of the Label property to _Save, the value of the Handler property to on_save, and the accelerator to Ctrl+s. To make the save icon appear on the menu item, select gtk-save for the Icon property value. The last item on the Screenshot menu will allow the user to quit the program. Click the Add button, set the label to _Quit, the Handler to on_quit, and the icon to gtk-quit.
The screenshot utility will also have a Settings menu. Click the Add button to add a new menu item. If you click the Add button while the Quit menu item is selected in the menu item tree, Glade will add the new item after Quit on the Screenshot menu. To make the new item a top-level menu rather than an item on the Screenshot menu, click the left arrow button below the menu item tree. Keep in mind that Add Child will add a new submenu to the selected item, whereas Add will create a new item at the current level. Now set the Label to Se_ttings and clear the Handler value. The items on the Settings menu will allow the user to configure the behavior of the program. Instead of using handlers, the Settings menu items will have checkboxes that the user can toggle. The state of those checkboxes will be used at run time to determine how the program operates.
To add the first Settings menu item, click the Add Child button. This menu item will allow the user to configure whether or not the program should beep after it successfully completes a screen capture. Set the label to _Suppress Beep and clear the handler.
To make this menu item a checkbox, select Check in the Item Type property group. To make the program suppress the beep by default, set the Active toggle property to Yes. Because the program will access the value of the checkbox at run time, the Suppress Beep menu item needs to have a meaningful value for the Name property. Set the Name property of the Suppress Beep menu item to checkSuppressBeep.
To create another menu item that will allow the user to configure whether screen captures of single windows should include window borders, click the Add button, set the Label to Show _Frame, and clear the handler. To ensure that screen captures will include window borders by default, set the Item Type to Check and make sure that the value of the Active property is Yes. Then, set the value of the Name property to checkShowFrame. When you finish creating the menus, click OK.
Now it is time to add a toolbar to the vertical box. Select the toolbar widget from the Basic category of the palette. It can be found to the right of the menu widget button. Now click inside of the second partition of the vertical box, right below the menu. Glade will display a dialog box that asks how many items you want to include on the toolbar. Our toolbar will have three buttons that perform the same operations as the items on the Screenshot menu, so set the value to 3 and click OK. When the toolbar is added, it will contain three empty boxes with the same crosshatch background as the empty portions of the vertical box. Many Gtk widgets that can be placed in a window can also be placed in a toolbar, but in this case, we will use toolbar buttons, so select the toolbar button widget from the Basic category of the Palette window. It's the first icon on the second row of the palette, right below the window widget icon. Now click the first empty slot in the toolbar to create a new toolbar button. Repeat this process two more times to fill in the rest of the empty slots.
Next we have to set the proper attributes for the new toolbar buttons. Click the first toolbar button in the screenshot utility window and then select the Widget tab of the Properties window. This button will perform the capture function. Set the value of the Label property to Capture and then select an icon for the Icon property. I used the gtk-new icon because I couldn't find one that seemed more relevant. Now you have to associate that button with the capture method. With the first toolbar button selected in the screenshot utility window, select the Signals tab.
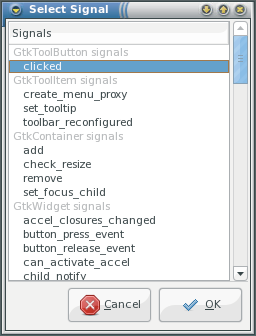
In Gtk, signals are messages that are emitted when an event transpires. In this case, we want the program to call the on_capture method when the user clicks the toolbar button, so we have to hook the button's click event. To open up the signal selection dialog, click the small button to the right of the Signal text box (Figure 5). The signal selection dialog lists all of the signals that can be emitted by the selected widget, including signals inherited from other widgets. Select the clicked signal and click the OK button. The signal name now appears in the Signal property text box. Because the Capture button will do the same thing as the Capture menu item, they should both trigger the same handler: the on_capture method. Set the Handler property value to on_capture and then click the Add button in the Properties window.
Select the second toolbar button in the screenshot utility window. Because this button is associated with the save function, which is commonly used, you can use Gtk's stock button feature instead of manually setting the label and icon.
Select Save from the Stock Button property combo box in the Properties dialog. Now click the Signal tab and associate the on_save handler with the clicked signal. To enable the last button to allow users to quit the program, set its Stock Button property value to Quit and then associate the on_quit handler with its clicked signal.
The menubar and toolbar are now finished and the user interface for the screenshot utility is almost complete. The user needs a way to specify what file name to use when a screenshot is saved. The program could use a conventional save dialog, but I think it's more convenient to integrate the save feature directly into the application window in this case. Select the file chooser widget from the Additional category of the Palette window. The file chooser widget icon is a folder inside of a white box, and it is positioned at the far left of the third row from the bottom of the Additional category. After you select the file chooser widget, click the first of the two remaining empty spaces in the screenshot utility window. The file chooser's target file will have to be accessed in the on_save method, so the file chooser widget will need a name that you can remember. Set its name to fileChooser. By default, the new file chooser widget behaves like the Gtk dialog used to open a file. To make it behave like a Save dialog, change the value of the Action property to Save.
The Local Only property indicates whether or not the file chooser widget will be able to access remote locations. I frequently use screenshots to show Linux programs to my friends, so I want to be able to save my screenshots directly to my web server using the ftp protocol. To make this possible, the screenshot utility will have to leverage Gnome's virtual filesystem layer, which is capable of reading and writing remote files with several protocols, including ftp, SSH, and SMB. Set the value of the file chooser widget's Local Only property to No for the ability to navigate to remote locations.
The one thing that annoys me the most about Gnome's built-in screenshot utility is the small preview size. When I preview a screenshot, I want to see more than just a thumbnail, so this custom screenshot utility will include support for full-size previews with scrolling. Some Gtk widgets already include support for scrollbars, but for other widgets, scrollbars have to be added separately with a Gtk viewport widget. In this case, a viewport is required.
To select the viewport widget from the Additional category of the Palette window, click on the first icon on the last line of the Additional category. Now click inside of the last empty space at the bottom of the screenshot utility window. Scrollbars will appear on the bottom and right edges of the empty space. By default, scrollbars are always shown. To make it so that the scrollbars only appear when they are needed, set the viewport widget's H Policy and V Policy properties to Automatic. Now you have to add the image widget to the viewport by selecting the image widget icon, a small house with green grass and blue sky, from the Basic category of the Palette window. Now click inside of the remaining empty space to place the image widget. The contents of the image widget will be manipulated in the program's source code, so it needs a meaningful name. Set the value of its Name property to imagePreview.
To make sure that the program terminates when the user closes the window, you have to associate a handler with the window's destroy event. To do this, select the screenshotWindow item in the widget tree, navigate to the Signals tab, and click the button with three dots to the right of the Signal text box. Then, select the destroy signal in the Select Signal dialog window, and click the OK button. Next, type on_quit in the Handler text box and click the Add button. Now the program will invoke the on_quit method when the user closes the window.
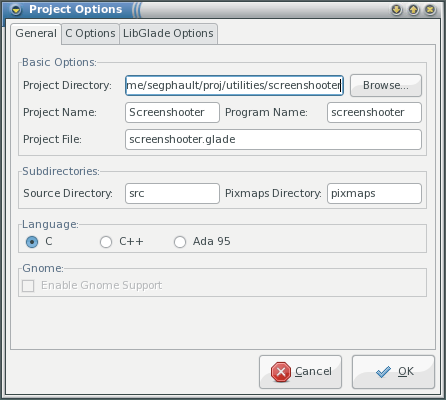
Before you can use the interface in a Ruby script, you must save the Glade project. To save the project, select Save from the Project menu of the Glade project window. In the Project Options dialog window (Figure 7), select the directory in which you will store your Glade project and then enter Screenshooter into the Project Name text box. Because most of the rest of the options in the Project Options dialog window relate to deprecated code generation features, you can safely ignore them and click the OK button to save your project. Glade will generate a .glade file, which contains the XML data for the user interface. Glade will also generate a .gladep file, which stores other project information.
To transform the Glade interface file into a fully functional Ruby application, you must create a simple Ruby script that loads the Glade file, displays the window, and associates various interface events with application functionality.
Start by creating a file called screenshooter.rb in your favorite text editor (Listing 1). Save the file in the same directory as the screenshooter.glade file. The script starts with a shebang (#!) line, which specifies which interpreter the system should use to run the program. After the shebang line, the script uses the require keyword to load the Ruby libraries employed by the script. In this case, we will use the RMagick library to capture the screenshot, the libglade2 library to handle the Glade user interface file, and the gnomevfs library to provide support for network transparent file access. After loading libglade2, the script has to initialize the underlying Gtk infrastructure, which is done with the Gtk.init.
| Listing 1: screenshooter.rb |
01 #!/usr/bin/env ruby
02
03 # Load the required libraries
04 require "RMagick"
05 require "libglade2"
06 require "gnomevfs"
07
08 # Initialize the Gtk toolkit
09 Gtk.init
10 # Specify the location of temporary capture
11 $capture_file = File.join(ENV["HOME"], ".screen_capture.png")
12 # Specify the location of the glade interface file
13 $glade_file = File.join(File.dirname(__FILE__), "screenshooter.glade")
14
15 def on_quit
16   # Quit the program
17   Gtk.main_quit
18 end
19
20 def on_capture
21   # Capture a screenshot and save it to disk at the location specified by $capture_file
22   Magick::Image.capture($glade["checkBeep"].active?, $glade["checkFrame"].active?).write($capture_file)
23   # Load the captured screenshot into the image preview pane
24   $glade["imagePreview"].file = $capture_file
25 end
26
27 def on_save
28   # open the file non-exclusively, in write mode
29   f = GnomeVFS::File.new($glade["fileChooser"].uri, 2, false)
30   # write the contents of the temporary capture file to target
31   f.write(File.open($capture_file).read)
32   # close the target file
33   f.close
34 end
35
36 # Load the Glade file
37 $glade = GladeXML.new($glade_file) {|h| method(h)}
38
39 # Start the main loop
40 Gtk.main
|
When the program captures a screenshot, it will have to store the image file in a temporary location. For the sake of convenience, I save the file in the user's home directory as .screen_capture.png. After initializing Gtk, the script assigns the path of the temporary storage location to the $capture_file variable, done with the File.join method and the HOME environment variable. The File.join method uses the proper directory separator ("/" on a Linux system) to combine file and directory paths. ENV["HOME"] provides the full path of the user's home directory. When I run the program on my computer, the value of the $capture_file variable is /home/segphault/.screen_capture.png.
After assigning the proper value to the $capture_file variable, the program has to specify the location of the Glade user interface file. The File.join method is used again, this time with the File.dirname method and the name of the Glade file (screenshooter.glade).
Now we have to implement the on_quit, on_capture, and on_save methods. These methods must be defined before the GladeXML.new invocation, which binds those methods to signals.
The on_quit method contains only one method call, Gtk.main_quit, which terminates Gtk's main loop and ends the program. If we wanted to make the program pop up a dialog box to request clarification before exiting, we could do so here. This method is called when the program's window is closed, when the Quit toolbar button is pressed, or when Quit is selected from the utility's Screenshot menu.
The on_capture method is a bit more complex. The first line of the method uses the Magick::Image.capture method to capture the screenshot and then uses the write method to save the screenshot to the temporary file described in the $capture_file variable.
The second line loads the captured screenshot into the utility's image preview pane. The Image.capture method of the Magick module receives two parameters, which specify whether or not the program should beep after taking the picture and whether or not the frame of a selected window should be included in a screenshot.
To determine whether the checkboxes on the Settings menu are checked, we have to retrieve those widgets from the Glade object stored in the $glade variable and then use the active? method to determine the state of the checkbox.
To retrieve a widget from a Glade object, you can use square brackets. For example, to retrieve the checkFrame checkbox, you would use $glade ["checkFrame"]. In the on_capture method, I also call the active? method on the checkFrame widget after I retrieve it from the Glade object: $glade ["checkFrame"].active?. I do this for both the checkFrame setting and the checkBeep setting and provide the returned values, booleans, to the Image.capture method as parameters.
The last line of the on_capture method retrieves the imagePreview widget from the Glade object stored in $glade and then associates its file property with the file name stored in the $capture_file variable.
The on_save method saves the captured image to a location specified by the user with the integrated file chooser widget. It also uses the Gnome virtual filesystem layer to provide support for network transparent file access, which enables users to save files to remote locations with several protocols, including ftp and SMB.
The GnomeVFS::File.new method opens a file at the specified location for reading or writing. The first parameter sent to the GnomeVFS::File.new method is the full path of the file to open, which is taken from the fileChooser widget's URI property. The second parameter determines whether the file is opened in read mode or write mode. In this case, we use 2, which indicates write mode.
The third parameter of the GnomeVFS::File.new invocation specifies whether or not the program is permitted to overwrite existing files. In this program, I use false as the value for the third parameter to indicate that existing files can be overwritten.
The second line in the on_save method opens and reads the file described in the $capture_file variable and writes it to the new file created by the GnomeVFS::File.new invocation. The final line in the on_save method closes the new file.
Because we used GnomeVFS rather than Ruby's built-in file methods for saving the image file to the target location, users can save the files to remote servers or other computers on the local network. To take advantage of this functionality, a Gnome user must first connect to a remote location by selecting Connect to Server from Gnome's Places menu. If the user mounts a remote location with the Connect to Server dialog, it will be accessible in the file chooser component in the screenshot utility.
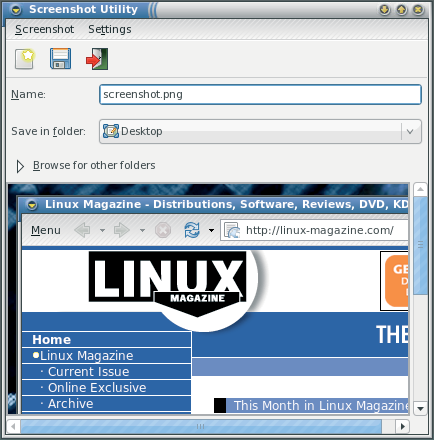
Now that the screenshot utility is complete, it is time to put it to the test. To run the utility, change the permissions of the Ruby script so that it is executable and then run it like a regular shell script (Listing 2). The entire utility, which is only about 20 lines of code, has more functionality than Gnome's built-in screenshot feature. With Ruby and Glade, developers can produce effective applications and utilities with less effort and greater efficiency. Best of all, developing with Ruby and Glade completely obviates the need for compilation. The program can be executed immediately after modification and no other intermediate step is necessary.
| Listing 2: Running the Utility |
01 $ chmod +x screenshooter.rb 02 $ ./screenshooter.rb |
Glade comes with several additional widgets that I did not discuss in this article. You can experiment with different tools on the Glade palette to learn more about the capabilities of Glade. You can also refer to the Gnome development documentation to learn more about specific widgets.