
By Kristian Kißling
Linux users love to experiment with new kernels, drivers, and programs, but as you may already know from personal experience, things can go badly wrong. If worst comes to worst, you might have to reinstall the whole system.
Although experienced Linux users typically take this in stride, the install and the ensuing configuration are time consuming, and time is a precious commodity for most people. Why not preserve a perfect copy of the system so you can restore your original configuration when something goes wrong?
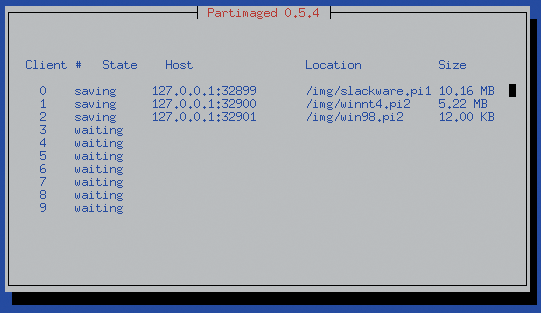
Partimage [1] lets you back up complete partitions - either locally or across the network. The Partimage backup tool (Figure 1) supports several Linux filesystems (including ext2, ext3, Reiser3, and XFS), as well as FAT16 and FAT32. Once you finish the backup, you can burn the archive to a DVD or CD set and restore your system from disk if disaster eventually strikes.

Partimage does not let you save partitions that are currently in use, and this creates some complications if you want to back up a Linux system. The best solution is to configure the computer for dual boot. Boot the system from one partition, install Partimage on it, and use this version to copy the other Linux partition to the server. As an alternative, you could boot the system using a Live CD, such as SystemRescueCd [2], which still uses Partimage version 0.6.4.
In this article, I show you how to get started with Partimage.
Partimage consists of two components: a server (Figure 2) and a client. The server runs on the remote machine, where you store your backup copy. Up to 10 clients can log in to the server and save their data. Of course, you don't need a server if you will be creating a local backup.
The first step is to launch the client on the machine you want to back up. In my example, /dev/hda7 is the device I need to back up.
As I mentioned, you will need to launch a different Linux version from dual boot or start a liveCD. Do not mount the source partition intended for the backup.
The source code for version 0.6.5 is available from the Partimage website [3]. To unpack, copy the archive to a directory and enter tar -xvjf partimage-0.6.5. tar.bz2 at the command line. Before you start the build, check first to see whether you have fulfilled all the dependencies listed in Table 1.
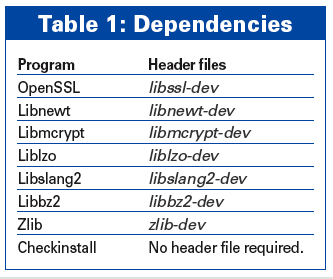
Note that you need the header files (-dev) for the libraries. If you are installing Partimage on OpenSUSE 10.2, you should read the box titled "OpenSUSE 10.2 and Partimage" before continuing.
For security reasons, only the partimag user account is permitted to create backups on the target machine. You will need to create a partimag user on both the source and target systems.
The setup routine will prompt for the account name at the make install step and use the name to create standard directories.
Before you can run make install, you need to configure the source code. To do so, change to the directory created when you unpacked the archive and enter ./configure --prefix=/usr to store the data in the /usr directory.
Assuming the configuration works correctly, you can then type make to build the binary, before entering sudo make install to install.
The typical approach is to keep pressing the Enter key throughout the installation dialog. You need to do this on both machines. You can then launch Partimage on both PCs - either as the server or as the client.
In our lab, I found out that Checkinstall simplified the installation procedure on Ubuntu: Checkinstall automatically builds a package from the source code and then goes on to install the package. Just enter sudo checkinstall instead of sudo make install.
Again, setup will ask you for the name of the Partimage user. Make sure you close any package management tools you have running.
| OpenSUSE 10.2 and Partimage |
|
Although I was able to build the source code on OpenSUSE 10.2, I was unable to access files on the SUSE Partimage server from a Ubuntu machine. The server wouldn't let me log on and kept complaining about an incorrect password. I was unable to pin down the bug, despite intensive searching, so I used an older version of Partimage (version 0.6.4) as a workaround. |
It is a good idea to create SSL certificates and store them in /usr/etc/partimaged to guarantee secure transfer of your data to the remote computer.
The server uses the certificates to prove its identity to the client. To set this up, change directory to /usr/etc/partimaged, become root, and enter make certificates. The software creates certificates with appropriate privileges below /usr/etc/partimaged. Typing ls -la shows you what has happened.
It makes sense to launch the server on the target machine before trying to log in with the client. Working as root, create a new user. The client logs in with the privileges assigned to this account; in this example, the username is kris.
To make sure the server will grant kris access, you need to add kris to your /usr/etc/partimaged/partimagedusers file. To edit the file, enter sudo su to use the console with root privileges, then launch your preferred editor and add an entry for the name.
If multiple users will be creating backups on the server, you can add entries for their user accounts - one name per line. Partimage needs a user with the same name on the target system on which the server is running.
Server side, you still need to create the directories in which you will store your backups. Make sure you have enough free space on the disk to avoid unpleasant surprises. You should also modify the permissions to prevent access to the directory by unauthorized users.
Finally, type sudo partimaged to launch the daemon - note the d at the end of the name. A blue background appears, showing you the free slots for external access. When a client logs on to the server, the client's IP address and the backup path are both shown.
On the client, enter sudo partimage to launch the client software. On Ubuntu, I originally saw the message /dev/dm inode not found, but pressing Enter a couple of times got rid of this message. In our lab, the message had no effect on operations. If the message bothers you, you can use the following command to create the matching device file:
mknod -m 644 /dev/dm b 240 0
To run the command automatically when you boot your machine, add the command to your /etc/rc.local file.
After launching the client, you should see a fairly self-explanatory input dialog box (Figure 1). To start, specify the partition to back up. As mentioned earlier, you need to make sure that the partition is not mounted. To see which partitions are currently mounted, type mount at the command line. In the line below this, you need the path to the backup directory, so enter a name of your choice and add GZ as the suffix.
To select an action, use the radio button. To back up a partition, select Save partition into a new image file. The next step is to specify where the server is located and whether you will be using a secure SSL-encrypted connection. Enter the IP address for the machine with the listening daemon. Clients will use port 4025 to log on to the server by default. If you have a firewall running on the client or server, make sure you modify the rules to accommodate this.
To protect the data stream against sniffing, check Use SSL to encrypt network data then press F5 to tell Partimage to go to the next screen, where you need to enter the user name and password. Make sure that:
Now click OK to tell the client to knock at the server's door. This is the exciting part of the process: if the login fails, you might have a problem with the privileges, paths, or the passwords. Recheck your entries.
Once you have everything set up correctly, a new dialog box should appear, and the program will ask you how to compress the data. If you take a look at the server display in the meantime, you should see the client IP address and a connected status message.
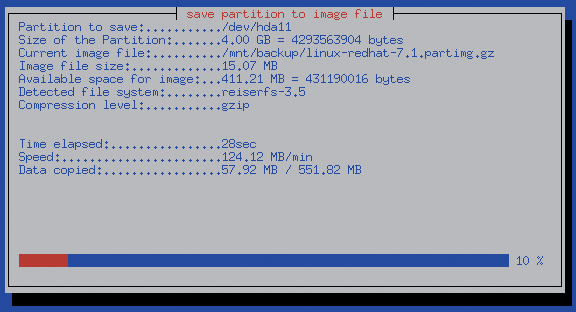
Returning to the client, you might recall that it was asking which Compression level you would like to use. Gzip is the default; Bzip2 creates small footprint images but takes a while to do so (Figure 3). Uncompressed images are fast, but they take up more disk space.
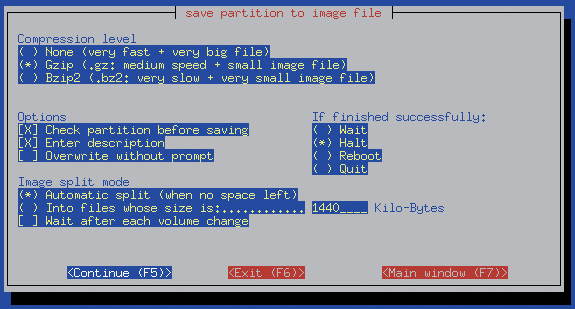
Options lets you specify whether Partimage should check the partitions before saving; you can enter a description or disable the prompt, which warns you when you are about to overwrite an existing version.
This just leaves one more thing: the Image split mode. Partimage will either automatically split the image file if it runs out of space or it will create files of a definable size.
If you check Wait after each volume change, Partimage will take a break when the sub-image reaches a certain size, which is a useful feature if you are backing up to DVDs or CDs.
The If finished successfully option tells the client what to do after completing a backup. For the time being, this is all there is to it, so press F5 to start creating the backup; this can take a while depending on the volume of data and available bandwidth.
Although I had no problem installing the current version of Partimage on OpenSUSE 10.2, Ubuntu was unable to access the server on OpenSUSE. Strangely, this worked with the older version 0.6.4 of Partimage.
Another advantage is that the archive contains just two binaries - partimage and partimaged - removing the need to build the software.
Unfortunately, this version does not support secure data transfer, although there is nothing to prevent you from using it for backups on the local network or on local disks.
After you unpack the archive, copy the partimaged file to the directory in which you will be storing your backups on the server. Then, you can become root and launch the server by entering ./partimaged start. The partimage file stays on the client.
To launch the client software, type ./partimage, again working as root, then enter the IP address of the remote machine; there is no need to log on or generate certificates.
Saving a partition on a remote server has a number of benefits. If the server is hosted by a commercial web hoster, you can rely on your data being backed up regularly, although a slow Internet connection would be a disadvantage because it would drastically slow down the restore.
In our lab, the program took about 10 hours to restore the data on a 10GB partition over the wire. Local backups on external disks take just a fraction of this time. The partition on which you restore the backup must be the same size as or bigger than the original partition with your data. If you restore a smaller partition to a larger target, the unused space is left empty.
To restore a partition, launch the client and the server, select Restore partition from an image file in the dialog you used previously for the backup, enter the address of the remote server, then press F5 to change to the next screen.
Optionally, you can tell the program to simulate the process or to overwrite free blocks with zeroes. The If finished successfully option tells the server what to do after executing the backup. Pressing F5 starts the write operation.
If you are short on time, you might prefer to back up your data to a local disk. For this, you only need the client, and you can do without passwords, new user accounts, and privilege management.
In our lab, I used an external USB disk as the backup device. The steps are basically the same, but you do not need to launch the server, just the client. In the Partition Image window, enter the path to the local directory in which you will be creating the image file.
Ubuntu automatically mounts the external drive in /media/usbdisk. In the Partimage window, create a directory below this path, then enter the path plus a name for the backup.
Just ignore anything related to accessing machines over the network and press F5 to move to the next screen, where you can select the compression level, which you should be familiar with from the network backup. The next step is the backup itself; there is no need to log on.
The steps for restoring a partition follow the same pattern: Launch Partimage, specify the image you want to write to the partition, and off you go.
Although restoring data across the network with an encrypted connection took 10 hours, backup and restore on the USB drive took just 20 minutes.
Partimage gives users a simple approach to backing up a partition, and it is useful for backing up a complete Linux installation. If you value security and intend to use a remote server, you'll need to go to additional trouble to add SSL, which will slow down the backup process.
A local backup is faster, but it involves some residual risk, and it might not be what you are looking for. Whichever approach you choose, Partimage's simple controls will take you quickly where you want to go. Partimage is perfect for private use and small networks, but regular backups should be left to other tools.
| INFO |
|
[1] Partimage: http://www.partimage.org
[2] SystemRescueCd: http://www.sysresccd.org [3] Download Partimage: http://www.partimage.org/Download |