
By Marcel Hilzinger
WiFi-Radar [1] searches for wireless networks and automatically connects. This helpful Python-based tool provides an easy alternative to the better known wireless network managers and even supports WEP and WPA encryption.
WiFi-Radar packages are available for Debian, Gentoo, SUSE, and Ubuntu. On Ubuntu and Debian, you can simply type apt-get install wifi-radar to install. For Gentoo [2] and SUSE [3], you need to download the packages.
Because WiFi-Radar is written in Python, you need not build the program; assuming you have a Python installation and the python-gtk package on your machine, just unpack the tarball, become root, and enter make install. The WiFi-Radar tool launches when you enter sudo wifi-radar in a terminal window.
The first time you launch the program, WiFi-Radar will create the /etc/wifi-radar.conf configuration file. Modifying the interface = auto_detect entry helps the tool launch more quickly. For an Intel WLAN chip, you need to modify the entry as follows:
interface = eth1
Some WLAN cards have to be enabled manually. To do so, first switch on the card by giving the ifconfig <device> up command. Then enter iwlist <device> scan to search for networks.
WLAN devices with Ralink and Zydas chipsets belong to this category. If you happen to have one, you need to change the ifup_required = False entry in the configuration file to
ifup_required = True
This tells WiFi-Radar to automatically enable the interface at boot time. The latest version of WiFi-Radar has a graphical configuration dialog for these settings. To open the dialog box, click on Preferences in the main window and make the required changes.
Just as with any other WLAN tool, the main WiFi-Radar dialog gives you a list of available networks (Figure 1). A padlock to the left of the ESSID indicates that the network is encrypted.
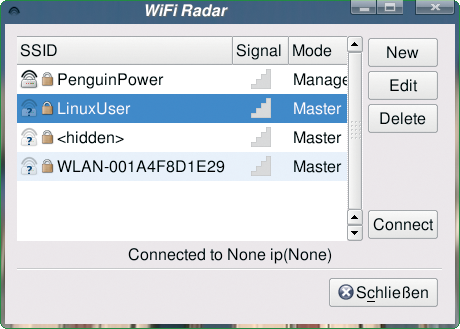
The tool displays a question mark to the left of the padlock for WLAN networks without a configuration file. The question mark disappears once you have set up a profile.
To connect to a WLAN network, just select the required network in the list and click on the Connect button. Depending on whether or not your WiFi-Radar implementation has a profile, the program will either connect or display a confirmation dialog. Clicking on Yes pops up the WiFi-Radar profile manager (Figure 2).
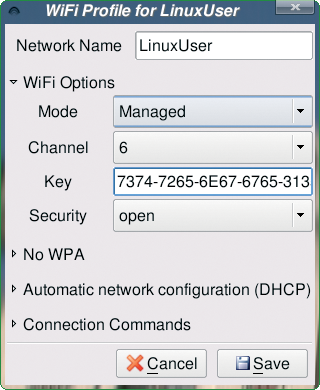
For an unencrypted WLAN network with a DHCP server, you can just click Save to save the profile and then click on Connect in the main WiFi-Radar window to connect. If you need to access a WEP-protected WLAN, click WiFi Options and enter the WEP Key.
In our lab, WiFi-Radar needed hexadecimal notation for the WEP key. Depending on your WLAN adapter and access point, you might need to modify the entries for Mode, Channel, and Security. After setting the correct values, just click Save and Connect.
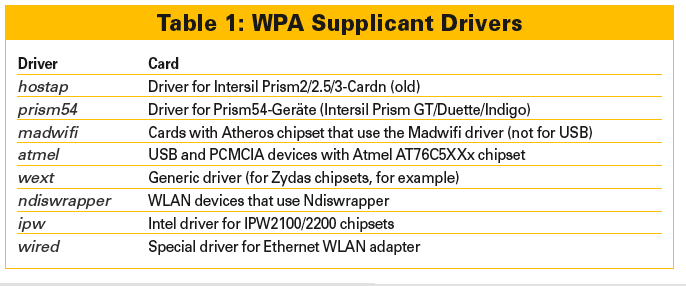
To use a secure WPA connection, click the arrow to the left of the slightly misleading No WPA button. This pops up a dialog and changes the label to Use WPA. Now you can enter the WPA supplicant driver. For details on the right driver for your adapter, see Table 1.
The remaining steps in the WPA setup are manual, and you start by creating a configuration file as /etc/wpa_supplicant/wpa_supplicant.conf. A couple of examples in the README WPA-Mini-HOWTO.txt file comes with the WiFi-Radar source code.
If WiFi-Radar discovers a network for which a profile already exists, it will automatically connect to this network. To add WiFi-Radar to your boot process, use the command line wifi-radar -d.
Despite repeated attempts, and a lot of research on the Internet, I was unable to set up a secure WPA TKIP connection using WiFi-Radar and a WPA Supplicant. In fact, my attempts even failed with an IPW2100 chipset, which the developers officially classify as tested.
Because I was able to set up the connection manually using iwconfig and wpa_supplicant, this is very likely a WiFi-Radar bug.
The developers also fail to provide a satisfactory solution for WEP support. The documentation does not refer to the fact that the entry in WiFi Options | Key has to be in hexadecimal notation.
Additionally, the tool failed to display the signal strength for any of the adapters we tested, although this is theoretically possible.
And it might be a good idea for the main dialog to indicate what kind of encryption the network uses. Thus, WiFi-Radar fails as a replacement for the popular Gnome NetworkManager tool.
On the up side, the WiFi-Radar tool scores with a number of features that comparable programs lack. For example, the Connection Commands | Before and Connection Commands | After options give users the ability to integrate scripts to access mail or to set up an SSH tunnel. Furthermore, WiFi-Radar is one of the few tools that supports static connections without an access point or DHCP server. In our lab, this worked fine on a machine with an IPW2100 chip (Intel) and a second PC with a USB stick and a Ralink driver.
| INFO |
|
[1] WiFi-Radar project homepage: http://wifi-radar.systemimager.org
[2] Gentoo packages: http://packages.gentoo.org/search/?sstring=wifi-radar [3] WiFi-Radar for SUSE: http://linux01.gwdg.de/~pbleser/rpm-navigation.php?cat=Network/wifi-radar |