
By Karl Deutsch
Linux users often rely on screenshots to document the state of their desktops. Most distros include some kind of GUI-based screenshot tool, such as Ksnapshot, Gimp, or Gnome-Screenshot, but some users prefer to generate quick shots from the console. An alternative screenshot utility called Scrot [1] runs from the command line. Scrot offers some features the GUI-based programs don't provide, such as automatic thumbnail generation and the ability to compress images.
Scrot is not included with many Linux distros, so you might have to install it manually. On OpenSUSE 10.2, for instance, make sure the imlib2 and imlib2-loaders libraries are installed on your system. Then go on to download the scrot-0.8-1.i386.rpm and giblib-1.2. 4-0.pm.0.586.rpm packages from the LinuxBrit [2] and Packman [3] sites, respectively.
To install the packages, change to the download directory, become root, and enter rpm -Uhv *.rpm.
If you use SUSE Linux 10.1, you will need to add Packman as an additional package repository. In YaST, select Software | Change installation source, click Add to add a new FTP source, type packman.iu-bremen.de in the Server name line and suse/10.1 in the line below, and then click on Finish. YaST will now read the external package list. Then, relying on YaST to handle the dependencies, you can proceed to install Scrot in the normal way.
Users with Ubuntu "Edgy Eft" have an easier task - after enabling the Universe package repository, you can use Synaptic to install Scrot. Select Settings | Repositories and, at the top of the Ubuntu 6.10 tab, check Community maintained Open Source Software (universe).
The easiest way to launch Scrot is to type scrot at the command line. This command creates a snapshot of the whole workspace and drops it into your current working directory. The PNG filename comprises the date and time, the screen resolution, and a suffix of _scrot.png. To use your own filename, just pass the name to Scrot when you launch the program: scrot <filename>.png, or scrot /path/to/<filename>.png.
You might need to grab a single window or a screen area from time to time. To do so, specify the -s option in front of the filename. After pressing Enter, click the window that you want to grab.
Because Scrot will normally just grab the window without any decorations, you will need to set the -b flag to tell Scrot to grab the border:
scrot -s -b window.png
If you need a screenshot of a screen area, again specify the -s option, hold down the left mouse button while launching the program, and drag a square frame on the desktop. When the frame reaches the required size, release the left mouse button. You should hear a beep to let you know that the screenshot has been stored.
In some cases, it can take a while to arrange the window, or you might need to wait for an interesting screen to appear. The autotimer feature can help you with this. For example, the command
scrot -d 5 -c workspace.png
uses the -d parameter to specify a 5-second delay. The -c switch additionally displays a countdown to let you know when Scrot will press the button (Figure 1).

Scrot generates fairly large files: a screenshot at a resolution of 1280 by 1024 pixels will weigh in at about 1MB. To save storage space, you might like to change the image quality and compression with the -q switch.
The range is between 0 and 100, with a default of 75. A higher value creates a file with a low compression level; smaller values give you small-footprint files with a higher compression level. Because Scrot stores images in PNG format, which uses loss-free compression, you should use a value of less than 30 for storing larger image archives.
The -m option is designed for power users with multiple screens. The -m tells Scrot to create a snapshot of each screen. The tool automatically composes a single image from all the individual snapshots.
If you intend to publish your screenshots in a web-based gallery, you will definitely need thumbnails. To create a thumbnail, just pass in the -t option and a number to Scrot.
The number specifies the relative size of the thumbnail to the original image as a percentage. If you enter, say, 50, the thumbnail will be half the size of the original. The thumbnail file is automatically labeled with a -thumb suffix.
To automatically pass an image you have grabbed to another application, you can set the -e option, followed by the command line or application name. To view a screenshot after grabbing, a combination with Display might be a good idea:
scrot filename.png -e 'display filename.png'.
The Display tool is included with most distributions, but if not, just install the Imagemagick package.
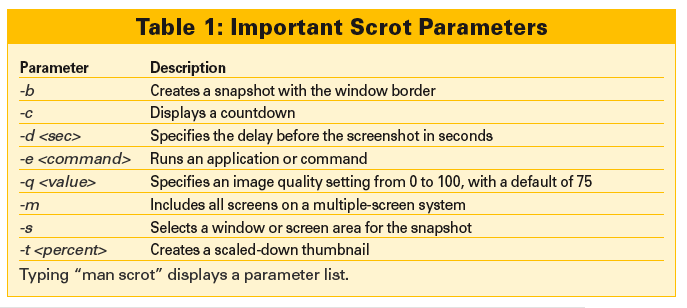
The Scrot command-line screenshot tool is useful if you need more flexibility than GUI-based tools can offer. Table 1 provides an overview of some important Scrot parameter options.
Because the Scrot tool does not rely on user interaction, it is also suitable for scripting. To create delayed serial snapshots or to label your snapshots immediately after grabbing them, you might also want to investigate another module from the Imagemagick package - the Import tool.
| INFO |
|
[1] Scrot homepage: linuxbrit.co.uk
[2] Download Scrot RPM for SUSE 10.2: http://linuxbrit.co.uk/downloads/scrot-0.8-1.i386.rpm [3] Download the Giblib package for SUSE 10.2: http://packman.links2linux.org/download/giblib/44943/giblib-1.2.4-0.pm.0.i586.rpm |
| THE AUTHOR |
|
Karl Deutsch is the author of the book Linux für Windows-Administratoren (German). He is an IT consultant and the proprietor of IT-Works.co.at. Karl has used various Linux distributions for his daily work since 1997. |