
By Æleen Frisch
Over the course of my career as a system administrator, I've written scripts in a variety of languages and environments (beginning with DCL under VMS). Once I began taking care of UNIX-based systems, I gravitated first toward the C shell and then to Perl, which I used for many years. More recently, however, I have begun using Python. Although the choice of a scripting language is inevitably a personal one, and effective scripts can be written in any language, Python nonetheless offers many advantages to system administrators. For me, the most important advantages are:
In this article, I'll introduce you to Python by showing you a variety of actual code snippets and short scripts, copiously annotated and commented upon, allowing you to learn about the language in context.
Here is the canonical first Python program, which is exceedingly simple:
#!/usr/bin/python
print 'Hello, world!'
After the initial shell designation, the program's single statement prints the specified character string to standard output. In Python, simple things are often simple, as is the case with the print statement.
Python also has an interactive mode, which you can reach by issuing the python command:
$ python
>> print 'Hello, world!'
Hello, world!
With just a little experimentation, you can learn quite a lot about Python variables and data types, as shown in Listing 1. Listing 2 is a simple script that illustrates several other important Python features. It queries a POP server for the status of a specified user's mailbox.
| Listing 1: Working in Python |
01 >> 3/5 02 0 # Result of operation on # integers is also an integer 03 >> 3.0/6 # Force floating point # operation 04 0.5 05 >> a='lion'; b='ess'; c=3 # Define 3 variables 06 >> a+b # String concatenation 07 'lioness' 08 >> c+4 # Addition 09 7 10 >> a+c # Illegal operation # (message shortened) ... 11 TypeError: cannot concatenate 'str' and 'int' objects 12 >> a+str(c) # ... but, Python provides # conversion functions 13 'lion3' 14 >> ^D |
| Listing 2: Getting the Mailbox Status |
01 #!/usr/bin/python
02 import poplib,sys        # Enable Python modules
03
04 who=sys.argv[1]  # Store the first script  # argument
05 pw="xxxxxxxx"
06 mailsrv="mail.ahania.com"
07
08 m=poplib.POP3_SSL(mailsrv)
    # Open secure connection to    # POP3 server
09 m.user(who)      # Authenticate
10 m.pass_(pw)
11 print "There are %d messages waiting for %s." % (m.stat()[0],who)
12 m.quit
|
The script in Listing 2 has several notable points. First, the import statement indicates Python modules that will be used in the script (modules provide additional capabilities over the built-in Python constructs). Here I am using the module related to the POP3 protocol and the system module required for script argument access. The latter are stored in a list (array) named sys.argv[]. Individual elements are selected with the familiar square bracket notation. Numbering begins at zero; sys.argv[0] holds the first element from the command line, namely, the script name.
In this script, the variable who is used to store the first argument, which is the user account whose mailbox should be queried. The script also defines two variables holding literal strings.
The final section of the script is where the actual work gets done. First, it opens a connection to the specified mail server system via the POP3_SSL() function in the poplib module (note the naming convention: poplib.POP3_SSL()). The connection's handle (identifying data structure) is stored in the variable m.
The remainder of the script takes advantage of various methods (functions) that are defined for POP3 connections in the poplib module. The user() and pass_() methods transmit authentication data to the server, the stat() method retrieves the number of messages present in that user's mailbox (as well is the amount of space they consume), and the quit method closes the connection.
The syntax for the method calls uses the standard object-oriented format, in which the method name is appended to the object to which it applies, separated by a period, followed by parenthesized arguments - for example, m.user(who).
The stat() method returns a two-valued tuple containing data about the mailbox: (#messages, #bytes). The script selects just the first element for printing with the [0] suffix. The print statement is a bit more complicated here; it includes a format string and a parenthesized list of items to print (another tuple), separated by a percent sign. Here, %d and %s specify an integer and a string value, respectively. Later, you'll see more examples of format codes.
Even this simple script shows how powerful Python can be, given that querying a network server takes only a few simple statements. Many Python modules are available, including modules for all major network servers and services.
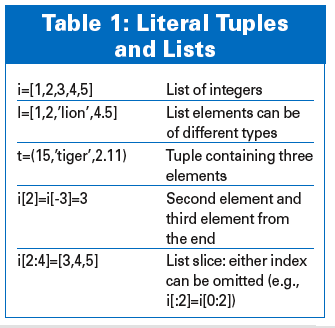
Tuples and lists are two examples of collections: variables that hold multiple values. They are also known as sequence objects because their elements are ordered.
Table 1 shows some examples of literal tuples and lists. The final example illustrates slicing a list; you can also slice tuples and character strings.
The next example explores Python statements related to looping and conditional execution. The script in Listing 3, which converts temperatures between different temperature scales, also illustrates script argument parsing and some string manipulation methods.
Listing 3 introduces several important control structures: try/except, if/else, and for ... in. The try/except construct attempts the statement specified by try and executes those following except statements should the try statement fail. Note that each keyword is followed by a colon and that the statement blocks following them are indicated by indentation. In general, Python relies on indentation to identify structural blocks (rather than, say, curly braces as in C). These two features are shared by the two if/else constructs later in the script.
The for loop is similar to those found in other scripting and programming languages. It has the general form for var(s) in list:, and the specified variables are assigned successive elements from the list at the beginning of each loop iteration. In Listing 3, the list was stored in the variable olist, which contained a list of tuples. Two variables were specified in the for loop, and they were assigned to the first and second elements of each tuple in succession.
The getopt() function is used to parse the command-line arguments. It takes the argument list and a string indicating valid argument letters (and other information). Here, it is passed all of the script arguments except the final one (which was previously stored in the variable temp), and the valid arguments are defined as -c, -k, -f and their uppercase counterparts. The function checks specified arguments for validity in the presence of required values, generating errors as appropriate. Once the getopt() parsing is complete, the script goes on to process the arguments as appropriate.
In this case, the script performs a string comparison for equality. Python supports several comparison operators: == (equality), != (inequality), and < and > (less than and greater than, respectively, either of which may be followed by =). Complex logical conditions can be constructed with parentheses and the keywords and, or, and not.
| Listing 3: Converting Temperatures |
01 #!/usr/bin/python 02 import sys #If you import modules as the next 03 from getopt import * #line, methods can be invoked 04 #without the preceding module name 05 is_c=0 06 print_k=0 07 temp=sys.argv[-1] #Find script argument holds temperature 08 try: #Attempt an operation, but... 09 t=float(temp) 10 except: #...catch any errors and exit 11 print "%s is not a temperature." % temp 12 sys.exit(1) 13 14 # parse script arguments #getopt returns a list of (-x, val) #tuples in olist 15 olist,alist = getopt(sys.argv[1:-1],"cCfFkK") 16 for opt,a in olist: #Loop: variables are assigned elements #of each tuple in olist 17 if opt.lower()=='-c': #Covert option to lowercase and compare 18 is_c=1 19 if opt.lower()=='-k': 20 print_k=1 21 22 t=eval(temp) #Covert string to number and do the math 23 if is_c==0: # Fahrenheit to Celsius 24 ftemp=t 25 ctemp=(t-32.0)*.55 26 else: # Celsius to Fahrenheit 27 ctemp=t 28 ftemp=(t*1.8)+32.0 29 ktemp=ctemp+273.0 30 31 if print_k: #Print Kelvin only if requested 32 print "%.1f Fahrenheit is %.1f Celsius is %.1f K." % (ftemp,ctemp,ktemp) 34 else: 35 print "%.1f Fahrenheit is %.1f Celsius." % (ftemp,ctemp) |
Listing 3 introduced the lower() method for strings. The corresponding upper() method for conversion to uppercase and a title() method for title-style capitalization also exist. Listing 4, which downloads a file from a website and processes its contents, introduces string searching and substring extraction. The first part of the file initiates an HTTP connection to a site on the Internet and retrieves a file containing currency exchange rate data, ultimately storing its contents into the variable rates.
| Listing 4: Downloading and Processing |
01 #!/usr/bin/python
02 import httplib           # Module for HTTP operations
03 url = "/en/markets/csv/exchange_eng.csv"
04 c = httplib.HTTPConnection("www.bankofcanada.ca")
05 c.request("GET", url)
06 r = c.getresponse()
07 rates = r.read()
08 c.close()
09
10 intl = rates.index(sys.argv[1])
11 us = rates.index("U.S. Dollar")
12 intlline = rates[intl:rates.index("\r\n", intl)]
13 intlrate = intlline.split(",")[-1]
14 usline = rates[us:rates.index("\r\n", us)]
15 usd = usline.split(",")[-1]
16 rate= float(intlrate)/float(usd)
17 if rate >= .25:
18     print "%4.2f US Dollars = 1       %s" % (rate,sys.argv[1])
19 else:
20     print "1 US Dollar = %6.2f    %s" % (1.0/rate,sys.    argv[1])
|
The second part of the script extracts the most recent rate for the US dollar and the foreign currency specified as the script's first argument. For each currency, the data in rates is searched for a specified character string according to the index() method, which returns the character location of the first occurrence. A slice is used to extract the relevant line from rates, beginning at the location returned by index() and continuing through the location of the first subsequent carriage return-linefeed. The latter illustrates the use of the optional second argument to the index() method, which indicates the location within the string at which to begin searching (the default is the beginning, character 0).
Here is an example of the data that would be extracted for a specific currency (in this case, yen):
intlline=Yen,0.0086864,
0.008691,0.008730,0.008731,
0.008465,0.008513
intlline.split(",")[-1]=0.008513
The split() method divides a string into a list of elements delimited in the original string by a specified separator character. Here, I use split() with a comma separator character to divide the extracted string, and I use the [-1] suffix to retrieve the final element within the desired line (the most recent exchange rate). The script concludes by computing the exchange rate between the specified foreign currency and the US dollar (on the basis of Canadian data available on the Internet) and printing the result. The final conditional statement ensures that the printed information is in the most easily understood form. The format codes in these print statements include those for floating-point numbers (f), along with output field width values of four and six characters (respectively), with two places to the right of the decimal point for both.
Other useful string methods of which you should be aware are replace(), which replaces of substring with new content, find(), a more powerful substring location method, and strip() and its variants lstrip() and rstrip(), which remove leading and trailing white space.
So far, I have considered a couple of types of network operations, as well as string manipulation and arithmetic commutations. In this next script, I turn to the filesystem.
Python provides an easy mechanism for traversing a directory tree to potentially operate on some or all of the files found within it - the walk() method within the os module.
The example in Listing 5 is a favorite for illustrating the walk() method within the os module because it can be accomplished quite easily: by changing file extensions. Listing 5 also illustrates the Python standard practice of implementing functionality as methods to aid in code reuse. Note that all that is required syntactically is the initial def keyword, the colon following the calling sequence, and the indented block of statements composing the method code.
| Listing 5: Changing Extensions |
01 #!/usr/bin/python
02 import os
03
04 def mass_mv(dir, old, new):     # Define a method   # (subroutine) with three   # arguments
05   if old[0] == ".":                 # Remove initial period     # from old and new     # extensions if present
06     old = old[1:]
07   l=len(old)                        # Save length of the old    #  extension
08   if new[0] == '.': new =   new[1:]
09 #     # os.walk       # returns list of:      # (path, dirnames,       # filenames)
10   for path, ignore, files in  os.walk(dir):
11     for f in files:                 # Loop over files in each      # subdirectory
12       if f.split(".")[-1] ==       old:
13         new_f = f[0:-l]+new
14         os.rename(path+"/"+f,         path+"/"+new_f)
15  return    # End of method mass_mv
16
17 if __name__=='__main__':         # True when script file is   # executed directly
18     import sys
19     if len(sys.argv) < 4:
20         print "Too few args:         start-dir old-ext         new-ext"
21         sys.exit(1)
22     mass_mv(sys.argv[1], sys.    argv[2], sys.argv[3])
|
After removing any initial periods from the specified old and new extensions, the method calls os.walk(). The latter returns a list of three element tuples, each containing a subdirectory and file name lists for each directory it encounters. Two for loops iterate over each successively lower directory and the files within it. The split() method is used to divide the file name at period boundaries, and the [-1] index again retrieves the final component, the file extension (try similar commands in interactive mode to see how they work). If it matches the target extension, then a new file name (new_f) and path are constructed and passed to the os.rename() method.
The code in the final section of the script is included as a convenience so that the file containing the method can also be executed directly, as well as being callable by other Python scripts; the code tests the current method name to indicate whether it is the main routine. If so, the code checks that a sufficient number of arguments have been passed (but a production-worthy script would perform more sanity checks) before invoking the method.
Logfile searching in processing is another task that admins frequently perform and for which Python is well suited. Such operations often take advantage of Python dictionaries: arrays indexed by (typically) textual keys rather than integers/integer position. The structures are called associative arrays in other languages. Here's an example of a literal dictionary and two assignments involving dictionary elements:
temps={"boil":212, "freeze":32,
"scald":120, "cold":10}
temps["hot"]=110
t=temps.get("tepid",66)
# Return requested value or
specified default if undefined
The second statement adds an element to the dictionary for the key hot (value 110). The final statement retrieves the value for the key tepid, if such an element exists; otherwise, it returns the value 66.
The script in Listing 6 produces a report of error types and counts in the /var/log/messages logfile. The file defines a general function that opens and reads a logfile, splits each line into fields at spaces and other white space, and compares a specified field (index which) to the string stored in match, looking for relevant lines. When a relevant line is found, the data in the field designated in collect becomes a dictionary key; the corresponding value is the count of occurrences for that key within the file. The dictionary get() method's default value feature is used to initialize a count for new keys to 1.
| Listing 6: Report of error types |
01 #!/usr/bin/python
02
03 def count_em(logfile_pathname,which,match,collect):
04   counts = {  }                     # Initialize dictionary
05   lf = open(logfile_pathname,  "r")
06   contents =  lf.readlines()       # Place entire file into     # contents
07   for line in contents:
08     fields = line.split()           # Split on any whitespace
09     if fields[which] ==     match :
10       what=fields[collect]
11       counts[what] = counts.      get(what, 0) + 1
12   return counts
13
14 if __name__=='__main__':
15   sudo_users = count_em("/var/  log/messages",4,"sudo:",5)
16   format = "%-8s  %-5s"             # Define print format     # string for multiple use
17   print "sudo Command Usage by  User"
18   print format %   ("User","Times")
19   users = sudo_users.keys()        # Extract dictionary keys     # into a list...
20   users.sort()                      # ...sort the list of     # users...
21   for u in users:                 # ...and print data in     # sorted order
22     print format % (u, sudo_    users[u])
|
The second portion of the script calls the generic function I've created, looking for messages from the sudo facility within /var/log/messages and recording the user name present in each entry. This code also illustrates the use of a variable for the format string within a print statement. The format codes within it include what appears to be a negative field width value; in fact, the minus sign indicates that the output should be left-justified within the field. Here is some sample command output:
sudo Command Usage by User
User     Times
aefrisch 5
chavez   191
root     100
Creating programs and tools with a graphical interface is also easy and rapid with Python. Several different graphical modules are available. The most used is probably Tkinter. Listing 7 is a simple script that illustrates some of Tkinter's most basic features.
| Listing 7: Python GUI with Tkinter |
01 #!/usr/bin/python
02 from Tkinter import *
03
04 window = Tk()             # Create root window
05 window.title("Hi.")       # Set window title text
06 w = Label(window,text="Hello, world!")
07 w.pack()                       # Finalize and construct the  # label
08 q = Button(window,text="Quit",fg="red",command=window.quit)
09 q.pack()                          # Finalize and construct the  # button
10
11 window.mainloop()                # Event loop: wait for user   # input
|
Listing 7 imports the required module, again using the syntax that allows you to omit the module name prefixes from method invocations. Next, it creates the root window, in which all other graphical entities will reside, and sets its title text. Then it adds a text label and a button to the window. Each item must call its pack() method before it actually appears. The script ends by entering the main event loop, waiting for user input to which it will respond.
The button creation statement specifies the window in which the button will reside, the text that will appear on it, the color of that text, and a command that will be executed when the button is pushed. The latter is known as a callback, and it is typically a function call to a built-in routine or any method provided by the programmer (the former in this case). Figure 1 shows what the resulting window looks like (its appearance will vary somewhat depending on the window manager).

Pressing the Quit button invokes the window's quit method, which terminates the event loop and destroys the window.
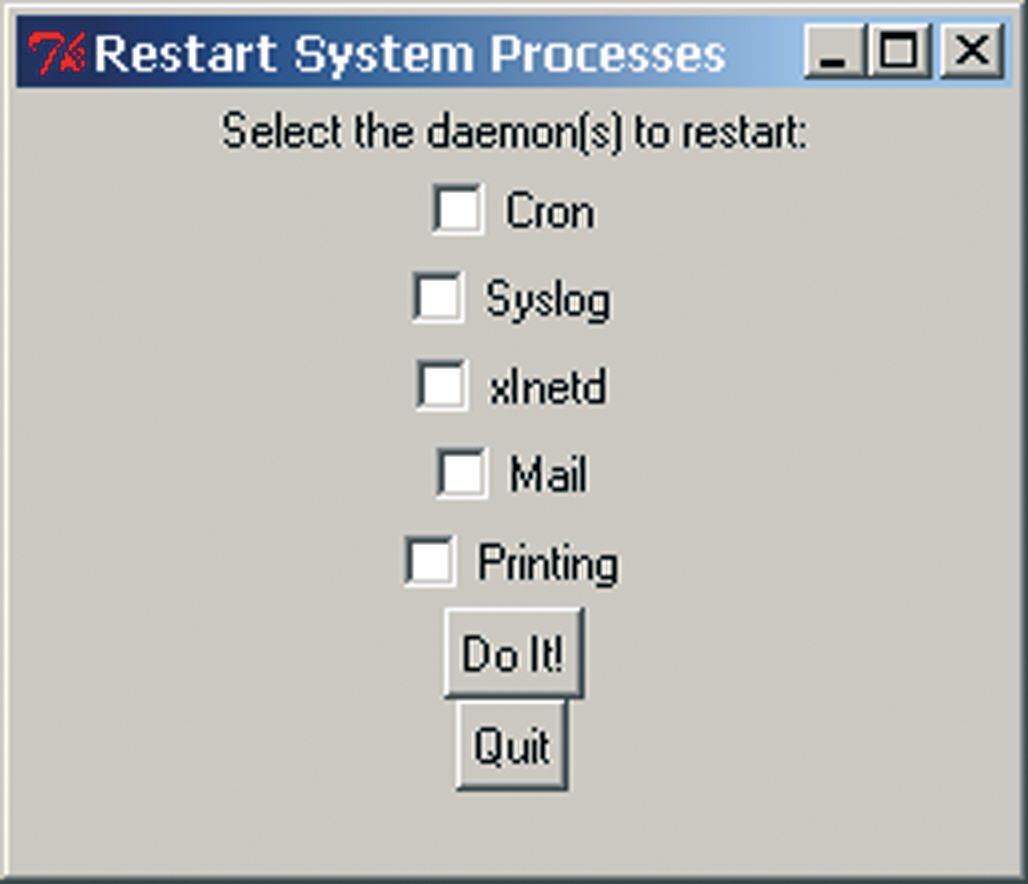
I will now examine a more complex GUI utility for signaling system daemons, designed to restart or reinitialize running servers on demand. It generates checkboxes for various daemons dynamically according to the entries in its configuration file. Some sample entries are as follows:
Label:Type:Name-or-Command
Cron:i:cron
Syslog:h:syslogd
xInetd:h:xinetd
Mail:s:/etc/init.d/ postfix reload
Printing:i:cups
The fields hold the text for the checkbox, the signaling method type, and the daemon name (or complete command).
The script in Listing 8 begins with import statements, followed by a method definition, which I'll examine later. It then creates the main window, sets its title, and adds some text:
Each line of the configuration file is split into the three-component field at the colon delimiters. All three are stored in successive elements of the dconfig list by the list append() method; the last character of the third field is dropped (the newline character). An integer variable is appended to the states list and initialized for use with Tkinter controls. Finally, a checkbutton is created for each entry with the configuration file label (the first field) as the button text.
| Listing 8: Adding Options to the GUI |
01 #!/usr/bin/python
02 from Tkinter import *
03 import os
04
05 def do_it(s,d):  # Code listed and described   # below
06
07 w=Tk()    # Create main (root) window
08 w.title('Restart System Processes')
09 txt=Label(w,text='Select the daemon(s) to restart:')
10 txt.pack()
11
12 # The next portion of the # script is concerned with # processing the configuration# file and adding checkboxes # to window for the various# entries:
13
14 states=[]         # Initialize lists and   # variable i
15 dconfig=[]
16 i=0
17 dfile=open('/usr/local/sbin/daemons.conf','r')
18 devils=dfile.readlines()         # Get daemon list from   # config file...
19 for d in devils:            # ...store data...
20   (dlabel,dtype,dcmd)=d.  split(":")
21         dconfig.append(dlabel)
22         dconfig.append(dtype)
23         dconfig.        append(dcmd[0:-1])
24   states.append(IntVar())          # ...and create button
25   c=Checkbutton(w,text=dlabel,  variable=states[i],width=6)
26   c.pack()
27   i+=1
28
29 q=Button(w,text='Do It!',command=lambda:do_it(states,dconfig))
30 q.pack()
31 q=Button(w,text='Quit',command=w.quit)
32 q.pack()
33
34 w.mainloop()
|
The resulting checkbox is controlled by a variable - the corresponding element of states - by which its value can be set, queried, or both. This section of the script ends by creating two buttons: one to signal the selected daemons, and one to exit the utility and start the event loop. The command argument to the first button deserves special attention for its use of the lambda function, which causes the specified method to be passed to the control rather than being executed immediately (try creating a control with a callback with and without this construct to understand its function). Figure 2 shows an example of how the resulting window looks.
Listing 9 is the callback function (which would actually appear at the beginning of the script file). It examines the status array. For elements that are equal to 1 - corresponding to elements whose boxes are checked - it generates the appropriate command on the basis of the second type field: type i commands are started with the restart keyword to a script in /etc/init.d whose name is in the configuration file's third field; type h acommands are sent a HUP signal via the killall command with the name in the third field as its argument, and any other type uses the third field as the entire command to execute.
The constructed command is executed by the os.popen() module, which executes an external shell command. The final act of the method is to reset the checkbox for each item. Note that this script does not do enough error checking for a production script, but it does illustrate many useful Python features.
| Listing 9: Callback Function |
01 def do_it(s,d): # Callback function # for button 02 for i in range(len(s)): # Examine status list: ... 03 if s[i].get() == 1: # if box is checked,... 04 start=i*3 05 name=d[start] # unpack corresponding # fields from the # list... 06 type=d[start+1] 07 cmd=d[start+2] 08 if type=="i": # set up appropriate # command... 09 the_cmd="/etc/init. d/"+cmd+" restart" 10 elif type=="h": 11 the_cmd="killall -HUP "+cmd 12 else: 13 the_cmd=cmd 14 os.popen(the_cmd) # run it... 15 s[i].set(0) # ...and reset # checkbox |
I've only explored some basic Python features here, but you should be well prepared to learn more about Python on your own. Two of Python's most useful features that I have not examined is classes and extensions written in other programming languages. Python makes both object-oriented programming and interfacing to methods and programs in languages like C, C++, and Fortran straightforward. See the Info box for more information.
| INFO |
|
[1] Syntax summary for this article: http://www.aeleen.com/python_summary.htm
[2] Official Python website: http://www.python.org [3] Python Cookbook (examples): http://aspn.activestate.com/ASPN/Cookbook/Python [4] "Instant Python" by Magnus L. Hetland: http://www.hetland.org/python/instant-python.php [5] "Python Short Course" by Richard P. Muller: http://www.wag.caltech.edu/home/rpm/python_course |