
By Tim Schürmann
The former computer vendor Jah Shaka (not to be confused with the musician of the same name) was looking for a free - but powerful - video-editing program, particularly for third-world countries, where people cannot afford to invest several thousand dollars in real-time video-editing systems. At the time, Jah Shaka was working for a UNESCO project in Jamaica, which had similar goals but finally failed, thus prompting his decision to take up the reins. Shaka considered various high-end video-editing systems as role models before finally developing the free video-editing and effects program with professional features. He gave his own name to the results - Jahshaka [1].
The original version of the program was mainly restricted to effects and animations, but late in 2006, after more than five years of development, the long-expected version 2.0 appeared. The developers rightly advertise this product as being the first free, all-around tool in the field of video editing. The feature list sounds more like an excerpt from a catalog for an expensive real-time editing system. Thanks to the OpenGL interface, Jahshaka calculates effects in real time, offers compositing functions along with a painting tool especially for video (the aptly named Videopaint), fast animation tools for moviemakers, and, of course, video editing.
Jahshaka is intended for semi-professional moviemakers. This article shows how the editing software makes light work of editing the budding amateur director's latest holiday clips.
| Jahplayer |
|
As a bonus, Jahshaka includes Jahplayer, a player for media of any kind. Just like its bigger sibling, Jahplayer relies on the acceleration functions of modern 3D graphics adapters, which give the media player the ability to play some really exotic file formats. Binary packages of Jahplayer are available from SourceForge [2]. If you decide to build Jahshaka from the sources, you can ./configure jahplayer; make; make install. |
Before you launch the program, you have to take on two major hurdles. The first hurdle occurs at the installation phase; if you can't find ready-to-run binary packages for your distribution, you have no alternative but to download the source code archive. Be warned: you are in for a bumpy ride and your mileage may vary. For details, go to the "Installing from the Source Code" box. Users with Fedora Core will find a binary package on SourceForge [2]. To install the package, pop up a terminal window and enter sh jahshaka-2.0FC5.run. Users with SUSE 10.1 and newer can download an archive [3] with RPMs from the Jahshaka website. Debian and Ubuntu users will find an installation script in the Downloads area of the Jahshaka website. To download and install the required packages, launch the script by entering sh jahshaka-dapper-x86.sh install.
No matter which distribution you use, you need to fulfill a few dependencies for the software: the libraries Boost, Libdv, Libquicktime, Freetype2, and Glut (typically Freeglut). All major distributions should include these packages by default. Also, you need to ensure that 3D acceleration is enabled for your graphics card. The quickest way to do this is to call glxgears in a terminal window. The tool should show a frame rate of more than 200 frames per second.
The next obstacle occurs immediately after launching the program. Because Jahshaka has an enormous feature scope, it could take a while to familiarize yourself with its functions. As the main window (Figure 1) shows, the developers modeled the program interface on competing products, including the Discreet family, which is well known for its quirky controls.
Although Jahshaka can handle video files in many formats, it can't currently import movies directly from a video camera. You will need to rely on another program to export your raw material from the camera and store your first takes in a file. Kino, a tool that many distributions include, is a good choice.
If you split the movie up into scenes at the import phase, it will make editing all the more simple. Just press a button later to drop any material you do not need into a black hole and use drag and drop to move others to different locations in the finished movie.
| Installing from the Source Code |
|
If you do not have Jahshaka binary packages for your distribution, you will need to build the editing program from the source code package, which involves some preparation. First, install the following packages, including the corresponding developer packages, which you can typically identify by their -devel or -dev name components:
It seems that Jahshaka has something against the latest Qt4 libraries. If you have a newer distribution, you might need to temporarily uninstall the packages. Not all Linux distributions give you the ability to do so, and in this case, your only option is to manipulate the environmental variables - mainly $PATH and $QTDIR - manually to leave the Qt3 directories visible. Next, install the OpenAL system, which includes both the libraries and the developer packages. OpenSUSE 10.2 does not include this by default, but you can download it from the openSUSE repositories [4]. For more details on OpenAL, check out the project website [5]. Then, download Glew [6] and unpack into a directory, become root, and enter ./configure; make; make install. Make sure the developer packages for Gtk2 and SDL are installed, then download the MLT multimedia system [7], which you can also install with ./configure; make; make install. Another member of the MLT family, MLT++ [7, 8], is available from the same website. After building this program manually and installing it on your system, you are still missing OpenLibraries [9]. Again, enter ./configure; make; make install at the command line to install this software. If everything works out as planned, you can now turn to Jahshaka. Simply unpack the source code archive and then follow the usual three steps to install, as with the other programs. |
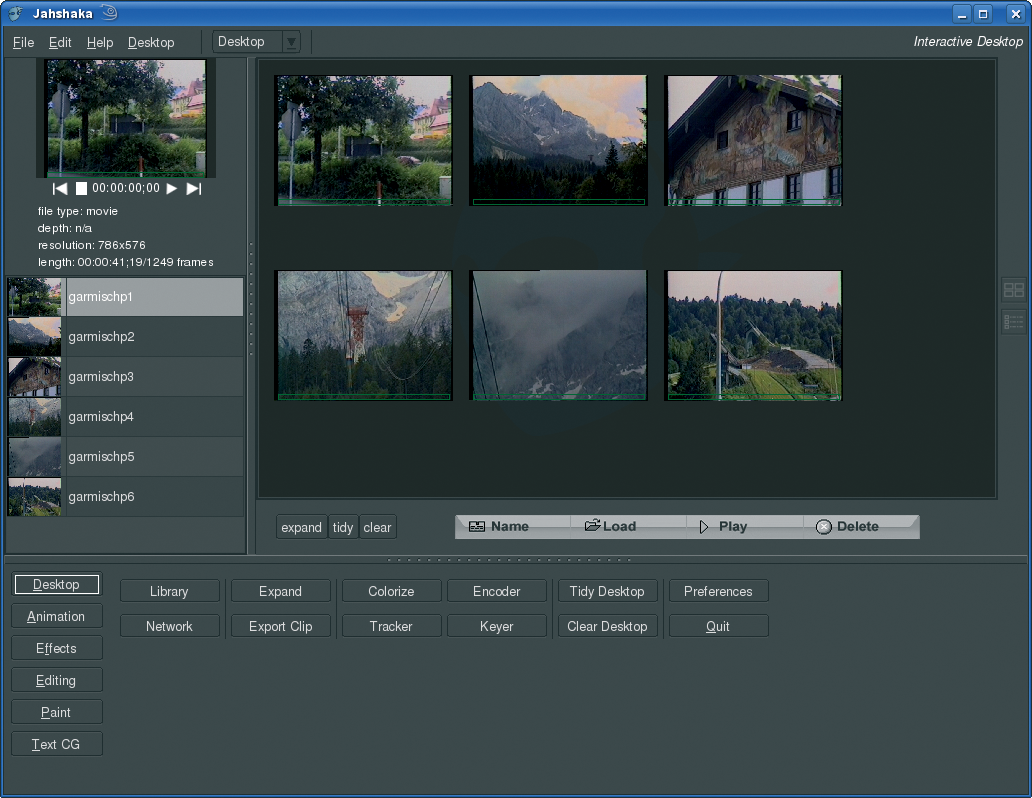
The first thing that Jahshaka shows you is the desktop, which is a kind of light table on which you can view your movie scenes. Before you start editing, you need to arrange your raw material on the ight table by either clicking Load or right-clicking and selecting the Load item from the drop-down menu.
The selected movie clip immediately appears on the desktop. If you repeat these steps with the second scene from your movie, Jahshaka drops it right on top of the existing clip. To tidy up, just drag the two candidates to another location on the desktop and drop them there.
Following this approach, you can easily organize your material thematically for a better overview. Clicking on Tidy tidies up the desktop by aligning the individual scenes in a grid. Clicking the Expand button tells the program to display the individual frames in a scene.
To view the selected video, you can click the Play button or press the tiny green icon below the selected scene. The icons use the intuitive pictograms found on any video recorder.
Each scene you load is additionally listed on the left of the screen. The list also contains details such as the resolution or run time.
The preview at the top of the list again lets you play the selected scene. If the list is missing, just take a look at the left border of the screen and drag the narrow checkered bar to the right.
Let's take a look at the bottom of the screen now, where Jahshaka displays the full set of commands that you can use at the current time. Right after launching the program, you have about a dozen options. For example, Tidy Desktop will clean up the desktop, Clear Desktop removes your samples from the desktop, and Quit needs no explanation.
The buttons on the left (Desktop through Text CG) are for fast access to individual modules. Jahshaka comprises several components, every one of which has a specific task. The buttons on the lower left of the main window let you toggle between these components at any time. For example, Text CG takes you to a titling function, whereas Animation launches the animation module. Clicking the Editing button takes you to a dialog box like that shown in Figure 2.
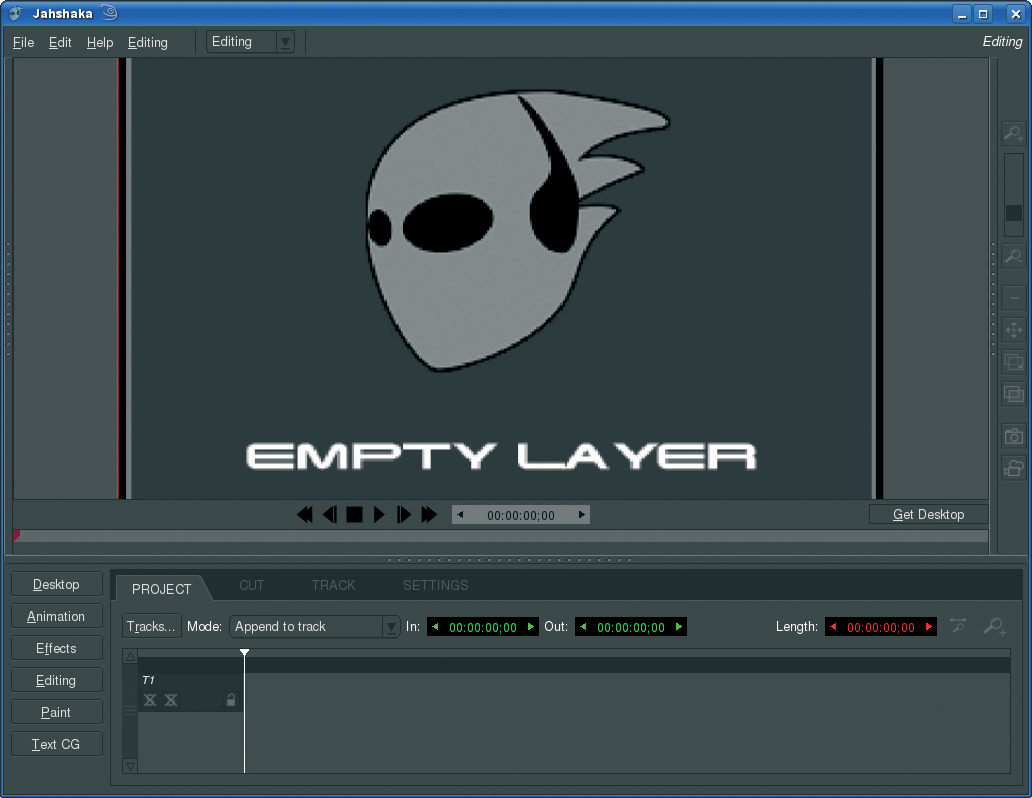
If you have used other video-editing programs, a few things here should be familiar, such as the timeline at the bottom of the dialog box. The timeline helps keep the scenes in your movie in chronological order. The four tabs above the timeline are Project, Cut, Track, and Settings. To check the basic settings, click Settings. If you use the normal DV format, the defaults in Figure 3 are just what you need.
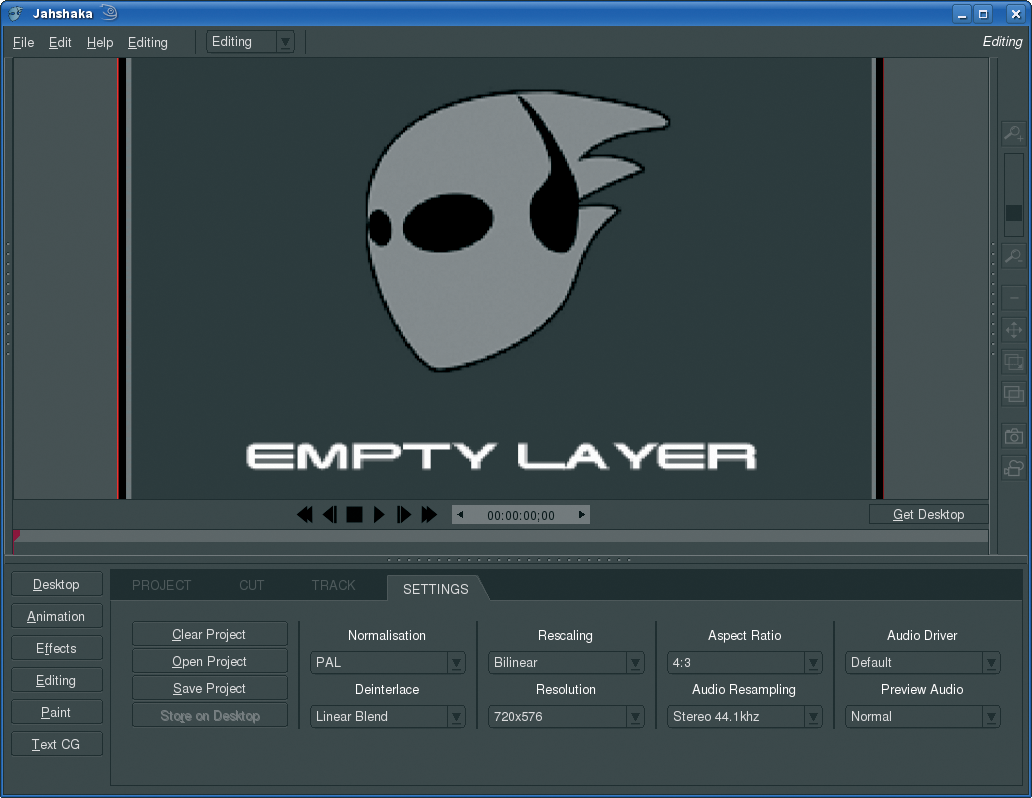
European countries use the PAL standard (Normalisation). The Resolution for DV material is exactly 720 by 576 pixels, with an Aspect Ratio of 4:3. Digital cameras for PAL use interlacing, in which the device splits an image into two fields - one field containing the even lines, and the other field containing the odd lines of the scan. Although this approach is perfect for legacy CRT tubes, Jahshaka has to calculate a full image from the two fields. This can cause cam artifacts, especially on panning, in which the camera tends to move before capturing the second field in the interlaced scan. Deinterlace lets you select a deinterlacing method. Methods are listed by quality, and thus by the CPU load you can expect them to generate.
In Audio Resampling, you can set the audio frequency with which you recorded raw material. For the best setting, you might want to refer to your camera manual. The two audio settings on the right just apply to the preview: Audio Driver selects a driver for sound output while replaying your clips, and ALSA will be your best option in most cases.
If you overload your computer with effects, you might notice that the preview starts to hang. In this case, you can use Preview Audio to specify what to do with the sound. Jahshaka applies your changes immediately without the need to store them. This means you can go straight back to the Project tab.
If you look at the left border of the main window, you will see a small bar with several dots at its center. If you now drag out the bar with the mouse, you will see the list of video files that you saw on the desktop earlier. Now select a clip and drag it with the mouse to the preview area on the right of the list.
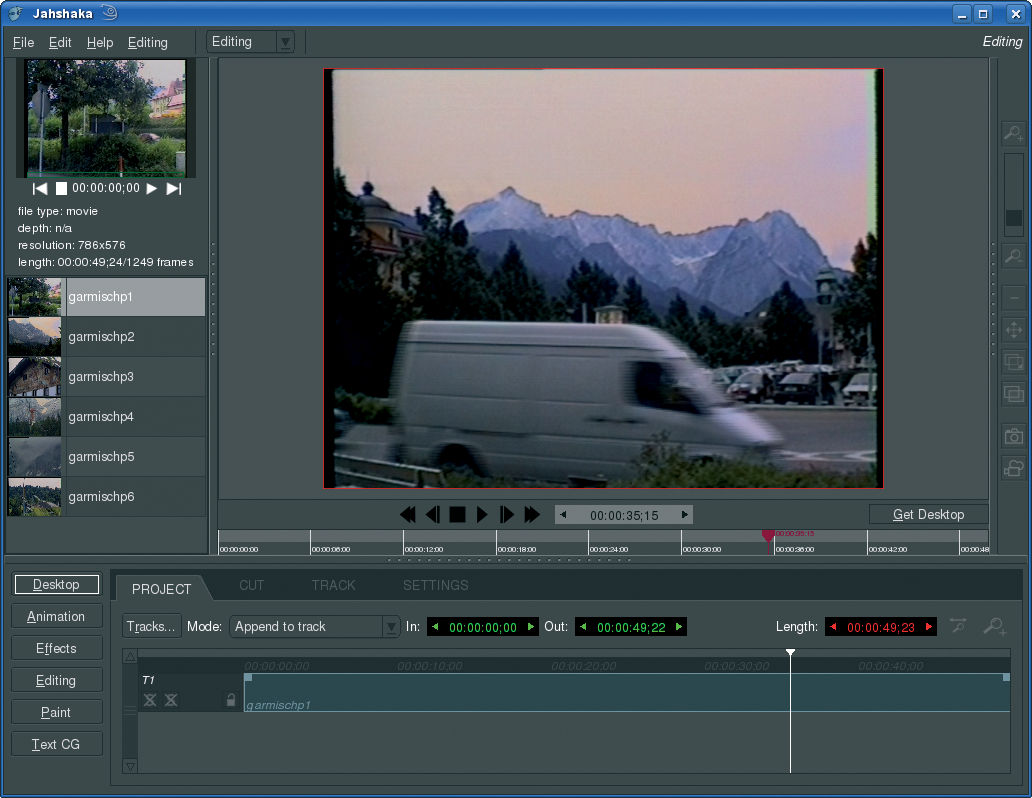
Note how the timeline changes at the bottom of the window (Figure 4). Jahshaka adds a bar to represents the video; the length of the bar reflects the length of the scene. The white pin tells you which frame of the movie is currently on display in the preview. You can use the mouse to drag and drop the pin to another position. Again, familiar video recorder-style controls are available below the preview image.
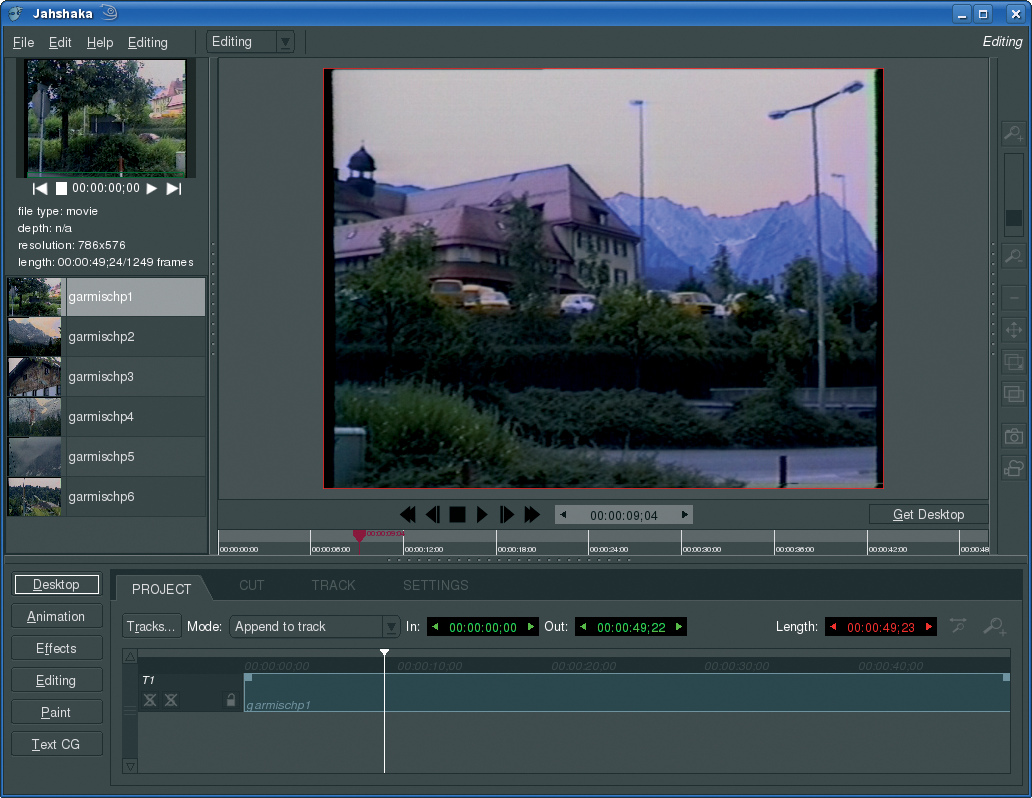
To change the size of the preview image, go to the tiny task bar on the right with a rectangular gray box in a light frame, click the box, and push it slowly up and down. The image should fill out the preview area and still be clearly visible.
Holiday movies are a typical situation in which amateur moviemakers tend to collect far too much raw material. The opening shots typically suffer from camera wobble, or you forget to press the stop button and carry on filming your own feet. Just a few clicks will help you remove these blemishes quickly from the beginning and end of the clip.
Let's start by removing the camera wobble. Position the white pin on the first frame after the scene you would like to remove, then press I. This moves the start of this scene, but not of the whole movie, to the current position.
Let's remove the feet at the end of the clip in the same way. This time we need to press O to mark the end of the clip. The green time specs next to In and Out tell you when the parts you cut start and end in the raw material. To move the borders later, you can use the green arrows to the left and right of these details, but this is not true if you actually cut something. You need this function to cut out a scene from the middle of a clip, or to split a clip into two parts.
In the sample video in Figure 5, a car drives through the image. To correct this scene by cutting, again move the white pin to the point where you would like to cut and press S. This splits the clip into two halves. Repeating these steps at the point where the car leaves the scene results in three clips. Select the one in the middle by clicking on it with the left mouse button, and then press the Del key. Jahshaka will automatically close the gap this creates (Figures 5 and 6).
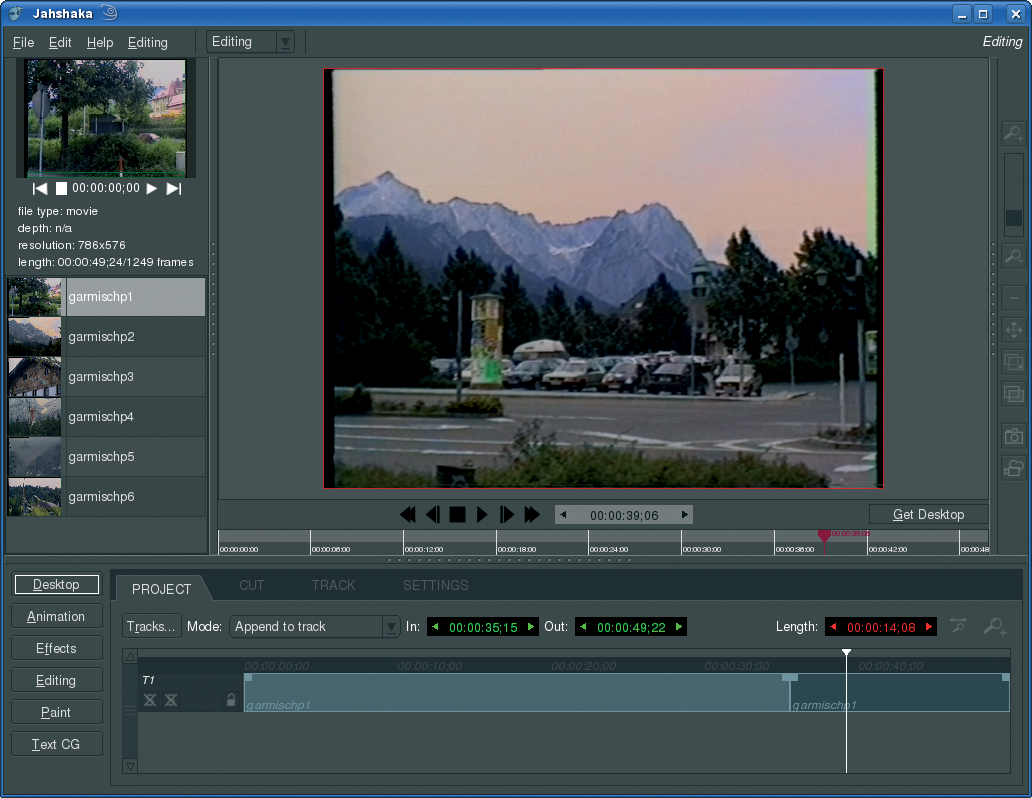
At the same time, the program modifies the size of the timeline to make sure that all the parts fit on screen. If you prefer to set the zoom factor yourself, just click the small magnifying glass symbol next to the red Length display.
Jahshaka lets you append movie snippets to your heart's content by selecting in the list on the left and dragging to the preview or timeline. The Mode setting is used to specify where to put the new material; Jahshaka will Append to Track by default.
For convenience, you can drag and drop clips to arrange them in the timeline. Jahshaka always applies editing steps to the currently selected clip, which is displayed in a slightly darker color than the inactive clips (see the "In Focus" box). If you make a mistake, you can always press Ctrl+Z to undo.
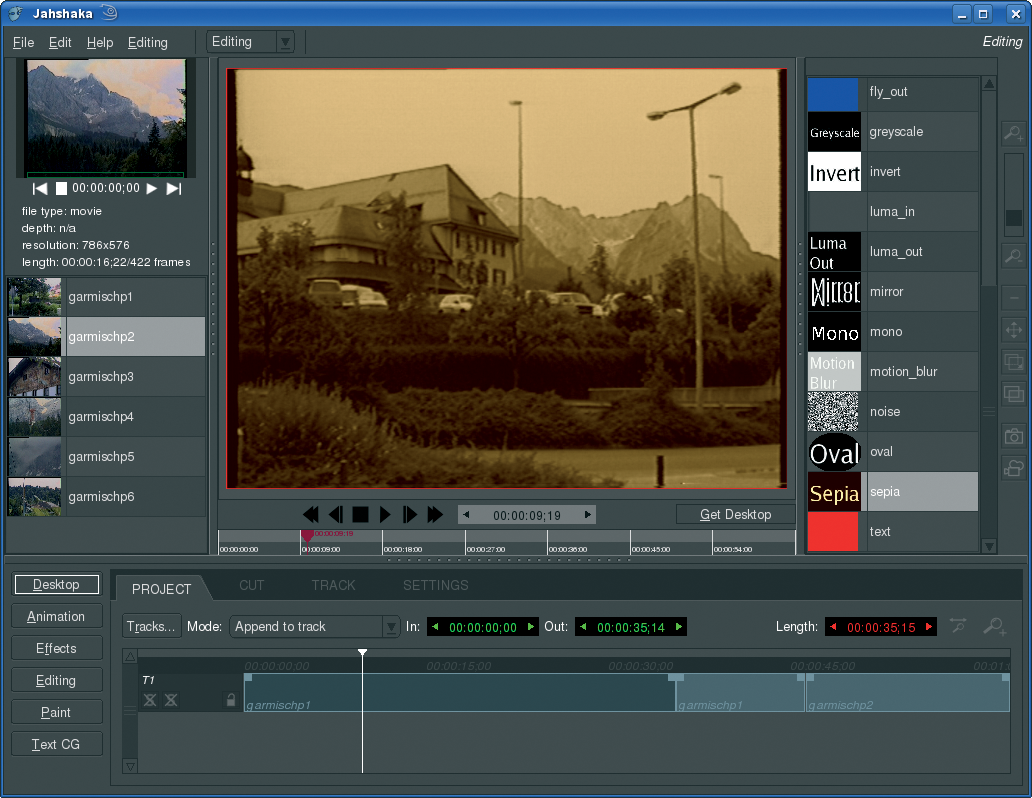
Jahshaka has a selection of effects for livening up parts of your video or the whole movie. The effects are located at the right edge of the screen in a bar that is originally hidden, but becomes visible in editing mode. In the small strip next to the preview, dragging the strip with the mouse expands and reveals the Effects Tray, a list of the effects available to you right now.
Select the element you want to apply the effect to in the timeline and drag the selected effect from the sidebar onto the video. For example, Figure 7 shows how I applied a sepia effect to a scene to add a nostalgic touch to my holiday movie.
Now go to the Cut tab. This view hides all your scenes except the one you selected, displaying additional information at the same time. For example, the timeline now lists the effects that you have applied to the current clip (Figure 8) - the sepia effect I mentioned earlier.
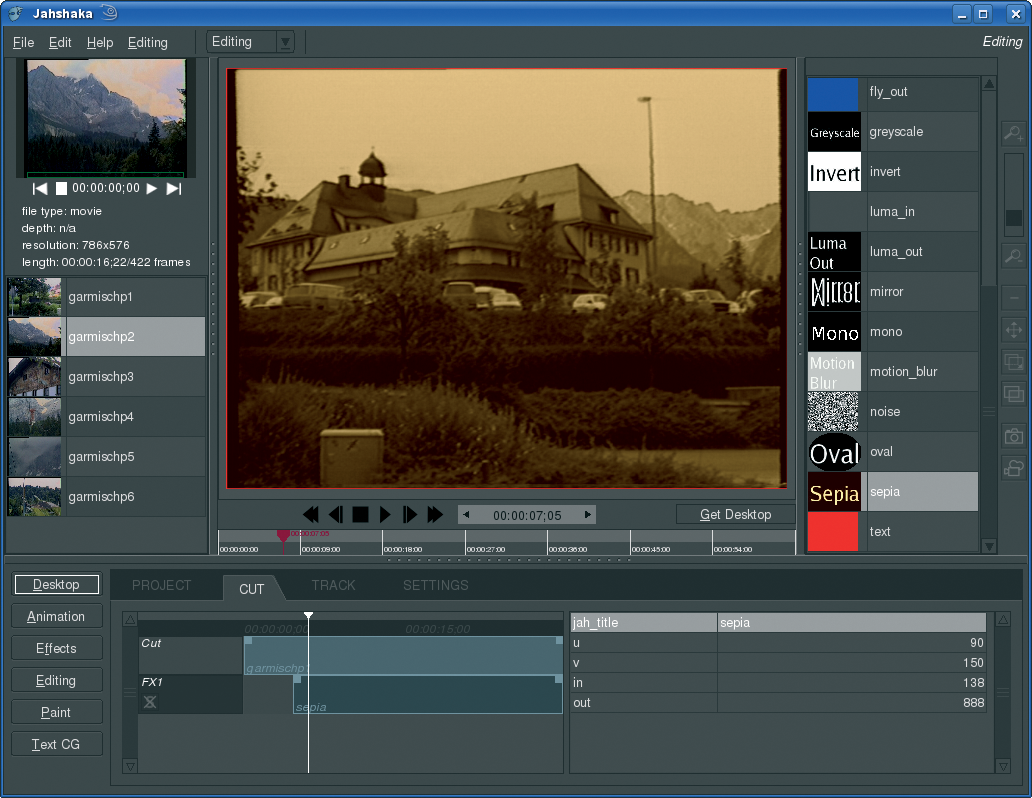
The table on the right of the timeline groups the details for the object selected in this view. For example, if you click the sepia effect in the timeline, Jahshaka will show you the effect name along with its start and end points.
To apply the effect slightly later, just use the pin to mark the starting position and cut the start of the effect by pressing I. As the example shows, Jahshaka treats effects just like videos. Some effects can actually replace the video, noise being just one example. However, in our lab, I repeatedly had issues with effects disappearing after editing the clips in question, although the effect objects still seemed to be assigned.
Thus far, my movie has relied on hard cuts. To enhance the artistic effect, I'll apply a couple of transitions to smooth out the jumps between scenes. Let's apply a fade-in effect to the vacation movie, which is just the right kind of effect if you change locations.
Start by going back to the Project tab and clicking Tracks... then Append... to add a video track. You can add as many clips as you like to this track. Each track is like a video projector that projects the existing material onto the preview screen. Note that the video in the subordinate track will always overlay the video in the track above it.
To apply the transition, select the second track by clicking on its name on the left side of the timeline. Then drag a new clip from the bar on the left onto the lower track. The two videos should overlap slightly, as shown in Figure 9.
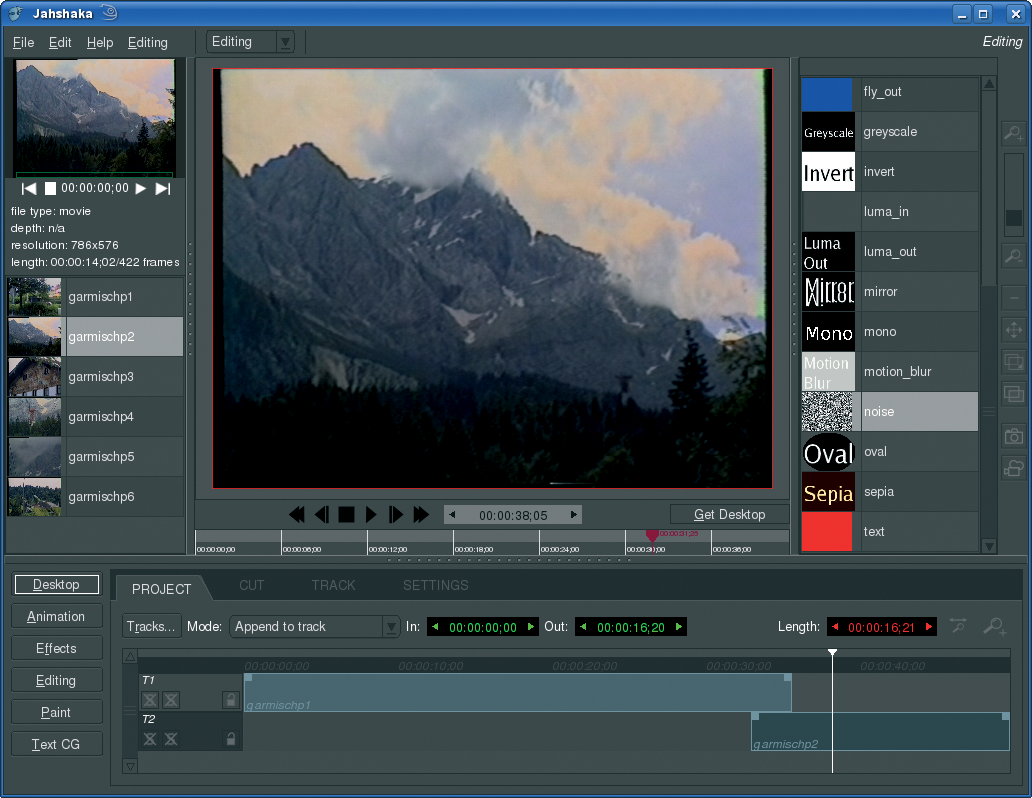
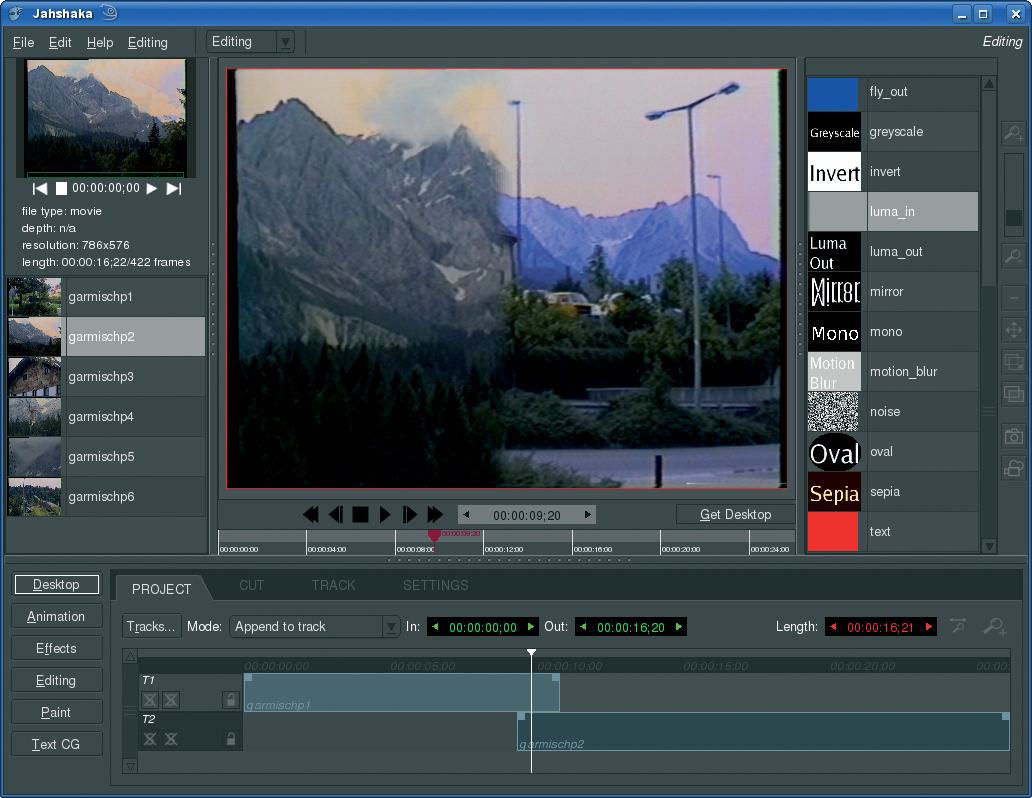
Assign the clip in the lower track, T2, an effect - Luma In in this example (Figure 10). You can then check the results in the preview. If you are unhappy with the results, change to the Cut tab and edit the transition just like any other effect. Jahshaka has a Luma Out effect that slowly fades a clip out to match the Luma In effect I just used.
To save your work, change to the Settings tab and click Save Project. All this does is to save the clip arrangement in the timeline. Incidentally, this happens automatically when you quit Jahshaka, and the current status quo is automatically loaded when you relaunch.
To tell Jahshaka to output the finished product, you need to click the camera icon in the bar on the right screen border, and select the required target format from the list. MPEG Layer 2 is perfect for a video DVD, whereas a video camera will be happier with Raw DV. The latter is also recommended for long-term archiving because it uses lower image data compression rates.
A supported video format might show two entries in the list. This means that two tools are available for the format in question. By clicking OK, you will be prompted to answer questions on the format. Once your computer starts calculating the output, you can relax.
| In Focus |
|
While working with Jahshaka, make sure you know exactly which element the focus is currently on before you perform an action. The program will only apply the action to these objects. This unusual behavior can cause unpleasant surprises from time to time. For example, if the second video track is enabled and you attempt to drag some new raw material out of the drawer and drop it onto the first track, it will actually end up in the second track. Selected elements are slightly darker than inactive ones. |
Jahshaka is powerful, but the lack of documentation, along with the quirky and overloaded interface, makes the initial steps difficult for newcomers. Fortunately, all the other modules, such as the Text CG titling tool, use controls similar to those used in the editing module I looked at in this article.
Tutorials on the Jahshaka site can help, although they might not reflect the latest stage of development. The software also crashed too often, for example, whenever I tried to cut a clip by pressing Ctrl+X. When working with the current version, keep this in mind and save your projects regularly.
| INFO |
|
[1] Jahshaka: http://www.jahshaka.org
[2] Jahshaka binary packages and source code: http://sourceforge.net/project/showfiles.php?group_id=24035 [3] Repository for openSUSE 10.1: http://repo.jahshaka.org/suse/10.1/RPMS/i586/ [4] OpenAL libraries for openSUSE 10.2: http://download.opensuse.org/distribution/10.2/repo/oss/suse/i586/ [5] OpenAL: http://www.openal.org [6] Glew: http://glew.sourceforge.net [7] MLT: http://mlt.sourceforge.net [8] MLT++: http://sourceforge.net/project/showfiles.php?group_id=96039 [9] OpenLibraries: http://www.openlibraries.org |