By Rüdiger Arp
KDE users have an easy option - K3b [1] gives them a powerful suite of burning tools that integrates perfectly with the desktop. Although GnomeBaker [2] is a functional Gtk alternative, GnomeBaker has never achieved the popularity of the KDE application. This has led to users installing K3b on many a Gnome machine and to K3b's undoubtedly justified reputation as the reference application among burning tools.
The launch of Brasero [3] marks a new competitor entering the market. Brasero version 0.5.2 lists an impressive feature set that helps facilitate burning on Gnome.
Besides basic functionality, Brasero gives users the ability to view video and audio files in the Totem [4] media player, which relies on the GStreamer framework [5], before burning. The developers have also integrated a Beagle-based search for files and folders.
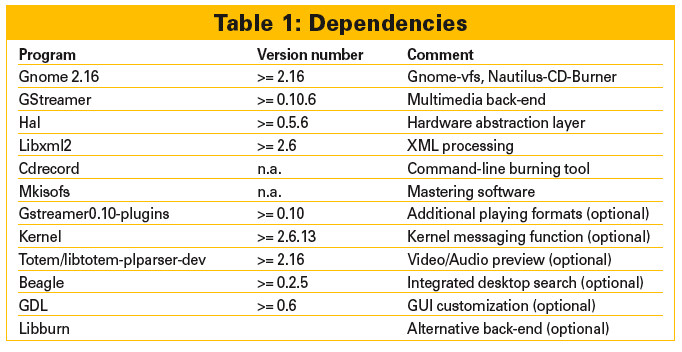
Use of the current 0.5.2 version typically requires some manual steps. Before you can build the program from the source code, you first need to set up the matching development files (see Table 1 for dependencies). The developer file or package names typically end in -dev or -devel. The package names can vary depending on your choice of distribution.
Users with the latest Ubuntu distribution, "Feisty Fawn," can install Brasero version 0.5.2 from the Universe repository by entering sudo apt-get install brasero. Unfortunately, the binary does not support Beagle; if you prefer not to do without Beagle, the compiler is your only option.
Brasero's multimedia support will depend on your GStreamer version. To discover which file formats GStreamer supports, type gst-inspect-0.10 in a terminal window. To search for a specific file format, such as MP3, you can restrict the command as follows:
gst-inspect-0.10 | grep mp3
After installing the current GStreamer version and satisfying the remaining dependencies, you can unpack the Brasero source code and change to the program directory in a terminal window. Now type ./configure to start the build; you should see a short overview of the enabled features when this completes.
Because the setup tool automatically detects and enables the installed dependencies, no other options need be specified. Now type make and then become root and type make install to complete a global installation, after which you can launch the program by typing brasero & in a terminal window or select Applications | Sound & Video | Brasero Disc Burning Application in the Gnome menu. The Brasero interface is attractive and tidy (Figure 1).
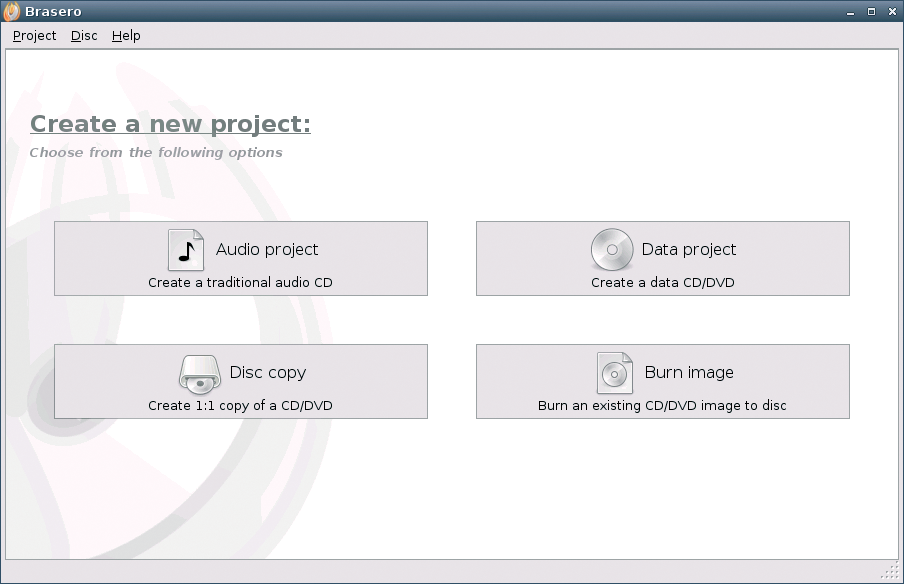
The program comes up with a simple menu containing just four options: Audio project, Data project, Disc copy, and Burn image. More details on these options follow.
Brasero uses a similar approach to creating data CDs and multimedia disks. The differences mainly have to do with converting audio formats and the audio/video preview features.
Most people have a collection of tracks in MP3 and Ogg Vorbis formats. If you would like to create an audio CD from this collection, you first need to convert the tracks to the audio CD format before burning. Brasero gives you the ability to do so with just a couple of mouse clicks.
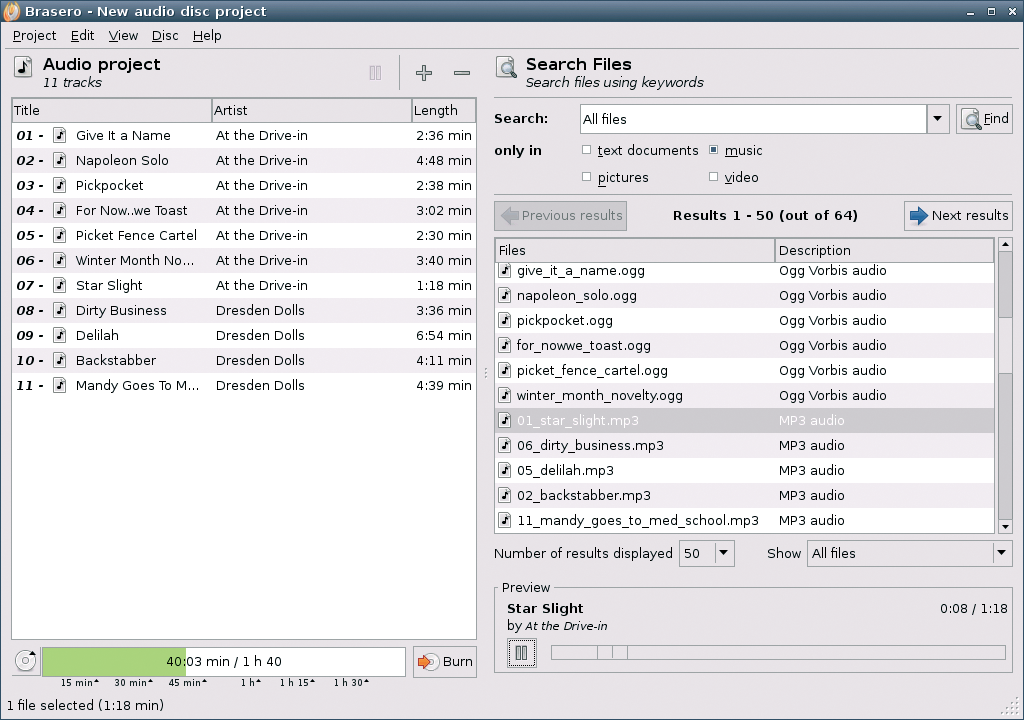
Start by clicking the Audio project button. Brasero will show you an interface with two sections: the project area with a list of files to process is on the left, and Brasero reserves the area on the right for the integrated file browser.
If you want to change this, you can opt to display just the project area without the file browser in the View menu (Nothing, F7 key) or the Playlists (F9) or Beagle Search dialog (F10). The F11 key toggles the audio/video Preview on and off. Because this makes life easier and doesn't take up much space, it is a good idea to enable it.
Pressing F8 takes you back to the File Browser. To burn your choice of tracks onto a CD, first navigate to the directory with the goodies in the file manager. You can select individual tracks just as in the Nautilus file manager on the Gnome desktop. Hold down the Ctrl key and click to select individual files, or press the Shift key and click to select contiguous blocks. If you are happy with your selection, drag the files into the left half of the window and drop them.
As an alternative, you can click Edit | Add files in the menu to add files. If you need to remove a file you inadvertently added to the project, just select the file in the project window, right-click, and select Delete in the drop-down menu. As an alternative, you can select Delete files in the Edit menu.
On our lab machine, drag and drop with the mouse wasn't entirely reliable. Instead of dropping the files in the project area, the program just selected another bunch of files. But you can always use the menu option if this happens to you, too.
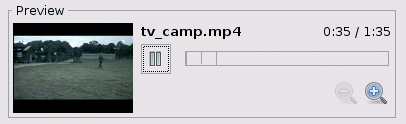
If you are not sure whether you want to add a certain track to an audio project, you can just listen to the track to help you decide (Figure 2).
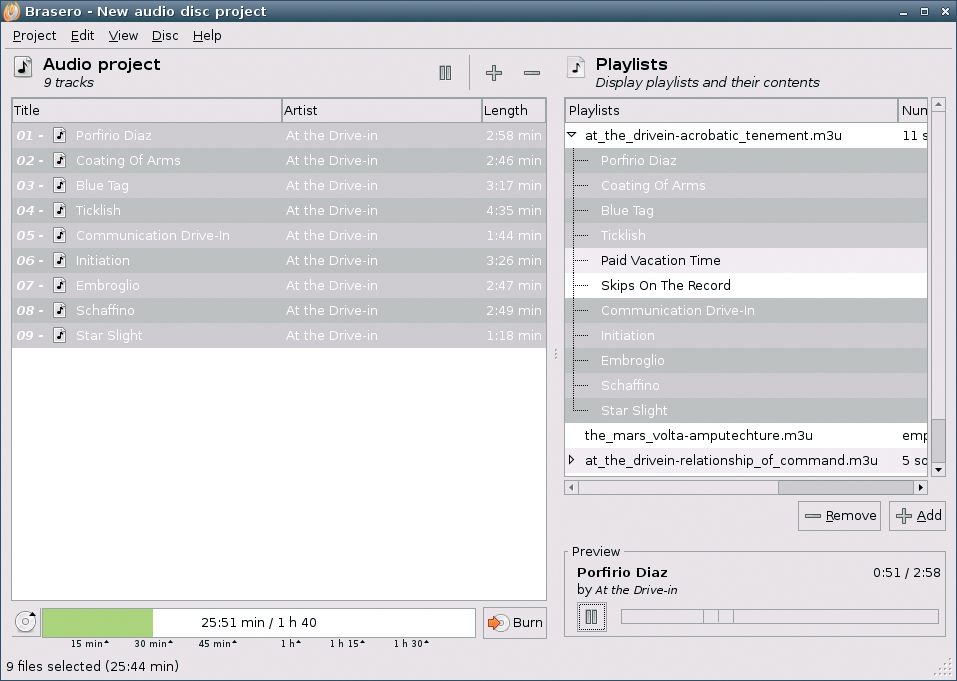
The function for adding whole playlists turned out to be useful - it can really save you time when compiling an audio CD (Figure 5).
After adding tracks, Brasero calculates how much playing time you have left and displays this value in a timebar on the bottom left. If the capacity of the medium in the display does not match the capacity of the physical medium, you can click the CD icon in the bottom left to change the details.
After compiling a CD, just click Burn to open the burning dialog. Title lets you then add an intuitive name for your compilation.
Properties lets you modify the burning speed, if needed, or enable the burn-proof function to ensure safe burning of all your data.
If you prefer to test the burning process before you go live, you can opt to do so in the same dialog box. Clicking Burn again starts to convert the selected tracks to audio CD format. The program then goes on to burn the audio tracks onto your disk.
After completing the burning process, Brasero ejects the medium. When you reinsert the medium, a CD icon with the title you entered previously should appear on the desktop. You can play the tracks on the new CD in your preferred audio player.
Brasero handles standard tasks such as copying CDs and DVDs in next to no time. Click Disc copy in the main menu to open a dialog box. If your system has more than one drive, you need to select which drive to use. The File Image option in Select a drive to write to gives you the ability to create an image file.
Click on Properties to enter the file names and locations and to specify an image type, if needed. The most common image file types on Linux are ISO images, which have an extension of .iso. Many Linux distributions are available for downloading as image files, for example.
You can burn an image by selecting the Burn image option in the main window. To do so, click Path, navigate to the image file, and launch the burn process by selecting Burn.
The Disc menu takes you to two more functions that help you verify the burning process (you can alternatively press Ctrl+F to do this). If you also have the MD5 checksum of an ISO file you burned, you can enable the checkbox in Settings and navigate to the MD5 file. This function helps you avoid unpleasant surprises if you download a Linux distribution in ISO format.
The Delete option helps you clean up rewritable media (CD/DVD-RW). Users with older versions of Brasero complained about bugs here that forced them to use alternative tools to delete media. Whereas version 0.5.1 issued an incorrect error message when deleting data from a rewritable medium, the current 0.5.2 version handles this perfectly (see Figure 3).

Fortunately, one really annoying bug in older versions has now been removed; to create multisession disks, you needed to use rewritable media with 0.5.1 or older. Now all you need to use is a normal CD-R.
Brasero does not have the same feature scope as the major-league tool K3b, which is to be expected at this early stage of development. The functions that Brasero has right now work well and reliably, apart from a minor bug in the drag and drop results. The integration of Totem and the resulting ability to burn audio titles from playlists and preview videos (Figure 4) left me with a positive impression of Brasero.
As evidenced by the interface, the developers have successfully focused on user friendliness, and newcomers should have no trouble getting started.
A word of criticism concerning the developers' news policy: We only found out by coincidence that the Brasero website was moving. The README file that accompanies the current source code fails to reflect the state of development. An inquiry concerning the installation of the alternative back-end, Libburn, remained unanswered when this issue went to press.
| INFO |
|
[1] K3b: http://www.k3b.org
[2] Gnomebaker: http://gnomebaker.sourceforge.net [3] Brasero: http://www.gnome.org/projects/brasero [4] Totem: http://www.gnome.org/projects/totem [5] GStreamer: http://www.sourceforge.net/projects/gstreamer |