
By Stefan Schwarzer
VoIP offers many benefits, not the least of which is economy. PC-based phone calls are typically free, apart from the Internet charges you would pay anyway.
VoIP also provides features that aren't available on most conventional phone lines. For instance, VoIP clients (also known as softphones) support video as well as voice, meaning that the person you call can actually see you. And VoIP is portable. If you register your current public IP address with your provider, your provider can forward your calls to wherever you are on the Internet.
Of course, VoIP has its disadvantages: for a good conversation over the Internet, you'll need a fast Internet connection. And if you want to receive incoming calls at any time, you will need to leave your computer switched on.VoIP might not be for everyone, but Internet telephony is growing increasingly popular as an alternative to conventional phone services. In this month's cover story, I explore VoIP in Linux.
The data packets in an Internet-based call need a defined target, just like data packets when you surf the web. As an alternative to managing the IP addresses of your contacts locally, today's service providers give you the ability to enter your details in a kind of virtual phone book.
To do so, you need to register with the registrar, also known as your VoIP provider, telling the provider the IP address that people can use to contact you. If your address changes because you move or because your DSL provider interrupts the connection every 24 hours and assigns a new IP address, there is no need to tell all your contacts your new address.
If you reside behind a NAT gateway, you might not even know the public IP address. In this case, you will need STUN (Simple Traversal of UDP through NATs [4]), which gives clients behind a NAT gateway the ability to discover their publicly visible IP address on the Internet. A request to a STUN server tells you your public Internet address, which you can then pass on to the registrar.
To make a call, subscribers need a unique ID, such as a SIP address. The SIP address acts as a kind of VoIP phone number, but it more closely resembles an email address:
sip:subscriber@domain.
Subscriber A can use a SIP address of sip:SubscriberB@ProviderB to reach a contact, Subscriber B. The section following the at-sign (@) tells A's client the registrar of B.
Once the two subscribers, A and B, have found each other, they can exchange voice and even image data directly, normally with RTP (the Real-time Transport Protocol). To disconnect the call, both subscribers again use SIP to contact the registrar.
VoIP configuration works best one step at a time; otherwise, tiny problems can quickly become impassable barricades. Table 1 shows a recommended configuration sequence.
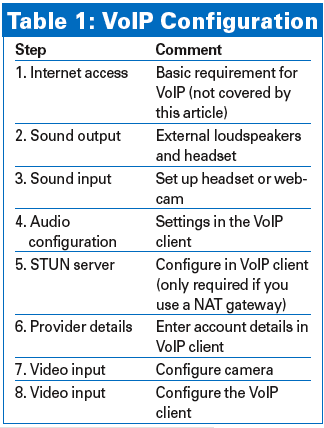
To give you a taste of VoIP configuration, in the rest of this article, I describe how to set up the Ekiga telephony client (formerly GnomeMeeting) for the free provider Ekiga.net [5]. To make it easier to apply this configuration to other clients, I will not use the Ekiga wizard but will, instead, just follow the steps in Table 1. To follow this procedure, you will need to cancel the dialog when you first launch Ekiga. (Of course, if you will only be using Ekiga and do not care about configuring other softphone clients, you could just continue with the druid.)
The machine in our lab runs a recent version of Gentoo Linux; the device files might have slightly different names on other distributions. After completing the configuration, the system will use the external speakers, which are connected to a sound chip on the mainboard to signal incoming calls. For voice input and output, I will use a USB headset. My Internet connection is DSL with 6000Kbps in the downstream and 580Kbps in the upstream directions. The network type is insignificant, as long as it gives you enough bandwidth (approximately 150Kbps in both directions for a conversation without video).
Most current Linux distributions use the Advanced Linux Sound Architecture (ALSA) [6]. Most distributors will build sound support into the kernel, or at least use a kernel module. If your desktop outputs acoustic signals while you are working, or if you can run an audio player to listen to music, ALSA or some other sound system has already been configured for your system.
Besides generic ALSA support, you also need drivers for audio chips. To support a USB headset, you will need the snd_usb_audio kernel module, which is often enabled. For a list of devices recognized by the ALSA system, check out the proc filesystem. The output should look something like that in Listing 1.
| Listing 1: Displaying ALSA Devices |
01 # cat /proc/asound/cards 02 0 [CK804 ]: NFORCE - NVidia CK804 03 NVidia CK804 with ALC655 at irq 17 04 1 [Headset ]: USB-Audio - Logitech USB Headset 05 Logitech Logitech USB Headset at usb-0000:00:02.0-8, full speed |
If your system fails to detect all the attached audio devices, you can help by recompiling the kernel or by installing an audio device-dependent driver.
If you have audio support on your mainboard or a sound card, the output from the lspci program should give you more details. The following line was -output on the machine in our lab:
00:04.0 Multimedia audio control
ler: nVidia Corporation CK804 AC
'97 Audio Controller (rev a2)
The output from dmesg when you plug in your USB headset tells you whether the operating system has detected the headset (Listing 2).
| Listing 2: Plugging in Your Headset |
01 # dmesg | tail 02 ... 03 usb 2-8: new full speed USB device using ohci_hcd and address 7 04 usb 2-8: configuration #1 chosen from 1 choice 05 input: Logitech Logitech USB Headset as /class/input/input5 06 input: USB HID v1.00 Device [Logitech Logitech USB Headset] on usb-0000:00:02.0-8 |
If your proc filesystem details all the audio sources you expected, you should be able to play audio files with a player such as Rhythmbox or Amarok. Depending on your distribution, you might need to add the VoIP user to a specific group - in this case, it is the audio group:
# ls -l /dev/sound
...
crw-rw---- 1 root audio 14,  3 M
ay 15 16:30 dsp
crw-rw---- 1 root audio 14, 19 M
ay 16 23:05 dsp1
...
After adding a user to a group, you need to restart the applications, accessing the audio devices in a new shell to apply the changes. The groups command tells you the group memberships for the logged-on user.
If you don't get any sound from your loudspeakers, use a mixer program such as Alsamixer, Gamix, or Kmix to determine whether the output channels are muted or the volume settings are too low.
A headset or an internal microphone in a webcam are good options for voice input. A webcam mike should appear in the device list on the proc filesystem. Again, if you plan to communitcate with a device such as a webcam mike, use a mixer program to make sure the mike isn't muted.
To tell the VoIP client to send voice output to the headset and not to your loudspeakers, select Edit | Preferences | Devices | Audio Devices (Figure 1) in Ekiga and specify the devices for voice input and output. If the required device does not appear in the list, click Detect devices.

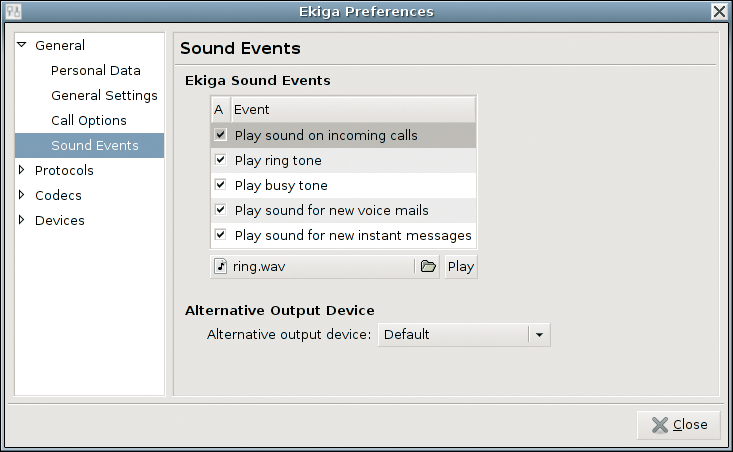
Do not confuse the voice output device with the ringing device. If you use a headset, you will only want to wear it while you are making a call. If you used the headset as the ringing device, you would probably not hear an incoming call. It makes more sense to use your loudspeakers as the ringing device.
In Ekiga, the settings for defining the ringing device are located in General | Sound Events (Figure 2). Select the ringing device from the drop-down list under Alternative Output Device. If you do not hear anything when you click the Play button, try the Default or Standard output device instead.
If your machine hides behind a router or a firewall that translates between the public Internet and your private LAN (through NAT), your client needs to contact a STUN server to discover its public IP address before it can exchange data. For this to happen, you need to enter the name of your provider's STUN server in your VoIP client program. In Ekiga, this setting is in Protocols | Network Settings (Figure 3). No matter how many accounts you have, one STUN server is enough.
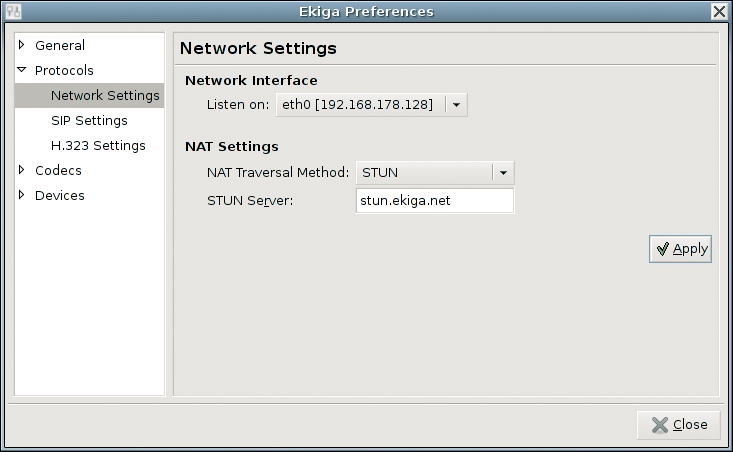
For VoIP clients that support a STUN server for each account (such as Twinkle [7]), it is fine to enter the STUN server recommended by the provider. If your machine has multiple IP addresses, you will need to specify the required port as the Monitored port. If you are unsure, try the selected interface.
Now it is time to set up a connection to a provider. Table 2 shows a list of typical account details. You receive most of these details from your provider when you set up an account. Although you can typically select your own username and password, some providers set even these details for you.
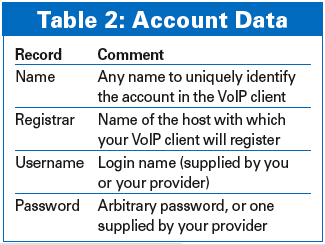
Figure 4 shows the settings for an account with Ekiga.net. In the Ekiga VoIP client, you can select Edit | Accounts to access these details and then press Add to enter them. Click OK when you are done.

If you have multiple accounts, it makes sense to specify your most frequently used account as the default. To select a default account, choose the entry and right-click the Default option to the right of the account list (the line is now in boldface).
Note that you need to check the box in the column below the A header in the table to register the client with the registrar, telling the registrar where to forward calls. If you see Login failed under the Status table header instead of Logged in, you can look forward to some troubleshooting.
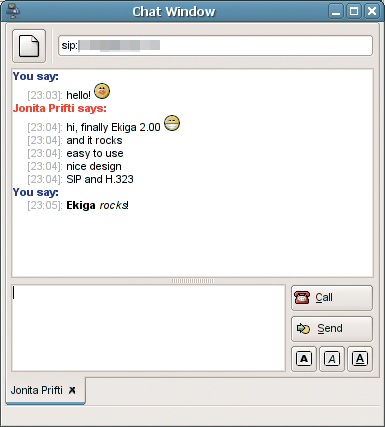
Next, it is time to test drive your Ekiga account. To do so, put on the headset, enter the SIP address of a contact in the text box below the menu (to the right of sip:), and click the connect icon to the right. If your configuration works, you should hear a dial tone, and the connection should be established, assuming your contact accepts the call.
If you don't have anybody to call right now, you can try an automatic echo account such as sip:500@ekiga.net. When the voice stops, start talking, and you can listen to the delay between speaking and hearing an echo of your own voice.
Of course, things can go wrong. In fact, you'll find that there are as many potential sources of error in a VoIP client as there are settings. Some of the typical causes of error, and some of the possible solutions, are listed in the "VoIP: Troubleshooting" box.
Logging is a useful option if your client fails to register, or if you can't connect. In Ekiga, select Tools | Call history. This takes you to a list of error messages and other messages, such as for cases in which you can't reach a contact.
If neither the table nor the error messages in the history list help, you can refer to web forums, mailing lists, or newsgroups on the topic, or you can search the web with your favorite search engine. If you need information on generic ALSA or Video4Linux configuration issues, forums for your own Linux distribution are likely to be more useful than general forums on Linux or VoIP.
In really difficult cases, you can look for errors using a program such as Tcpdump [8] or Wireshark [9] to analyze the STUN or SIP traffic on your Internet connection. However, before you load the big guns, remember that the problem could be because your provider's server is down or incorrectly configured.
| VoIP: Troubleshooting |
|
No sound via loudspeakers or headset (error message)
No sound, no error message
Registration fails
No connection to contact
Only one subscriber can hear sound
Poor voice quality or connection interrupted
No camera image
No camera image in VoIP client
Incorrect colors in image
|
Some connection attempts fail because the registrar refuses to forward incoming calls from some other providers. If you set up the SIP proxy recommended by your provider, this could also prevent outgoing calls to other providers.
The easiest solution to dealing with such hijacking is for both subscribers to move to a free registrar. When you call this contact, both of you need to make sure you select the account for the shared provider in your SIP clients. The Default option in the Ekiga account dialog box is needed for the calling side.
If the provider only restricts calls to or from other networks in exceptional cases, it might make more sense to call the contact via land line (PC to Phone) using the VoIP client. Depending on your provider, different approaches are used, but as you can imagine, links between the worlds will cost you money, and using a normal land line phone might be less convenient for the person you are calling.
This approach also works in the reverse direction (Phone to PC): If you would like to accept calls from the normal PST network, you can ask your provider for a land line number. Callers who ring this number will be directed to your Linux machine's VoIP link.
If voice quality is unexpectedly low or if the connection breaks down completely, both the caller and the callee should consider whether other applications are currently hogging too much Internet bandwidth. Typical examples would be downloading large files or sending large email attachments.
If you fail to discover a bandwidth hog, the evil-doer might reside on the same local network as you or your contact. If several parties use the same LAN, the upstream of the DSL connection can be a bottleneck. One possible approach is to do without video.
If you have a camera and you don't mind letting callers see your face, it's time to continue with another step in the configuration marathon. Cameras on Linux are normally controlled by the Video4Linux [10] subsystem. Depending on your distribution, this subsystem could be built in to your kernel or be available as a kernel module.
You will need a driver for your model of camera. It is easy to find out whether your kernel has Video4Linux support: go to the /dev/v4l directory and look for the video or video0 device files, which should be there if your camera is working:
# ls -l /dev/v4l
crw-rw---- 1 root video 81, 0 Ma
y 17 12:45 video0
Be sure to add users who are permitted to use the webcam to the correct group, visible from the device listing above. When you connect the camera, you should see an entry in your system messages (Listing 3).
| Listing 3: Connecting a Webcam |
01 # dmesg | tail 02 ... 03 usb 1-1.1.4: new full speed USB device using ehci_hcd and address 48 04 usb 1-1.1.4: configuration #1 chosen from 1 choice 05 ... USB SPCA5XX camera found.(ZC3XX) 06 ... |
Use a program such as Xawtv [11] to make sure your webcam is working properly before you integrate the camera with your VoIP client.
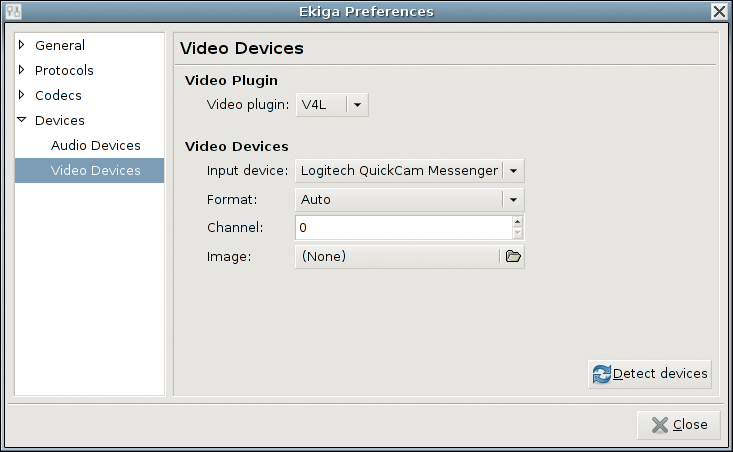
In Ekiga, you can configure your camera in the settings under Devices | Video Devices (Figure 5) by selecting V4L2 or V4L as the video plugin (this is trial and error, and it depends on the driver module), clicking Detect devices, selecting the hardware from the list by Input device, then setting the Format to Auto, NTSC, or PAL as appropriate.
Another tip: When you quit the VoIP client, don't lose your patience. It takes a couple of seconds for the software to revoke the registration you made on launching the program and tell your registrar that you are offline. If you forcibly quit in this phase, you might not be able to register when you relaunch.
| INFO |
|
[1] Ekiga VoIP client: http://www.ekiga.org
[2] Linphone: http://www.linphone.org/index.php/eng [3] VoIP basics: http://en.wikipedia.org/wiki/Voice_over_IP [4] STUN: http://en.wikipedia.org/wiki/STUN [5] Free VoIP account: http://www.ekiga.net/user/reg/ [6] ALSA project: http://www.alsa-project.org [7] Twinkle: http://www.twinklephone.com [8] Tcpdump: http://www.tcpdump.org [9] Wireshark: http://www.wireshark.org [10] Video4Linux: http://linux.bytesex.org [11] Xawtv: http://linux.bytesex.org/xawtv |
| THE AUTHOR |
|
Stefan Schwarzer is a freelance developer who has used Unix and Linux on his servers and desktops for more than 10 years now. You can contact Stefan at sschwarzer@sschwarzer.com. |