
By Peter Arremann
In all the recent talk about virtualization, the name IBM is rarely mentioned, even though IBM has used virtual machines for decades on its mainframes. The experience with mainframes allowed IBM to create one of the most sophisticated Linux virtualization environments on the market today - the IBM System p, based on Power5 and Power6 processors. In fact, IBM won the prize for the best virtualization solution at LinuxWorld, August 2006 in San Francisco [1]. In this article, I will show you how to get up and running with the System p virtualization environment.
Most people have heard of PowerPC processors. CPUs with this instruction set are used in all three current-generation game consoles and, until recently, in Apple servers and desktops.
The Power processors also use the PowerPC instruction set, but offer several extensions to increase performance and reliability. Among these extensions is the hypervisor mode, designed to make virtualization more efficient. In hypervisor mode, the CPU allows programs to execute instructions related to the management of system resources in virtual environments. This design offers security and provides the ability to run different operating systems without special drivers or customizations.
IBM System p servers are typical Unix servers built for reliability, availability, and scalability. The systems range from single-processor, 1U rack-mountable systems to full frames containing 64 CPUs. The basic specs sound similar to the products from other Unix vendors with two important differences. First, IBM supports Linux on all System p servers. In contrast, Sun supports Linux only on its AMD-based products and systems based on the CoolThreads processors.
The second major difference is that the IBM servers are designed with the hypervisor mode of the Power processors in mind. This allows IBM to support multiple OS instances even if only a single processor is installed in the system.The virtualization support is also apparent on the back of each server, where two Ethernet ports labeled HMC1 and HMC2 are located. These ports can be used to connect a dedicated hardware management console (see the box titled "HMC"), or, if no HMC is available, the ports can be used to access the service processor directly.
Another feature of IBM System p is the VIOS - short for virtual I/O server. The VIOS allows you to share physical disks and network connections between multiple different OS instances. Part of the VIOS image is the integrated virtualization manager (IVM). The IVM offers only a subset of HMC functionality, but it does not require additional hardware.
| HMC |
|
The HMC is a dedicated Linux x86 system that is used to remotely manage multiple IBM System p servers. Newer models of the HMC offer a web interface that allows flexible remote administration. An HMC is required for many advanced features like partition mobility - a feature that allows migration of a logical partition from one physical server to another. |
The first task is to install the virtual I/O server from the VIOS media that came with the system. Use the menu system to boot from CD. Let SMS search for all available boot devices and then select the CD drive from the menu. Make sure you select Normal Boot Mode.
After booting, the VIOS installation program asks you to accept the terminal and language settings. In most cases, you'll want a default installation. After the initial configuration is complete, most administration can be done through a web browser, and you will rarely need to log into the VIOS [3].
After the installation, the VIOS will reboot and a login should appear. If your system stalls at Completed NFS services, the issue is likely cabling or the serial port. Make sure you are using the cable that came with your server. Sometimes changing the serial port speed to 9600 bps in the ASMI can also help [4].
The default login and password for the VIOS are padmin. Before configuration, accept the license agreement with license -accept. Then run mkgencfg -o init to create the initial device configuration.
The third step is to set up the network configuration for the VIOS with the command mktcpip and provide a host name, IP address, netmask, and gateway:
mktcpip -hostname ivm \
-inetaddr 192.168.100.77 \
-interface en0 -start \
-netmask 255.255.255.0 \
-gateway 192.168.100.254
If your network uses DNS, add the options -nsrvaddr and -nsrvdomain, followed by the IP address of your DNS server and the domain for the system. If you still cannot access the IVM through a browser, check the IP and DNS configuration and rerun mktcpip.
| ASMI and SMS |
|
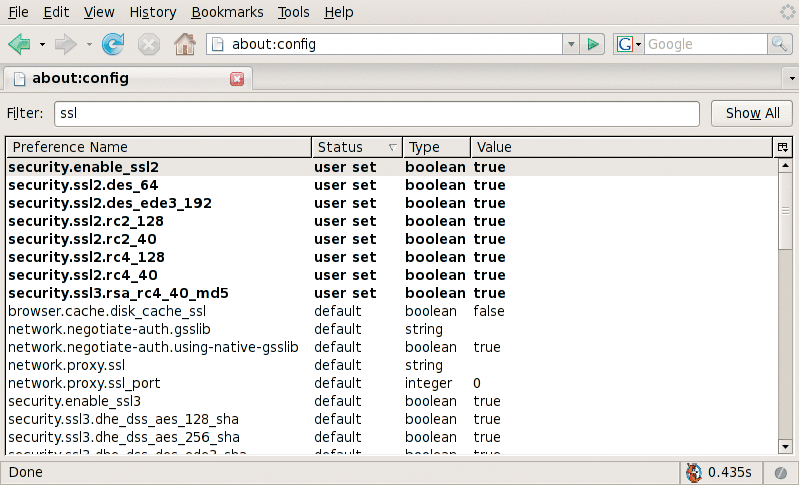
Like most modern servers, those of System p contain a service processor that allows the administrator to manage the server remotely. The service processor interface is called Advanced Systems Management Interface (ASMI) and can be accessed through the serial port, an HMC, or a web browser. The serial port is easiest to set up (19,200 bps 8N1, software flow control); unfortunately, once the system is powered on, the serial port will control the SMS or OS console login instead of the service processor. This makes it important to set up web access to the ASMI. Connect the server to power, but do not press the white power button. Instead, connect a serial terminal or console emulator and press Enter to bring up the ASMI login prompt. The default login and password are admin. After logging in, the ASMI is completely menu driven. Each menu entry on the screen is preceded by a number. To navigate into a submenu, enter the number that appears to the left of the menu entry followed by a Return. At first this approach feels fairly clunky, but with some experience, it allows for very quick and efficient navigation. Feel free to experiment with the different commands - if things go wrong, the Service Choices menu allows you to reset the ASMI configuration to factory defaults easily. The ASMI web access is enabled by default. If you have a DHCP server on your network, you can simply connect a cable to the HMC1 port and check the ASMI IP address through the serial console via the Network Services menu entry. This menu also allows you to configure a static IP address. Next is the configuration of your web browser. Recent releases like IE 7.0 and Firefox 2 ship with SSL2 support disabled [2]. To enable the appropriate SSL support in Firefox, enter about:config into the URL bar. This brings up a screen for all configuration options. With the search box you can search for SSL2 and enable all settings. Then repeat the search for the security.ssl3.rsa_rc4_40_md5 setting (see Figure 1). The ASMI should now be available through your web browser. |
Once the VIOS is configured, the IVM is accessible under the IP address you used with the mktcpip command. The default login for the IVM is the same as for the command line. The first task should be to change the password through View/Modify User Accounts on the left.
The next step is to create one or more storage pools. A storage pool is a set of disks used for the logical partitions (LPARs). If no additional disks are available, it is possible to create LPARs with the rootvg storage pool created when installing the VIOS. The downside of this setup is that reinstalling the VIOS will destroy all partitions.
Under the Create Virtual Storage menu is the Create Storage Pool button. The dialog lets you enter the name for the new storage pool and select unused disks.
The next task is to map virtual Ethernet devices to physical ports through the View/Modify Virtual Ethernet menu entry. The VIOS default configuration supports four virtual Ethernet devices. Simply map the first virtual interface to the first physical port. More advanced configuration options like link aggregation are possible from the VIOS command line but are not available through the IVM [5].
After the initial configuration, you are finally ready to create logical partitions. A click on the View/Modify Partitions menu entry reveals one partition on the system (see Figure 2). This partition houses the VIOS and IVM. It is best to leave this partition untouched.

Next, the Create Partitions menu entry will bring up a wizard. The first step is to set the name of the partition and also set the partition ID. Usually you do not need to modify the partition ID, however, the name should describe the usage of the partition.
The second page allocates memory. The firmware and existing partitions occupy part of the total memory in the system. The remaining RAM is available for new partitions and can be allocated in 64MB increments to the newly created partition. Then you must decide whether processors will be dedicated to a partition or part of a shared pool.
Dedicated processors guarantee a partition access to the processors, but any unused cycles are not available to other partitions. Shared processors allow sharing of the resources in the system between multiple partitions. Each partition is guaranteed a minimum share; however, if other partitions in the pool do not use their share, some partitions can use the excess capacity. This arrangement is more efficient, and in most cases, you want to take advantage of shared processors.
The next steps let you specify a network device, create and configure virtual disks, and select optical devices. The final screen of the wizard shows a summary. Click Finish, and, after a short wait, IVM shows the newly created partition in the View/Modify Partitions menu.
If you have made it this far, installing Linux is easy. First, select the partition you want to install Linux on in the View/Modify Partitions menu, then click on the Activate link at the bottom of the screen. Activation takes a few minutes to get the partition to the SMS prompt. Next, connect to the VIOS command line. The command mkvt -id <partition id> starts the virtual console and brings up the SMS menu.
Insert the disk with your favorite distribution and then follow the same steps you used to boot the VIOS installer. Once the installation program starts, things should become more familiar. Fedora 7, RedHat RHEL 4.5 and 5.0, and Novell SLES 10 all installed without a problem.
Performance is usually one of the main issues for virtual environments. Most applications show a significant performance loss when run inside a virtual machine. This loss stems from the effort of emulating hardware and translating commands between the OS and the hypervisor. As a rule of thumb, the more I/O an application does, the worse it performs when virtualized.
The results of the performance test are summar-ized in Table 1. Each test shows the performance loss compared with running the application natively on the system. The second column contains the results for VMWare Workstation 6 on a dual Opteron system.
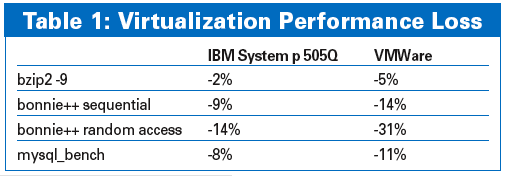
The first test, bzip compression, is a CPU benchmark. As such, the results show barely any loss. Tests 2 and 3 use bonnie++ and measure sequential and random disk writes. Test 4 is the mysql_bench test, which stresses CPU, disk, and the memory subsystem.
The results of the performance tests are straightforward. Although the performance loss is up to 14%, Power virtualization is much better than with the VMWare solution, which loses up to 31% in the random disk write test.
Once a virtual Linux on the Power installation is up and running, the performance and ease of management are convincing. The system completed all tasks without problems and the performance was also impressive.
Unfortunately, getting to that point takes more effort than it should. Outdated SSL algorithms and a serial console that does not always work simply should not happen. The VIOS is distributed by IBM, so from IBM's perspective, it is understandable that it would run on AIX; however, it leads to additional work for people running an otherwise pure Linux environment.
Bottom line, aside from the initial setup issues, IBM has delivered what it promised: Stability and performance are impressive.
| INFO |
|
[1] IBM Wins at LinuxWorld: http://www-03.ibm.com/press/us/en/pressrelease/20138.wss
[2] ASMI and modern browsers: http://projectdream.org/wordpress/2007/02/12/accessing-the-asmi-using-ie7/ [3] IBM RedPaper: Integrated Virtualization Manager on IBM System p5: http://www.redbooks.ibm.com/abstracts/redp4061.html?Open [4] Serial port troubles: http://www-128.ibm.com/developerworks/forums/dw_thread.jsp?forum=748&thread=150883&cat=53 [5] IBM RedPaper: Advanced POWER Virtualization on IBM System p5: Introduction and Configuration: http://www.redbooks.ibm.com/abstracts/sg247940.html?Open |