
Question:
I am trying to learn enough Linux so I can shift to Linux only, and your column has indirectly answered a lot of my questions, so I hope that you will be able to help me with an issue that I have - or at least point me in the right direction.
Before I start, let me say that I am having a little bit of a problem because the nomenclature between systems is different, and I hope I am using the names consistently when presenting my problem. So far, no one has responded to this question in forums.
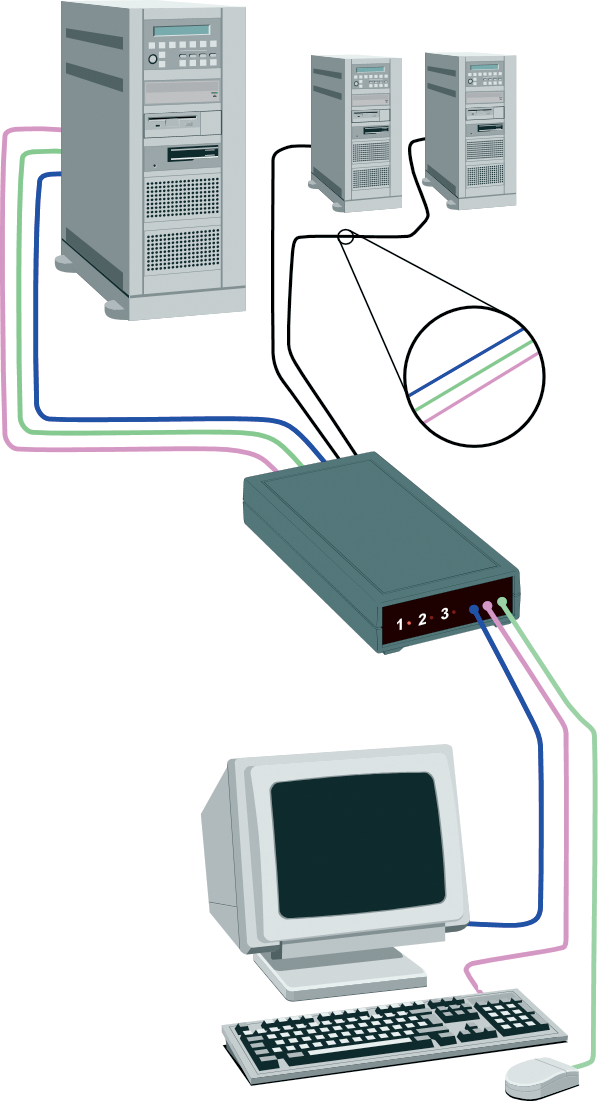
I have a group of computers and have connected them to one set of controls (one mouse, a monitor, and a keyboard) through a device I know of as a KVM. The issue is when I try to install Linux, the install process can't seem to "see" through the KVM box and find the keyboard, mouse, and monitor, so I have had to resort to stand-alone installs outside my setup. I pull out the KVM system I want to use Linux with, add a keyboard, monitor, and mouse directly to the system, and then install and use Linux. This is a real pain.
I haven't been able to find information about this issue because I suspect I can't ask the question in a way that Linux people understand.
I haven't tested my situation by trying a number of distributions or configurations. I tried it with a Knoppix Live disk and with Ubuntu. Before I spend a lot of time, I need to find out whether I am trying to do the impossible.
Answer:
Digital KVM switches should be completely transparent for hardware signals, so programs like ddcprobe that probe the monitor (and graphics card, too) for the frequency settings required for setting up the X server should give meaningful results with and without the KVM switch in between monitor and graphics card. So much for the theory...
In the real world, several problems can arise when using KVM switches, but most of them can be fixed. I found that some KVM switches get their power supply from the keyboard/mouse ports (PS/2 or USB) in an unreliable way, and when there is not sufficient power, or no signal on the input ports, KVM boxes can display the strangest results, ranging from inability to switch the port by keyboard or buttons, failing to display a picture on the monitor, or even completely missing signals on the output ports where the mouse/keyboard and monitor are connected. The problem may also depend on the timing of the boot process - when a signal becomes available. KVM switches that have their own external power supply are sometimes better, and sometimes worse. So, if your KVM switch gets its power from the input ports, it may help to use a KVM switch with an external power supply.
You can also compare the log file /var/log/Xorg.0.log with and without the KVM switch to see whether all signals get through.
If the KVM switch is simply not capable of transporting DDC signals from the monitor for hardware autodetection, I would try to run the installation without the KVM switch (i.e., with the monitor and keyboard directly connected to the board). When the installation is complete and all config files are written, the settings should also work when the switch is used again. In the worst case, DDC-probing could be switched off in /etc/X11/xorg.conf if there are still problems with the KVM switch during startup of X. Look at the Monitor section in xorg.conf for correct values of HorizSync and VertRefresh).
Question:
I recently purchased a new Samsung CLP-550 color laser printer because I read it was well supported by CUPS and Linux. Now when I print pictures from my digital camera, the colors are too strong. Faces appear red, and the picture is darker on the paper than it should be.
There are no settings in the vendor-supplied printer driver PPD or in the CUPS generic postscript printer setting that would allow me to change the saturation and brightness.
I can always use GIMP to change the colors and brightness of the pictures, but considering the number of pictures I would like to print, it will take hours to process each one.
Did I miss an option in CUPS to change the colors during print, or is there a quicker way to just print a bunch of pictures at once with custom settings?
Answer:
As we enter the holiday season, many CUPS users will probably have this problem. CUPS is designed to act primarily as a printer server, so it considers picture post-processing an application-side task, rather than part of a printer driver or filter. For this reason, you may find a lack of commonly used general options. I have been searching for a way to change saturation and brightness settings for printing through color settings (or by adjusting gamma values), but for most printer PPDs, it does not seem much easier to let CUPS do this on-the-fly. I have, however, developed a recipe that may address the problem of quickly printing photographs with adjusted colors without having to go through GIMP scripting.
The script shown in Listing 1 (printphotos.sh) will process all pictures specified on the command line (as in printphotos.sh *.JPG) through the graphics toolkit Netpbm [1] and will use PhotoPrint [2] to autoscale the output to photopaper of various sizes, printing multiple pictures on one page upon request.
| Listing 1: printphotos.sh |
01 #!/bin/sh
02
03 SATURATION="-50"
04 VALUE="+10"
05
06 TMPDIR="/tmp/pprint.$$.tmp"
07
08 mkdir -p "$TMPDIR" || exit 1
09
10 trap bailout 1 2 10 15
11
12 bailout(){
13   rm -rf "$TMPDIR"
14   exit $1
15 }
16
17 echo "Correcting colors for print -> $TMPDIR" >&2
18
19 for i in "$@"; do
20  echo "$i..." >&2
21  case "$i" in
22   *.[Pp][Nn][Gg])
23     pngtopnm "$i" | ppmbrighten -s "$SATURATION" -v "$VALUE" | pnmtopng -compression 1 > "$TMPDIR/$i.png"
24     ;;
25   *.[Jj][Pp][Gg]|*.[Jj][Pp][Ee][Gg])
26     djpeg "$i" | ppmbrighten -s "$SATURATION" -v "$VALUE" | pnmtopng -compression 1 > "$TMPDIR/$i.png"
27     ;;
28   *) echo "Skipped '$i': Unknown extension (extend $0)" ;;
29  esac
30 done
31
32 photoprint "$TMPDIR"/*.png
33
34 bailout 0
|
You will need libjpeg-progs, netpbm, and photoprint; just do an apt-get install libjpeg-progs netpbm photoprint on Debian to install these packages.
The script does not modify the original pictures; it just creates a temporary directory with the processed pictures and calls PhotoPrint to select and print them nicely (Figure 1). The temporary files will automatically be removed when the script ends, or when you hit Control+C. The variables SATURATION=-50 and VALUE=+10 in this example seem to give very good results on the CLP-550 color printer, but feel free to find better values in your own experiments. For best scaling, use the "Lanczos Sinc" algorithm in the PhotoPrint settings.
A good side effect of brightening the pictures and adjusting the colors is that your color toner will last much longer.
Question:
I have an IBM Thinkpad R50e with Linux Ubuntu 6.06 as its operating system (because that version advertises "long-term support," and I care more about stability than about having the latest bugs). I also have two dual-booted desktops, each with two graphics cards. One has an adapter on the motherboard plus an nVidia Riva TNT2 PCI adapter; the other has an S3 Savage 4 AGP video adapter plus an identical nVidia TNT2. I have two KVM switches and two flat-screen monitors. All three are connected to a router/broadband modem.
I have been trying for about two years to move entirely from Windows 2000 to Ubuntu, and I have managed almost everything; however, I have been using two monitors under Windows. Under Linux, I can only get one monitor to work at a time.
By setting the BIOS initial monitor to either AGP or PCI, I can get either monitor working, but not both.
I have tried the following:
uname -a > system.txt
lspci    >> system.txt
lspci  --vv >> system.txt
dmesg    >> system.txt
At one time, I had both monitors working - I think under SUSE 9.0 - but I can't get back to that state. In any case, I prefer Gnome to KDE. I have also tried Knoppix 4 and 5 from the Linux Magazine DVDs without any success. So I would be pleased if you can suggest how I might get two monitors working under a Debian Linux system.
Answer:
I like your remark about not wanting to have the "latest bugs." On servers and Internet gateways, I also run the stable branches of Debian or other distributions, whereas on the desktop side, I'm more adventurous and experiment with Beryl and Compiz for usability and fun, which does not always give perfect results.
Your setup with two graphics cards is very specific, so I cannot give a generic answer on how you managed to get it working under SUSE, but I'll try to provide some hints.
One important part is to make sure the computer's BIOS is set correctly. The initial monitor setting (which should probably be named the primary graphics adapter setting) may be important to get the second graphics card to work. If you can see both adapters with lspci, this is probably already set up correctly.
Rather than running two X servers (one for each card), you will have to configure two separate graphics adapters and monitors in xorg.conf for a single server; this is similar to the xorg.conf example in Listing 2 (which only shows the relevant parts).
Due to the lack of corresponding hardware, I have not tested this setup. The PCI sections for each board will have to match your lspci output.
| Listing 2: xorg.conf with Two Adapters |
01 Section "ServerLayout" 02 Identifier "ServerLayout" 03 Screen 0 "Screen0" 0 0 04 Screen 1 "Screen1" 0 0 05 # Or: Screen 1 "Screen1" LeftOf "Screen0" 06 InputDevice "Keyboard0" "CoreKeyboard" 07 Option "Xinerama" "0" 08 Option "Clone" "0" 09 # Or: Option "Clone" "1" 10 EndSection 11 12 Section "Monitor" 13 Identifier "Monitor0" 14 VendorName "Vendor0" 15 ModelName "LCD Panel 1280x1024" 16 HorizSync 31.5 - 67.0 17 VertRefresh 50.0 - 75.0 18 Option "dpms" 19 EndSection 20 21 Section "Monitor" 22 Identifier "Monitor1" 23 VendorName "Vendor1" 24 ModelName "LCD Panel 1280x1024" 25 HorizSync 31.5 - 67.0 26 VertRefresh 50.0 - 75.0 27 Option "dpms" 28 EndSection 29 30 Section "Device" 31 Identifier "NV0" 32 Driver "nv" 33 VendorName "nVidia" 34 BoardName "nVidia" 35 Option "AddARGBGLXVisuals" "1" 36 BusID "PCI:1:0:0" 37 Screen 0 38 EndSection 39 40 Section "Device" 41 Identifier "SV1" 42 Driver "savage" 43 VendorName "Savage" 44 BoardName "Savage" 45 Option "AddARGBGLXVisuals" "1" 46 BusID "PCI:0:1:0" 47 Screen 1 48 EndSection 49 50 Section "Screen" 51 Identifier "Screen0" 52 Device "NV0" 53 Monitor "Monitor0" 54 DefaultDepth 24 55 SubSection "Display" 56 Viewport 0 0 57 Depth 24 58 Modes "1280x1024" 59 EndSubSection 60 EndSection 61 62 Section "Screen" 63 Identifier "Screen1" 64 Device "SV1" 65 Monitor "Monitor1" 66 DefaultDepth 24 67 SubSection "Display" 68 Viewport 0 0 69 Depth 24 70 Modes "1280x1024" 71 EndSubSection 72 EndSection |
| INFO |
|
[1] Netpbm: http://sourceforge.net/projects/netpbm/
[2] PhotoPrint: http://www.blackfiveservices.co.uk/photoprint.shtml |