
By Michael Schilli
I was browsing a mail order catalog for electronics the other day when I noticed a couple of low-budget, digital multimeters with RS 232 interface. I discovered the MAS-345 model by Mastech on eBay for US$ 35 and quickly pressed the "buy-it-now" button.
When the device arrived, it came with just a Windows CD. After a quick search on the web, I discovered the Marsh project [2], which uses a bit of C code to address the Mastech MAS-345 among other multimeters.
The serial line protocol used by the device is fairly straightforward. After a couple of introductory signals to set up the line, the PC sends a newline character to the measuring device. The device responds with a 14-byte string containing the value shown on the multimeter's LCD display, and other useful information like what's being measured and the selected range.
If the string returned by the Mastech device is V -120.3 mV, this indicates that the multimeter is in voltage mode and showing a value of -120.3 millivolts.
The multimeter takes about one second to respond, so the computer can retrieve a maximum of one measured value per second.
Listing 1 shows a test script that fetches a value from the multimeter. The CPAN Device::SerialPort module gives developers a convenient, object-oriented interface for talking to the computer's serial port. The port will use the RS 232 protocol to talk to the multimeter on the other end of the line.
| Listing 1: mmread |
01 #!/usr/bin/perl -w
02 use strict;
03 use Device::SerialPort;
04
05 my $serial = Device::SerialPort->new(
06   "/dev/ttyS0");
07
08 $serial->baudrate(600);
09 $serial->databits(7);
10 $serial->purge_all();
11 $serial->rts_active(0);
12 $serial->dtr_active(1);
13
14  # Send request
15 $serial->write("\n");
16  # Wait one second
17 select(undef, undef, undef, 1);
18
19  # Read response
20 my($count, $data) = $serial->read(14);
21 print "$data\n";
|
mmread in Listing 1 sets up a connection with the computer's first serial port, which has a device name of /dev/ttyS0 on Linux. To enable the script to run on a normal user's account, the root user will need to open the device file for global reading and writing by entering chmod a+rw /dev/ttyS0. If you have a new-fangled computer without a serial port, you will also need to invest about US$ 10 in a serial PCI card. Note that Linux might then show the serial ports under different names; typical examples are /dev/ttyS5 and /dev/ttyS6.
The test script first sets the baud rate to 600 and the number of data bits to 7. A call to the purge_all() method triggers the Unix tcflush(2) internally with the TCIOFLUSH flag set to delete any dangling data bits. The RTS line is then cleared and the DTS line is set to initiate communications with the multimeter.
The write() method then sends a newline character to the multimeter, which responds after a short while with the data in its display. For reasons explained above, the script waits for a second before issuing a read() command to fetch more data from the serial port. You could use sleep(1) to do this, but select() supports fractions of seconds, and I tried various values while developing the script before deciding on one second as the most reliable approach.
We know that the multimeter will send exactly 14 characters, and read explicitly requests to retrieve that many. The result string ends up in $data, which the print command subsequently writes to STDOUT.
I bundled everything into a module and dropped it off at CPAN as Device::MAS345, so other MAS345 enthusiasts can read their multimeters without concerning themselves with the underlying technology. Another advantage that CPAN modules offer is that they are available wherever you are and are easy to find using search.cpan.org.
Device::MAS345 gives developers an object-oriented interface at a higher abstraction level. The mmloop script in Listing 2 shows how to fetch data from the multimeter using an infinite loop and how to store the acquired data along with the current time in a text file. The CPAN module picks up the raw string from the multimeter via the read method, and it splits the result into the measured numeric $value, the $unit, and the $mode. Before launching into the infinite loop, the script switches to autoflush mode by setting $|, making sure that subsequent print commands won't hold back the output. tail -f monitors the progress in the output file.
| Listing 2: mmloop |
01 #!/usr/bin/perl
02 use strict;
03 use warnings;
04 use Device::MAS345;
05 use Log::Log4perl qw(:easy);
06 Log::Log4perl->easy_init($DEBUG);
07
08 my $mas = Device::MAS345->new(
09       port => "/dev/ttyS0");
10
11 open FILE, ">>values.txt" or die;
12
13  # Autoflush
14 select FILE;
15 $| = 1;
16
17 while(1) {
18   my($val, $unit, $mode) = $mas->read();
19   die $mas->error() unless $mode;
20   print FILE time(), " ", "$val\n";
21   sleep 10;
22 }
|
I've always wondered how much power my desktop computer, which runs 24x7, consumes in the course of the day. Does my computer save power when I'm not using it? A device like the Kill-A-Watt [3] can calculate the total consumption, but I'm interested in what the computer does in the middle of the night when nobody's looking.
The MAS-345 measures current up to 10 Amps and it also measures alternating current, which is a feature you can't take for granted with low-budget multimeters. Moreover, as any electrical engineer can assure you, simply multiplying voltage and current doesn't give you the actual power consumed, but I've verified with the Kill-a-Watt that it comes pretty close for both my PC and my Laptop.
Be careful when using your multimeter to measure the power coming out of the wall sockets. Mains power in the United States is just 110V, but that can be more than enough to cause serious injury. Uninsulated banana plugs like those used for low-voltage experiments aren't appropriate here.
A long time ago, one of my physics teachers paid a high price for being absent minded and ended up in a hospital after touching a banana plug carrying 220V! Thankfully, new measuring cables for multimeters always use insulated banana plugs; I just bought myself a couple to connect to a multiple socket. Also, don't try the soldering experiment mentioned below if you're not feeling comfortable working with high voltage. This is for experts who know how to use proper safety precautions.
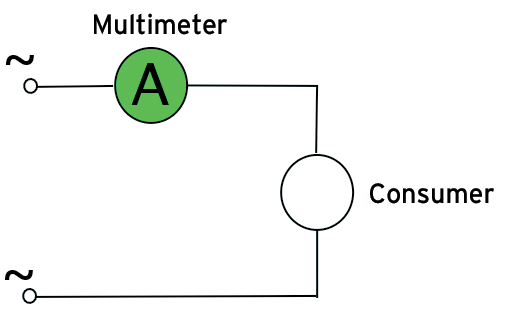
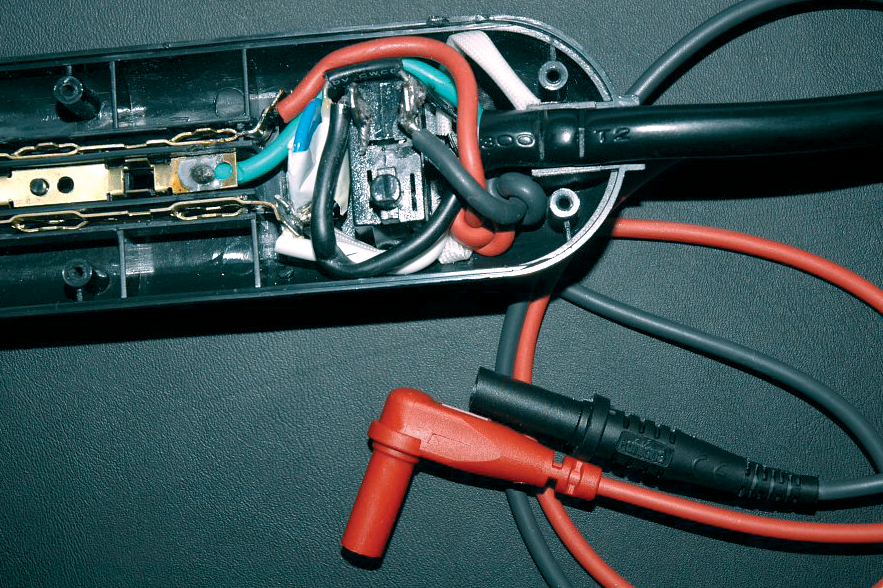
The amperemeter needs to be connected in series with the consumer. Figure 1 shows the circuit diagram, and Figure 2 shows the physical wiring using a low-budget multiple socket. In ampere mode, the multimeter's internal resistance is almost zero and connecting it in parallel to the socket would be fatal. You could destroy your multimeter this way or, at best, blow fuses all over the house and in the multimeter (if it happens to have one).
The soldered joints in my multiple socket were tougher than expected. In fact, I had to buy a 60W soldering iron for the job because my other two soldering irons were designed for use with smaller electronic devices.
After double-checking the modified hardware, I plugged in carefully and started measuring the power consumption of the Linux-based home PC and a laptop with docking station in the Perlmeister lab.
Obviously you're not going to thrill the crowds by generating a text file with rows of figures. To help visualize the data, the mm2rrd script in Listing 3 parses the file line by line and separates the timestamps from the acquired values. Then you can pass the results to rrdtool to create a neat graph with a minimum of effort.
| Listing 3: mm2rrd |
01 #!/usr/bin/perl -w
02 use strict;
03 use RRDTool::OO;
04 use Sysadm::Install qw(:all);
05
06 my @points;
07
08 plough sub {
09  chomp;
10  my($time, $value) = split / /, $_;
11  push @points, [$time, $value];
12 }, "values.txt";
13
14  # Constructor
15 my $rrd = RRDTool::OO->new(
16        file => "mmdata.rrd" );
17
18  # Create a round-robin database
19 $rrd->create(
20  step    => 30,
21  start    => $points[0]->[0] - 1,
22  data_source => { name => "amps",
23          type => "GAUGE" },
24  archive   => { rows => 10_000 });
25
26 for(@points) {
27  $rrd->update(time => $_->[0],
28        value => $_->[1]);
29 }
30
31 $rrd->graph(
32 width => 600,
33 height => 400,
34 image     => "mmdata.png",
35 vertical_label => "Amperes",
36 start     => $points[0]->[0],
37 end      => $points[-1]->[0],
38 draw      => {
39   type  => "line",
40   color => "0000FF",
41   legend => "Laptop Power",
42 }
43 );
|
We use the plough method from the CPAN Sysadm::Install module to read the data line by line. The method expects a subroutine reference and a file. The method opens the file, iterates over the lines and jumps to the function for each, and sets the $_ variable to the content of the current line.
mm2rrd extracts the timestamp and the measured value and pushes both as array references to the end of the @points array.
rrdtool options are fairly cryptic, but the CPAN RRDTool::OO module gives developers an understandable interface by converting input into rrdtool commands. The create() command generates a round-robin database, mmdata.rrd, with 10000 primary data points (PDPs), which it expects every 30 seconds (step value). The previous script outputs measured values at 10-second intervals, but rrdtool automatically calculates the 30-second average to arrive at the PDPs.
rrdtool does not respond well to values outside the start point of the RRD database, so the script sets the $start parameter for the create method to one second before the first measured value.
A similar approach is used to set the time scale for the graph, but in this case, $points[-1]->[0] sets the end point to the timestamp of the last data point in the @points array. The graph method generates a nice chart as a PNG file.
Figure 3 shows the power consumption of the Linux PC at night. The machine did not sleep at all because I also used the system to run the measuring script. There is a noticeable increase in power consumption caused by the backup and indexing process kicking in at 2am. The three disks I installed in the machine were spinning up and pushed the power usage. The process terminated and power consumption dropped to the original level just before 7am.
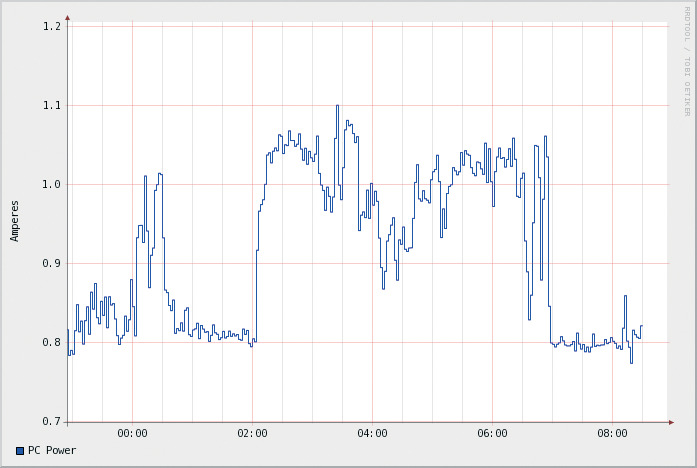
Figure 4 shows the power consumption for my laptop, which is connected to a docking station, a couple of minutes before and after switching on. The docking station still consumes 40mA when it is switched off, which means I'm wasting 4 watts day and night!
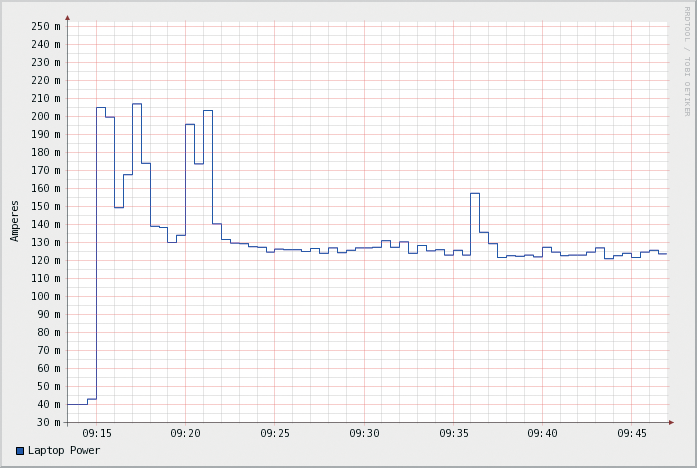
The consumption values rocketed after switching on the docking station. That's no surprise because the system has to ramp the disk up to speed and launch the operating system.
After a couple of minutes, the value dropped to about 130mA. In other words, my laptop uses about 15 watts, which is just more than a tenth of what the PC uses. The multimeter will also measure temperature and capacity, and online nerd stores have all kinds of sensors with voltage output, so creative tinkerers will have hours of fun discovering new applications.
| INFO |
|
[1] Listings for this article: http://www.linux-magazine.com/Magazine/Downloads/83
[2] Marsh project for controlling the Mastech MAS-345, http://savannah.nongnu.org/projects/marsh [3] The Kill A Watt power measuring device, http://www.p3international.com/products/special/P4400/P4400-CE.html |
| THE AUTHOR |
|
Michael Schilli works as a Software Developer at Yahoo!, Sunnyvale, California. He wrote "Perl Power" for Addison-Wesley and can be contacted at mschilli@perlmeister.com. His homepage is at http://perlmeister.com. |