
By Frank Wiles
Are you plagued by too many Apache children eating up your RAM? Do you have a bunch of slow clients accessing your site? Do you need to load balance between several servers? Are you trying to separately route static versus dynamic content? Are you operating without a budget for new hardware? If you answered "Yes" to any of these questions, you probably need Perlbal. Perlbal [1] is a single-threaded, reverse-proxy load balancer and web server. A plugin interface lets you extend Perlbal in interesting ways. Although Perlbal itself is single threaded, internally, it uses asynchronous I/O to achieve its phenomenal performance.
Perlbal was written by Brad Fitzpatrick (of LiveJournal.com and Memcached fame) to solve several of the problems that are familiar to anyone who has maintained a large website. At some point during the life of a large website, you will run into one or more of these issues:
The first four issues are easy to diagnose, but the last issue, which some of us affectionately call the "Spoon Feeding Problem," is harder to spot. You are probably suffering from it a little now, but it probably isn't noticeable.
The spoon feeding problem originates when none of the browsers visiting your site can download your pages as fast as your server can dish them out. Apache ends up "spoon feeding" the content a few packets at a time to the browser. During this time, the Apache child assigned to the task cannot serve up content for anyone else. You're probably saying to yourself, "Yes, but MY visitors are all on broadband so I don't have this problem."
Think again. Broadband users can still suffer from this problem, especially when you factor in pages that include more than a few images, Javascript files, or CSS files. By default, browsers only download a certain number of included elements (typically four) at any one time, which can easily cause an otherwise speedy client to behave as a slow client. Perlbal addresses the spoon feeding problem and many other performance challenges that could be slowing your website.
You have two options for installing Perlbal: by hand or via the CPAN shell [2]. To install Perlbal from the CPAN shell, su to root ( or use sudo) and run the command cpan. Enter the following two commands:
install IO::AIO
install Perlbal
This sequence will download any other prerequisite CPAN modules along with Perlbal itself. If you haven't used the CPAN shell before, note that the installation process takes you through several configuration steps; in most cases, the default options are sufficient.
Your other option is to install Perlbal by hand. To do so, download the latest tar.gz files for Perlbal, along with the CPAN modules Danga::Socket and IO::AIO, which Perlbal uses to implement asynchronous I/O. You then need to extract the archives with tar -xzf and cd to the directories created. Then it's a simple matter of executing in each directory:
# perl Makefile.PL
# make
# make install
If you need Perlbal to support SSL, download and install the IO::Socket::SSL CPAN module. Perlbal, by default, is configured via the file /etc/perlbal/perlbal.conf. However, you can specify an alternative file in the --config=/path/to/file command-line option.
One of the more interesting features of Perlbal is that it provides a telnet management interface to itself. By connecting to the management port on the local server, you can alter Perlbal's configuration on the fly at run time. This option is useful for doing seamless migrations or to remove a web server from the load balancing pool for maintenance.
The management interface is typically configured in perlbal.conf as follows :
CREATE SERVICE mgmt
   SET role = management
   SET listen = 127.0.0.1:60000
 ENABLE mgmt
Once you have this in your configuration file, you can start Perlbal with:
perlbal --daemon
You can access the management interface via Telnet, so you just need to connect to the proper port with:
# telnet localhost 60000
The use of the loopback address (127.0.0.1) is intentional; this restriction ensures that the management console is accessible only when connecting from the server. No remote access is allowed.
Note that Perlbal does not give you a prompt when you connect and expects you to just start sending commands. The lack of a prompt has tripped up many new Perlbal users.
I'll start off with the simplest Perlbal setup. Assume you have an entirely static site and you want to avoid using Apache altogether.
For this scenario, you would configure Perbal like this:
CREATE SERVICE web
  SET role    = web_server
  SET listen  = 0.0.0.0:80
  SET docroot = /home/httpd/html
  SET dirindexing    = 1
  SET persist_client = 1
ENABLE web
The first two parameters say that you want to run a service that should act like a simple web server and you want it to bind to port 80 on all of the server's configured IP addresses. You may also restrict this service to a specific IP address or a subset of the available addresses.
The docroot directive sets the base location where Perlbal will look for your content. The SET dirindexing directive tell it to perform "directory indexing," so you can view a list of all files in the directory if no index.html exists; the last option turns on keep-alive support.
Often you need to host several domains on a single IP address. To illustrate this configuration, I'll set up two different domains (foo.com and bar.com) as simple web servers. That configuration is shown in Listing 1.
| Listing 1: Multiple Domains on One Address |
01 # Include the perlbal virtualhost plugin 02 LOAD vhosts 03 04 CREATE SERVICE foo_service 05 SET role = web_server 06 SET docroot = /home/foo.com/public_html 07 SET dirindexing = 1 08 ENABLE foo 09 10 CREATE SERVICE bar_service 11 SET role = web_server 12 SET docroot = /home/bar.com/public_html 13 SET dirindexing = 1 14 ENABLE bar 15 16 CREATE SERVICE virtualhosts 17 SET listen = 192.168.0.1:80 18 SET role = selector 19 SET plugins = vhosts 20 SET persist_client = 1 21 22 VHOST *.foo.com = foo_service 23 VHOST *.bar.com = bar_service 24 ENABLE virtualhosts |
The configuration in Listing 1 first creates a simple web server service for each domain, omitting the listen directives and persist_client options. These options are handled by the third service, the cleverly named virtualhosts service.
The virtualhosts service is configured as a selector, which is Perlbal's term for a virtual service that maps one service onto another. For the purposes of visualization, you can think of the virtualhosts selector service as proxying the connections to the individual foo_service and bar_service, depending on the requested hostname.
If you wanted to host a few websites on one IP address and a few on another, you would just need to set up another selector service to listen on the alternative IP address and map the domain names to their respective web_server services.
Although you might find some utility in mimicking simple web servers, load balancing is where Perlbal really shines. I'll configure a slightly larger setup with three servers. perlbal.foo.com is where Perlbal will run; web1.foo.com and web2.foo.com are the servers that hand out files.
If you assume that these hostnames map to the following IPs,
192.168.0.1 perlbal.foo.com
10.0.0.1    web1.foo.com
10.0.0.2    web2.foo.com
you would create this configuration on perlbal.foo.com as shown in Listing 2.
| Listing 2: Load Balancing |
01 CREATE POOL apache_pool 02 POOL apache_pool ADD 10.0.0.1:80 03 POOL apache_pool ADD 10.0.0.2:80 04 05 CREATE SERVICE balancer 06 SET listen = 192.168.0.1:80 07 SET role = reverse_proxy 08 SET pool = apache_pool 09 SET persist_client = on 10 SET persist_backend = on 11 SET verify_backend = on 12 ENABLE balancer |
For this setup to work properly, you will want to point the DNS for your domain to perlbal.foo.com`s IP address (192.168.0.1 in this example ). This configuration sets up a reverse_proxy service, which will proxy and load balance requests across both web1.foo.com and web2.foo.com.
The verify_backend option instructs Perlbal to ensure it is talking to an actual web server back-end and not the server's TCP stack. If it determines it is stuck in, say, web2`s listen queue, it will resend the request to web1.
The persist_backend option is useful if Perlbal will be the only client connecting to your back-end pool nodes. It will then use HTTP keep-alives to keep an open connection between Perlbal and the web nodes. Perlbal can also read a list of nodes for a particular pool from a separate text file.
The file is checked every few seconds and any changes are reflected. This feature is configured with:
CREATE POOL foo_nodes_from_file
     SET nodefile = /home/foo.com/nodes.txt
Suppose web1.foo.com is due for some maintenance or has suffered a hardware failure. If you were to Telnet to the management interface and run the command
pool apache_pool REMOVE web1.foo.com:80
that server would then be removed from the pool and all traffic would be routed to web2.foo.com until you re-enable it:
pool apache_pool ADD web1.foo.com:80
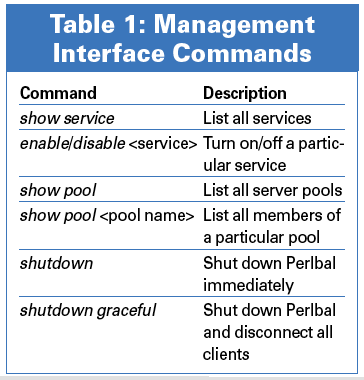
Other useful commands for the management interface are shown in Table 1.
Also, you can execute any of the configuration commands I've used in other examples on the command-line interface. For example, you could use CREATE POOL to set up a new pool of web servers called new_apaches and then use:
SET balancer pool = new_apaches
Perlbal will switch to using the new back-ends without skipping a beat.
Perlbal has a plugin system you can use to write your own custom logic. Check the Perlbal source for documentation and examples of writing your own plugins. For example, you could write a plugin that redirects all static content to a particular pool of servers on the basis of the URL.
A friend of mine, Jacob Kaplan-Moss, wrote a plugin for his employer that checks for the existence of a session cookie that would indicate whether the requester was logged into a local news site. If the user isn't logged in, Perlbal directly checks for the existence of a cached copy of the page from memcached and returns it to the client. This essentially removes the web server from the picture for any cached pages requested by users not logged in, which dramatically reduces server load.
The AccessControl plugin lets you allow or deny requests on the basis of IP address or netmask. To use this plugin, just add the line LOAD AccessControl to the top of your configuration file and enter the following:
ACCESS POLICY DENY
ACCESS ALLOW netmask 192.168.0.0/24
This would deny access by default but allow anyone in the 192.168.0.0/24 network. Or if you just need to block a few bad IP addresses, you could reverse this:
ACCESS POLICY ALLOW
 ACCESS DENY IP 10.0.0.1
which would allow everyone by default, except for the bozo at 10.0.0.1.
The other plugin you might find useful is NotModified. This plugin will return a 304 to the client if the client sends an "If-Modified-Since" header. By returning the 304, Perlbal is telling the browser that, if you have a copy in your cache, it's up to date.
This plugin is useful if you have a page in which your content really doesn't change - for example, an image or video archive. The use of this plugin removes the need for Perlbal to even ask a back-end node about the last modification time.
I hope these examples reveal some ways Perlbal might help you in your quest for better and easier web server performance, load balancing, and reverse proxy service.
| INFO |
|
[1] Perlbal: http://www.danga.com/perlbal/
[2] CPAN: http://www.cpan.org |