
By Aleksander Korzynski
A Single System Image (SSI) cluster is a collection of separate computers that appear as a single multi-processor system. SSI clustering platforms are typically implemented at the kernel level.
In SSI high-performance clusters, the program does not even have to know it is running in a cluster. The only requirement is that the program spawn multiple processes. These processes then pass transparently among the computers in the cluster.
Although SSI clusters are not as scalable as some of the other clustering alternatives, they offer a significant advantage in that the program running on the system doesn't even have to know the cluster exists. Other high-performance clustering platforms require that the source code of the program contain clustering code - or at least that the program be linked to a clustering library.
OpenSSI is a comprehensive, open source SSI clustering solution for Linux based on HP's NonStop clustering platform. NonStop is derived from Locus, which was developed in the 1980s.
OpenSSI can transparently spread processes over multiple machines - a feature known as load-leveling [1]. Other SSI Linux clustering platforms capable of load-leveling include openMosix and Kerrighed.
OpenMosix is by far the most popular SSI clustering alternative for Linux. In July, however, it was announced that the openMosix project will end in March 2008. Kerrighed is relatively new and is under rapid development.
In this article, I will show you how to set up load-leveling in OpenSSI, starting with an overview of relevant OpenSSI features, then describing the OpenSSI installation and configuration before using a cluster to compile source code on multiple machines at once.
And finally, I will demonstrate a visual monitoring and management tool for OpenSSI.
OpenSSI constantly monitors the load on the computers in the cluster, and it automatically migrates processes among the nodes. The OpenSSI system is capable of migrating a multi-threaded application, but it cannot migrate individual threads. A migrated process can continue with the same operations it was doing at the original machine. It can read and write to the same files or devices. A migrated process can even continue Inter-Process Communication (IPC) over a pipe or socket.
Most applications run on OpenSSI without any modifications with some exceptions, as listed in the man page for the migrate command. OpenSSI also provides a library that programs can use to control the cluster.
The view of the filesystem is the same at every machine; however, the contents of a particular file can be different at each computer in the cluster. This occurs through a feature known as Context-Dependent SymLinks (CDSL).
A CDSL is a symbolic link that points to different file contents at each machine. Devices on the local computer are available under /dev as usual, and devices on other machines are accessible under special subdirectories in /dev.
Process management is cluster-wide. The whole cluster shares a single PID space, with a single naming space for IPC objects.
Additionally, the /proc filesystem is modified to show information about all the processes in the cluster.
Many standard system tools work with OpenSSI without any modifications, although some tools are specifically adapted for OpenSSI. The ps or top commands, for example, display processes running on all computers in the cluster.
The OpenSSI project supports stable and development release branches. The stable versions are numbered 1.2.x and the development versions inhabit the 1.9.x series. The stable branch is based on the 2.4.x Linux kernel and the development branch on the 2.6.x kernel. The latest stable version is OpenSSI 1.2.2, which is based on kernel 2.4.22. The latest development version is 1.9.2, which is based on kernel 2.6.10.
OpenSSI is released through distribution-specific packages. Stable series releases are available for Fedora Core 2, Debian 3.1 (Sarge), and Red Hat 9.
Development releases are available for Fedora Core 3 and Debian 3.1 (Sarge). You can also find a Live CD version that runs OpenSSI 1.2 and is based on Knoppix 3.6.
| Development Branch |
|
The development branch is a port of the stable branch to the 2.6 kernel and to newer Linux distributions. The branch inherits the advantages of the 2.6 kernel, such as better I/O schedulers, greater scalability, more supported hardware, and an improved virtual machine. The development branch adds support for running OpenSSI in the Xen and Linux KVM virtual machine environments. The next release in the development branch will include even more improvements. As of this writing, the development branch has a notable bug. The bug is observed when a process that has been moved from one machine to another listens on a TCP/IP socket. In particular, the bug affects SSI high-performance clustering and does not affect web service or high-availability clustering. The OpenSSI team has an ambitious road map. According to OpenSSI developer Roger Tsang, the next release will be 1.9.3 in the development branch. It will be based on Linux kernel 2.6.11 and will include enhancements to high-availability clustering, the cluster filesystem, and the OpenSSI core. It will also add experimental support for the Infiniband network architecture. Other plans include porting to the Linux 2.6.16.x stable kernel series. Ports to Red Hat Enterprise Linux 5 and the related CentOS 5 are in the making. Support for x86_64 hardware is under development as well. Once the 1.9.x branch is stable, it will become OpenSSI 2.0.0. As a long-term task, the developers will continue working on Linux kernel hooks intended for inclusion into the mainstream kernel. |
To create an OpenSSI cluster, you'll need at least two PCs and a local area network. The network used for connecting the machines in the cluster together is called the interconnect. The faster the interconnect, the better your performance will be.
If you are using the OpenSSI Live CD, none of the computers has to have a hard drive. One computer will boot from CD-ROM and the remaining computers will boot over the network. For the traditional hard drive installation, only one computer has to have a hard drive.
The machines that boot over the network can start booting from floppy, CD-ROM, a small partition on the hard drive, or from a network card capable of network booting.
If you want the cluster to be accessible from an outside network, it's a good idea to configure another network card on one of the machines, rather than using the interconnect for that purpose. You'll be able to access any computer in the cluster through the system with the two network cards.
OpenSSI is difficult to install. The official documentation calls the procedure "somewhat clunky." You should be fairly familiar with the distribution you are using, so that you'll be able investigate and solve potential problems.
In OpenSSI, one node is special and called the init node. The init node boots directly from the root filesystem. The remaining nodes boot over the network.
To boot the non-init nodes over the network, you need Etherboot or PXE. Etherboot is free software that you install Etherboot on a bootable medium, like a floppy, a CD, or the hard drive, or flash it into the network card's ROM.
Almost any network card is compatible with Etherboot. PXE, on the other hand, is already integrated onto some network cards, and you usually enable it in the BIOS setup.
The easiest way to get started with OpenSSI is by booting the Live CD; however, you may face two problems with the Live CD.
The first problem you could encounter is that your network card might not be supported. Because the Live CD is based on the old 2.4.22 kernel, it might not recognize late model cards. For instance, it didn't recognize my network card, which was manufactured in 2007.
The other problem is that, contrary to the official documentation, the Live CD has buggy support of Etherboot. It only supports PXE well. This problem has been reported to the OpenSSI mailing list. Check whether your card supports PXE. If you're unlucky, jump to the hard drive installation directly.
To run the Live CD, download the CD ISO image [2]. You have to burn it to one blank CD only. You will boot only one node from the CD, then you'll boot the remaining nodes over the network.
For clarity, I'll guide you through setting up a cluster of two nodes. The first node will be the init node, and the other node will be the non-init node.
First, enter the BIOS setup of the non-init node and enable PXE. Next, reboot the node. It will display its MAC address and hang waiting for the boot server. Write the MAC address down on a piece of paper.
Now boot the init node from the Live CD. Wait until you are given the shell prompt. If you can't boot due to hardware problems, you can try the hard drive installation. Using the 1.9.x OpenSSI series instead of 1.2.x will probably help.
If you succeed in booting the Live CD, you should now have the shell prompt at the init node. Now you have to configure the init node to accept the other node into the cluster. To do that, run ssi-addnode. You will need to answer a series of questions.
For the first question, type y to enable verbose guidelines. Next, you will be asked to pick a node number. Type a number between 2 and 125. You will then be asked for the MAC address of the node. Type the address you wrote down previously.
Note that the numbers should be separated by colons regardless of how PXE displays the address to you. Next, you will be asked for the IP address of the new node. Type an address from the 10.x.x.x space, for example, 10.0.0.2. (The init node has 10.0.0.1 assigned to it already). When asked whether the node boots over PXE or Etherboot, type P for PXE. Type a name of your choice for the nodename, for example, Knoppix2. (The init node is Knoppix1 already).
Finally, hit Enter twice to acknowledge the configuration. After you have configured the init node, another node can join the cluster.
Reboot the non-init node now and wait until you see the shell prompt. Type cluster -v to confirm that the non-init node has booted successfully.
If the new node doesn't boot, you can try restarting the boot server and rebooting the non-init node. This step is sometimes necessary because the boot server does not reply to the same machine twice. To restart the boot server, type the following commands at the init node:
# /etc/init.d/dhcp restart
# /etc/init.d/inetd restart
If you haven't stumbled upon hardware compatibility problems, you now have a running SSI cluster. Jump to the section on configuring load-leveling.
For real production use, you'll have to install OpenSSI on the hard drive. The hard drive installation takes longer than running the Live CD, and I won't describe it here in detail. However, I will let you know where to look for the detailed instructions.
At the OpenSSI Download page [2], you will find links to How to Install guides for each OpenSSI version. Once you have installed basic OpenSSI, find the information on how to configure various features [3].
Once you have a basic OpenSSI cluster up and running, you can configure load-leveling for the cluster.
To tell OpenSSI to configure load-leveling for a program, you can either put the program name on the load-leveling list or run the special bash-ll shell before invoking the program.
If a program is on the load-leveling list, all the processes it creates, and all their offspring, will be load-leveled. If you are running the Live CD or Debian, the list is located at /cluster/etc/loadlevellist. If you are running Fedora, it is in /etc/sysconfig/loadlevellist.
To set up the special bash-ll shell, copy the standard bash shell to a file called bash-ll. Also, put bash-ll on the load-leveling list. Now, if you want to load-level a program, first run bash-ll. Each process starts from the new shell, and all offspring of that process, will be load-leveled.
To complete the configuration, create a bash-ll hard link pointing to bash:
$ ln /bin/bash /bin/bash-ll
On Fedora, bash-ll is configured by default. On the Live CD, bash-ll is not configured by default. On Debian, bash-ll is partially configured.
To test the configuration, run the demo that comes with OpenSSI.
The demo works as follows. First you disable load-leveling. Then you run a specifically prepared demo program. The program spawns several processes. Each second, the program outputs information on how much data it processes per second. Enable load-leveling at any time, and the processes are spread over the cluster. You can then observe the increase in the total amount of data the program processes per second.
If the demo is not present in your hard drive installation, check the OpenSSI website. If you're using the Live CD, you'll find the demo in /demo-proclb.
To run the demo on the Live CD, boot at least two nodes into the cluster. On the Live CD, the program is on the load-leveling list already. Add the demo directory to your PATH:
# export PATH=$PATH:/demo-proclb
Now switch to another console on the same node and disable load-leveling temporarily:
# /etc/init.d/loadlevel stop
Load-leveling is now disabled. Switch back to the previous console to run the demo program. The program requires an input file, which can be any large file.
You can, for example, use the initrd image in /boot. Invoke the program:
$ demo-proclb
<input_file>
The program should now be running.
Look at the output for several seconds. The output displays the amount of data processed per second.
Enable load-leveling at any time. To do that, switch to another console and run:
# /etc/init.d/loadlevel start
Load-leveling is now enabled, and processes are being migrated to other nodes. Switch back to the console with the demo program.
Did it work? After a few seconds, the total amount of data processed per second should increase. Listing 1 shows an example of the demo program at work. Each line represents the amount of data processed in a given second. Load-leveling is enabled at t=9.
| Listing 1: Load-Leveling Demo |
user@debian:~$ demo-proclb -m 1800 in_file Forked child 50 / 50 1: 0 ##### |1800: 575 recs/sec 2: 0 ####### |1800: 812 recs/sec 3: 0 ####### |1800: 833 recs/sec 4: 0 ####### |1800: 837 recs/sec 5: 0 ####### |1800: 841 recs/sec 6: 0 ####### |1800: 833 recs/sec 7: 0 ####### |1800: 835 recs/sec 8: 0 ####### |1800: 835 recs/sec 9: 0 ####### |1800: 817 recs/sec 10: ####### |1800: 791 recs/sec 11: 0 ########## |1800: 1183 recs/sec 12: 0 ############ |1800: 1431 recs/sec 13: 0 ########### |1800: 1375 recs/sec 14: 0 ############ |1800: 1425 recs/sec 15: 0 ########## |1800: 1172 recs/sec 16: 0 ############# |1800: 1592 recs/sec 17: 0 ########### |1800: 1320 recs/sec 18: 0 ############ |1800: 1486 recs/sec 19: 0 ############# |1800: 1504 recs/sec 20: 0 ############ |1800: 1479 recs/sec 21: 0 ############ |1800: 1477 recs/sec |
If you are a software developer, you can use an OpenSSI cluster to speed up your compiler. In practice, this solution is only really convenient if you're using the hard drive installation.
The make command has a switch that splits the compilation task into a number of parallel jobs. The switch is -j.
To compile source code on multiple machines at once, configure load-leveling and then type:
$ make -j N your_project
N is a number equal to or greater than the number of nodes. You can experiment with different values of N.
If you have installed OpenSSI on the hard drive, you can install the excellent visual monitoring and management tool for OpenSSI.
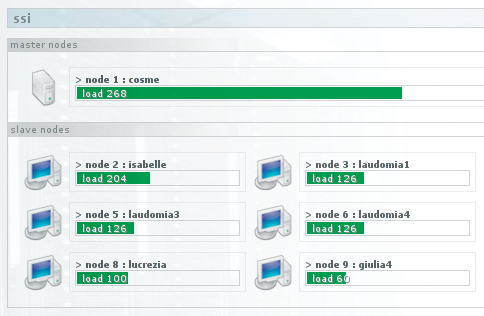
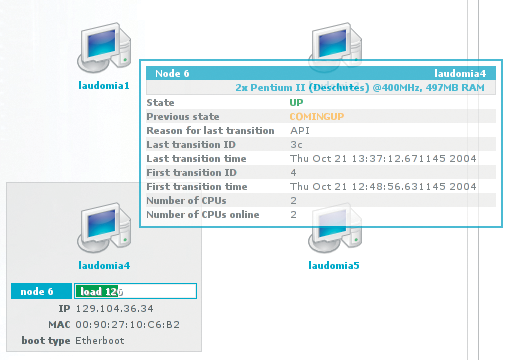
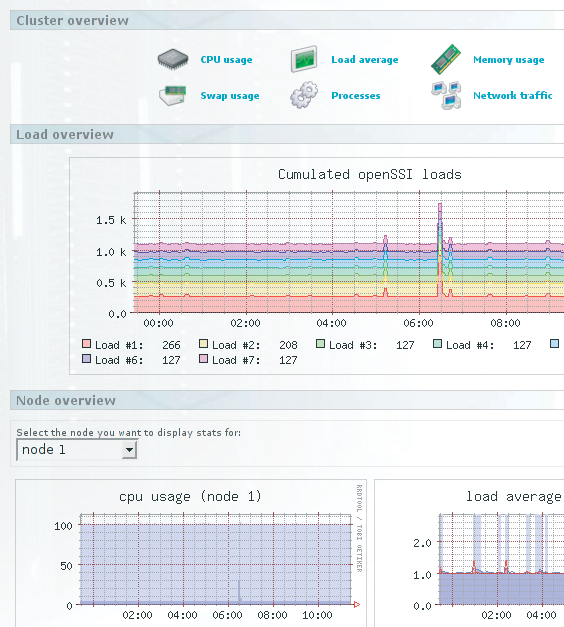
OpenSSI-webView is a is a PHP-based tool developed by Kilian Cavalotti. The interface is divided into several tabs. You can view the load at each node in the cluster (Figure 1), monitor the status of each node (Figure 2), or view charts with various statistics (Figure 3). You can also monitor processes at each node and manually migrate a process to another node.
To use webView, you first have to install OpenSSI on the hard drive. You'll find instructions online for installing OpenSSI-webView on distros such as Debian [4] and Fedora [5].
The OpenSSI features are amazing, and the ambition of the project is great. However, the releases are rather far behind the development of the Linux kernel. With the openMosix project having announced End of Life, and with Kerrighed under rapid development, the future of OpenSSI remains open. For the time being, enjoy it. You can check out a comprehensive performance comparison between OpenSSI and its competitors in Lottiaux et al. [6].
| Acknowledgments |
|
Many thanks to Roger Tsang for answering my questions about OpenSSI. Special thanks to Killian Cavallotti for permission to use the OpenSSI-webView screenshots. |
| INFO |
|
[1] Introduction to OpenSSI: http://openssi.org/ssi-intro.pdf
[2] OpenSSI download: http://openssi.org/cgi-bin/view?page=download.html [3] OpenSSI documentation: http://openssi.org/cgi-bin/view?page=docs [4] OpenSSI webView for Debian: http://wiki.openssi.org/go/OpenSSI_webView [5] OpenSSI webView for Fedora: http://openssi-webview.sourceforge.net/install.php [6] OpenMosix, OpenSSI and Kerrighed: a Comparative Study: http://www.irisa.fr/paris/Biblio/Papers/Lottiaux/LotBoiGalValMor05CCGrid.pdf |
| THE AUTHOR |
|
Aleksander Korzynski is a Software Developer at ClusterVision in the Netherlands. Earlier this year, he received his MSc from the Warsaw University of Technology in Poland. His thesis project included analyzing and modifying the source code of the OpenSSI kernel. He enjoys playing snooker. |