
By Karsten Reich
No matter what size office you work in, a variety of documents will land on your desk every day. Many organizations have a system for sending documents to a team of participants on a circulation list. The document reaches one employee after another along a defined path. After all the participants have viewed the document, it is returned to the sender.
At least this is what happens in theory, but what happens to the circulation if somebody is sick, on vacation, or simply not in the office? The old paper-based circulation systems often resulted in documents getting delayed in the shuffle. Several electronic collaboration systems are now available, but these systems are often too complicated for small teams.
An open source tool called CuteFlow [1] supports cross-platform document workflows. CuteFlow is an electronic collaboration tool modeled on the old paper-based circulation systems. The configuration and front-end of the PHP-based CuteFlow are fully web-based; a web browser and an email address are all you need.
With the use of a web interface, you can forward paperless documents for viewing or processing to the recipients on the distribution list, and you can add project sketches, video, or audio recordings as attachments to the document circulation. Additionally, CuteFlow allows you to extend the circulation with text boxes, radio buttons, checkboxes, and combo boxes. If necessary, you can modify the circulation list to reflect changes in requirements.
While the document circulation is in progress, you can keep track of documents through CuteFlow's handy status overview table. After a document completes the workflow, CuteFlow archives it for later viewing.
The CuteFlow document circulation system requires a web server (e.g., Apache 1.3.x or newer) with PHP5 extensions, PHP5, MySQL as the database, and an email server that you can address via SMTP. CuteFlow optionally supports LDAP-based authentication, and you will need the PHP LDAP packages for your distribution.
The installation archive with version 2.9.0 of the CuteFlow files is available from SourceForge [2]. The sparse installation guide recommends unpacking the CuteFlow archive in the document root directory on your web server as the first step: /var/www/ for Ubuntu, or /srv/www/htdocs/ for SUSE 10.2. Then open CuteFlow in your browser by entering http://IP address/V.2.9.0/index.php. Don't forget to change IP address to match your web server's IP.
The program immediately launches into the install, which comprises five steps. To complete step one, just click the Install button. The routine will check to see whether your system fulfills the requirements and whether the permissions for the directories and files are set up correctly. If you unpacked the archive in the document root directory as root, the administrative user will be the owner of the directories and files, which causes CuteFlow to complain (Figure 1).
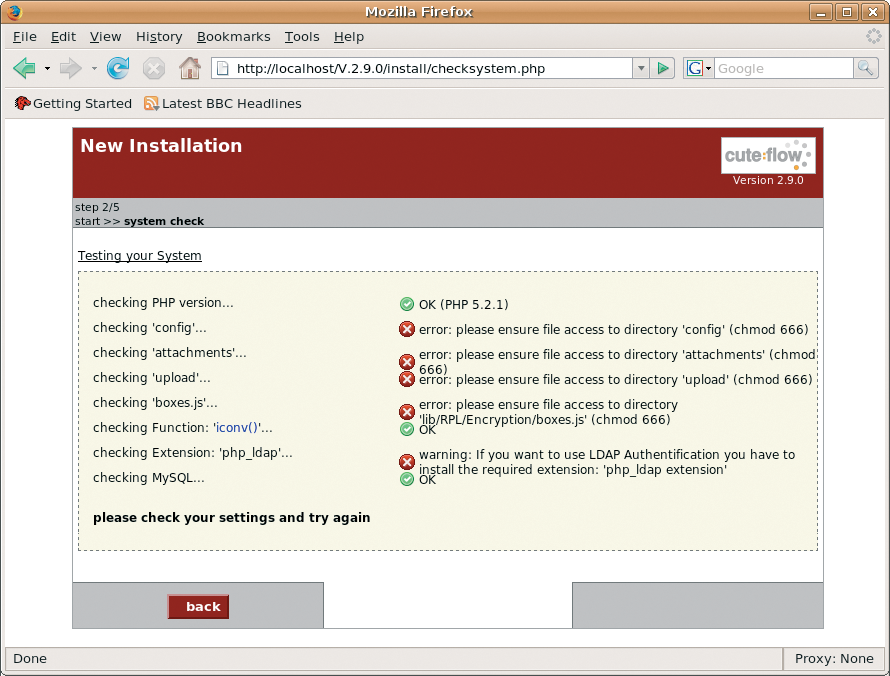
Change the owner of the data below V.2.9.0. Ubuntu users must enter sudo chown -R www-data:www-data /var/www/V.2.9.0. If you have SUSE, change the owner to wwwrun and group membership to www. The -R option will recursively modify the files and directories below V.2.9.0. To do this, you need root privileges.
Now press the Install button again; CuteFlow will confirm that the system test has completed successfully and carry on with the installation. Next, the program prompts you for details about the database. CuteFlow currently supports MySQL; support for other databases is under development. Enter your MySQL server hostname, the database name, and the user ID and password.
The dialog that follows prompts you for details about your SMTP server. You do not need to install a separate mail server for this; use your email provider instead. At Server, enter mail.your_provider.com. Next, enter the credentials for your mail client - your user ID and password, for example - in the other fields.
If you later experience problems sending emails with CuteFlow, leave your user ID, password, and the authentication checkbox blank so that, in this case at least, you will be able to send messages to system users independently of the circulations.
The program completes the install by giving you the opportunity to set up a sample database. If you want to test CuteFlow with predefined users and document templates, check Install sample database and enter an email address.
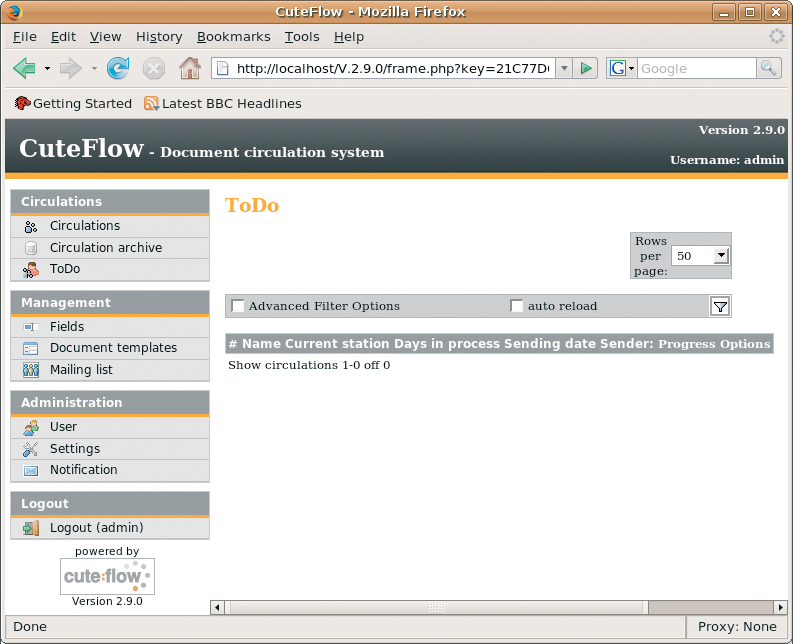
After completing the install, you are taken to the CuteFlow front-end the first time you log in. With a combination of admin as your username and admin as your password, the program automatically opens the ToDo page. In normal operations, this page gives you an overview of the circulations currently waiting at your node.
Configuring and using the program is just as easy as the installation (see Figure 2). On the left side, you can see the program's four main functions: Circulations, Management, Administration, and Logout. Working as the administrator, you can now go on to configure CuteFlow. Two items below Administration let you set up and delete User, and modify the database, mail server, and front-end Settings.
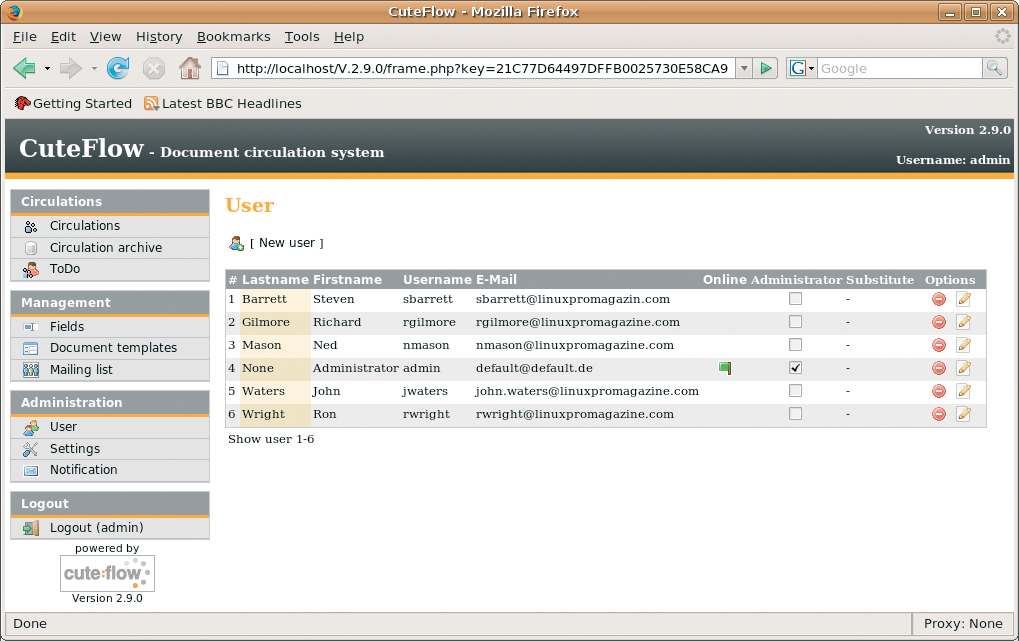
When you click User, you will see a list of existing employees (Figure 3). The overview includes typical data such as names and usernames, but also a status display that tells you whether the employee is currently online. Clicking the icon in the Options column gives a user administrative privileges, deletes a user, or shows the user's account details.
New User takes you to a dialog box in which you can add users who will be working with the document-circulation system. Make sure you add a valid email address along with the user's credentials; CuteFlow needs the email address to notify the user when a document is waiting at the user's node. Additionally, the administrator can use the email address to send messages to registered users. CuteFlow also lets you enter a proxy for a user. The program enables the proxy if the actual target fails to respond within a certain deadline when a circulation is waiting at the user's node.
One thing to look for is how you define a new user's privileges when you create the user and choose the radio buttons in the User rights tab. The program distinguishes between Administration, Sender, Read-only, and Receiver. The last two permissions simply confirm that the user views the document in circulation. The Receiver is allowed to add comments, assuming the template supports this, before sending the circulation off to the next node. Administrators and Senders are allowed to initiate new circulations and delete or resend existing ones. Users with Sender privileges are not allowed to manage CuteFlow, in contrast to Administrators.
The configuration of the database, the CuteFlow and email servers, the GUI, and authentication are all located below Administration | Settings. The Databases tab lists the settings configured when you installed the program and does not let you make changes. The Server tab is where you enter the host address on which the CuteFlow server resides.
More settings are available for email. For the program to work, you need to specify an SMTP server, which the program will use to mail messages to users. Either an IP address or a URL, like smtp.sample.com, will work, and port 25 should work in most cases.
When you are using the program, some issues with message dispatching could occur if the user ID and password fields contain non-standard characters besides letters and numbers. If this happens, you will need to delete the entries in both fields.
The Authentication tab takes you to settings for LDAP, which CuteFlow will optionally use as its authentication method. If you are familiar with LDAP, you can add the required credentials here; otherwise, you can stick to the defaults that tell the software to use the user-management details that you entered in Administration | User.
CuteFlow lets you modify the GUI display elements to some extent. For example, you can change the language, the number of lines per page, the sorting order, the column order in document circulations, and many other things. Changes are made in the GUI tab.
The categories are self-explanatory; you should not have any trouble discovering the functions. After changing basic settings, make sure you click Save at the bottom of the page. The Reset button is a practical aid that reinstalls the defaults if things go wrong.
To initiate your first circulation with CuteFlow, you must define the fields, document template, and mailing list; the functions for this are located below Management on the left.
The fields let you define whether and how recipients are allowed to add information to the circulation. CuteFlow distinguishes various information types, from Decline/Accept decisions to checkboxes and combo boxes. You can even allow recipients to upload files as attachments to the circulation.
Next, CuteFlow needs a document template, which contains slots for dividing your document visually and by topic (Figure 4).
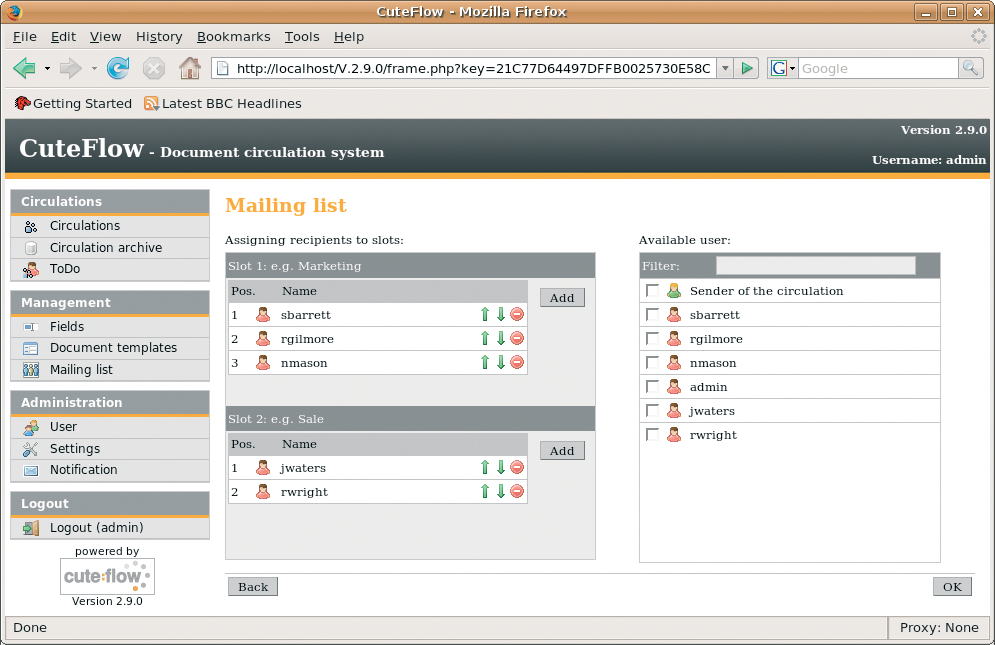
When you add mailing lists at the next step, you can decide which receivers are assigned to which slot (what sections of the document the users see or can modify), and you can create one or multiple slots and assign fields to them.
Before the circulation is launched, the system needs at least one mailing list. If necessary, you can assign a different template to each list. After completing this step, finalize the process by adding users to the mailing lists and assigning the users to slots (Figure 5).
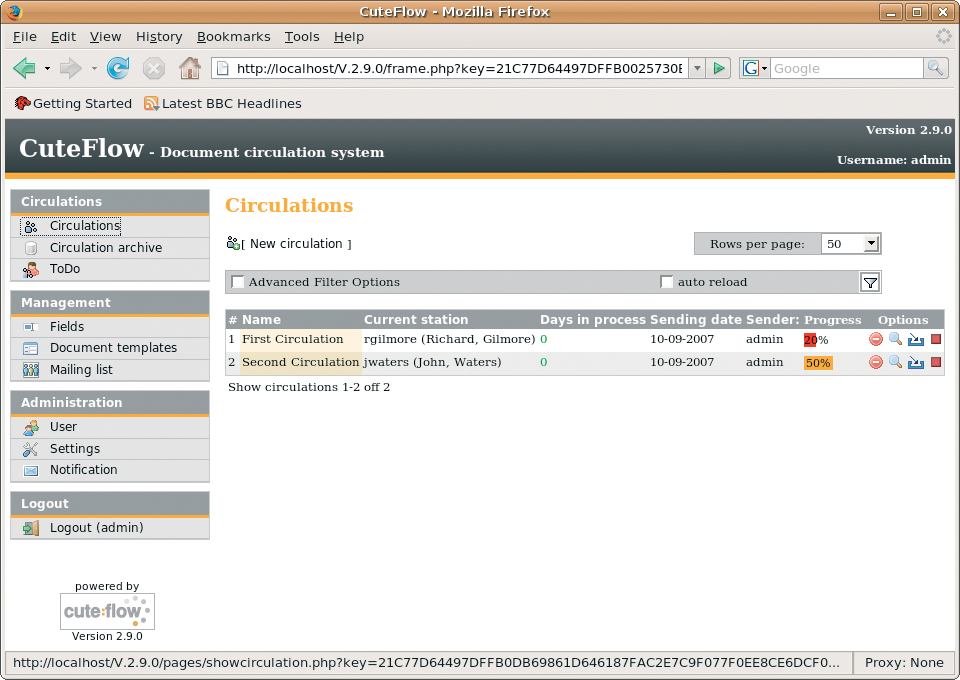
To initiate a new circulation, go to Circulations | Circulations | New Circulation. The circulation name and the mailing list are required in the dialog box that follows. If you like, you can add an attachment or an introductory text to the circulation.
Clicking on Next takes you to an overview where you can modify the mailing list and template settings for this circulation; however, normally, you do not need to do this. Clicking Complete will get your first circulation under way (see Figure 6).
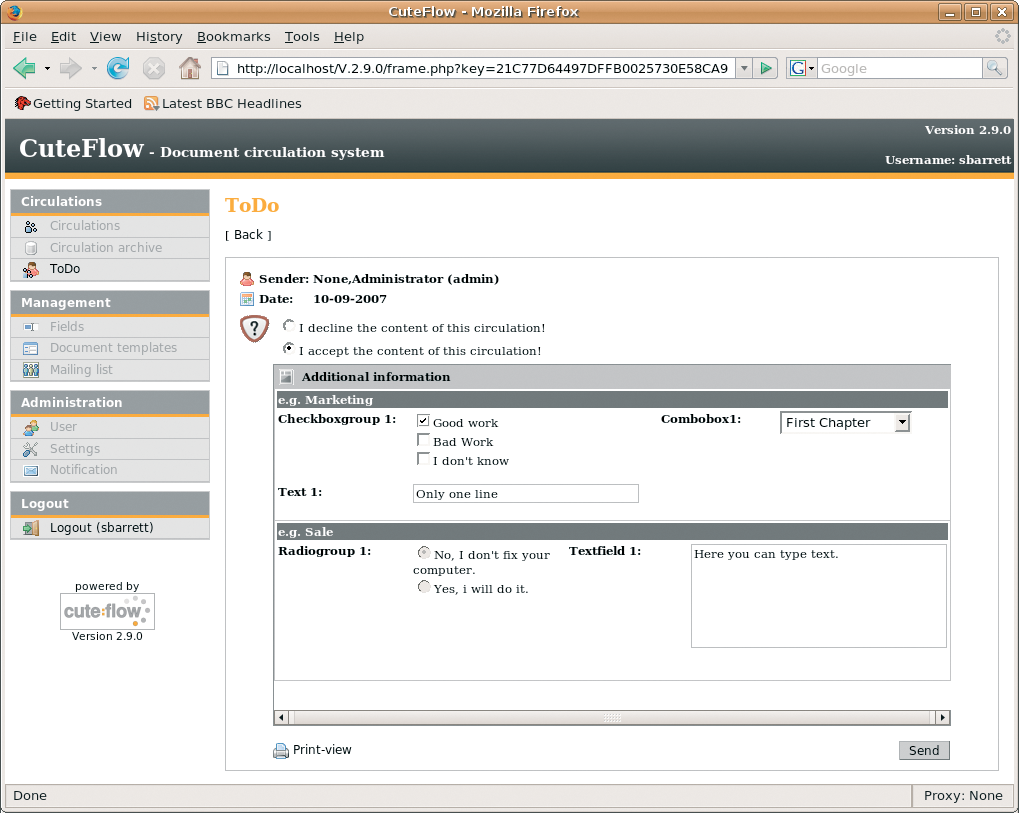
CuteFlow now sends an email to the first user on the mailing list, telling the user to log onto the CuteFlow server and contribute to the circulation. If it's your turn, log on and check the circulations at your computer in the ToDo list. Next, clicking the Edit circulation icon in the Options column takes you to the circulation content. After adding information to the circulation, clicking on Send sends it to the next node.
At this point, CuteFlow should send an email to the next person on the list; however, this feature did not actually work in our lab. Because the documentation is sparse, I was unable to resolve the problem. Troubleshooting the problem was challenging because I had no trouble sending general messages to the mail addresses of the system users via Administration | Notification. The mailerror.log in the CuteFlow root directory, which normally contains a list of mail errors, was clean. The maintainer was unable to help and only replied sporadically to my questions [3].
Of course, I can't rule out an incorrect configuration entirely, but taking poor support and the lack of documentation into account, users are advised not to consider CuteFlow for production use yet. Even though the program failed to notify the next recipient on the list by email, the workflow itself worked perfectly. Every recipient was able to add information and send the document to the next user on the list. CuteFlow archives completed workflows and automatically updates the list of open document circulations.
| INFO |
|
[1] CuteFlow: http://www.cuteflow.org
[2] Download: http://downloads.sourceforge.net/cuteflow [3] Support for CuteFlow: http://www.cuteflow.org/support.html |