
By Christian Kroll
Unix is an ideal platform for terminal servers. The many network-capable services, such as the X11 graphics interface, the SSH remote shell, and NFS, are mature and trusted standards that have been around for years. But good server-based computing means that the user experience is identical to the experience of working directly with the application.
Programs should play back sound to the client system, rather than to the server running the application; USB sticks plugged into a client should be accessible to applications running on the server; and printers attached to the client should be visible to the terminal server system.
The Linux Terminal Project (LTSP) [1] is an open source project devoted to building a high-end terminal server system for Linux. LTSP combines X Window, SSH, and NFS to deliver access to local printers, drives, and sound cards in network boot configurations. LTSP cleverly combines critical network services for a full-fledged terminal server solution that is easy to set up and maintain. The power and easy configuration of LTSP makes it a favorite for schools and development aid projects.
At the core of any LTSP installation is a chroot environment containing all the necessary systems. An X server with minimum resource requirements launches on the thin client and automatically connects to the terminal server.
Up to Version 4 of LTSP, the chroot environment was a separate distribution with a special set of administration tools. However, the environment mainly comprised a special combination of projects such as Glibc or X.org, which turned out to be a problem. All of these projects are under development and regularly release security updates that then have to be ported to LTSP.
LTSP 5 opted for a different approach. Instead of publishing a compilation of various projects, as had been the case previously, the programmers focuses on central LTSP components. Besides startup scripts and modified configurations, auxiliary services now give the terminal server access to peripherals attached to thin clients.
The remaining program packages and a major part of the tool chain is provided by the server's host distribution in LTSP 5. This allows for granular emulation of the chroot environment and supports program updates and the installation of new programs via the apt-get package manager.
Besides Debian, Ubuntu is the major contributor to LTSP 5 development right now. This explains why these distributions, and their offshoots Edubuntu and Skolelinux, have the most advanced LTSP 5 implementations.
If you are configuring a terminal server for LTSP, assessments of the hardware requirements will vary considerably depending on the intended use. For typical office scenarios, recommended minimum memory size is around 256MB RAM for the server itself plus 64MB RAM for each user logged on to the server.
A midrange CPU running at 2 GHz will be fine for 15 to 20 users in an office-only scenario; multimedia applications will need a high-end CPU with multiple cores. Flash, Java, video, and 3D applications, in particular are notorious for stressing a system.
If you are unsure, you will need to take a very close look at the memory requirements and CPU load for your choice of applications and multiply the values you determine by the number of users. Make sure you add a safety margin; if the server runs out of main memory, it will start to swap data out, and this will affect performance.
The network topology recommended by Edubuntu envisions a separate subnet for the clients. The terminal server should thus have two Ethernet cards - one of them on the subnet, and the other connected to the rest of the LAN or a router. For ten or more clients, it makes sense to use Gigabit Ethernet for the client subnet to avoid peak load bottlenecks client side. In many cases, the hard disks, which are stressed by multiple simultaneous access, are typically the most sensitive bottleneck on this kind of system, so it makes sense to opt for a RAID system with fast read times.
Cheap SATA disks with Native Command Queuing (NCQ) and 16MB cache are fine as RAID components. Native command queuing gives SATA disks the ability to modify the order of requests arriving in quick succession to boost read performance. This is a big advantage if you have a large number of simultaneous access requests, but it does mean having a controller with NCQ support.
The minimum requirements for an LTSP thin client are a 233 MHz CPU, 64MB RAM, a 100Mb Ethernet NIC, and a graphics adapter with 2MB video RAM. A 400 MHz CPU and 128MB RAM are recommended.
If you will be playing back videos and using 3D applications, you will need a graphics adapter with X video or GLX support; however, a local hard disk is not required.
If you will be booting clients from the network, an Ethernet card with a PXE-capable boot ROM is recommended. If your boot ROMs don't support this, you can download tailor-made ROM images [3] for many cards courtesy of the Etherboot/gPXE project [2].
Of course, this assumes you have an EEPROM burning device; if not, you can still download a disk or CDR image from the Etherboot project. Generally speaking, it makes more sense to boot off the network than from a legacy drive, as network boot reduces mechanical problems and eliminates the need to keep a store of boot media.
Assuming you use the suggested network topology, LTSP 5 will be ready for use when you complete the install, and your thin clients will be able to boot without any further ado.
Adding LTSP to an Ubuntu system takes slightly more effort. First, you have to make sure that the Ethernet cards in your designated terminal server are correctly configured. The /etc/network/interfaces file has the configuration.
Listing 1 shows a sample configuration based on the topology suggested by Edubuntu. The eth0 card is attached to the regular subnet and is configured automatically via the network; eth1 serves the thin client subnet and is set to a static IP address of 192.168.0.254. For more details, just type man 5 interfaces.
| Listing 1: /etc/network/interfaces |
01 # loopback interface 02 auto lo 03 iface lo inet loopback 04 05 # the NIC on the regular subnet 06 auto eth0 07 iface eth0 inet dhcp 08 09 # the NIC on the thin client subnet 10 auto eth1 11 iface eth1 inet static 12 address 192.168.0.254 13 netmask 255.255.255.0 14 network 192.168.0.0 15 broadcast 192.168.0.255 |
To avoid automatic aids such as Avahi or Network Manager "improving" your Ethernet interface configurations, it is a good idea to uninstall the avahi-autoipd and network-manager packages. The following enables the configuration:
sudo invoke-rc.d networking restart
The next step is to install the ltsp-server-standalone package, which includes the ltsp-build-client script for setting up the chroot environment for the client system.
The software has a couple of dependencies on services that are critical to running the terminal server, but your package manager should handle them without you needing to step in. In addition to this, the SSH server has to be installed, as LTSP relies on SSH for its default login mechanism.
When you call the ltsp-build-client script, it automatically downloads the packages it needs for chroot from the repositories and then runs debootstrap to install a lean Ubuntu system in /opt/ltsp/i386. The main difference to the host system, besides the spartan selection of installed packages, is that it includes ltsp-client, which gives you start scripts for diskless thin client operations.
You can manage the system just like any normal Ubuntu installation for the most part. An online update looks like:
sudo chroot /opt/ltsp/i386
apt-get update
apt-get upgrade
exit
Before you let the clients boot off the network, become root and make sure the required services are correctly configured and accessible.
The clients use the Dynamic Host Configuration Protocol (DHCP) to retrieve all the settings they need, such as the IP address, subnet, default gateway, and other parameters. The dhcpd3 daemon, which handles all of the requests from the subnet, runs on one of the machines (typically on the terminal server itself.) The configuration is available in the /etc/ltsp/dhcpd.conf file; Listing 2 gives you an example with comments.
| Listing 2: /etc/ltsp/dhcpd.conf |
01 # options entered here are mandatory
02 # for all clients
03 authoritative;
04
05 group {
06   # Typical parameters for an IP network
07   option domain-name "example.com";
08   option domain-name-servers 192.168.0.1;
09   option broadcast-address 192.168.0.255;
10   option routers 192.168.0.1;
11   option subnet-mask 255.255.255.0;
12
13   # The path to the boot loader on the TFTP
14   # server for PXE and Etherboot
15   if substring( option vendor-class-idetifier, 0, 9 ) = "PXEClient" {
16     filename "/ltsp/i386/pxelinux.0";
17   }
18   else{
19     filename "/ltsp/i386/nbi.img";
20   }
21
22   # The NFS root directory to mount
23   option root-path "/opt/ltsp/i386";
24
25   # Host "foo" with a MAC address of
26   # "00:11:22:33:44:55"
27   # will always be assigned an IP address of
28   # "192.168.0.10"
29   host foo {
30     hardware ethernet 00:11:22:33:44:55;
31     fixed-address 192.168.0.10;
32   }
33
34   # Other computers on the
35   # "192.168.0.0/24" subnet
36   # are assigned a random
37   # IP address between
38   # "192.168.0.20" and "192.168.0.250"
39   subnet 192.168.0.0 netmask 255.255.255.0 {
40     range 192.168.0.20 192.168.0.250;
41   }
42 }
|
If you are interested in plumbing the depths of DHCP daemon options, check out man 5 dhcpd.conf. Fortunately, there is typically no need to change the configuration provided by the ltsp-server-standalone package. The main thing is to make sure the subnet matches the Ethernet card settings for the clients you are serving. The filename and option root-path entries are also of interest to LTSP (see the PXE and NFS sections.)
On LTSP, Trivial File Transfer Protocol (TFTP) serves up the boot loader and kernel to the client. TFTP is a sparse version of FTP. It does not support user authentication or any kind of file permissions. It will not list directories, and the maximum file size is restricted to 32MB. On the upside, the protocol's simplicity makes it perfect for lean implementations that will fit into the boot ROM on an Ethernet card.
By default, Edubuntu 7.04 uses the tftpd-hpa daemon as its TFTP server; the daemon is started by the inetd superserver. The TFTP root directory is typically /var/lib/tftpboot, and this is where you need to store the boot loader and the kernel along with the RAM disk. After modifying the kernel file, the ltsp-update-kernels script copies it into the chroot environment and automatically updates the symlinks for the boot loader in the process.
The Preboot Execution Environment (PXE) is an Intel standard that gives PCs the ability to boot automatically off the network via their Ethernet cards. To do so, PXE first connects to the DHCP server, requests an IP address, and parses the DHCP filename option shown in Listing 2.
This gives the client a TFTP path to the boot loader, which it then downloads and executes. LTSP uses Pxelinux from the Syslinux package [4] for this; it downloads the kernel and a RAM disk and boots the client.
The Etherboot project helps PCs without PXE boot-capable Ethernet cards boot off the network. Instead of a boot loader, the client uses a kernel image modified by the mknbi program. The configuration shown in Listing 2 gives the DHCP server the ability to detect whether PXE or another client is requesting the boot loader, and to respond with the matching path.
GPXE is a free PXE implementation; both Etherboot and GPXE are available from the etherboot.org site [2].
| Thin Client Manager |
|
To keep client management as simple as possible, Edubuntu has a graphical Thin Client Manager in its thin-client-manager-gnome package, which gives administrators an at-a-glance overview of logged-on user activities. A process list - much like the Gnome system monitor - tells administrators how much memory processes occupy and the system load they cause. In addition to this, the administrator can launch or terminate processes for each user and send help in the form of simple text messages to users. If a user misbehaves, the administrator can click to block the user or force the user to log out. The Thin Client Manager also integrates a VNC viewer, which pushes the content of the user desktop onto the administrator's screen. To allow this to happen, administrators need to put in some additional work, because the clients do not have a VNC server by default. You can use the package manager in the chroot on the server to install the required package - e.g., x11vnc from the universe repository - by running apt-get install. |
As thin clients typically have to do without local drives, their root filesystems are remote. Network File System (NFS) is a good choice of protocol for handling this. The /etc/exports file has the settings for the thin client root filesystem.
Export entries comprise three components. The first is the absolute path to the exporting directory, followed by a list restricting the authorized hosts. The list can include resolvable hostnames and IP subnets (including wildcards). The last component defines NFS-specific options that define behavior of the NFS server.
The ltps-server package creates the following entry in /etc/exports:
/opt/ltsp
*(ro,no_root_squash,async)
This entry gives any host, as designated by the wildcard *, the ability to access the directory /opt/ltsp. The ro (read only) option prevents write access. async tells the client to buffer access to improve performance. no_root_squash ensures that any client user, including root, is allowed to access the directory.
| No Filesystem Security |
|
no_root_squash demonstrates an inherent weakness of NFS: Version 3, which LTSP uses, does not support authentication. This serious deficit has earned NFS many derogatory nicknames such as "No Filesystem Security" and worse. A client simply tells the server the user and group IDs it wishes to use, and the server grants access. Once an attacker has compromised a client, the attacker can assume the identity of any user. To prevent disaster, NFS typically maps the root user to nobody, but the no_root_squash option changes this. Because the filesystem is the root filesystem from the client's point of view, the clients have to be able to access the filesystem with root privileges. The fact that the server exports the directory for read-access only prevents attacks on the terminal server; confidential data should never be stored in the chroot. NFS has another disadvantage - performance slumps in the case of multiple simultaneous access to small files; of course, this is exactly what the thin client start scripts need to do at boot time. If possible, administrators should avoid booting too many machines at the same time. Instead, you could boot smaller computer groups at staggered intervals. |
To access its filesystem, the client first uses the DHCP root-path option (see Listing 2) to ascertain where its exported root directory is located. The client then mounts the directory as its root filesystem and bind mounts a directory that matches its architecture, typically i386. Wherever it needs write privileges, the client mounts a temporary filesystem that resides in RAM on top of this.
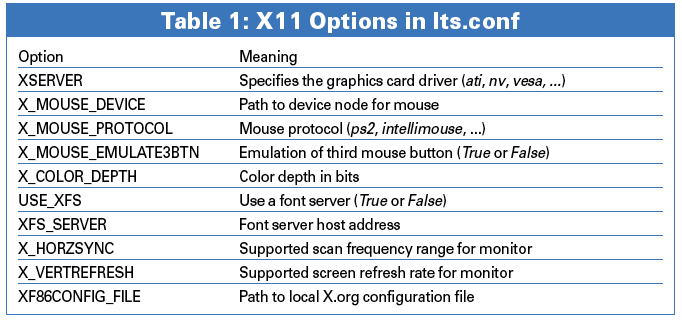
In other words, all of the thin clients share the same system. A file called /opt/ltsp/i386/etc/lts.conf gives admins the ability to support custom settings for individual clients. Besides global settings, you can use the file to configure options for individual machines based on their Ethernet MAC addresses. Listing 3 shows an example with comments. For a more comprehensive overview, and a description of the options in lts.conf, see the documentation [5].
| Listing 3: /opt/ltsp/i386/etc/lts.conf |
01 [default] 02 # 16 bit color depth saves bandwidth 03 X_COLOR_DEPTH=16 04 # pass local devices through to server 05 LOCALDEV=True 06 # Start sound server 07 SOUND=True 08 # German keyboard layout 09 XKBLAYOUT=de 10 11 [00:11:22:33:44:55] 12 # Use Vesa drivers 13 XSERVER = vesa 14 # Integrate serial mouse 15 X_MOUSE_DEVICE=/dev/ttyS0 16 X_MOUSE_PROTOCOL=intellimouse |
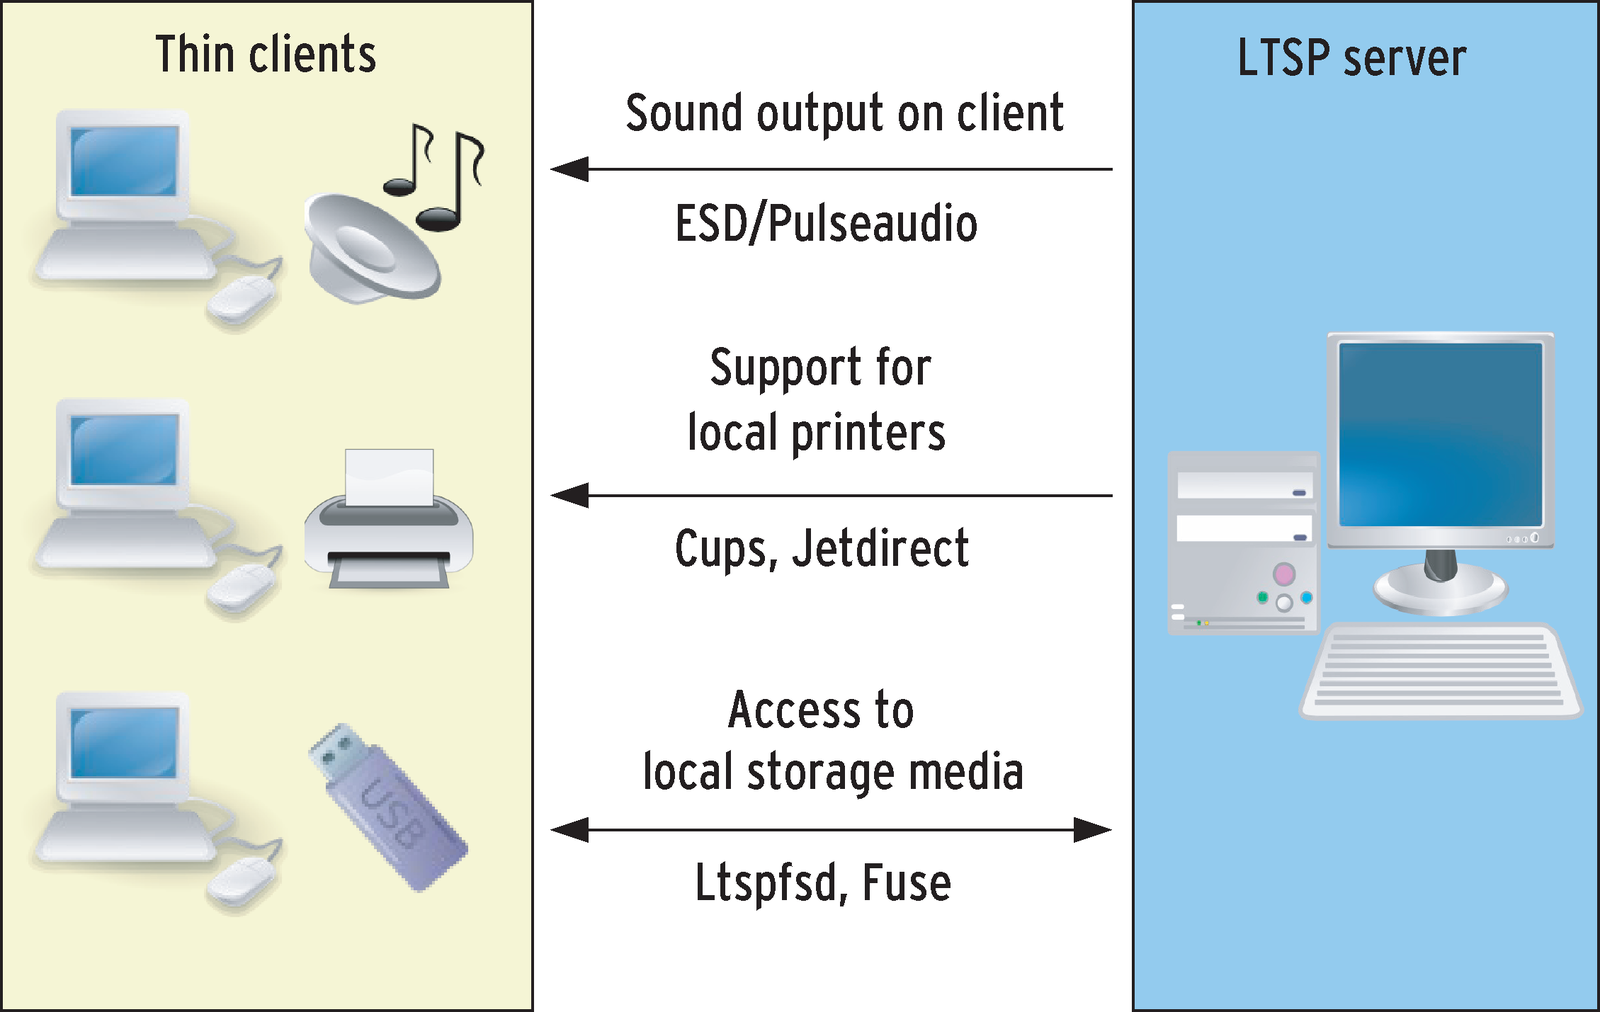
Linux audio APIs (OSS, ALSA) are typically local. A sound server that provides a network-transparent audio interface is required to transport sound between machines. The sound server that LTSP uses by default is PulseAudio [6], which was originally developed under the name of Polyaudio as a replacement for the fairly ancient Enlightment Sound Daemon (ESD) (Figure 1).
PulseAudio supports flexible extensions by means of a sophisticated plugin architecture; PulseAudio emulates the interfaces of the widespread ESD, and it provides its own ALSA plugin. This is not much use without application support, of course, but more and more multimedia programs are starting to support the interface.
The PULSE_SERVER environment variable for the native Pulse-audio protocol tells you where the sound server is located. The value is formatted as tcp:host:port. Alternatively, the ESPEAKER variable points to the emulated ESD interface and is formatted in a similar way (host:port). To enable sound server support on the clients, all you need is a SOUND=True entry in lts.conf.
LTSP can bind local drives on the thin clients to the terminal server. A daemon called ltspfsd runs on the clients to monitor attached drives or USB sticks plugged in to the client. Its counterpart, ltspfs from the same package, runs on the server. Ltspfs reacts to event messages from the Ltspfsd daemon and mounts the devices detected by the daemon. The daemon relies on the FUSE framework [7] to access devices via the network. By default, only the users in the fuse group are permitted to mount devices to FUSE directories. You need to enable this function in the lts.conf file on the thin clients by adding a LOCALDEV=True entry.
Also, you can access local printers, although this feature is not supported dynamically. Start by creating an entry for the printer port on the client in lts.conf. The PRINTER_0_DEVICE entry includes the device node for the interface, such as /dev/usblp0 for a USB printer.
PRINTER_0_TYPE specifies the printer interface type, where U stands for USB, P for parallel, and S for serial. The Edubuntu documentation [5] includes more fine-tuning parameters.
These values help the client-side jetpipe Python script discover the right port. The script typically listens on TCP port 9100 and passes input and output for this port to the local printer interface. Also, you can use CUPS on the terminal server to configure a matching printer that uses a socket to the client's IP address as its interface. The Gnome printer settings for CUPS store this configuration below the name AppSocket/JetDirect.
This example only works if the client IP addresses do not change. To make sure a printer attached to a client is available, you will need to assign a static IP address via the DHCP server. Listing 2, Lines 25 through 32, show an example of a static assignment using the fixed-address parameter.
By default, LTSP 5 uses LTSP Display Manager (LDM) to handle graphical logins. LDM does not run on the terminal server, but locally on the clients. The login procedure runs in the background and is encrypted by SSH. To allow this to happen, the user's X session is launched on the terminal server after logging in; then Gnome - tunneled via SSH - is pushed to the client's X server. In addition to this, LDM automatically sets the environment variable for the sound server. Sound output from applications is sent directly to the client.
LTSP is moving in the right direction and helping make Linux-based terminal services more popular thanks to easy maintenance and a complete feature scope. The Linux Terminal Server Project has taken a giant leap forward in its move to Version 5, and the results are impressive. The developers have made much progress with regard to flexibility and ease of maintenance, and LTSP has quite obviously profited from integration with Edubuntu.
On the downside, the hardware requirements are higher than before. The previous version, LTSP 4, did not ask as much of the clients and it booted faster.
Once more, help is at hand. The current development status of the future LTSP version for Ubuntu "Gutsy Gibbon" gives users a sneak preview of a number of useful new features. The most significant change is that the project is dropping NFS as the root filesystem. I can already hear security-aware users and admins breathing sighs of relief.
In the future, the LTSP chroot will be stored in a compressed Squash FS image, which clients will access directly via a network block device. Administrators will find this system easier to secure than NFS. This also means less overhead and faster boot times.
Thanks to SSH, attackers can no longer sniff X11 sessions, but this security boost comes at the price of higher CPU load. X clients with high traffic volumes, caused by viewing videos or complex animations, will soon have the terminal server gasping for breath. Hopefully a new LTSP version will support unencrypted X11 connections, in combination with secure authentication, to boost performance on less powerful hardware.
| INFO |
|
[1] LTSP homepage: http://www.ltsp.org
[2] Etherboot and gPXE homepage: http://www.etherboot.org [3] Customized Boot ROMs for Ethernet cards: http://www.rom-o-matic.net [4] Syslinux and Pxelinux: http://syslinux.zytor.com [5] Edubuntu documentation for lts.conf: http://doc.ubuntu.com/edubuntu/handbook/C/ltsp-client.html [6] PulseAudio homepage: http://www.pulseaudio.org [7] Filesystem in Userspace (FUSE): http://fuse.sourceforge.net |
| THE AUTHOR |
|
Christian Kroll is a student of Computer Science at the University of Dortmund, Germany. He is also a freelance software developer. In his free time, Christian helps the GNU/Linux User Group in Bochum. He started using Debian Potato back in 2001 and has been a Linux evangelist ever since. |