By Vincze-Aron Szabo
Over the years, your files start to bulge with an overload of paper. Old invoices, letters, and copies take up valuable space that would be better put to another use. If all this printed material is bugging you, but you're unsure whether you might need the information again some time, gscan2pdf will help you clean up.
The clear-cut gscan2pdf interface gives users an uncomplicated approach to creating PDF files from existing paper documents. All you need is a scanner that works on Linux. In this article, I will explain how the tool works and what other functions the program offers.
Gscan2pdf [1] is optimized for storing data in PDF format. Current Linux systems let users create PDF files via the print function, but the settings are complex - even though you might not need most of them - and introduce an additional step. Gscan2pdf simply gives you the tools you need and completes the whole job at once.
To install gscan2pdf on Ubuntu and other Debian-based distributions, launch any editor with superuser permissions and open the /etc/apt/sources.list file. For both of these steps, you can type sudo gedit /etc/sources.list at the command line. The file is a list of software repositories that the system references when installing packages.
Next, go to the end of the file and add this line:
deb http://gscan2pdf.sourceforge.net/download/debian binary/
Then save the file and close the editor.
Next, you will need to reparse the package sources, which is easy to do. Type sudo apt-get update at the command line, then launch into the install by entering sudo apt-get install gscan2pdf. Setup will ask you whether you want to install the packages without checking. If you trust the source, select Y. If you prefer not to see this message again, follow the steps in the "Trusted Sources" box.
For RPM-based distributions like SUSE or Fedora, RPM packages are available online [2]. Download the package and install by entering rpm -i gscan2pdf-< Version>.rpm. If the system does not resolve the dependencies correctly, a complete list of required packages is on the homepage. If all of this works out, you can now take gscan2pdf for a trial run.
| Trusted Sources |
|
Various systems check the integrity of packages with GPG (GNU Privacy Guard). If your package manager fails to find a key for the software on your system, it will issue a message warning you that this is an untrusted source. If you trust the source, enter the key at the command line. In the case of gscan2pdf, you need to run the following commands: $ gpg --keyserver www.keyserver.net --recv-keys 4DD7CC93 $ gpg --export --armor 4DD7CC93 | sudo apt-key add - The first command requests the key from the specified server and downloads the key. The combination of letters and figures at the end of the line is the unique key ID. The second line lets you add the key you downloaded to keys you already have. For each new repository that offers a key, you need to repeat these steps with the matching key ID. |
To install gscan2pdf from the source code, first load the source code [1] and type tar xvfz gscan2pdf-<Version>.tar.gz to unpack, change to the directory created in the last step, then enter perl Makefile.PL to create a makefile. To install, become root and enter the make install command.
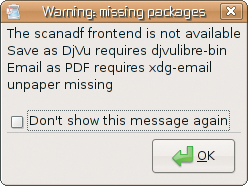
After completing the install, type gscan2pdf in a dialog to launch the program or pop up the quick-start window by pressing Alt+F2. A note tells you that you are missing a package (Figure 1), but this will not affect basic functionality. Press OK and the software will welcome you with a clear-cut interface.
Gscan2pdf is now ready to scan. Switch on your scanner and insert a document. Go to File | Scan and open the Scan document dialog. The program starts by detecting available scanners and then shows you options (Figure 3).
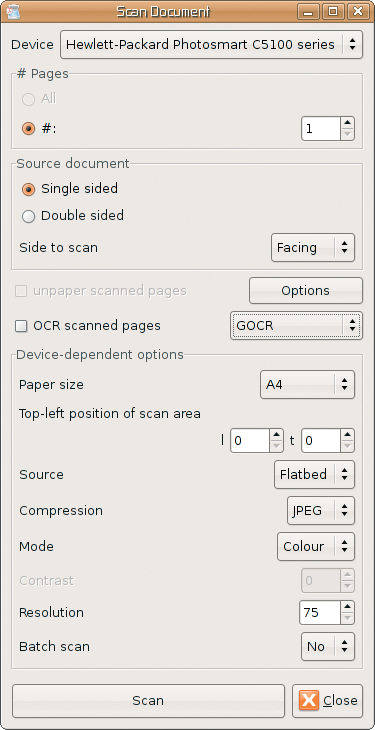
Define the number of pages to scan in # Pages. This setting is only used with duplex scanners that can scan multiple documents at a single pass. Leave the setting of 1 for a normal flatbed scanner; otherwise, the software will scan the inserted page multiple times. If you have a normal scanner, leave the Source document setting as Single sided.
Options lets you define various settings for your scanner. Scanning Mode lets you select whether you want the scanner to create a color or grayscale scan. A resolution of 75 dpi is fine for displaying documents on screen, but if you will be printing the document later, you will need a higher resolution; 300 dpi puts you on the safe side, but the file size will be larger.
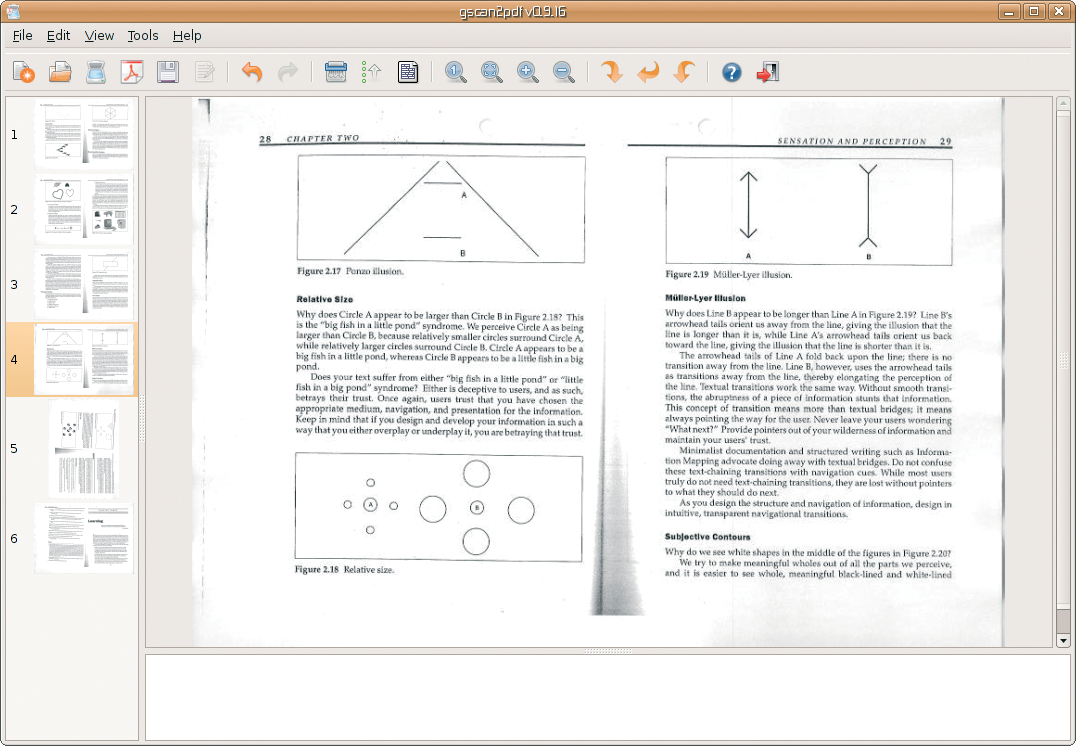
Now click Scan, and the software will read the document and open it in the workspace within the program window. The sidebar on the left shows all the pages in the order of scanning. If you mix up the order when scanning, you can simply drag and drop the offending page to the right position. If you scan a document upside down, you can select it the document the sidebar and use the three arrow icons to rotate it into the correct position.
After scanning all the pages in your document, there is nothing to stop you creating a PDF. Figure 2 shows the interface with the scanned documents. If you do not want to store all the pages in the file, you can select the pages you need by clicking. For multiple selections, hold down the Ctrl key, then select File | Save as PDF, or just click the PDF icon in the toolbar to open the dialog.
Enter metadata here if needed; the data are stored with the PDF file. If you made a page selection already, click Selected pages under Scope to tell the software to store just these pages.
Select All pages if you want to add all the pages to the PDF. Compression lets you decide the format in which gscan2pdf will store the documents.
After clicking Save, you are prompted to type a file name and a path to save the PDF file.
Gscan2pdf is a lean program, but it can do slightly more than just scan pages and save files; it relies on a number of tools to provide convenient auxiliary functions. The "Installing Extensions" box gives you details of installing the additional tools.
If you regularly scan book pages, the images typically have dark edges, and in many cases, the pages are lopsided. The Unpaper [3] tool removes the dark edges and aligns your pages. However, you might need to make adjustments before you find the perfect setting for your application. After installation, the tool is in the Scan document | document | unpaper scanned pages field. Press Options to go to the Unpaper settings dialog.
| Installing Extensions |
|
Regardless of whether you are interested in optimizing scans or mailing directly from gscan2pdf, the open source world will have the right program for your application. Enter the following command at the prompt to install extension programs on Ubuntu: sudo apt-get unpaper xdg-utils gocr sane On SUSE, you can simply locate these packages via YaST and click to install. |
If you want to send a scan by email in a hurry, install XDG-utils [4], which lets you launch a compatible mail program such as Evolution.
The File | Mail as PDF function stores the document as a PDF file and attaches it to a new mail message at the same time. This feature is not available with Thunderbird because it will only open empty mails without attachments.
If you want to add an optical character recognition (OCR) step when scanning a file, you need an additional OCR tool such as GOCR [5]. In this case, you need to restart gscan2pdf after installing the OCR tool.
Gscan2pdf launches the scanimage program in the background; the program is also available as a standalone tool at the command line. Many scanners work more reliably with the alternative scanadf program, so gscan2pdf gives you the ability to choose between the two by clicking Edit | Frontend.
In contrast to programs like XSane [6] or Kooka [7], gscan2pdf is an uncluttered representative of its species - its specialty is to streamline the process of saving scans as PDF files. Gscan2pdf masters this task with flying colors, although it lacks settings for contrast and brightness and a scan preview.
Gscan2pdf really shines when you need to handle larger quantities of documents, so just give it a try.
| INFO |
|
[1] Gscan2pdf: http://gscan2pdf.sourceforge.net
[2] RPM files: http://sourceforge.net/project/showfiles.php?group_id=174140 [3] Unpaper: http://unpaper.berlios.de/ [4] XDG-utils: http://portland.freedesktop.org/wiki/ [5] GOCR: http://jocr.sourceforge.net/ [6] XSane: http://www.xsane.org/ [7] Kooka: http://kooka.kde.org/ |