
Question:
I am having some difficulty installing certain Linux distros on my AJP M560A laptop. Fedora, Knoppix, Debian, and some others start to load, but then my screen goes blank. Asplinux, Suse, and a couple of others will only give me 800x600 screen resolution. Mandriva and Biglinux display a lock with either an i or an exclamation mark in the center, and my keyboard ceases to function.
Answer:
Although most Notebook chipsets are supported natively by any current GNU/Linux distribution nowadays, getting the X.org server to work in an optimal, or at least acceptable, way is sometimes not easy for notebooks. In many hardware tests, I found that most notebook displays are not capable of reporting their preferred resolution and refresh modes to the operating system. Therefore you either need a pre-made configuration file that works out-of-the-box with a specific graphics chipset/TFT monitor setup (which would be solved with drivers under Windows), or you need to experiment a little in order to figure out the right parameters, or, for the impatient, you need to use vesa or framebuffer modes that work with virtually every graphics card. The latter solution is somewhat slow - playing 3D games or using 3D desktops such as Compiz will not be possible.
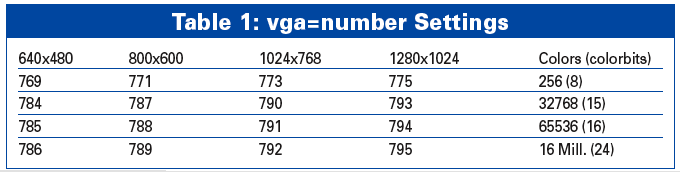
The most reliable option that works most frequently is the use of framebuffer mode via the vga=number option in the boot command line and telling the X.org server to just stay in that mode by selecting fbdev as a driver. Table 1 shows some of the numbers for the vga= number kernel loader, which then sets the desired resolution and color depth (if the graphics adapter supports it).
Framebuffer mode also means that your text console at the usual beginning of the Linux startup process will be graphics-capable, which you will immediately notice when penguins appear on top of the screen (one penguin per CPU core).
If framebuffer mode works in text mode, the graphics server X.org will work with the framebuffer driver as well. The only thing you have to do is make sure that:
Driver "fbdev"
is set in the Device section of /etc/X11/xorg.conf. Please note that for some graphics adapters, a chipset-specific framebuffer driver has to be compiled in the kernel; otherwise, you will get a selected mode unsupported warning at boot time.
Although framebuffer mode usually works well, you might also want to try the accelerated native mode. If Driver in the Device section of /etc7x11/xorg.conf says radeon or i810 (or something similar) after you set up the X server with a config tool, the most critical parameters for the monitor or TFT display may be
HorizSync    28.0 - 102.0
VertRefresh  50.0 - 76.0
in the Monitor section of /etc/X11/xorg conf. HorizSync is the allowed horizontal refresh rate in kilohertz, and VertRefresh is actually the picture frame rate of your monitor, which is 75Hz for most TFT displays and about 100Hz for tube monitors. If these frequencies are set wrong, you get no picture, but the monitor sometimes displays a kind of warning message about "wrong input parameters," which is, of course, not a message generated by the operating system but by the monitor itself. For most notebook displays, you just get a totally blank screen if frequencies are set wrong.
In some rare cases, the built-in power save of a notebook display kicks in as soon as the display mode is changed, probably because the system "thinks" an external monitor is to be used by default, instead of the internal display. I have seen this behavior mostly with ATI onboard graphics chipsets. Switching back to the text console (Ctrl+Alt+F1) reactivates the backlight in some cases, but the real winner is
Option "MonitorLayout" "LVDS,Auto"
in the Device section of /etc/x11/xorg.conf, which changes the way the video ports of a notebook's graphics chipset are activated.
For the changes to take effect, you have to restart the X server (X.org) after changing /etc/X11/xorg.conf. If you notice anything strange, hitting Ctrl+Alt+Backspace will terminate the X server (unless this hotkey was disabled in xorg.conf).
Question:
I bought a brand new HP dv 9540 laptop. First, I tried to install Ubuntu 7.04 and had problems with the graphics card, as well as with getting the wireless to work. After lots of googling, I found http://albertomilone.com/nvidia_scripts1.html, which helped me get the graphics card working (nvidia G8400M). Then I got the wireless to work using https://help.ubuntu.com/community/WifiDocs. I had problems with locating the secondary internal hard drive - some Live CDs found the hard drive and others didn't.
I never got the internal HP webcam to work; nor was I able to use the external quickcam webcam, which works fine on my older PC. The webcam worked when I switched the touchpad on, but as soon as I used the mouse, the webcam stopped working.
When the Ubuntu 7.10 stable version was released, I installed it. This time the graphics card was found by the system, and it worked, but wireless was not working, so I again used https://help.ubuntu.com/community/WifiDocs. Then I googled and got the internal webcam to work with the help of http://www.arakhne.org/spip.php?article51, so now the webcam works in Kopete and Ekiga. When I tried the internal webcam in aMSN, the webcam lit its blue lamp, and then the program "froze." When I tried CamStream, I got ...error 19 - no such device.
The external webcam still does not work. So my conclusion with the Hewlett Packard dv 9540 laptop is that the hardware is too new, or the software is too old, and this product is absolutely not for Linux newbies.
Answer:
Thanks for your fine description of your experiments, and the project URLs that at least solved the problems partly. Many would just have given up and replaced the notebook with one that provides better Linux support (which is usually also my recommendation), but, of course, technically interested people always find a challenge in overcoming the limitations of problematic hardware.
Let me just add some remarks to your list of hints.
When a device stops working as soon as another device is active, the problem may be a resource conflict, most likely competing interrupts. You can check with
cat /proc/interrupts
for interrupts that may be assigned twice or more to different devices. Sometimes, this is no problem (for PCI devices, for example, it's quite usual to share interrupts), but sometimes it is an issue. Boot options that can help to identify and circumvent the problem are:
linux noapic nolapic pnpbios=off pci=bios acpi=off
acpi=off is an effective solution for resource/interrupt problems, and almost for sure it indicates a design flaw in the board's chipset or BIOS. Sometimes a BIOS update helps (but be careful). Sometimes you just have to use a certain kernel option. Some notebooks, for example, need the nolapic option (note that this is different from the noapic option), or the kernel stops dead in the middle of the boot process.
For newer hard disk controllers, you will certainly need an up-to-date kernel (the current version as of this writing is 2.6.23.1), though sometimes, very old kernels magically work with controllers that stop working in newer kernel versions. The explanation for this phenomenon is that unsupported hard disk controllers sometimes have an emulation mode that simulates a different type of - mostly older - controller that is still supported by the older OS. But as soon as a - possibly "experimental" - native driver for the controller is activated, the emulation mode disappears. If the new driver now can't handle the controller's chipset, though it's at least recognized, hard disk access becomes unavailable. The solution is to try a newer kernel every now and then, watch out for support for your board's chipsets, and if in doubt, disable all controllers in the kernel's configuration but the ones you are sure will work. This approach can also save duplicates in the hardware detection (concurrent kernel modules thinking they are both responsible for the same card or device, which frequently happens with wifi cards supported by multiple modules).
For the quick and impatient, again, it is sometimes easier to just ask for a refund of non-working hardware, rather than twiddling with drivers and settings.
Question:
I have an old laptop that I'd like to use for wireless Internet browsing. I installed Debian Etch from the recent Linux Magazine cover disc. The laptop has no network card. I would like to use NDISwrapper to get a Belkin USB wireless network device working.
I am new to Linux, and I don't know how I can do this. I would be very grateful if you could you tell me how I might install NDISwrapper and get everything going. I have access to the Internet via a PC installed with XP.
Answer:
NDISwrapper is a Linux kernel extension that lets you load a Windows network driver as if it were a Linux kernel module, in order to support network cards that have no matching native Linux kernel support.
Beginners will discover some obstacles because kernel extensions such as modules require basic knowledge of how the operating system works, as well as a working installation of the kernel source files and C compiler matching the running kernel. So, I can't promise that the following instructions will go smoothly if you have never installed a kernel module or worked from the command line. A better solution may be installing a newer kernel version that supports the wireless card natively (with a Linux driver instead of a Windows driver and NDISwrapper).
If you want to try NDISwrapper, though, the following instructions should help you get started. In this example, I assume that the NDISwrapper source archive ndiswrapper-1.49.tar.gz and the windows driver for your network card, mycard.inf, are both present on a hard disk partition or memory stick mounted at /media/sdb1:
cd
tar xzvf /media/sdb1/ndiswrapper-1.49.tar.gz
cd ndiswrapper-1.49
make
make install
ndiswrapper -i mycard.inf
ndiswrapper -l
modprobe ndiswrapper
Whenever you want to do this again, you just have to repeat from Step 5, since the tools are already installed.
An easy solution that would avoid this whole complicated procedure would be to return a wireless device that doesn't support Linux to the place where you bought it, and get one that works as a replacement.