Question:
The December 2007 Ask Klaus question on "Replacing Windows" cracked me up. I, too, am in the three score-plus range and started in the good ol' days of DOS. I am, however, a 95 percent convert to Linux. I agree that Linux is not a replacement for Windows. I would have advised the writer to try a multiboot configuration. Keep XP while you are getting a feel for Linux. I use Windows to play my Chessmaster 10000 and to run Acronis's True Image, which for some reason has a problem with my P5K Deluxe MB using the True Image boot CD.
Now for my question: I have two 250GB SATA drives running as IDE-compatible. I have Windows XP on the first partition of Disk 1, Fedora on the second partition, and Ubuntu on the third in control of the MBR. I have two more ext3 partitions and a couple of NTFS partitions for Acronis True Image to backup to.
I like to play with other Linux distributions, which causes partition ID changes. Then I have problems booting to Ubuntu and Fedora.
Usually I am able to get into Ubuntu and run blkid and edit fstab to suit. Fedora can be a bit trickier. I have been advised to use man 2ext, but I am a little in the dark as to how. Do you have any suggestions? What about an fstab configured to accept changes to partition IDs?
Another thing that would be handy is a bootable emergency CD, where you can access the different partitions and edit fstab after running blkid.
Thanks Klaus; I really enjoy your column. See the disk information shown in Listing 1.
| Listing 1: Disk Information |
01 # /etc/fstab: static file system information. 02 # 03 # <file system> <mount point> <type> <options> <dump> <pass> 04 proc /proc proc default 0 0 05 # /dev/sda5 06 UUID=54a4d859-f595-40f4-b139-ef30e21237d9 / ext3 defaults,errors=remount-ro 0 1 07 # /dev/sda1 08 09 UUID=1201DEF75EAE43A9 /media/sda1 ntfs defaults,umask=007,gid=46 0 1 10 # /dev/sda3 11 UUID=2d9d00d3-4809-4f57-b65d-97f70d497dbd /media/sda3 ext3 defaults 0 2 |
Answer:
Before I answer your question directly, I'll start with a brief description of some important concepts. Linux uses specific names for partitions, either statically created block device file names in /dev, or dynamically created ones (by udevd).
The common naming scheme is hd for IDE, and sd for SCSI, USB, or SATA hard disks and storage, followed by a letter indicating the disk (a for the first one, in alphabetical order), and then, if you are not using the entire disk, followed by a number indicating the partition, where 1-4 are primary partitions and 5 and up are logical partitions (with an extended partition table). So, /dev/sdb9 would be the ninth partition on the second SATA, USB, or SCSI disk attached to the system. Unlike IDE, where hdb is always the "slave disk attached to the first controller," sd* devices get their names from the sequence of their detection, so it may depend on the sequence of drivers loaded whether a USB flash drive will suddenly appear under the name that a SATA hard disk previously had. Most distributions, however, load the SATA drivers before USB, so an unexpected disk change is unlikely to happen.
The partition ID usually means the partition "type," which is a number in the partition table that is set or changed by fdisk, cfdisk, gparted, or similar partitioning programs.
The partition ID tells the BIOS whether the partition is usable for booting, is marked as "free space," or is being used for "logical" partitions.
The ID also tells an operating system about the partition's presumed content. (For Linux, however, the partition type does not really matter. Also, you could mount a Linux filesystem on a partition marked as NTFS or Swap, though this is, of course, not recommended.)
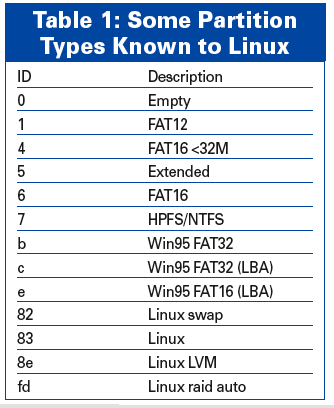
ID 82 is "Linux swap," ID 83 is "Linux filesystem," and so on (see Table 1 from fdisk). The real content of the partition, however, has nothing to do with this ID. In fact, the ID does not even change if you reformat or destroy the partition's content, since the ID is not located on the partition itself but only within the partition table.
A UUID is a universally unique identifier for a native Linux filesystem such as ext* or reiserfs. The UUID is contained in the filesystem header on the partition. It can be used to find and identify a filesystem in /etc/fstab via the UUID= keyword instead of a partition name. UUIDs are supposed to be unique. Automatic naming ensures that there is only one partition with a given UUID in your system. This value can be set during filesystem creation, and it can be changed later with tune2fs -U or reiserfstune -uuid.
The label is similar to the UUID, but usually is used to give a filesystem a human-readable name such as Root or even mount point names such as var_log, so you can better guess from the filesystem label what's contained inside. The label can be used to find and identify a filesystem in /etc/fstab via the LABEL= keyword. A label does not have to be unique in the system.
/etc/fstab is the configuration and setup file for mount. The general syntax for fstab is:
partition mountpoint filesystem filesystem-options backup check
partition means a block device, file, network share, or, in general, a resource that contains the physical data to be accessed. mountpoint is the place where a directory/file view of this data will be displayed after a successful mount. filesystem is the driver part, which tells mount in which way the data is organized, and options are features that can be activated for that filesystem. The backup sequence is rarely used in any backup program, but it must be present in /etc/fstab for compatibility reasons. The last field, the filesystem check order, tells which filesystems should be automatically checked and repaired in case of trouble when booting.
Most of the entries in /etc/fstab have a very flexible syntax, which is partly described in man 5 fstab, in man 8 mount, and in various filesystem-specific online manuals such as man ntfs-3g.
Now, back to your initial question.
In the partition entry in /etc/fstab, you have to give a resource description for mount in order to find the data to access, which, for file systems located on hard disk partitions, can be done in the simplest case by telling the partition name, or a filesystem label, or UUID (which will be searched for on all known partitions, see /proc/partitions).
As it looks, you would be better off with mount looking for a specific and constant partition, rather than a UUID, to automatically find the partition containig a filesystem.
In theory, the UUID should not change, unless there is a reinstallation of the entire filesystem - which may be the problem here, if you like to experiment with different distributions.
My recommendation for this case would be not using UUID=, but directly writing the partition names as source block devices. For instamce, your /etc/fstab line
# /dev/sda3
UUID=2d9d00d3-4809-4f57-b65d-97f70d497dbd /media/sda3 ext3 defaults 0 2
would change to
/dev/sda3 /media/sda3 ext3 defaults 0 2
Most Live rescue CDs also use /dev/partitionname instead of filesystem labels for automatically creating /etc/fstab. But you can also use the script in Listing 2 to automatically create UUID-based entries to cut and paste.
If you like to back up frequently and restore Linux installations to different partitions, other than to the ones they had been installed to in the first place, your original /etc/fstab approach is better because, in that case, really the partition name changes, whereas the UUID should remain constant because it is contained in the image of the partition data; however, if neither the partition name nor the filesystem UUID remains contant, you have a problem. Then, the best thing you could do is keep your current fstab and reset the UUID and/or label after a restore; for example,
tune2fs -U 2d9d00d3-4809-4f57-b65d-97f70d497dbd /dev/sda3
to get back the UUID used in the fstab.
| Listing 2: Creating UUID-based Entries |
01 #!/bin/bash
02
03 sudo blkid | while read device values; do
04  DEV="${device%:}"
05  UUID=""
06  TYPE="auto"
07  MP="/media/${DEV##/dev/}"
08  eval $values
09  if [ -n "$UUID" ]; then
10   echo "# $DEV"
11   echo "UUID=$UUID" "$MP" "$TYPE" defaults 0 0
12  fi
13 done
|
Question:
Thank you for the hints in your October 2007 column. Your pe-nultimate paragraph plus Listing 2 gave me enough help. What I was missing was the information that the settings are controlled by /etc/X11/xorg.conf and that the command man xorg.conf is ultimately informative - but slow reading. Of course my first attempt didn't work, but by changing Screen and Monitor to Screen0 and Monitor0, then adding Screen1 and Monitor1 and altering Server Layout, I got both monitors working. Then I found that I needed Option "Clone" "1" to get the mouse onto the second screen. It seems necessary to restart Linux after each change. I tried the suggested sudo dpkg-reconfigure -phigh xserver-xorg, which took things back to the previous setting and also gave me a US keyboard.
I have spent about 4 or 5 hours spread over two days, which illustrates the problem people like me have with Linux: How does one find the appropriate information in the huge number of files? Once you know where the necessary files are, they are generally easy to fix.
Answer:
Thanks for the additional information. I would have expected the mouse to be present on both screens regardless of Option "Clone" "1", but then, I haven't ever needed that configuration myself. Setting the
Option "sw_cursor"
in the "Device" section might have solved the invisible mouse cursor problem, too. It seems to be needed for some cards, while for others, the opposite Option "hw_cursor" solves a background refresh problem. So many possible hardware setups exist that it is not easy to find a general minimal setup that works for "most" cases.
sudo dpkg-reconfigure -phigh xserver-xorg indeed overwrites your xorg.conf in /etc/X11, possibly creating a backup of the old file under an extension like .orig or .dist.
It is a lot safer if you back up experiments with config files every now and then. You can use a file name with a date (such as /etc/X11/xorg.conf-2007-11-12) or use version control to create an archive of configurations, as in
ci -l /etc/X11/xorg.conf
which will, on the first call, create an rcs archive /etc/X11/xorg.conf,v, which, from now on, contains a backup with a description of your changes every time you issue the preceding command. You can retrieve an individual version from the archive by
co -l -ddate /etc/X11/xorg.conf
where date is a quite relaxed specification of a time, such as -d"2007-11-12". Some system administrators use this system called rcs to archive configuration files, so if you experiment a lot with different settings, the rcs package can be a useful extension, with much less overhead than networked revision control systems like cvs, svn, or git.
Question:
Your Knoppix 5.1.1 is a wonderful product. I recently used Knoppix to burn files to a DVD and move them to another PC when I could not boot from the hard drive. But now I have a question.
The SUSE Enterprise 10 DVD that came with the October issue was somehow defective and messed up my Linux installation when I tried to install it. Finally, I got the bootloader working. Now I want to find a way to copy the SUSE vmlinux to the /hdb2/boot folder, but I cannot figure out how to get around the "Read Only File System." If it can be done, please tell me how.
Answer:
The Knoppix-specific part is: After clicking on the partition desktop icon to see the contents of the filesystem, which will mount the partition read-only, click a second time, but with the right mouse button, and select Change read/write status from the menu. This will issue the command
sudo mount -o remount,rw /media/partitionname
and will thus allow writing on the partition. After you are done with the changes, remember to right-click the icon again and select Unmount device (which will issue the command umount /media/partitionname in order to save all changes back to disk).