
By Kristian Kißling
Most users associate multimedia tools with the standard GUI desktop and bright graphical effects, but Linux comes with tools for playing streams, editing images, and reading CDs or DVDs from the command line. In this article, I describe some Linux text-based multimedia utilities.
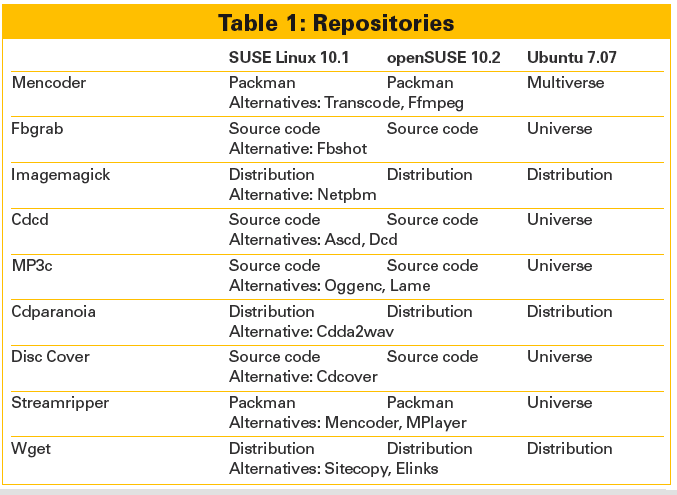
The Mencoder console tool lets users convert movies into other formats while scaling a multi-gigabyte DVD movie to lean MPEG4 material that will fit on a CD. To do so, Mencoder uses the Ffmpeg codecs. To view the results, you will need to enable the framebuffer. The repository list in Table 1 shows which external package sources you need to install for Mendoder and other individual programs as an Ubuntu or SUSE user and what alternatives are available.
The normal approach to converting a DVD comprises three steps (three-pass encoding): start by ripping the audio track, then transcode the video from VOB format to MPEG4 format, and drop the audio track on top of it. Depending on the data you have grabbed, the last step enhances the quality of the movie. I'll take this method one step at a time.To see the titles and chapters on a DVD, use mplayer -identify -nosound -novideo dvd://. The command
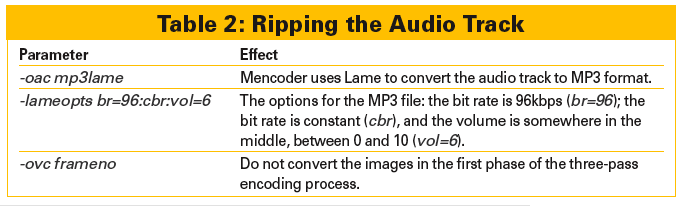
$ mencoder -oac mp3lame -lameopt
s br=96:cbr:vol=6 -ovc frameno -
o target.avi dvd://7
then extracts the audio track from title seven, for example, of the DVD in the drive and stores the results in target.avi. Table 2 explains what the parameters in this command do.
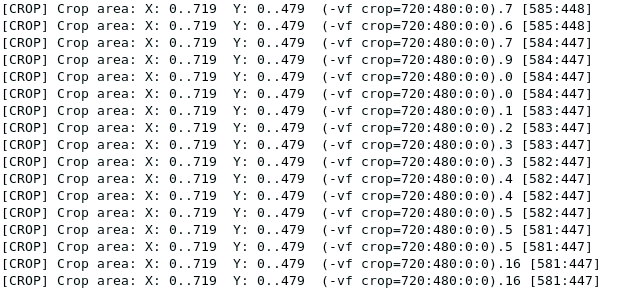
Next comes a step to determine the crop values. To find out which part of the raw material you need to crop to remove the black stripes at the edges, you need to set the cropdetect option:
$ mencoder -sws 2 -oac copy -ovc
 lavc -lavcopts vcodec=mpeg4:vhq
:vbitrate=629:vpass=1 -vf cropde
tect,scale=720:480 -o target.avi dvd://7
After starting the process, the command line outputs the required crop values after about 10 seconds (Figure 1). Replace cropdetect with the displayed crop value, such as crop=720:640:0:0.
Now it's time to start phase two, which will produce the first rough version of the movie. Table 3 explains the numerous options.
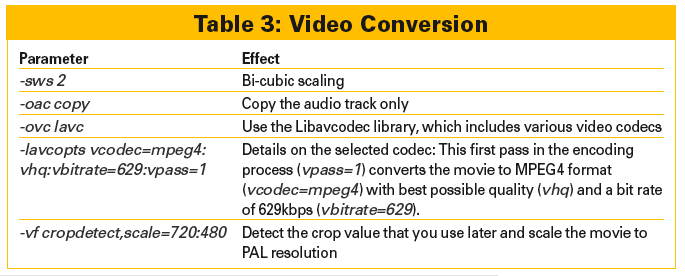
Now for the last trick: Phase three. Use the same command line, but replace vpass=1 with vpass=2. What's the difference? This time, the program uses the logfile created at the previous pass and enhances the quality of the resulting movie on the basis of information in the file.
A detailed description is beyond the scope of this article, but numerous online guides can help [1][2][3].
Check out the Mencoder man pages for fine-tuning tips (man mencoder).
The command line also has much to offer in the image manipulation field. For example, the FBGrab tool lets users grab screen shots at the command line. The command is fbgrab screenshot.png; again, this assumes you have set up the framebuffer. Likely, you do not want to grab a picture of the screen shot tool itself, so type
$ fbgrab -s 5 screenshot.png
and then press Ctrl+Alt+F4 to switch to another terminal. Make sure the application you want to grab is running; you can replace the 4 with another terminal number as needed. Wait a couple of seconds, and when the 5 seconds (-s 5) have elapsed, you can return to the original terminal to check the screen shot. The FBGrab man page also tells you how to produce the best possible size and quality images.
People are rarely happy with just looking at images: In many cases, you will need to convert an image to another format. If you want to edit an image, you can install the ImageMagick package, which includes programs such as Convert, Identify, and Import [4].
To discover the size and color depth of an existing image, type identify image.png (Figure 2). This works with multiple images, too; the command is identify *.png, in this case. To convert PNG images to JPEG, just type
$ convert image.png image.jpg

You might need to produce preview images (thumbnails) for a website. If Konqueror is not available to you for reducing images, you can combine the Convert command with a call to Resize:
$ convert -resize 200x200! image.
png image_small.png
This creates a 200x200-pixel copy of the original (image.png). If you leave out the exclamation mark (!), the command will just reduce one side of the image to the required size while automatically retaining the aspect, which prevents distorted thumbnails.
The console is as musically gifted as any GUI: To play a normal music CD, all you need is a tool called Cdcd, which you can launch by typing cdcd, and which you can control via text input. The tool will ask you where your CD-ROM drive is (typically /dev/cdrom) and then display a prompt. Press ? to tell Cdcd to list the control commands. If you then type rndplay, the software will play the tracks on the CD in random order. Typing stop quits the player.
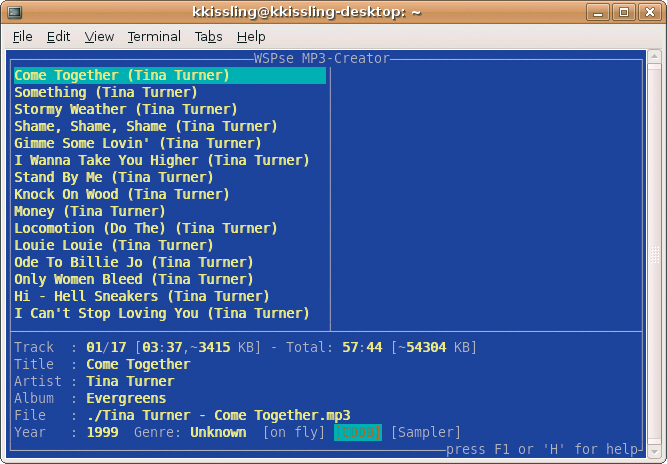
If you borrowed the CD, you will have to give it back some time. To create a private copy - and I'll assume you are allowed to do so in this case - just run MP3c. The software converts tracks from CDs to MP3 or OGG format and also includes a CLI (Command-Line Interface), which gives you keyboard-based controls. Typing ./mp3c launches MP3c; the converted data is dropped into the directory in which you launched the tool.
When launched, MP3c looks for a hidden .cddb folder and asks you whether it should create a folder if one does not exist. Pressing the Tab key moves the cursor to YES; then press Enter. Alternatively, the arrow keys move the cursor. By default, MP3c assumes that your CD-ROM or DVD drive is in /dev/cdrom, although this might not be the case. If not, press F2 and type the correct path to your drive. F2 takes you to the MP3c configuration menu, in which you can change many settings. Enter opens the fields for editing.
As an example, the software typically saves titles in files that use cryptic numbers as names. If you change the pattern in Pattern for MP3/OGG filenames to [%1 - %2.mp3], the software will write the artist name followed by the title of the track.
Despite the prefix, which would suggest otherwise, MP3c creates OGG files by default. Moving the cursor to the bottom of the configuration menu and selecting Load Presets (MP3/Lame) tells MP3c to create MP3s, as the name would suggest. However, this means modifying a couple of other options, and then saving your changes by executing Save Configuration. Don't forget to save if you want to keep the changes when you restart the program.
The left side of the MP3c CLI lists the names of the individual tracks on the music CD (Figure 3). Pressing F4 encodes a single track; F3 encodes the whole CD. Q quits the individual menus and then the program. To discover what other options MP3c offers, you can either work your way through them or press H for help.
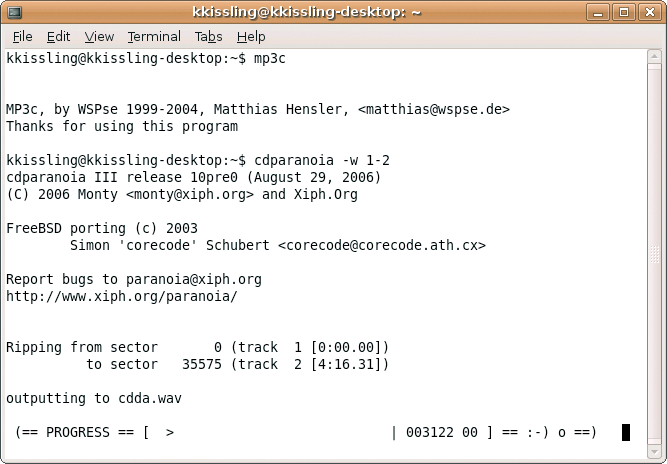
Many CD players will detect and play files in OGG and MP3 format without any trouble. To be on the safe side, you might want to convert the songs for your CD to WAV files. Cdparanoia is a useful tool for this [5]. A simple command is all it takes, but make sure you have enough disk space. The cdparanoia -vsQ command tells you the number of tracks on the CD. To convert the first two tracks to WAV format for test purposes, for example, try the command:
$ cdparanoia -w 1-2 -B
If things work out and you would like to convert the whole CD, just leave out the -w 1-2 parameter (Figure 4). To keep the software from storing all the tracks in a single file, set the -B option. Unfortunately, the tool will not keep the track names; instead, it renames them to something generic, like track1.cdda.wav, track2.cdda.wav, and so forth. Some manual processing is needed.
The tiny Disc Cover program will create a simple but workable cover for your CD [6]. To do so, it retrieves the data for the individual tracks from CDDB, assuming there is an entry for the CD in question. You can decide which text format to use for the cover. A typical command is:
$ disc-cover -t pdf -D /dev/scd0
The tool searches for the drive with the CD in /dev/cdrom, but setting the -D option specifies an alternative path. The -t option sets the required output format - PDF in this case. Alternatively, you can create covers formatted in PS, DVI, HTML, or TEX. The more parameters you pass in to the software, the more you change the cover. If you are using a slim CD case, you additionally need to set the -c slim flag. The -pic image.jpg command lets you add an image file to the cover.
The Streamripper tool can rip a stream at the command line [7]. The command
$ streamripper http://85.25.145.
179/motorfm.mp3.m3u
drops the stream into a single, huge file. The recordnplay.sh script lets you play back the sound you recorded:
streamripper http://85.25.145.17
9/motorfm.mp3.m3u -r &
sleep 20
mplayer -cache 500 'http://local
host:8000'
Typing chmod u+x recordnplay.sh makes the script executable, then launch the script (Figure 5). The first command tells Streamripper to record the stream, and the -r option tells the program to publish the stream at the same time via port 8000.
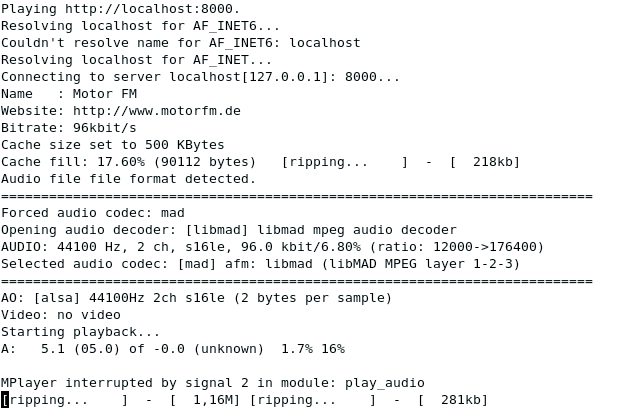
After a short break (sleep 20), MPlayer wakes and picks up the stream from the specified port, and it buffers the data to improve performance (-cache 500). Issuing a Kill command quits Streamripper, ps aux reports the process ID (PID), and kill PID switches off the program - this could take awhile.
Who needs multimedia? After all, downloads are no problem at the command line. Wget is an excellent tool for downloading websites along with all the images and the objects they contain. The syntax for this is wget -Option URL.
The command will download both individual files and complete websites (see Figure 6).

Wget automatically follows links if you set the -r (for recursive) option and is thus capable of mirroring complete sites. The -A switch tells the program to download only specific elements from a page, such as images or movies.
To continue an interrupted download, use the -c ("continue") option. Thanks to integrated time stamps, the tool is also useful for scripting regular backups of a website.
Just because you prefer to work at the command line you do not need to go without the fun of multimedia. Many alternatives exist for the tools covered in this article, and it might take awhile for you to learn all their tricks. All the same, multimedia-wise, the console is still leading edge.
| INFO |
|
[1] Calculating the required bit rate and other details: http://f0rked.com/projects/simplerip
[2] Gentoo users on three-pass encoding: http://gentoo-wiki.com/HOWTO_Mencoder_Introduction_Guide [3] More on three-pass encoding: http://axljab.homelinux.org/Mencoder_DVD_to_MPEG-4 [4] ImageMagick: http://www.imagemagick.org/script/index.php [5] Cdparanoia: http://xiph.org/paranoia/ [6] Disc Cover: http://www.belightsoft.com/products/disccover/overview.php [7] Streamripper: http://streamripper.sourceforge.net/ |