
By Heike Jurzik
In the past few years, Linux has progressed in the field of hardware detection and management. The days of static device files huddled below the /dev directory are long gone, and Devfs is also obsolete. Since kernel 2.6, udev [1] has been responsible for handling both the device filesystem and Hotplug, which includes setting up the required device files, setting permissions, and optionally launching certain programs.
In contrast to its predecessors, udev runs in user space - that is, as a "normal" program. This has a number of advantages, including freeing the kernel from the responsibility of management and naming attached devices, which facilitates configuration.
Udev has more benefits for users; for example, you can choose your own device names, and hardware assignments are always unique.
To keep everything running smoothly, udev needs rules that it references to discover a device's name and how to handle the device.
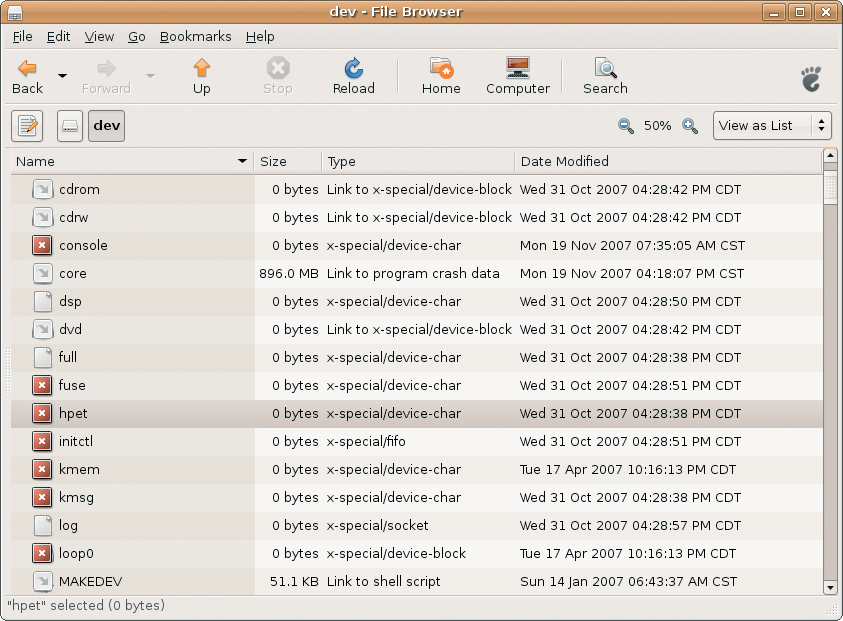
The udev "repository" is the /dev directory, which is where the device files that allow applications to access hardware reside. If you look inside the folder, you will see not only the file names for your hard disks and partitions (for example, sda, as in sda1, sda2), but also files for CD/DVD drives (a symlink to cdrom typically points to the "genuine" device, e.g., hdc), serial ports (e.g., ttyS0, ttyS1), and so on (see Figure 1).
The operating system stores the content of the /dev folder in a temporary filesystem, as you can see by listing the currently mounted RIS:
$ mount
...
udev on /dev type tmpfs (rw,mode
=0755)
...
Linux always sets up the files in /dev at boot time, but it also sets up a file when a new device is attached. It only makes sense that a device name will disappear when you remove the matching hardware. What keeps the directory clean and dynamic, while avoiding user confusion over changing device names, are the udev rules.
Various rule files, located in /etc/udev/ and /etc/udev/rules.d/, control udev's behavior. Some distributions, such as Debian, use symbolic links in the latter directory to point to the rules in /etc/udev/.
As you can see from Listing 1, rules are enumerated or start with a letter because udev works through the directory in alphabetic order when an event occurs. This method ensures that critical rules are processed first. The last port of call is normally the HAL daemon. (Udev notifies the daemon of the new device.)
| Listing 1: Rules |
01 $ ls -la /etc/udev/rules.d/ 02 ... 03 lrwxrwxrwx 1 root root 20 2007-05-09 23:40 020_permissions.rules -> ../permissions.rules 04 lrwxrwxrwx 1 root root 19 2007-05-10 00:39 025_libgphoto2.rules -> ../libgphoto2.rules 05 lrwxrwxrwx 1 root root 16 2007-05-10 00:39 025_libsane.rules -> ../libsane.rules 06 ... 07 lrwxrwxrwx 1 root root 12 2007-05-10 00:36 z99_hal.rules -> ../hal.rules |
If you take a closer look at a rule file, you will discover one or multiple instructions in a single line (without line breaks). The instructions contain various comma-separated conditions and control commands.
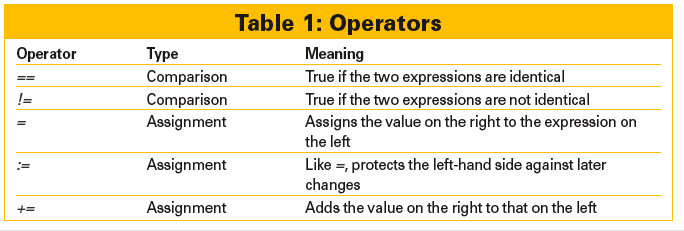
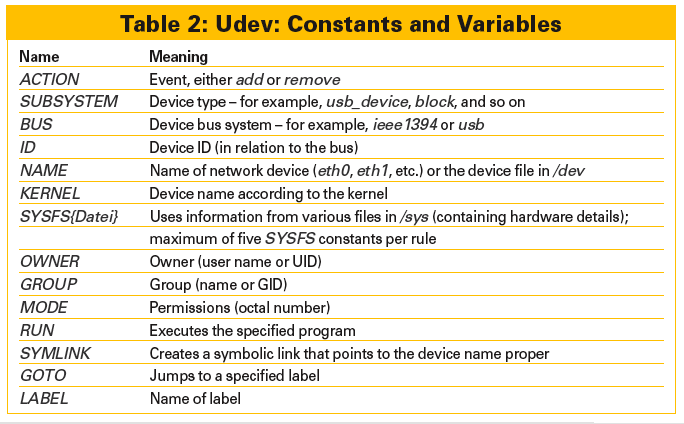
Shell-style wildcards, such as *, ?, [...], and so on, are supported. Additionally, various operators are typically used (see Table 1). Table 2 shows you an overview of frequently used constants and variables. The man page (man udev) also has a full list of operators, constants, and variables.
Creating your own udev rules, thus extending hardware detection functionality, is fairly easy. If you use external USB memory devices, they are assigned different names depending on the order you plug them in. In this case, I'll assume you have a hard disk on which you regularly back up your data.
Of course, you could plug in the disk, wait until it is correctly mounted, then discover the mount points and launch a backup script to complete the job. Thanks to udev, you can save a couple of these steps. To do so, you need to create a rule that automatically assigns the same device name to the hard disk. If you like, you can add a mount command to the rule or run a shell script to launch the backup.
First, you need some information about the device; you can use the lsusb (Listing 2) program for this. Make a note of the details that follow idVendor, idProduct, or iSerial, which you need to uniquely identify the device.
| Listing 2: lsusb |
01 $ lsusb -v 02 ... 03 Bus 003 Device 010: ID 152d:2338 04 Device Descriptor: 05 ... 06 idVendor 0x152d 07 idProduct 0x2338 08 bcdDevice 1.00 09 iManufacturer 1 10 iProduct 2 11 iSerial 5 12 bNumConfigurations 1 13 ... |
Now, you need to write a new rule file. The file will reside in /etc/udev/rules.d. Working as root, launch your favorite editor to create the file.
Use a unique number to insert the rule into the existing sequence, and add a .rules prefix. On my Debian Etch test system, I assigned the name z98_usb-platte.rules for the file and then added the following content:
SUBSYSTEM=="block", SYSFS{idProd
uct}=="2338", SYSFS{idVendor}=="
152d", NAME="backup"
Apart from saying that the device is a block device, the rule states the idProduct and idVendor information discovered by running lsusb and then specifies the name of the device file.
Running the command
udevcontrol reload_rules
as root reparses the rules. Alternatively, you can unplug your USB device and then plug it back in. The udevmonitor tool shows you what is going on behind the scenes. In combination with the --env option, the tool becomes more verbose and shows various details related to the rule on the test machine:
# udevmonitor --env
...
ACTION=add
DEVPATH=/block/sda/sda1
SUBSYSTEM=block
...
DEVNAME=/dev/backup
...
A quick check of the /dev directory reveals that udev really has created a /dev/backup device file, just like the doctor ordered. If you unplug the USB disk, the entry disappears again.
As Table 2 shows, you can use RUN to define the program to execute in your rule file.
If you want to mount /dev/backup in /media/backup in one fell swoop, you can extend the rule like this:
SUBSYSTEM=="block", SYSFS{idProd
uct}=="2338", SYSFS{idVendor}=="
152d", NAME="backup", RUN+="/bin
/mount /dev/backup /media/backup"
Make sure you enter the pull path to the program (/bin/mount in this case), but you need to create the mount point /media/backup with the mkdir command (working as root) first:
$ mkdir /media/backup
Then, you can launch the backup program manually. As an alternative, you could create an entry for the device in your /etc/fstab file as follows:
/dev/backup /media/backup ext3 u
sers,atime,noauto,rw,nodev,exec,
nosuid 0 0
This would let you add the mount command to the backup script to make sure that the external disk is mounted before backing up your data. In the udev rule, you would then replace "/bin/mount ... with the path to the backup script:
..., RUN+="/home/chicken/bin/ backup.sh"
If your computer has a single Ethernet card, the card will typically go by the name eth0. If you add a second card, such as a WLAN device to the machine, the card could be ath0 or eth1 depending on the driver. If you prefer your network cards to use the same names, you could create a rule to enforce this behavior. Instead of idProduct or idVendor, type the MAC address for your NIC, as shown after SYSFS{address} here. To discover the MAC, you can run ifconfig:
$ <B>/sbin/ifconfig<B>
eth0 Protocol:Ethernet Hardwa
re Address 00:10:A7:21:36:7C
...
ath0 Protocol:Ethernet Hardwa
re Address 00:00:C0:77:D8:F5
...
Listing 3 shows you how to create a matching rule.
| Listing 3: Matching Rule |
01 KERNEL=="eth*", SYSFS{address}=="00:10:A7:21:36:7C", NAME="eth0"
02 KERNEL=="eth*", SYSFS{address}=="00:00:C0:77:D8:F5", NAME="wlan0"
|
| INFO |
|
[1] Udev homepage: http://www.kernel.org/pub/linux/utils/kernel/hotplug/udev.html
|
| THE AUTHOR |
|
Heike Jurzik studied German, Computer Science and English at the University of Cologne, Germany. She discovered Linux in 1996 and has been fascinated with the scope of the Linux command line ever since. In her leisure time you might find Heike hanging out at Irish folk sessions or visiting Ireland. |