
By Thomas Leichtenstern
Ubuntu's entry in the distro customization showcase is the Ubuntu Customization Kit (UCK) [1]. UCK offers an enormous range of options for creating a customized operating system from a standard Ubuntu ISO. The graphical interface guides you step by step through the process of localization. You can add, remove, or update software then generate a new ISO that reflects your changes. With just a few mouse clicks, you can set up your own Ubuntu distribution.
| Log File |
|
UCK stores both the handling process and a record of any errors in a log file, /home/user_name/tmp/build.log. |
UCK accesses Ubuntu-specific programs and therefore requires a working Ubuntu installation. In our lab, I managed to set up the software on Ubuntu 7.04 and 7.10 without any trouble.
You can download UCK from the pro-ject website [2]. To install UCK, double-click the uck_2.0.0_all.deb package. The gdebi installer on your Ubuntu system resolves any dependencies.
UCK can work with all popular Ubuntu releases, as are well as derivatives such as Kubuntu, Xubuntu, or Edubuntu. You'll need an ISO image of the distribution you want to remaster. If you only have the distribution on disc, you can create an ISO image with the following command:
$ dd if=/dev/drive_name of=image_file
Replace drive_name with the corresponding device identifier, such as hdc. Replace image_file with the path and name of the ISO file you want to create, such as /home/tommy/ubuntu_7.10.iso.
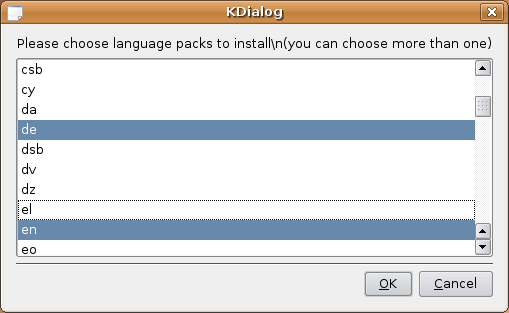
If you have a suitable ISO image, you can launch UCK either by clicking on the Tools | Ubuntu Customization Kit entry in the Gnome menu or by typing uck-gui at the command line. In the first dialog, select any localizations you want UCK to install (Figure 1). If the required language files are not part of the ISO image, the program will download them from the online repositories.
In the next dialog, select the language for the boot menu. Then go on to select the desktop environment (Gnome, KDE, or both). These details are mandatory; otherwise, the script starts the build process but quits after a couple of minutes.
In the file browser that now appears, select the ISO image you will be using as a basis. At the following prompt, enter a name for your creation.
If you will be adding packages to your distribution, or if you want to modify the system in any other way, say yes when asked Do you want to customize CD manually during build. You can delete Windows programs, such as Mozilla Firefox, provided with Ubuntu by saying yes in the next window.
UCK prompts you for the user password and starts to dissect the ISO image. It creates the directories remaster-iso, remaster-root, and customization-scripts in /home/user_name/tmp/. The remaster-iso folder stores the content for the CD. The script unpacks the squashfs file casper/filesystem.squashfs (the basis of Ubuntu) in the remaster-root directory. In order to treat the unpacked Ubuntu as an autonomous operating system, the script launches it in a chroot jail. If you have opted for further localization, UCK will launch apt-get in the chroot jail and install the necessary packages.
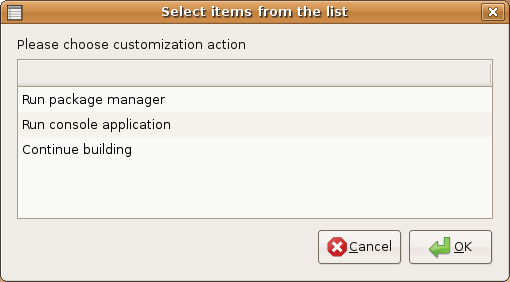
When you have completed this process, a selection window appears. You can choose to Run console application or run the Synaptic package manager in the chrooted environment in which Ubuntu is running (Figure 2). Synaptic lets you install or uninstall packages and to update the system.
To make sure UCK considers software from the Universe and Multiverse repositories, you first need to bind the repositories. To do so, open the source management function via Settings | Repositories, and enable the entries by checking their respective boxes. If you want to apply both security updates and recommended program updates, make sure you check the box for Recommended updates in the Updates category. After completing a selection, click Apply. Synaptic will then set up the selected packages in your chrooted Ubuntu to make them available in the live version.
After closing the package manager, the navigation window automatically re-appears. If you prefer the command-line approach, click Run console application to pop up a shell in the chroot jail. This gives you access to all the commands and programs you are familiar with from a normal Ubuntu system.
Among other things, UCK launches the X11 server in the chroot jail, which allows you to launch an application with a graphical interface, such as Firefox, in the chroot environment. Besides working on the semi-virtual system, you can add or remove arbitrary files to, or modify the scripts in, the /home/user_name/tmp/remaster-root/ directory, which is the root of the chrooted Ubuntu.
Files that you want to put onto disk, but that you don't want to appear when Ubuntu launches, must be copied to the /home/user_name/tmp/remaster-iso directory.
When you have completed all of your modifications, click Continue Building (see Figure 2) to tell the build script to create an ISO image from the files.
When it finishes, the script will not shut down the X server in the chroot jail. What this means for the basic build system is that GUI programs fail to start. To fix this problem, you need to reboot.
UCK creates the ISO image in the /home/user_name/tmp/remaster-new-files/ directory, where you can either launch it for test purposes in a virtual machine such as VirtualBox or burn it directly onto a CD or DVD.
Any additional programs you downloaded, as well as localizations, are stored in /home/user_name/tmp/remaster-apt-cache.
Besides the graphical user interface, UCK provides impressive script support that lets users automate the creation of customized distributions.
Following the HOWTO [3], you need to launch ./remaster-live-cd. However, a quick glance at the changelog will tell you that the developers have renamed the script from remaster-live-cd to uck-remaster in the latest release and forgot to mention the fact in the manual. Type
$ uck-remaster image_file modifications
then replace image_file with the path and name of the ISO file you want to remaster, and replace modifications with the path to the control scripts for further modifications.
The complete command line would look something like this:
$ uck-remaster /media/ubuntu.iso /home/tommy/ modifications
The remaster script checks the contents of the control scripts directory and runs the control files specified in the directory. A script's name will tell you what it does.
If the folder contains a customize file, Uck-remaster will integrate this with the packed Squashfs file and execute it in the chrooted environment.
According to the manual, all of the scripts are options that can exist but don't have to. You'll find a complete list of all possible action scripts in the user manual.
Tests with the sample scripts included in the /usr/share/doc/uck/example-scripts directory failed without exception.
My attempts with control scripts that create the GUI in the customization-scripts directory also failed.
Also, Uck-remaster quit the build process, reporting that it could not find (an existing) file.
| Reconstructor |
|
An alternative to UCK is the Python-based Reconstructor [4]. On one hand, Reconstructor provides far more in the line of technical capabilities than UCK; on the other hand, it lacks elementary functions, such as the ability to select the localizations. The program will process versions of Ubuntu burnt onto CD or DVD, and it will create both live and alternative versions suitable only for installation. In my test with Ubuntu 7.04, Reconstructor completely failed. The program refused to open a shell in the chroot jail, telling me that None of the authentication protocols specified are supported and host-based authentication failed. Because Reconstructor, in contrast to UCK, does not have a full-fledged package manager, the integrated installer will only support ex post installation of individual packages. You might be able to live with that, but my first attempt to boot the remastered Ubuntu system in my lab brought us right down to earth: Reconstructor had not integrated any of my settings into the new image. The selected services did not launch, and the desktop theme did not change. Hopefully, the Reconstructor developers will address these problems, as the program has many functions for experienced users that UCK does not offer. |
The Ubuntu Customization Toolkit allows users with different levels of experience to quickly create a customized version of Ubuntu.
The sample scripts provided with the tool are designed for experienced users who are not afraid of plumbing the depths of a function to find out why it is broken.
Unfortunately, the documentation supplied with the Ubuntu Customization Kit is no big help.
| INFO |
|
[1] Ubuntu Customization Kit: http://uck.sourceforge.net
[2] UCK Download: http://sourceforge.net/project/showfiles.php?group_id=169959 [3] Ubuntu Customization Script Manual: http://uck.svn.sourceforge.net/viewvc/*checkout*/uck/trunk/uck/docs/building-script.html [4] Reconstructor: http://reconstructor.aperantis.com |