By Tim Schürmann
![]()
The holidays are over and your new digital camera is bursting at the seams. Before setting up a photo gallery on your website, you need to sort through the photos and put together a few preview shots. Normally, you would fire up GIMP, open a single photo, process it, resize it, and then save it, repeating this process until you have sorted through all your photos. This method could eat up hours of your busy weekend.
Fortunately, ImageMagick includes a collection of command-line tools for your images. These tools are almost exclusively accessed from the console and let you process a bunch of images easily in an assembly-line manner. For example, adding a frame to each of your 451 vacation photos only requires a short command.
| Typical Tasks |
|
The ImageMagick program is especially suitable for the following types of tasks:
|
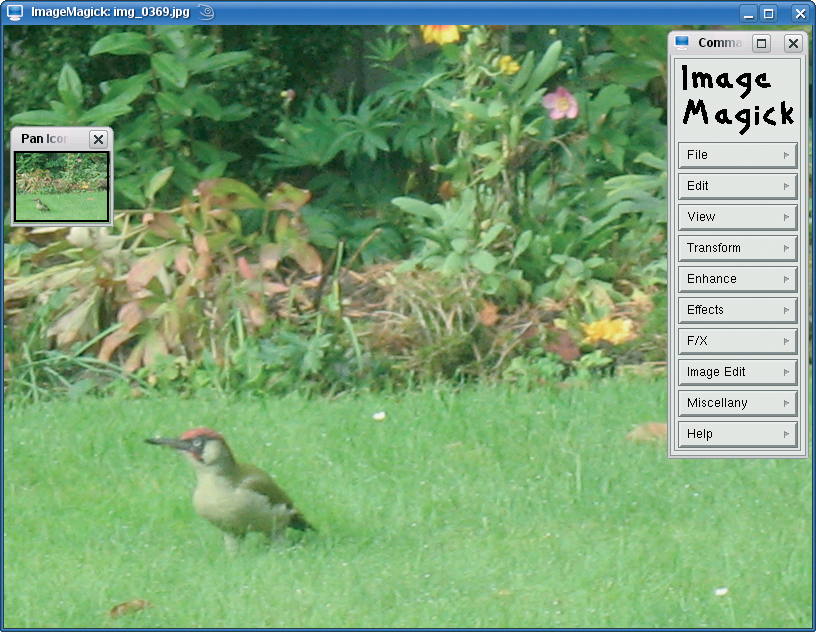
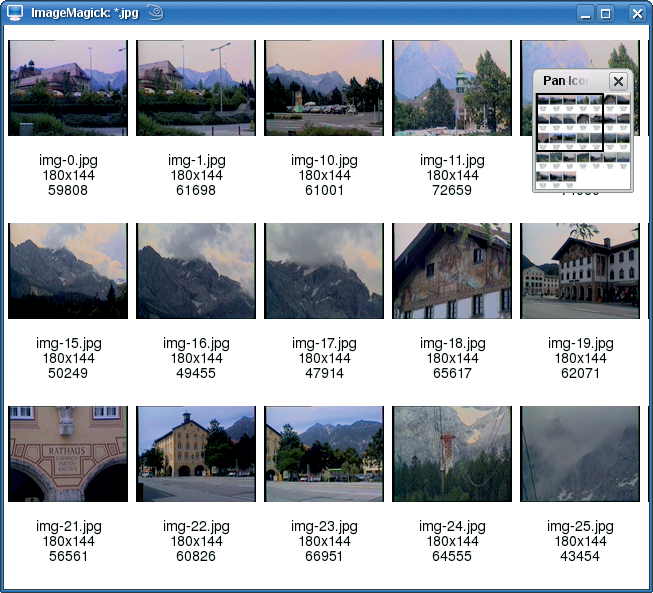
First, the display program can help you sort through all your images (Figure 1). The display *.jpg command, for example, displays all of the JPEG images in the current directory. Pressing the space bar moves you from one image to the next. An overview (Figure 2) of your current photos, which also can be saved by pressing Ctrl+S, can be generated by the display vid .jpg command.
The identify image.jpg command provides you with more detailed information about a photo (Figure 3), including some somewhat cryptic information.
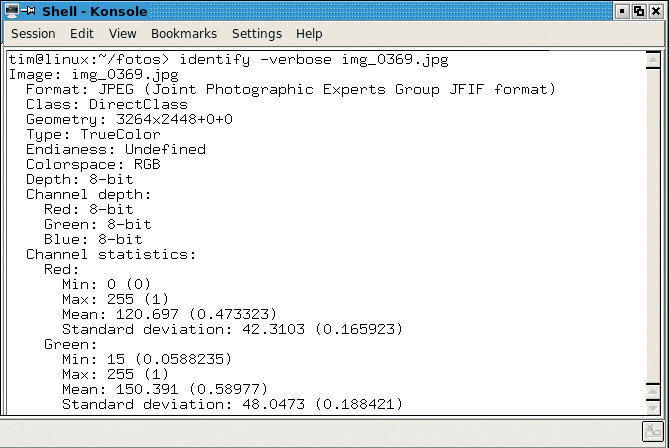
The example shown in Figure 3 concerns a JPEG file with a resolution of 3264x2448 pixels, where each color channel contains 8 bits of color information. Using three color channels (for red, green, and blue) results in a color depth of 24 bits. The last value gives file size information. The Exif information hidden in many photos is dug out by the -verbose parameter:
$ identify -verbose image.jpg
After you have determined which photographs you don't want and deleted them, it's time to prepare the other photos for your website.
Cameras normally generate photos in JPEG format, which has a serious disadvantage: To achieve high compression, JPEG tends to throw image information overboard, which is evident as soon as you try to apply filters and effects. These changes can leave unwanted artifacts in the image. If you still want to post-process your vacation photos, you first need to convert them into an uncompressed format; for example, photographers like the TIFF format, which is generated by the convert image.tiff command.
If you have a large number of files, the following shell command helps you convert them all in one go:
$ for i in *.jpg; do convert $i $(basename $i .jpg).tiff; done
For each file ending with .jpg, the shell removes the ending from the file name, replaces it with .tiff, and calls convert with the results.
| TIP |
|
Instead of the file name, you can also use the name of the font - for example, Courier. |
Like all of its companions in the ImageMagick package, convert independently detects the file format by its extension. Each application automatically knows that a photo named image.jpg is a JPEG photo.
If the converted file needs an exotic ending for some reason - for example, exot.exo - simply put the format at the beginning of the file name:
$ convert image.jpg TIFF:exot.exo
The mogrify command along with the -rotate parameter rotates sideways images into an upright position. Using the following command rotates your images:
$ mogrify -rotate "90>" image.tiff rotated.tiff
This command rotates image.tiff clockwise 90 degrees.
Note that you do need the quotation marks; otherwise, the shell would interpret the pointy bracket as a redirect and would delete the image.tiff.
A number of effects and filters can change or enhance your images after the fact. In many cases, the sharpen filter is helpful:
convert -sharpen 6 image.tiff scharf.tiff
The number behind the -sharpen parameter indicates the strength of the filter effect. Using convert, you can quickly and gently lighten photos that are too dark:
$ convert image.tiff -sigmoidal-contrast 4,0% lighter-image.tiff
If an image doesn't really convey the atmosphere you were hoping for, you might want to try converting it into a black and white photo:
$ convert image.tiff -colorspace gray black-white.tiff
However, the results of this type of conversion can be quite dull in some cases.
If this happens, one popular trick is to use a color channel:
$ convert image.tiff -channel R -separate black-white.tiff
This command extracts the red channel in the image and converts the intensity values to gray scale in the final image.
In addition to these basic effects, there also are a few more fun effects. The following results in a charcoal drawing:
$ convert image.tiff -charcoal 5 charcoal-image.tiff
The value behind -charcoal determines the hardness of the "charcoal pencil."
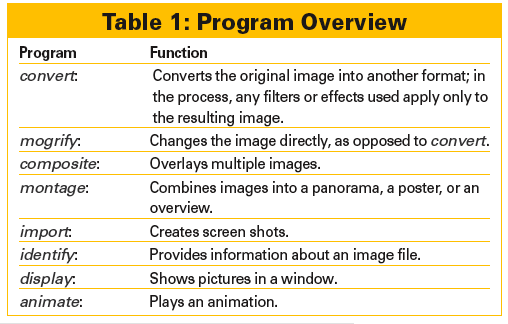
The -solarize parameter (Figure 4) produces a negative, a swirl is generated by -swirl (Figure 5), and -implode implodes the image.

Before you load the final results into your website, consider investing a bit more work to prevent any viewers from stealing your images simply by applying a watermark.
To apply a watermark, first create a logo and place it, for example, in the upper left corner:
$ composite -geometry +100+100 logo.png photo.tiff photo_logo.tiff
This command copies the image from logo.png to the (100, 100) position on the image photo.tiff and places the results in the photo_logo.tiff file (Figure 6).
![]()
A logo inserted in this manner does indeed indicate the origin of the image; however, this doesn't really look like a typical watermark. The -watermark parameter was created specifically to take care of this problem:
$ composite -watermark 30% -gravity south logo.png photo.tiff mitwatermark.tiff
In this parameter, the percentage indicates how visible the watermark should be. The composite command not only integrates logos and watermarks, but it also easily creates collages. For example, you could add an arrow from one photo that has a small ski hut in the background to another photo of the ski hut.
Also, adding a caption is a good idea.
| TIP |
|
Some parameters are used by more than one of the ImageMagick tools. This means that composite produces text according to the same process as convert, for example. |
Captions under the image can indicate the precise location the picture was taken or who the people in the picture are. To add captions, you first need a file with the font you want to use, preferably in a TrueType format (ending .ttf).
On KDE and Gnome, perform a search for the fonts using search engines such as Tracker or Beagle. Then it is time to use convert again, which you pass on behind -font, where the font is located. Listing 1 shows the somewhat long, yet complete, command.
| Listing 1: Convert |
01 $ convert -font @/home/tim/fonts/font.ttf -pointsize 20 -fill black -draw "text 100, 150 'Vacation in the mountains'" image.tiff caption.tiff |
The @ symbol before the file name tells convert that it is dealing with a True-Type font. The rest of the command places the text Vacation in the mountains (-draw) at the (100, 150) position in black, with a point size of 20 pixels (-pointsize 20), in the font.ttf font. Enter the English name for the color after -fill - for example, red, or enter the corresponding RGB values directly. In the second case, select between decimal notation, for instance, rgb(255,0,0), or hexadecimal notation, "#FF0000", which you may know from HTML programming.
In both cases, you should see the color red. The convert -list color command lists all the known color names and their RGB values.
This is not an exhaustive list of everything that ImageMagick can do with text. For example, you also can add a frame around the text and fill it with green with the use of the -stroke parameter for the border and -stroke width parameter to set the thickness of the border (Listing 2).
| Listing 2: Add a Frame |
01 convert -font @/home/tim/fonts/font.ttf -pointsize 20 -fill red -stroke black -strokewidth 3 -draw "text 100, 150 'Vacation in the mountains" image.jpg caption.tiff |
If you like to decorate your photo albums, you can easily put frames around your images with the following:
$ convert -bordercolor blue -border 10x10 image.tiff border.tiff
The command generates an image with a border (-border) that is 10x10 pixels wide. The border color is specified by bordercolor - blue, in this example.
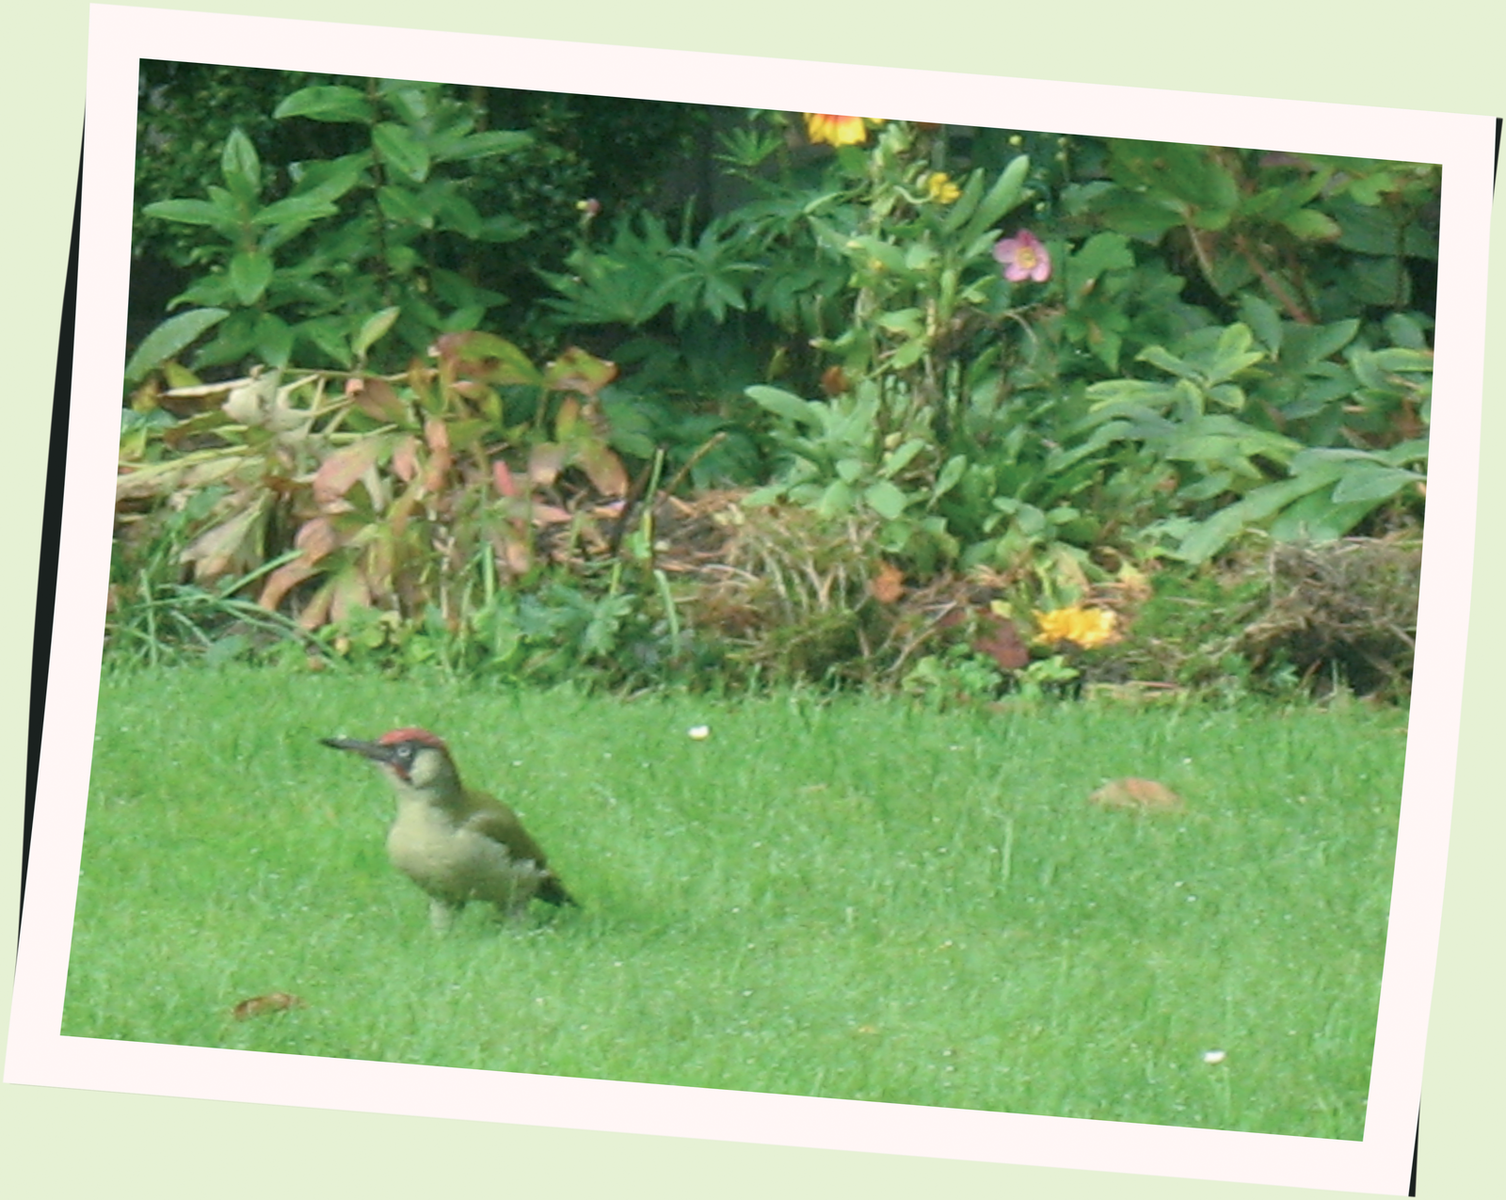
The additional +polaroid option bends the image in such a way that it looks like a photo that has been glued in and has slight waves in the paper (Figure 7):
$ convert -bordercolor snow -background black +polaroid image.tiff polaroid-photo.tiff
To create a three-dimensional edge effect, configure the -frame parameter. This parameter also adds a border to the image; however, it gives you finer control than the -border parameter. The option -mattecolor sets the color of the edge; for example:
$ convert -mattecolor peru -frame 9x9+3+3 image.tiff image-w-3D-bordmen.tiff
The numbers after the plus symbols determine the width of the interior and exterior edge of the image.
After you have the effects right, process the photos to be published online. First, you should scale down their size a bit. Monster images with a resolution of 3264x2448 pixels only fit into a small corner of most monitors, plus they unnecessarily eat up disk space. If you want to drop the extra weight, use the option -resize:
$ convert -resize 200x200 photo.tiff small-photo.png
The command reduces photo.tiff to a size of 200x200 pixels - or rather, it tries to. To prevent distortions, convert confines itself only to the dimensions specified. An image that was originally 3264x2448 pixels ends up at 320x100 pixels. If it is imperative that the image measure 200x200 pixels, even if it turns out distorted in the end (Figure 8), place an exclamation mark behind the size:
$ convert -resize 200x200! foto.tiff small-photo.png
Alternatively, you can work with percent values. The following example reduces to 75 percent of its original size:
$ convert -resize 75% photo.tiff small-photo.png
The following shell can help you easily convert all of your vacation photos into space-saving thumbnails at one go:
$ for i in *.tiff;do convert $i -resize 800x600$(basename $i .tiff).png; done
The command reduces the size of the images to a monitor-friendly 800x600 pixels and simultaneously converts them into space-saving PNG format, too.
Future visitors to your website probably will not want to see all of your photos, so a thumbnail overview is helpful. Thumbnails also help when you want to print any of your images and makes it easy to locate specific photos on the overview.
Collecting all of the photos is handled by the montage option, which actually prefers working with thumbnails:
$ montage -label '%f' *.png -frame 5 overview.png
This command adds a border to every preview image, writes the file name at the bottom (-label `%f'), and packs the finished candidates in the overview.png file. The result is a large poster like the one in Figure 9.

On your website, it should be possible to click the preview image to display the entire photo. This task also is no problem for ImageMagick, even if it does take a slight detour with the use of visual directories. These directories contain small preview images that display the corresponding photo when clicked. You can create a visual directory using convert vid .png meindir.vid, the results of which open display meindir.vid. To look at a photo, right-click to open the context menu and select Load. With the use of the command
convert 'vid:*.png' HTML:index.html
in the console, the visual directory can generate an entire preview page for your website, resulting in multiple files. index.png contains the actual overview graphic, and index.html links it and notifies the browser which photo is behind which preview image.
To work properly place both files together with the correct photos on a web server. As soon as visitors request index.html, they see an overview of the available photos. Clicking one of the preview images loads the photo at its actual size in the browser.
The tools available in the ImageMagick package use a rather cryptic syntax that takes getting used to, but the learning curve is worth it if you have a large number of images that need to be manipulated. Also, shell scripts offer nearly unlimited options for automation.
| THE AUTHOR |
|
Kristian officially studied German philology, history, and social science in Berlin but wasted a lot of his time with computers. He got hooked on Linux in the 1990s and works now as editor for LinuxUser. |