
By Justin Penney
The Linux environment offers several techniques for monitoring and managing remote systems, but conventional remote administration works through a connection with the operating system of the remote host. What happens when the remote host is down or otherwise compromised?
Intelligent Platform Management Interface (IPMI) [1] is an interface for monitoring and controlling computer hardware independently of the operating system. When the operating system is inactive, you can use IPMI to shut down or power up a computer. IPMI also offers access to a variety of other hardware information and settings that may not even be reachable through standard management tools. The IPMI interface controls power, reads environmental sensors, and even redirects the system console over the network. The IPMI interface requires support from the motherboard or computer manufacturer. The initial IPMI configuration is often complex and frustrating, but the effort is well worth it the first time IPMI saves you from a late-night trip to the data center.
The current IPMI specification is version 2.0. Version 1.5 interfaces are still common, as are controllers with a mixture of features from the v1.5 and v2.0 specs. These blended versions, often referred to as IPMI v1.5/2.0, typically provide more robust authentication ciphers and Serial Over LAN (SOL) support.
| Acronyms |
|
The IPMI environment is full of acronyms. Some important terms are: IPMI Intelligent Platform Management Interface SOL Serial Over LAN SMDC Server Management Daughter Card BMC Baseboard Management Controller KVM Keyboard Video Mouse |
The IPMI system is based around a hardware component known as the Baseboard Management Controller (BMC). The BMC receives information from other satellite controllers located on the chassis and serves as a point of contact for remote communication. Some whitebox - or bare-bones - computers have this IPMI functionality built in. Off-the-shelf motherboards usually add an IPMI BMC via an SO-DIMM slot, PCI slot, or ribbon cable.
The LAN interface usage varies from one manufacturer to another. Some products provide a LAN port connected directly to the BMC; others take over a LAN port that exists on the motherboard. A third type uses an existing LAN port but intercepts the IPMI communication while handing the remaining network traffic to the LAN driver. This approach, called pass-through, requires cooperation from the LAN driver, which can be hit and miss on Linux.
The initial configuration of an IPMI interface varies widely between different manufacturers. Some are very polished, requiring little more than setting an IP address, whereas others have multiple firmware components that need to be flashed and configured in multiple places.
For your hardware, you will need to work with your motherboard or system vendor on the specific instructions. The open source OpenIPMI project [2] provides a Linux IPMI driver that works for some BMCs.
| Difficult Configuration |
|
The BMC setup from some manufacturers may require as many as 20 distinct steps to finish the configuration. In some cases, this is the only way to configure devices. One IPMI implementation I recently deployed worked if I set the IP address in the BIOS setup, but when I changed the address with ipmitool, the BMC was unreachable until I set the IP address in the BIOS setup again. Unless the SOL settings are configured with a DOS utility that is specific to the motherboard, this BMC also does not perform SOL correctly. |
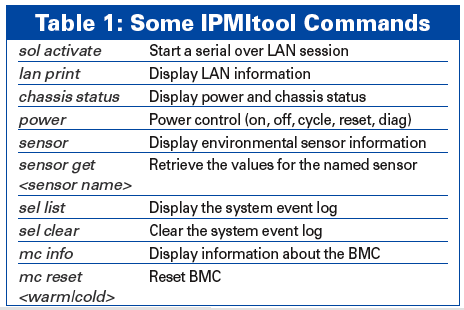
The Linux command-line utility IPMItool lets you configure and communicate with IPMI-equipped systems. Several major Linux vendors include IPMItool packages, and the source code is available at the project website [3]. IPMItool provides several commands for communicating with the IPMI infrastructure (Table 1).
After a BMC is configured locally, you can use IPMItool to configure the LAN interface (Listing 1).
| Listing 1: Setting LAN Interface Information |
01 ipmitool -I open lan set <channel> ipaddr <ip address> 02 ipmitool -I open lan set <channel> netmask <netmask> 03 ipmitool -I open lan set <channel> defgw <default gateway> |
The real power of IPMI comes from the LAN interface. After the LAN is configured, the BMC will respond to remote requests as long as the system has standby power. The BMC provides remote power control, access to BIOS settings, environmental sensor monitoring, console access, and in some cases, Keyboard Video Monitoring (KVM) over IP support.
Some manufacturers support virtual media that allow for the emulation of USB floppy and CD devices; this usually requires a manufacturer-supplied utility on the client machine that may or may not be supported under a Linux environment.
The IPMI v2.0 LAN interface is referred to as lanplus by ipmitool, and the IPMI v1.5 interface is called lan. Most current management controllers support IPMI v2.0 and use the lanplus interface. If you are using a v1.5 or a mixed v1.5/2.0 BMC and the lanplus interface is giving no response, try the lan interface.
Connections to the BMC begin by specifying the interface, in this case lanplus, the IP address, and the username. In this example, the option -a tells ipmitool to prompt for the password:
ipmitool -I lanplus -U <username> -a -H <ip address>
A simple test for the interface is to retrieve the power state of the machine:
ipmitool -I lanplus -U admin -a -H 192.168.2.1 chassis power status
Password:
Chassis Power is off
The machine's power is off. To turn the power on, use:
ipmitool -I lanplus -U admin -a -H 192.168.2.1 chassis power on
See Table 1 and the IPMItool documentation for additional commands.
SOL gives administrators the same access to a computer they would have using a keyboard and monitor connected directly to the machine. SOL requires that the BIOS, boot loader, and OS be configured properly.
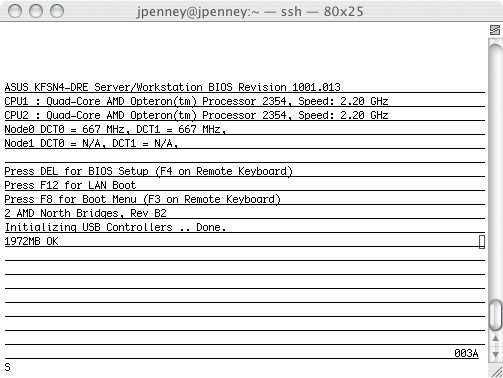
The BIOS setup should contain a section titled remote console or serial console; the BMC manual will specify the required settings. Once set, you will be able to see all the POST (Power-On Self-Test) messages; you will also be able to enter the BIOS setup through the SOL console.
Pay attention to the output on the screen during POST because some keys - notably Del and F9 through F12 - are reassigned. If Del is normally used to enter the BIOS setup, you might need to press F4. Look for the words on remote keyboard (Figure 1) for the proper keys to use for the BIOS functions.
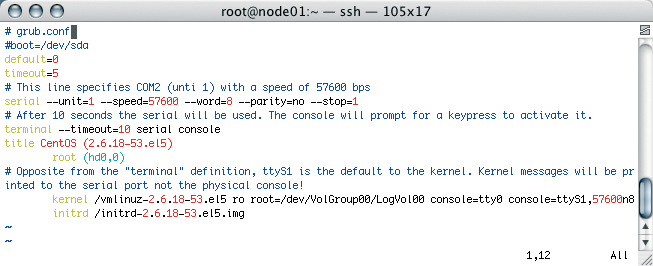
Grub needs to be configured to display over the SOL interface. Figure 2 shows /boot/grub/grub.conf as configured for a serial console using COM2.
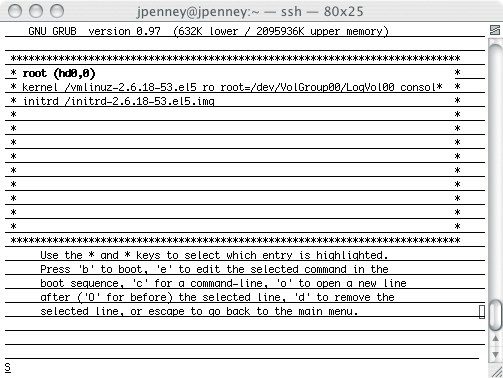
Standard console access to grub will be granted if a key is pressed within the timeout period of 10 seconds on a keyboard attached directly to the machine. With a monitor connected directly to the machine, the message "Press any key to continue" is printed once per second during the timeout period. Figure 3 shows an example of grub being displayed over the SOL interface.
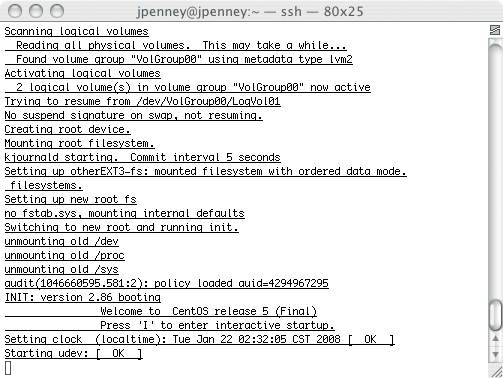
Be aware that almost all of the output during the boot process will be displayed on the serial console (Figure 4) instead of the standard console. When a monitor is connected, you will see a few messages and then the console will appear completely unresponsive until the getty programs start on the normal console devices, which can be confusing and frustrating when trying to diagnose a misbehaving computer. To avoid the console redirection, press the e key while over the preferred kernel in the grub menu, which will allow you to remove the console keys. After the kernel command line is edited, press the b key to boot the selected kernel.
The last step is configuring a getty to display a login prompt over the serial console. Most Linux distributions ship with agetty installed, which is the getty program most often used for a serial console. Starting a new getty is as simple as adding a line to /etc/inittab:
s0:2345:/sbin/agetty ttyS1 57600 vt100
To prevent agetty from attempting to detect a carrier on the serial console, you may need to add the -L argument.
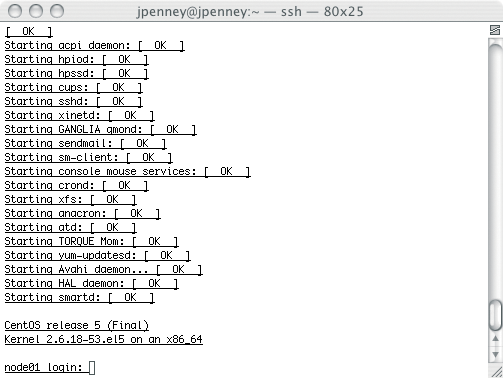
Adding ttyS1 to /etc/securetty allows the root user to log in via the serial console (Figure 5). This file specifies which terminal devices should be considered secure enough for root to log in.
Running init -q as root forces init to reload its configuration and start the new agetty process. At this point, you should be able to start an SOL session and access the machine at any stage:
ipmitool -I lanplus -U admin -a -H 192.168.2.1 sol activate
If your systems don't support IPMI, you can still achieve some of the same functionality through other tools. For instance, power control and serial console support are possible through external hardware. Network-controlled power strips, such as APC's Switched Rack PDU (power distribution unit) and Server Technologies' Sentry PDU, let you remotely power on, power off, or power cycle any connected devices.
Serial console servers, such as those from Avocent and Open Gear, allow console access via the serial console on the motherboard. The configuration is similar to the setup for serial console support with IPMI. Some motherboards allow redirection of the BIOS. Unlike IPMI, the interfaces to these devices are not standard, making it impossible to provide any generic instructions.
Because each manufacturer's processes are different, you'll need to follow their instructions.
Performing the initial setup of an IPMI implementation can be challenging; however, additional time and effort up front could save considerable time in the event of a failure.
The ability to see any errors during POST or the beginning stages of the kernel boot can be invaluable when diagnosing a downed server.
| INFO |
|
[1] Intelligent Platform Management Interface specification: http://download.intel.com/design/servers/ipmi/IPMIv2_0rev1_0.pdf
[2] OpenIPMI: http://openipmi.sourceforge.net/ [3] IPMItool: http://ipmitool.sourceforge.net/ |
| THE AUTHOR |
|
Justin Penney began using Linux as a hobby in 1997 and now designs high-performance computing clusters. Outside of computers, Justin enjoys creating music and photography. |