
By Tim Schürmann
At an Internet café, someone has just injected a virus to crash a freshly installed operating system. In an office down the street, a trainer has been trying for hours to harmonize the configuration on a group of 20 new PCs. At the same time, in an office upstairs, a hard-disk crash takes down the source code of an almost-finished project.
In all three of these horror scenarios, a legacy, file-based backup solution may not be the option you are looking for: Even if you manage to find the necessary backup disk, you'll have to reinstall the operating system before you can even start restoring the backup.
In these situations, a complete partition backup saves the day. If an emergency strikes, you just need to restore a snapshot, or image file, of the partition and carry on working. If you detect the signs of imminent disaster, you can create an image prior to the event and transfer it to a working disk.
Also, partition backup is extremely useful in forensics and for cloning partitions. Trainers can set up a single PC, create an image, and install the rest of the PCs from the image. If a student accidentally destroys the installation, the image can be restored. This technique also applies to Internet café owners, who can return a virus-infected machine to its original state by restoring an image.
When considering backing up a full partition, one question is where to put the enormous volumes of data. A newly installed operating system might fit on a normal DVD, but if you add your own documents and programs, you'll quickly overflow the disk. One convenient solution is to create a custom backup server, which will hold large amounts of data without the need for a human directly handling discs.
In this article, I will present some techniques for configuring a full-partition backup across the network with free, open source tools, including:
Several other partition image backup tools available on the Internet are actually front ends for these tools. Of course, a number of commercial backup solutions are also available, depending on your needs and budget.
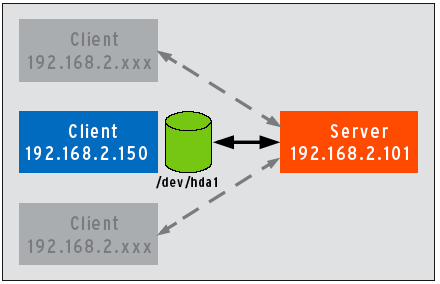
In this article, I will assume you are backing up the partition to a backup server system on your network (Figure 1). Before you can create a backup, you need a few basic details, starting with the IP address for the backup server, which is 192.168.2.101 in all the following examples. The client computer with the partition you want to back up, /dev/hda1, also is attached to the network and has an IP address of 192.168.2.150.
If you have a system that groups individual partitions, such as a RAID configuration, you'll need to attend to some additional details. See the box titled "Careful with LVM and RAID."
| Careful with LVM and RAID |
|
Almost all low-level tools directly access the native filesystem; thus, the steps described in this article will only work for normal, simple partitions. If you need to back up a NAS, a distribution filesystem, a RAID array, or some other specialized system, you need to study the documentation provided with the tools very carefully. You may need to use some specialized tool to perform the backup operation; otherwise, you run the risk of total data loss. |
The easiest tool for backing up a complete partition already is part of any Linux distribution - the tiny, ingenious dd command-line utility. Typing
dd if=/dev/hda1 of=Myimage.img
launches the utility to parse the first partition on the first hard disk, byte by byte, and store it in a file called Myimage.img. To restore the image, enter:
dd if=Myimage.img of=/dev/hda1
Using ftp or SSH, you can manually push the image you create onto your backup server. Netcat and a couple of pipes let you set up a more convenient delivery service.
For secure alternatives to netcat, see the "Safe, Not Sorry" box.
| Safe, Not Sorry |
|
Netcat will transfer data just as it is passed in - that is, unencrypted in most cases. In security-conscious environments, administrators will probably prefer to use an alternative, such as SSH, dd if=/dev/hda1 | ssh user@192.168.2.101 "cat > /home/user_name/myimage.img" and you can then send the image back like this: ssh User@192.168.2.101 "cat /home/user_name/myimage.img" | dd of=/dev/hda1 This approach gives you the advantage of avoiding the need to log on to the backup server and launch a program when you get there. As an alternative, you could share an NFS or SMB directory on your backup server and let the client store the image file in the directory. If you use this approach, you will need a Live CD when restoring a system partition because you will need to bind the NFS and SMB directories. |
The netcat program can use TCP to send or receive arbitrary data over a network. In this case, netcat first listens for incoming data on port 9000 on the backup server (parameter -l):
netcat -l -p 9000 | dd of=myimage.img
All incoming bytes are then piped directly to dd, which in turn pushes them into the myimage.img file. (Without the if parameter, dd will use standard input, which netcat will populate with data.) To clone a partition over the network, just use the matching device file instead of myimage.img:
netcat -l -p 9000 | dd of=/dev/hda1
Launch dd on the client in the normal way, but pipe the data it reads to the netcat command, which will forward the data to your backup server:
dd if=/dev/hda1 | netcat 192.168.2.101
9000
Reversing this procedure restores the image. Start by doing this on the client
netcat -l -p 9000 | dd of=/dev/hda1
and tell the backup server to send back the data:
dd if=myimage.img | netcat 192.168.2.150
9000
Although you might think the dd utility offers a fast and simple backup solution, this approach has a major drawback - dd is extremely lean. The dd utility will read the whole partition byte by byte, giving you a myimage.img file that is exactly the same size as the partition you want to save, although only a tiny fraction of it might contain data.
For the same reason, the image will take an incredibly long time to wind its way across the network.
To mitigate this, you could drop a packer into the command chain: gzip, for example:
dd of=/dev/hda1 | gzip -c | netcat 192.168.2.
101 9000
When you restore the image later, just unpack the data before writing it to disk:
netcat -l -p 9000 | gzip -d | dd of=/dev/hda1
But this approach will not prevent the unused part of the partition from crossing the network. Even if you use compression, snapshot sizes can easily reach 4GB. Some older filesystems just crash under this kind of load, including the old-timers FAT32 or Ext2 without Large File Support.
If you want to store an image on this kind of partition, use of the split program allows you to split it into more appetizing chunks:
dd if=/dev/hda1 | gzip -c | split -b600m myimage.img
In this case, chunks of 600MB (-b600m) are created.
To restore, you can use the cat command to concatenate the parts:
cat myimage.img* | gzip -d | dd of=/dev/hda1
But dd has no end of dumb utility tricks up its sleeve - when it restores a partition, it always will write the same number of bytes to disk as the size of myimage.img. If the target partition isn't exactly the same size, dd will either overwrite the following partition or waste disk space. This automatically gives rise to another major disadvantage: Typos can be deadly. If you confuse the parameters for if= and of=, you will trash at least one of your disks when you pull the trigger.
Last, but not least, dd simply stops reading if it discovers a defective sector. Fortunately, dd's sibling, dd_rescue [1], has a solution for this. Although dd_rescue was developed for data recovery, it works much like dd in other respects.
With all these advantages, you might be surprised to hear that there is one really good reason to use dd - it will save a partition without concerning itself with the filesystem.
No matter what kind of exotic filesystem you have on the disk, dd will back it up and restore it without complaining.
| Life-Saver |
|
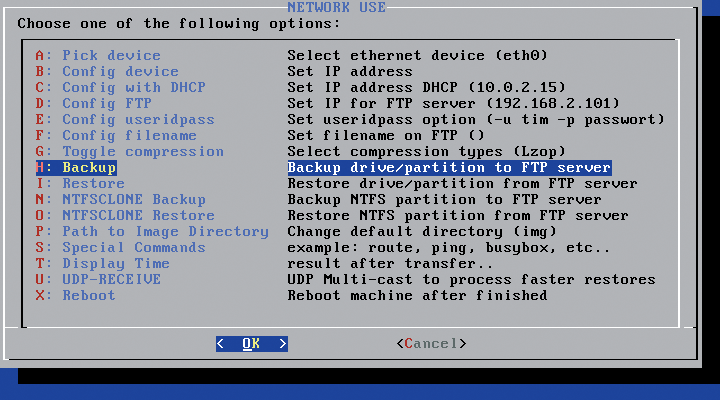
Backing up a mounted partition during normal operations is nothing short of suicide: If the Linux kernel decides to write to disk while you are creating the backup, you may just lose a couple of files, but the copy will not match your original, and the backup is thus useless for forensic investigations. As a consequence, you should only backup to unmounted partitions, and only restore to them, too. This said, the kernel is reluctant to unmount the system partition, although you are likely to want to back it up. To work around this issue, you can either install an additional rescue system on your disk or use a Live CD - Knoppix, for example. Because Live CDs are memory resident, a Live CD can create an image of any partition without any adverse side effects. Knoppix has all the tools you need for this, including Partimage, ntfsclone, netcat, and of course, dd. If you need more than this standard set of tools, you might prefer a special-purpose Live CD. The Device Image tools are available on a modified Knoppix CD, which sells at a price of around EUR 9-15 - a fairly stiff price, considering the components are all free, as in beer. The Ghost4Linux mini-distribution, or G4L [2] for short, is completely free. It comes with a simple interface that lets you backup a whole partition to an ftp server (Figure 2). Under the hood, you'll find your old friends dd, Partimage, and ntfsclone. G4L comes as a prebuilt ISO image [2], which you burn onto a CD. Use this Live CD to boot the client computer. After starting g4l, the menu gives you a choice of two backup approaches: File Mode refers to the legacy Partimage tool, but note that this will not help you with NTFS or other exotic partition types. Choose RAW Mode in this case. In the dialog, select Network Use, and work your way through the options, top down. Enter the ftp server address as Config ftp, the access data for the FTP as Config useridpass, and the disk image fil names as Config Filename. Then select Backup to create a safe copy of the disk or partition on your ftp server; Restore puts the backup back on your disk. If you need to back up an NTFS-formatted partition, use NTFSCLONE Backup or NTFSCLONE Restore to launch the ntfsclone tool. As an alternative to G4L, you might want to consider the tried-and-trusted Ghosting For Unix tool, aka G4U [3]. The G4U system is a mini-distribution that will pack whole partitions on an external ftp server. G4U is based on the NetBSD operating system and is slightly more inconvenient to use. On the upside, the tool offers both a CD image and an image for two legacy 1.44-inch floppies. Before you boot the client computer from the new medium, set up a user account for install on your ftp server. It makes sense to use a DHCP server to distribute the IP addresses for the computers involved. After fulfilling all the prerequisites, boot the client computer from the G4U medium. When you see the prompt, make a quick check of the existing disks by typing the disks command; to view the partitions, type parts harddisk, where harddisk is the BSD device name for a disk (which is not the same as on Linux). If you know the partition name, you can type uploadpart 192.168.2.101 Myimage.img Partitionname to send the image to the backup server. Typing slurppart 192.168.2.101 Myimage.img Partitionname restores the image. |
The Device Image [4] toolkit provides a more convenient alternative to dd. The toolkit contains a pair of utilities:zsplit and unzsplit.
Use zsplit to create backups. All you need to build the program is the zlib library. After completing the build, enter
zsplit -s 4.5G -N myimage.img -d /dev/hda1
to store the first partition on your first hard disk (-d /dev/hda1) in a file called myimage.img.
In contrast to dd, zsplit compresses the results and then splits up the results into palatable chunks of 4.5GB each (-s 4.5G). The tool thus combines the abilities of the three standard tools: dd, gzip, and split.
To restore the backup, you need the unzsplit tool. To install, use the same steps as for zsplit, and then type
unzsplit -D /dev/hda1 -d mypartition
to paste the chunks back together and unpack the results on the /dev/hda1 partition.
The zsplit and unzsplit team may seem easier to handle than the lengthy dd command lines, but you will need to turn to dd and netcat to transfer the data across the network. To start, tell the backup server to listen on the network:
netcat -l -p 9000 | zsplit -s 4.5G -N
myimage -d
The -d - option tells zsplit to read from standard input, which is populated by netcat. Then use dd to push the partition from the source machine:
dd if=/dev/hda1 | netcat 192.168.2.131 9000
The restore operation just reverses this process.
Both dd and the Device Image Toolkit have the disadvantage that they save the unused part of a partition, and thus unnecessarily bloat the resulting image. Saving the sectors that are actually in use makes more sense, which is exactly what Partimage [5] does.
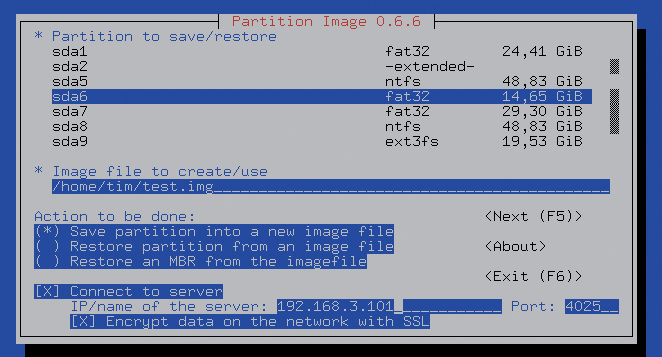
The Partimage tool comprises two parts: the partimage client, which parses the partition, and the partimaged server, which waits for the image and stores it on the backup server (see Figures 3 and 4). To use Partimage, you need to resolve some dependencies in order: OpenSSL, newt (Nifty Erik's Windowing Toolkit), zlib, libbz2, and slang.
To start, load the Partimage installation onto your backup server. Before you launch the compiler, create a new user account under the name part-imag. The Partimage server will need this account; although it launches as root, it quickly drops its privileges and runs with the privileges assigned to the partimag account.
Now install the source code by typing ./configure --prefix=/usr; make; sudo make install.
If you want to encrypt the data before transferring them over your network, create a matching SSL certificate by typing sudo make certificates.
The final step is to set up an account for each user who will be creating image files on the backup server. Enter the user names in the partimagedusers file, one name per line. Typing partimaged -i at the command line tells you where partimagedusers is located.
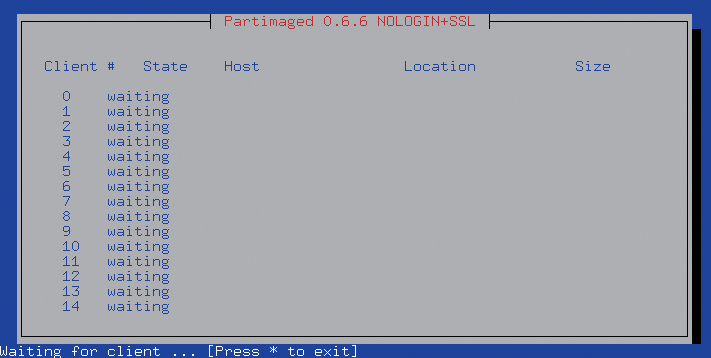
After entering authorized users, type sudo partimaged (don't forget the d at the end) to launch the Partimage server. Up to 10 clients can supply data to the server at the same time. The IP addresses shown in the user interface tell you which computers are currently transferring data.
Another Partimage copy is installed on the client computer. In this case, you can simply type ./configure --prefix=/usr; make; sudo make install. Then type sudo partimage to launch the Partimage client. Use the box at the top of the input dialog to select the partition to back up. In the line below, type a name for the image file, including the path to the backup directory on the server. In the lower part of the dialog, specify the Server connection for the backup. The server will listen on TCP port 4025 by default, so you will just need to adjust the IP address. Encryption should always be enabled. To continue, press F5. The new dialog prompts you for a user name and password; the user must have an account on the backup server and an entry in partimagedusers.
Now for the exciting bit: If the server accepts the login credentials, you can proceed directly to choosing a compression technique. Pressing F5 again launches the backup.
Note that you will only be able to log on to the server if the underlying Linux system uses DES or MD5 to encrypt passwords. Some current distributions use more recent algorithms by default. In this case, you currently have no alternative but to disable authentication when building the Partimage instances. To do so, call configure with an additional --disable-login parameter. To be on the safer side, you might want to boot both machines from the SystemRescue-Cd, a mini-distribution built for data rescue operations [6].
Restoring a partition follows the same steps: launch partimaged on the backup server, and then launch the client. Next, select the client partition where you want to restore the backup, and then select Restore partition from file below Perform task. The entry in the Create/use image file field must match the entry for the backup.
Using Partimage to back up a partition is easier and not as error prone as using dd or Device Image, however, Partimage also has its share of pitfalls. For example, the developers still say that the program is unstable, although it seems to perform perfectly under production conditions. This said, it makes sense to ensure that your daemon and client versions match.
The way Partimage works leads to another issue: To decide which sectors are free and which are occupied, Partimage needs to be very familiar with the underlying operating system. Right now, the only Linux filesystems that qualify are Ext2, Ext3, or ReiserFS, as well as the ancient FAT system. The Windows NTFS filesystem has been on the user wish list for some time, but Partimage's slow development process makes it uncertain when the tool will finally be able to handle NTFS reliably.
If you need to back up partitions that use the proprietary NTFS filesystem, your options are either to go back to dd or to use ntfsclone. This unimposing program is part of the ntfsprogs package, a kind of Swiss Army Knife for NTFS-formatted disks [7]. Most distributions include the package, but if not, building the tools from scratch isn't too difficult.
Ntfsclone's controls and functionality are reminiscent of dd. For example
ntfsclone --save-image --output myimage.
img /dev/hda1
will save the first partition on the first disk to a file called myimage.img, and the following command will write the contents back to disk:
ntfsclone --restore-image --overwrite
/dev/hda1 myimage.img
Again, you will need netcat to send the data across the network. Do this on the backup server
netcat -l -p 9000 | ntfsclone --restore-image --overwrite myimage.img
and then dispatch the partition from the client:
ntfsclone --save-image --output - /dev/hda1 | netcat 192.168.2.131 9000
If your original NTFS partition contains errors, Ntfsclone will cancel the operation. The --rescue parameter tells Ntfsclone to keep reading in spite of errors, thus rescuing the partition.
The Free, Open-source Ghost (FOG) [8] bundles some of the tools mentioned previously to create an extremely interesting package - assuming you mainly need to backup Windows XP or Vista systems. The underpinnings for FOG are Fedora Core 7 or newer, and unfortunately, FOG really does need Fedora. If you normally work on any other Linux distribution, you will either need to edit the installation script or perform the steps manually.
After disabling your firewall and SELinux, unpack FOG in your /opt directory, and then enable the backup system by running the installfog.sh script in the /opt/bin subdirectory. This script tells a number of daemons to wait in the background.
Configuring the FOG server is fairly simple using the web interface (Figure 5). The administrator typically performs the configuration from the desktop. In FOG-speak, the administrative desktop becomes a Manager.
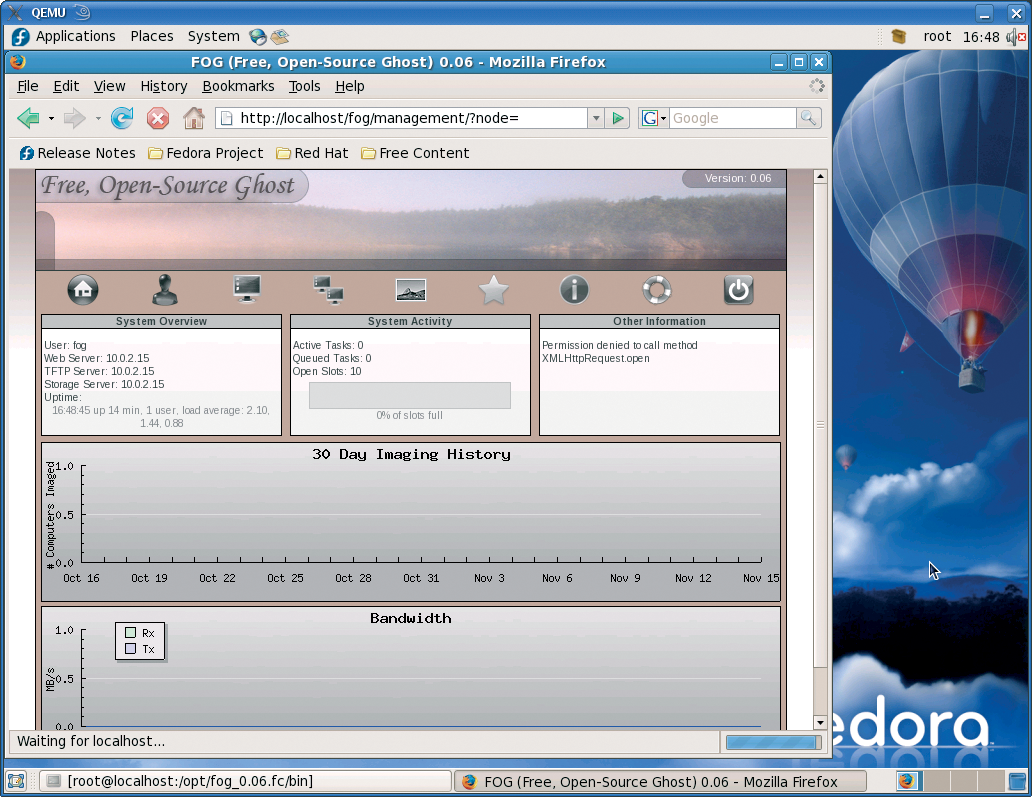
For the first few steps, launch a web browser and go to localhost/fog/management. Click the button that appears, and then log in as fog with a password of password.
To create an image of a client computer, click the third button from the left, and then select Add new Host to create a new host. Then click the fifth icon in the button bar to set up a New Image. Type a name for the image in the dialog that appears, and specify the name of the file where you will be storing the image.
After completing this step, map the image to the host you just created. To do so, again click the third icon in the button bar, type an asterisk (*) in the search box, and click the pictogram in the Edit column. Select the image below Host Image.
The next step is to tell the client to create an image of the disk the next time the client is started. To do so, create an Image Task. This time, you need the asterisk in the button bar. In the dialog that appears, follow List All Hosts to an overview of the existing host, then click the arrow to decide whether to back up or restore the related image.
Now move on to your Windows clients, where you may need to change the BIOS settings to support network boot. This enables what is known as the Preboot Execution Environment, or PXE for short; any motherboards you use with FOG will need to support this [9]. The FOG server will then distribute a tiny Linux system, which then performs the tasks assigned to it.
As of this writing, FOG will only back up Windows systems with exactly one partition. This said, development work is moving along quickly, and new operating systems and filesystems should be supported soon.
If you are looking for a no-cost, open source solution for backing up a disk or partition by transferring an image across your network, your only real choices right now are dd, Partimage, and ntfsclone. Ntfsclone is specifically designed for NTFS partitions, and Partimage supports all major Linux formats and FAT32. This leaves dd with the task of handling the more exotic formats, at the cost of bulkiness.
All other free imagers on the Internet typically give you a front end for the three tools just mentioned, which is also true of FOG, although the everything-on-one-server approach does look promising for the future.
As soon as the program gains more maturity, I'm sure that many administrators will not want to do without it.
| INFO |
|
[1] dd_rescue: http://www.garloff.de/kurt/linux/ddrescue
[2] G4L custom distribution: http://sourceforge.net/projects/g4l [3] G4U custom distribution: http://www.feyrer.de/g4u [4] Device Image: http://www.device-image.de/ [5] Partimage: http://www.partimage.org/ [6] SystemRescueCd: http://www.sysresccd.org/Main_Page [7] ntfsprogs: http://www.linux-ntfs.org/doku.php?id=ntfsprogs [8] Free, Open-source Ghost: http://freeghost.no-ip.org [9] Wikipedia entry on PXE: http://en.wikipedia.org/wiki/Preboot_Execution_Environment |