By Dmitri Popov
Creating a simple database application with OpenOffice.org Base is not that difficult: Add a table or two, compose a query, design a form, and your database solution is ready to go. But with OpenOffice.org Base, you can do much more than create single-table databases to store your favorite recipes and books.
To illustrate Base's more advanced tools and demonstrate a couple of useful techniques, I'll show you how to build a database solution - specifically, an invoicing application. In addition to being a useful tool on its own, an invoicing application demonstrates the reporting capabilities of Sun Report Builder [1]. This extension dramatically improves on Base's built-in - and rather weak - reporting engine.
Before you start working on an invoicing application, download and install the latest version of the extension. Keep in mind, however, that Sun Report Builder only works with OpenOffice.org 2.3 or higher, and if you use an older version of the office suite, you must upgrade it to take advantage of the new tool.
Sun Report Builder is distributed as .oxt package, so it installs as a conventional OpenOffice.org extension. Simply download the latest sun-report-builder_x.x.x.oxt package, launch OpenOffice.org, and choose Tools | Extension Manager. Then select the My Extensions section, press the Add button, select the downloaded extension, press OK, and restart OpenOffice.org.
Sun Report Builder doesn't add any menu items; instead, it integrates directly into OpenOffice.org Base. To evoke the report builder, you must switch to the Reports section in Base's main window and press the Create Report in Design View button or open an existing report for editing.
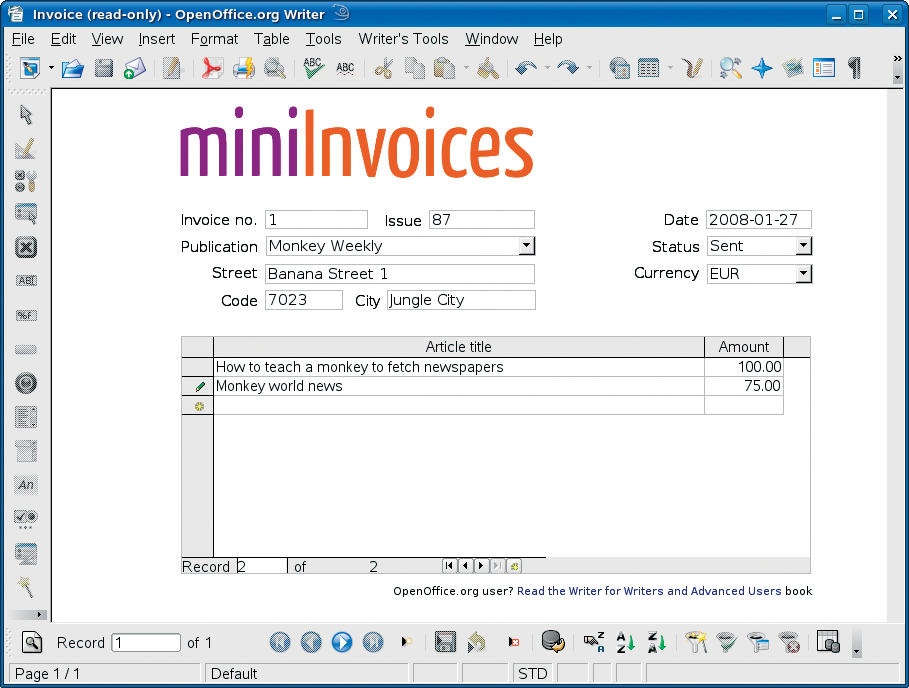
If you want to create an invoicing database, you need to start from scratch. Fortunately, I've already created a simple database called miniInvoices [2], which provides a foundation on which to learn a few useful techniques and build.
Because miniInvoices is designed for freelance writers, it offers a way to keep track of articles and publications and create invoices (Figure 1). The database consists of three tables: Articles, Publications, and Invoices. Adding other fields and tables to make the solution fit your particular needs is easy.
To retrieve the data from the tables, the database uses two queries: Invoice_query and Invoice_parameter. Right-clicking on the Invoice_query item in the Queries section and selecting Edit opens the query in the editing mode. The query includes all three database tables and connects them via the Article.Issue-Invoices.Issue and Publications.Publication-Invoices.Publication relations so the query can retrieve data from the related fields in the tables.
Except for two differences, the Invoice_parameter query (Figure 2) looks pretty similar to Invoice_query. First, the Invoice_no field is defined as the :Invoice criterion. This criterion allows you to narrow the query to a specific invoice. When you run the query, the criterion displays the Parameter Input dialog box. If you want to view data for invoice number 21, for example, enter 21 in the Value field and the query returns the result for the specified invoice number. Why would you want to run a query for a single invoice? Because you need this query to create a report that prints only one particular invoice.
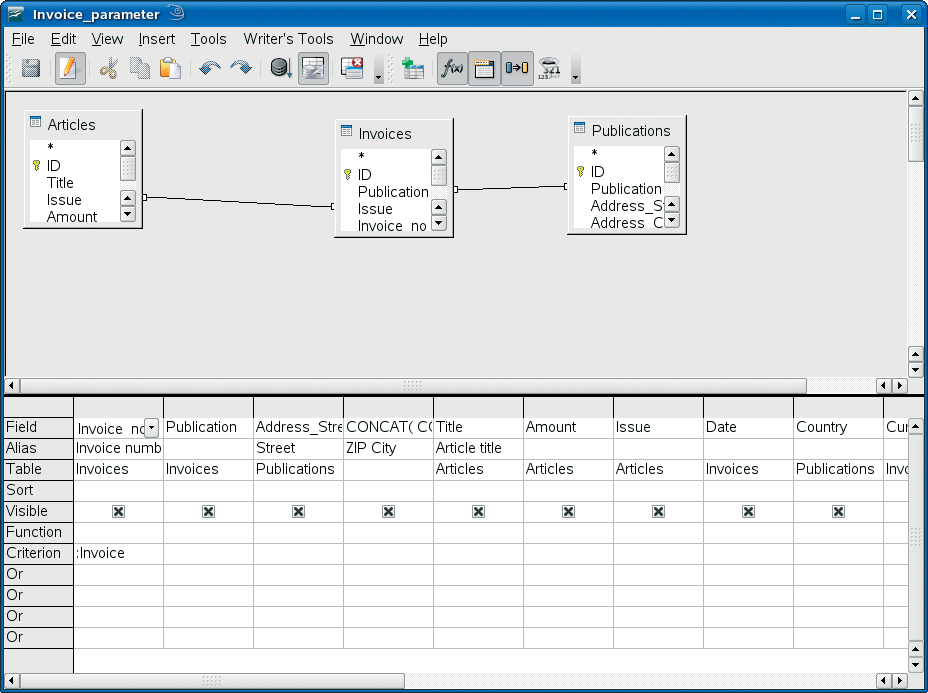
The Invoice_parameter query also contains another neat trick. If you take a closer look at the fields in the query, you'll notice a rather unusual field starting with the CONCAT command. This so-called calculated field uses an SQL query instead of an actual field from the database. In this case, the SQL query is based on the CONCAT command that concatenates (i.e., "glues" together) two or more strings. For example, if you want to concatenate the postal code from the Address_Code field and the city from the Address_City field in the Publications table, you can use the following command:
CONCAT("Publications"."Address_Code,"Publications"."Address_City")
However, you will discover a slight problem with this SQL statement - it doesn't insert a blank space between the two fields, so the result looks like "81292-Munich".
To fix this problem, you have to create a nested CONCAT statement like:
CONCAT( CONCAT( "Publications"."Address_Code", ' ' ),"Publications"."Address_City" )
The CONCAT( "Publications"."Address_Code", ` ` ) part creates a string that ends with a blank space, and the second CONCAT command glues the two strings together. When you need a visually consistent report layout, this trick comes in handy. For example, the postal code and the city usually appear on the same line, and creating two separate text boxes for each field could lead to the design issue shown here:
81292    Munich
DK-8000 Århus
See the problem?
Using concatenation, you ensure that there is always only one blank space between the two fields, no matter how long the postal code string is.
The next stop is the Forms section. The Invoice form allows you to create invoices and add articles to it.
The form's design is not particularly complicated: it consists of one main form (Invoices), and two subforms (Articles and Publication).
By exploring the form's structure using the Form Navigator, you can easily figure out the rest (Figure 3).
When adding subforms, remember to specify its relation to the main form by specifying the Link master and Link slave fields in the Form Properties dialog window under the Data tab. For example, the Article sub-form is linked to the Invoices form via the Issue fields.
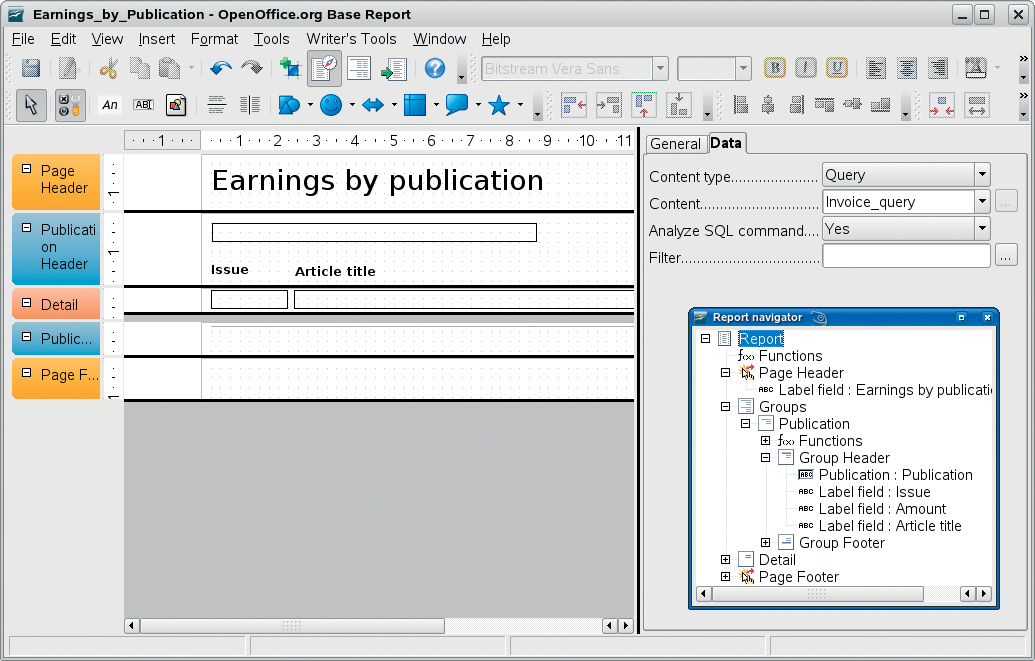
Any invoice database is pretty useless if you can't print invoices. Thanks to the Sun Report Builder, you can design reports for printing invoices and also for viewing the invoice data in a variety of ways. miniInvoices features two reports: the first (Earnings_by_Publication) generates an earnings report by publication, and the second (Single_Invoice) allows you to print a single invoice.
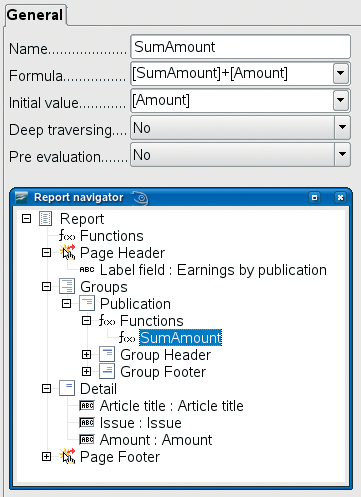
Base reports consist of three core components: Report, Groups, and Detail. Similar to a form, reports pull data from a specified data source. For example, the Earnings_by_Publication report pulls data from the query Invoice_query. The Groups component allows you to group the pulled data by a specific field. In this case, the report is grouped by the Publication field.
Finally, Detail is used to generate an itemized view of the data. For example, the Detail of the report generates a list of articles written for a specific publication by simply placing the Article title and other related fields from Invoice_query onto the Detail part.
Additionally, you can use Sun Report Builder to add functions to your report. The Earnings_by_Publication report, for example, contains a simple function that calculates the total earnings for each publication (Figure 4). More information about functions is available in the Sun Report Builder wiki [3].
Unlike Earnings_by_Publication, the Single_Invoice report is based on the Invoices_parameter query. This query returns only data from a specific invoice number, which is what you need when printing a single invoice.
The Single_Invoice report uses another handy technique. For example, if you live in Germany and send an invoice to a German publication, then the address on the invoice doesn't have to include the country. To prevent the City from appearing on the invoice, you can specify a condition for the city text box in the Conditional Print Expression field in the Properties window.
In this case, the condition should be as follows: [Country] <> "Germany". As you might have guessed, this expression prints the city only if its contents are not "Germany."
I'll take a quick look at how you can make miniInvoices work with Writer so you can quickly add the currently edited document to the Articles table. Simply register miniInvoices with OpenOffice.org as a data source and add the macro shown in Listing 1.
The key element in the macro is the SQL query that writes data into the Article table. Note that the macro pulls the information about the article's title and issue from the document's properties specified under File | Properties. The article's title is retrieved from the Title field in the Description section, and the issue and amount values are pulled from the Info 1 and Info 2 fields under the User Defined tab.
| Listing 1: Add Article to Invoices Macro |
01 Sub AddArticleToInvoices()
02 DBContext=createUnoService("com.sun.star.sdb.DatabaseContext")
03   If not DBContext.hasByName("miniInvoices") then
04     MsgBox ("Connection to the database failed.", , "Connection failed!") : End
05   End If
06 DataSource=DBContext.getByName("miniInvoices")
07 ConnectToDB=DataSource.GetConnection ("","")
08 SQLQuery="INSERT INTO ""Articles"" " + "(""Title"", ""Issue"", ""Amount"") VALUES "_
09 + "('" + ThisComponent.DocumentInfo.Title + "','" + ThisComponent.DocumentInfo.getUserFieldValue(0) +"',''" + ThisComponent.DocumentInfo.getUserFieldValue(1) + "')"
10 SQLStatement=ConnectToDB.createStatement
11 Result=SQLStatement.executeQuery (SQLQuery)
12 ConnectToDB.close
13 ConnectToDB.dispose()
14 MsgBox ("The data have been saved.", , "All done!")
15 End Sub
|
Although the miniInvoices application uses only a few simple tricks and techniques, you might find them useful when building your own OpenOffice.org Base solutions.
Feel free to take miniInvoices apart to see how it works, make improvements, or simply use it as-is.
| INFO |
|
[1] Sun Report Builder: http://extensions.services.openoffice.org/project/reportdesign
[2] miniInvoices: http://code.google.com/p/writertools/downloads/list [3] miniInvoices: http://wiki.services.openoffice.org/wiki/SUN_Report_Builder |