
By Martin Loschwitz and Markus Feilner
The popular Xen virtualization system lets you install different operating systems on the same hardware to leverage computational power efficiently.
In this article, we describe how to get started with Xen in Debian Etch, and you will learn about starting the guest and host systems and even how to set up a Windows guest on a Linux host. Some of the details might differ for other distros, but the steps are similar.
In the community, one software solution has practically become the virtualization standard. Xen [1], by the University of Cambridge, has a number of points in its favor. Because it emulates a complete computer in a style similar to VMware, users have an almost unrestricted choice of guest operating systems. Many management tools are available and the simple configuration procedure takes just a few steps. Debian has recognized these benefits, and Etch now has full support for Xen.
Although Debian 4.0 includes Xen, version 3.0.3 is not exactly state of the art. The tips and advice in this article can't be applied one-to-one to later versions of Xen in many cases because the configuration file layout, and other things, have changed.
Xen introduces a hypervisor upstream of the kernel running directly on the hardware (see Figure 1); the hypervisor uses the Xen Virtual Machine Monitor to access the hardware. The Xen hypervisor allocates resources to the individual virtual machines. A guest operating system only communicates with the hypervisor and is completely independent of the other guests.

The hypervisor binds the individual virtual machines to the network and supports communications with the outside world. In the world of Xen, the host system with the hypervisor is referred to as Dom 0 (or Domain 0), and a guest system is known as Dom U (Domain U).
The only task that Dom 0 has is to contain each active Dom U. When you are planning a Debian Xen system, a fresh Debian install is a perfect starting point. Although theoretically, there is nothing to stop you from using Dom 0 for normal purposes, such as hosting a web server, the potential damage that an attacker could cause by hijacking Dom 0 is a very good reason to avoid putting Dom 0 into production.
Any user with full access to Dom 0 also has complete control over every active Dom U. For this reason, it is important to outsource any services to a separate Dom U when using Xen and to start off with a fresh host system that does not run any services (with the exception of SSH).
Just a couple of steps are needed to make a Debian installation Xen-capable. Working as root, start by installing Xen and the bridge control programs that Xen needs to set up the network configuration. The package names are bridge-utils, xen-linux-system-2.6.18-3-xen-686, xen-tools, and libc6-xen. Xen replaces the legacy C library with a specially modified version.
After completing this step, disable the C library's TLS functionality; the easiest way of doing this is to move the library by typing mv /lib/tls /lib/tls.disabled. Because the following steps require Internet access, a network card must be set up in /etc/network/interfaces.
After installing a specially prepared Xen kernel, type lsmod and check the /etc/modules file to see whether the system provides a netloop module. To make sure that everything will work after you reboot, you should see an entry for netloop nloopbacks=255. Reboot the machine and, at the boot prompt, select the Debian Xen kernel before logging on in the normal way. Some dmesg output with various hypervisor messages concerning available processors or memory capacity should appear.
This takes care of the prerequisites for running a Dom U. Working as root, type xm list to see whether the hypervisor is working.
The next step is to configure a guest machine, the first Dom U, which will be running Debian GNU/Linux Etch like the host machine in our example. First, you need to create a configuration file for Xen, then you need to install the guest operating system on your disk.
In Xen 3.0, the configuration files have their own special format. The files are stored in /etc/xen and have a file extension of .cfg. The Xen configuration file schema is fairly simple (Listing 1). name refers to a name that Xen uses to reference the Dom U; hostname refers to the virtual machine's hostname. kernel and ramdisk contain the full paths to the boot kernel and its ramdisk; root tells the kernel which of its partitions contains the root directory.
| Listing 1: Xen Configuration for a Debian Dom U |
01 name="debian1" 02 hostname="debian1" 03 kernel = "/boot/vmlinuz-2.6.18-3-xen-686" 04 ramdisk = "/boot/initrd.img-2.6.18-3-xen-686" 05 memory = 512 06 vcpus = 1 07 vif = [ 'mac=aa:00:00:12:23:34, bridge=bridge0' ] 08 disk = [ 'phy:/dev/hda3,hda1,w', 'phy:/dev/hda5,hda2,w' ] 09 cdrom = "/dev/cdrom" 10 root = "/dev/hda1" |
The memory setting defines how much RAM the Xen hypervisor should reserve for this Dom U, and the disk entry specifies which disk or image files the Xen guest will detect. Because the guest machine also expects paths to the virtual filesystem, the administrator has to decide at this stage where the filesystems that will be created in the next step should be stored.
As you can see in Listing 1, a Dom U can also access a physical CD drive, specified as cdrom. The vcpus value specifies the number of processors that the Dom U is allowed to access. For example, if Dom 0 has a dual-core processor, you can use vcpus to specify whether the guest will be able to access one core or two.
The values kernel and ramdisk in the configuration relate to the filesystem for Dom 0. If you want to replace the Dom U kernel at a later stage, you can copy the new kernel to the right place in Dom 0 and then just modify the configuration file for the virtual machine.
The vif entry specifies which network interface Dom U is allowed to access and which bridge Xen will use to handle this access. It is also possible to assign a static (arbitrary) MAC address; otherwise, Xen will assign a randomly generated MAC address to the network adapter each time you start the virtual machine. In turn, this will cause Etch's hotplug system to keep changing the network device number, and the automatic configuration in /etc/network/interfaces will then fail.
Two basic options exist for guest filesystems: Either you can assign one or multiple partitions to Xen or the Dom U can work with image files. Both solutions have advantages and disadvantages: Physical partitions typically improve performance, but files allow the administrator to create backups by simply copying from Dom 0.
This decision is a matter of taste and will depend to a great extent on what you will be using the system for. The example in the listing assumes that one Dom U uses /dev/hda3 as a drive for its root filesystem. On top of this, Xen can assign multiple virtual disks as hard-disk partitions to the virtual machine.
The guest domain is installed completely from within Dom 0. Theoretically, you could boot the Debian installer with Xen and then use it to install the new system, but in reality, this approach will fail because of the lack of Xen support in the Debian installer kernel. Instead, the Debian Debootstrap [2] installation tool is used. Working as root, type apt-get install debootstrap to install the tool in Dom 0. If you haven't already done so, you will want to install a Linux-compatible filesystem on the target partition for the Linux guest system now. The Dom U will probably need a swap partition too; mk-swap sets this up.
Again working as root, mount the formatted partition on the Dom 0 filesystem and cd to the parent directory. The message debootstrap etch mountpoint for Domain U partition ftp://ftp.de.debian.org/debian will now install a complete, basic Debian system from the ftp server. When Debootstrap is done, you should find a complete, basic Etch system in the directory you specified. chroot to this folder; then install the libc6-xen package and disable the libc TLA extensions.
Etch system configuration is slightly more complex than previously, because base-config no longer exists; this handled many tasks automatically in the past. Now, the root user has to install the locales and console-data packages manually and add the following line to the /etc/hosts file:
127.0.0.1 localhost
Next, add the hostname to /etc/hostname, making sure that you use the same name as in your Xen configuration file. You still need to add a matching network card configuration to /etc/network/interfaces for the Dom U.
After linking the correct time zone file to /etc/localtime, it's time to tackle the configuration of the virtual drives in the /etc/fstab file. Listing 2 contains a ready-made fstab that is based on the examples given previously.
| Listing 2: Fstab Example for a Debian Dom U |
01 /dev/hda1 / ext3 defaults 1 2 02 /dev/hda2 none swap sw 0 0 03 /dev/pts devpts gid=5,mode=620 0 0 04 none /dev/shm tmpfs defaults 0 0 |
Finally, you will want to set the root password using the passwd command; you might also want to install the OpenSSH server and get out of the chroot jail.
After creating the configuration files for the Dom U and finishing the system setup, you can now start the virtual system. To do so, change directory to /etc/xen and give the following command: xm create -c name of configuration file. The -c parameter redirects the output from the Dom U's virtual screen to the current console. If everything worked out, the login prompt should be displayed after the Linux kernel boot messages. From now on, the init scripts included with the Xen package will automatically launch the new Dom U whenever you boot the system.
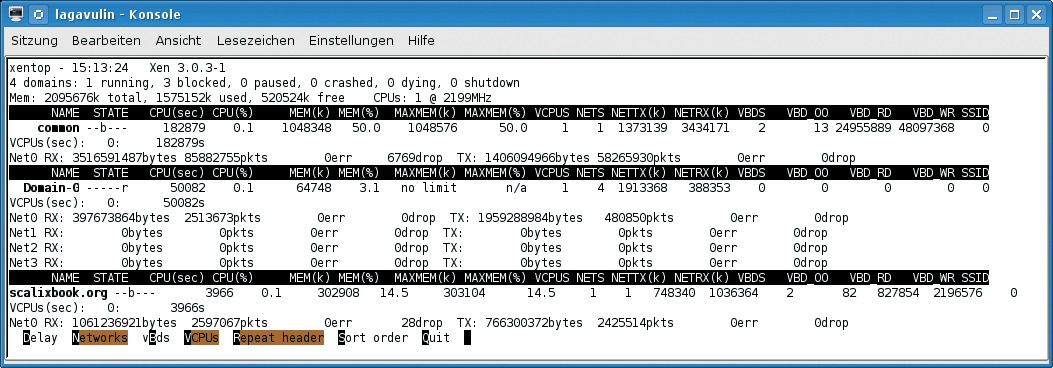
The xm list command gives an overview of the virtual domains running on your system (Listing 3). In our example, multiple Dom U's are running in the Dom 0, which has 64MB of RAM; one Dom U has 1GB of RAM, and one has 296MB. Entering the xm destroy name of VM command in Dom 0 terminates a virtual machine. The xm top tool displays an updated list of the virtual machines, including their RAM, CPU, and network load, in a similar fashion to the Bash top command (Figure 2).
| Listing 3: Listing Virtual Machines |
01 xen-dom0:~# xm list 02 Name ID Mem(MiB) VCPUs State Time(s) 03 Domain 0 0 64 1 r----- 50082.7 04 Dom U 1 31 1024 1 -b---- 182890.0 05 Dom U 2 67 296 1 -b---- 3966.4 06 (...) 07 xen-dom0:~# |
The Xen developers have made sure that you can run Windows as a Guest operating system in a Dom U. But there are some restrictions: the trick only works on PCs with a recent Intel processor capable of supporting Vanderpool Technology (VT) or on a recent AMD process with Secure Virtual Machine (AMD SVM). The list of suitable candidates [3] is maintained by XenSource and is typically up to date.
The steps for configuring a Windows Dom U are similar to those for setting up a Linux guest. Listing 4 shows a ready-made configuration file: The example assumes that the hda3 Dom 0 partition is the root partition for Windows.
| Listing 4: Configuration File for a Windows Dom U |
01 kernel = '/usr/lib/xen-3.0.3-1/boot/hvmloader' 02 builder = 'hvm' 03 memory = '512' 04 device_model='/usr/lib/xen-3.0.3-1/bin/qemu-dm' 05 disk = [ 'phy:/dev/hda3,ioemu:hda,w','file:/root/wincd.iso,ioemu:hdc:cdrom,r' ] 06 name = "windows" 07 hostname = "windows" 08 vif = ['type=ioemu, bridge=xenbr0'] 09 # Behaviour 10 boot='d' 11 vnc=1 12 vncviewer=1 13 sdl=0 |
The Windows guest can be installed directly from the installation CD, or, as shown in our example, from the wincd.iso backup image created with the dd tool. Installing from an ISO file is far quicker and more convenient than virtually booting the CD.
A Dom U is typically used as a server without a monitor attached. The output from the Windows system is thus directed to a VNC server; the server's IP address is defined by the vnc-listen parameter in the last line of the Xen configuration file /etc/xen/xend-config.sxp; the syntax is (vnc-lis-ten `1.2.3.4').
This completes the configuration of the Xen Windows Dom U; Windows itself will create the required filesystem in the Windows setup phase. Then, you can launch the Windows Dom U and use VNC to connect to port 5090 on the host system and complete the setup.
When Windows prompts you to remove the CD from the drive after copying the system files, you must make sure that Xen will boot the Xen domain from the virtual disk, and not from the CD, on restart. To do so, you need to change the value for boot in the configuration file from d to c and restart the virtual machine.
At the end of the installation, you should have a working Windows system.
Xenman [4], which has now reached version 0.6, is a tool for managing Xen servers and starting or stopping virtual machines (Figure 3). The administrator can connect to one or multiple Xen servers, click to create new domains, or move domains from one server to another. An overview of the performance (Dashboard, Figure 4) is also included.

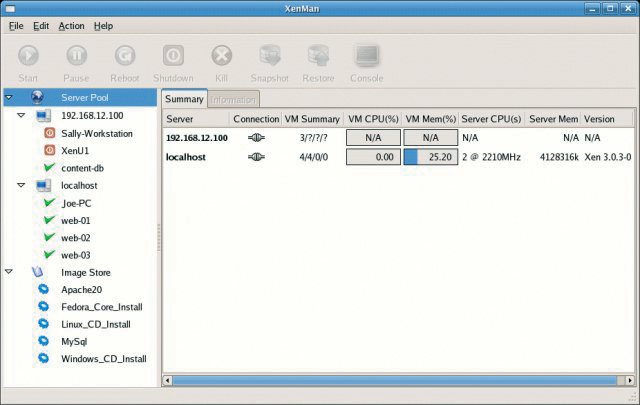
Xenman makes life easier for both newcomers and experienced administrators. It is designed for multiple server management and SSH tunneling, and it gives you the option of collectively managing all server images, which means that Xen can boot the Dom U belonging to Server A on Server B if need be.
One of Xen's special features is its ability to migrate the virtual server from one host to another while the server is running. To test this, all you need is two Xen servers and a single virtual machine. In the simplest case, you can use NFS for the shared data, but ISCSI or DRBD are also perfectly suitable. In your Xen server configuration file, enable the following settings:
(xend-relocation-server yes)
(xend-relocation-address ' ')
(xend-relocation-hosts-allow ' ')
To migrate the virtual system from one server to another, just type xm migrate --live Dom U target server.
Interruption to services while the virtual machine is on the move will not normally exceed a couple of tenths of a second.
Xen is a very powerful virtualization solution. In contrast to other options such as OpenVZ, it has the advantage of emulating a complete computer in a fashion similar to VMware. Xen is therefore capable of virtualizing guest operating systems other than Linux.
It is already possible to run NetBSD 4 as a Dom U on Linux or as a Dom 0 for Linux Dom U's without any major difficulties. The only issue is caused by NetBSD's lack of Physical Address Extension (PAE) support, which makes it more difficult to install Debian than it actually should be.
Considering the speed at which Xen and NetBSD developers are working to achieve a solution to this problem, you can expect rapid progress in the trend toward virtualizing different operating systems on the same hardware.
| INFO |
|
[1] Xen homepage: http://www.cl.cam.ac.uk/research/srg/netos/xen/
[2] Debootstrap: http://packages.debian.org/stable/admin/debootstrap [3] Hardware for HVM virtualization: http://wiki.xensource.com/xenwiki/HVM_Compatible_Processors [4] Graphical Dom U management with Xenman: http://xenman.sourceforge.net/ |