
By Tim Schürmann
VirtualBox is gaining popularity as a simple and effective virtualization alternative. This smart solution fits smoothly onto an ordinary Linux desktop, supporting a variety of Windows, Linux, and Unix guest systems. The German company Innotek [1] produces VirtualBox, which comes in both commercial and open source (GPL) versions.
On February 12, 2008, Sun Microsystems announced an agreement to purchase Innotek, with the goal of integrating the VirtualBox environment with Sun's own development tools. The long-term implications of this agreement are not yet known, but as of this writing, it appears that Sun plans to continue to support and maintain both the open and closed versions of VirtualBox. In this article, I will describe how to get started with VirtualBox virtualization.
The commercial and open source versions of VirtualBox differ with respect to USB device support and remote desktop functionality, which Innotek restricts to the closed source variant. Both versions support several operating systems - such as Linux, OS/2, and Windows/DOS - and both have a graphical administrative interface.
From an installation perspective, the open source version on Linux is a little clumsy (see the "Installing the Open Source Variant" box). Packages from distribution-specific repositories are better integrated.
Your choice of distribution is likely to offer you a version of VirtualBox via the package management system. If you have enabled the correct installation sources, you can simply type apt-get install virtualbox on Ubuntu or zypper in virtualbox on SUSE to install.
Clicking the icon or typing the VirtualBox command launches the GUI. The New icon lets you create a new virtual machine, with a wizard helping you through the setup phase.
Instead of a genuine partition, VirtualBox uses a file with a disk image. Opting for dynamic as the image size makes sense; remember, the image will grow as you add content. Once the emulation is running, the window will completely capture the mouse pointer; the right Ctrl key acts as a host key and releases the mouse.
VirtualBox comprises two components: the VBoxSVC XPCOM daemon and the Virtualbox front end. Of course, the daemon must be running before you launch the GUI, but there is no need to install separately. The steps outlined here will launch VirtualBox directly from a local folder.
| Installing the Open Source Variant |
|
To build the source code, you will need the following tools and libraries, plus the developer packages:
After resolving the dependencies, you can enter wget http://www.virtualbox.org/download/1.5.2/VirtualBox-1.5.2_OSE.tar.bz2 to download the source code archive [2]. After unpacking the archive, type the following commands in the VirtualBox source code directory to configure: ./configure source ./env.sh kmk all This installs VirtualBox and its collection of tools in the out/linux.x86/release/bin/ subdirectory. Before you can launch the box, the system requires the matching kernel module: cd out/linux.x86/release/bin/src make sudo make install Of course, you need the kernel sources for this build step. Working as root, you can enable the kernel module by entering modprobe vboxdrv before going on to allow non-privileged users to access the new device file: chmod 666 /dev/vboxdrv. Now you can launch VirtualBox: LD_LIBRARY_PATH=. ./VBoxSVC& LD_LIBRARY_PATH=. ./Virtualbox |
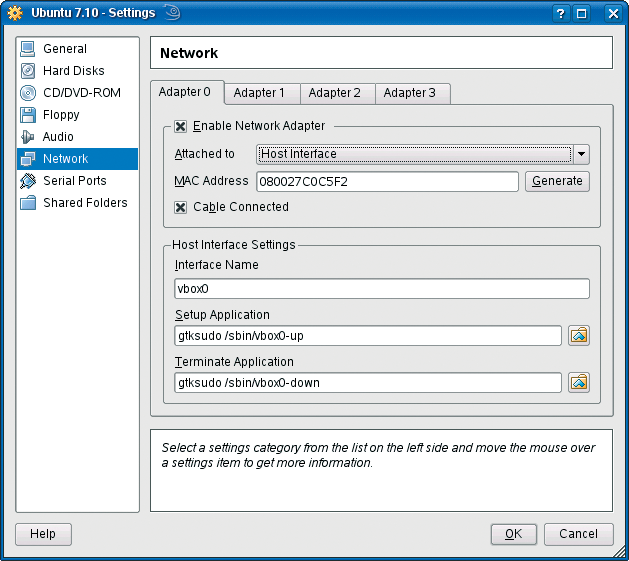
After completing the installation, the next step is to select - in the GUI - the virtual machine whose network settings you would like to configure and Machine | Change in the menu. Then select the Network entry on the left to access the settings (Figure 1).
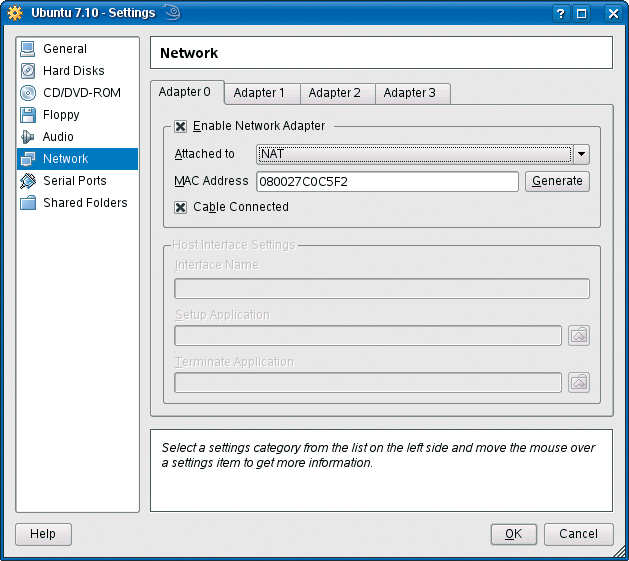
Up to four virtual network cards are available for each machine, Adapter 0 through Adapter 3. By default, only one NIC is configured for each machine; you need to click the corresponding tabs for the other NICs.
The Network cable attached switch allows the administrator to flip the virtual network switch. The card stays in the virtual machine; however, the connection to the outside world is interrupted, just as if somebody had unplugged the network cable. This control is good for tests or for re-initializing hotplug-capable guests.
Each of the four network cards can run in one of three possible operating modes as specified in the Connected to drop-down menu. This specifies who the virtual network card will talk to and to which other computers it is visible. The options are:
VirtualBox can simulate a separate internal LAN for the virtual network cards, with any number of virtual machines on the virtual network that will not see or talk to anybody else, including the host and computers outside of the internal network where your guest systems reside (Figure 2).
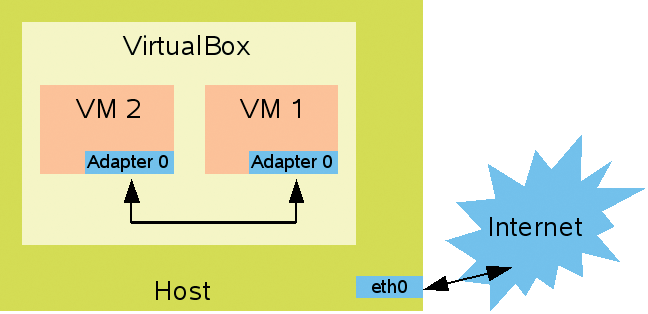
At first glance, the internal network doesn't seem particularly useful, but there are several good reasons for using it. Because the virtual LAN is completely isolated, no external influences can affect it, which makes the internal LAN a perfect choice as a test or troubleshooting environment.
In the other two modes, any data transmitted is also sent to the host system's network interface. If two virtual machines need to exchange data, this approach nearly always affects speed or presents a security problem. To connect a virtual network card to the internal LAN, select Internal network below Connected to in the GUI.
Adapters configured in this way in any virtual machine are attached to a simulated switch on the same virtual network. Unfortunately, a DHCP server is not available in this mode, which means that you have to assign IP addresses manually. Although this is quite easy to set up, the GUI does not give you access to one of VirtualBox's more interesting functions: VirtualBox supports multiple, independent internal networks, which it can run in parallel.
To make it easier to identify the virtual LANs, a unique name is assigned to each network. By default, network cards that you set up via the GUI will connect to the internal network called intnet.
If you need more LANs, there is no alternative to the VBoxManage command-line tool. The tool gives you a full-fledged text-based alternative to the GUI and also offers more in the line of settings. However, its use does entail typing long, cryptic chains of parameters.
To install a second interface (nic2) on a virtual machine called UbuntuVM on an internal LAN called MyNetwork, the modifyvm uses the following command line to modify the settings:
VboxManage modifyvm "UbuntuVM" -nic2 intnet -intnet2 "MyNetwork"
The internal network is like a closed box; without a second interface, the guest is unable to surf the Internet or access the physical LAN.
NAT mode gives you a quick and uncomplicated approach to breaking out of jail. After selecting NAT mode in the Connected to drop-down box, the virtual network card is assigned an address by a simulated DHCP server with a firewall that gives the virtual machine access to the outside world.
Figure 3 shows you how this works. In step one, the adapter in the virtual machine is automatically assigned an IP address by the integrated DHCP server, which normally assigns addresses in the 10.0.x.x. range.
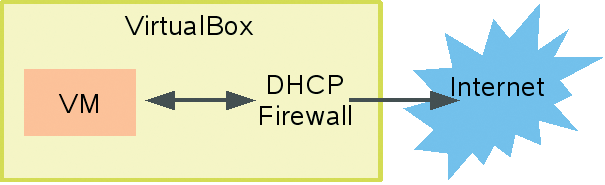
As soon as the guest starts transmitting packets over the virtual wire, VirtualBox captures the packages and inserts the host system's IP address before sending them onto the Internet.
Although the configuration does not take long, this operating mode involves one functional drawback: IP address implementation (NAT) in combination with the internal firewall lets the guest system send data out into the world; however, the outside world, and the host, are kept out. The only exception here is remote desktop in the commercial version, or you can use VPN tools such as Openvpn to tunnel into the box.
In other words, it is impossible to encapsulate production servers in the virtual NAT machine in a meaningful way. Port forwarding gives you a workaround. VirtualBox listens on a port on the host system and forwards packages arriving at this port to a port on the selected virtual machine. From another machine's point of view, it seems that the service is available directly on the host.
Three VBoxManage commands enable port forwarding before launching the virtual machine:
VBoxManage setextradata "UbuntuVM" "VBoxInternal/Devices/pcnet/0/LUN#0/Config/myservice/Protocol" TCP
VBoxManage setextradata "UbuntuVM" "VBoxInternal/Devices/pcnet/0/LUN#0/Config/myservice/GuestPort" 22
VBoxManage setextradata "UbuntuVM" "VBoxInternal/Devices/pcnet/0/LUN#0/Config/myservice/HostPort" 2222
This tells VirtualBox to forward all TCP connections for port 2222 on the host to port 22 on the guest. myservice is a freely assignable name, and UbuntuVM is the name of the virtual machine. If all of these values are empty when the command is called, VirtualBox will disable port forwarding again.
NAT with port forwarding entails noticeable organizational overhead. The administrator must open - and possibly secure - ports on the server; of course, you need to keep track of which ports are mapped to which services on which machine. Host Interface Networking mode gives you a more convenient approach to running a server on VirtualBox, although setting up this mode is quite tricky.
In Host Interface Networking mode, VirtualBox creates an additional virtual network card on the host - for example, vbox0 besides the familiar eth0. After setting up the new network card, VirtualBox uses a virtual cable to patch the connection to the simulated adapter on the guest system (Figure 4).
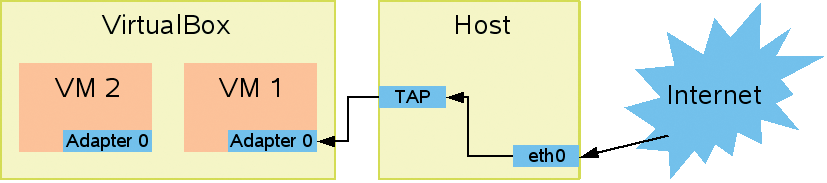
For productive applications, VirtualBox typically uses a bridge to connect the physical and virtual networks. This union acts like a single large network in interactions with the outside world.
To set this up, you first need to set up a virtual network interface for each guest on the host.
Linux has virtual network adapters in the form of TAP interfaces, and VirtualBox relies on this approach, too. The only requirements is free access to the /dev/net/tun device file for the user account used by VirtualBox.
Also, you need a bridge software, such as the bridge-utils package, and the tunctl command-line tool, which is part of the uml-utilities package on openSUSE.
Bridging with VirtualBox can be approached two possible ways on start up:
However, you need to type the administrative password in either case.
The list of commands for setting up a permanent interface is quite intimidating.
The first thing is to set up the bridge and connect it to eth0:
brctl addbr br0
ifconfig eth0 0.0.0.0
brctl addif br0 eth0
Updating the IP addresses comes next. If you use a DHCP server to assign addresses, dhclient br0 will handle this; if not, you need to assign addresses manually with ifconfig br0 IP address.
For each simulated network card in the guest system, you need a virtual interface host side; VBoxAddIF vbox0 User br0 connects it to the bridge.
The VBoxAddIF script creates a TAP interface, called vbox0, and grants the user User account to it. VBoxAddIF is included with the VirtualBox package, but hidden away in the depths of the source code directory tree in src/VBox/Installer/linux.
The final step, working as root, is to connect the simulated card in the guest system with the TAP interface. To do so, you need to enter the card name as the Interface name in the configuration dialog. In this case, leave the two lines for scripts blank.
To release the interface again after use, type VBoxDeleteIF vbox0 at the command line. Incidentally, this tool is missing in the open source variant.
The second method involves running two scripts: one to create the TAP interface and connect it to the bridge and the other to disable the interface again.
Listing 1 shows a sample script based on one provided in the manual for enabling a TAP interface; the VirtualBox manual [3] provides more detailed information on this.
| Listing 1: Enabling a TAP Interface |
01 #!/bin/bash 02 # Create TAP interface for the user klaus: 03 interface=`VBoxTunctl -b -u klaus` 04 # Create the interface: 05 ifconfig $interface up 06 # Connect with the bridge: 07 brctl addif br0 $interface |
The VBoxTuntl tool is included with VirtualBox; basically, this is the well-known tunctl tool.
Make the start script executable and enter it as the Enabling Program in the VirtualBox configuration GUI using a sudo combination such as gtksudo startscript (Figure 5).
If you do not have a graphical interface, you can do this instead:
VBoxManage modifyvm "VMName" -tapsetup1 "gtksudo startscript"
Listing 2 shows the script for disabling the TAP interface. Again, you must enter the path to the executable script in the VirtualBox input field, preferably in combination with a sudo command in Disabling Program.
In this case, an alternative command-line approach uses VBoxManage with the -tapterminate1 option.
After the virtual machine has booted, it calls the enabling script to create a TAP interface and prompts you for the root password because of the call to gtksudo. When the guest is shut down, the second script removes the TAP interface.
| Listing 2: Disabling a TAP Interface |
01 #!/bin/bash 02 # disconnect the interface (the name is in $2) from the bridge: 03 brctl delif br0 $2 04 # and remove the interface 05 VBoxTunctl -d $2 |
The commercial variant of VirtualBox can redirect screen output to another computer via the Remote Desktop Protocol (RDP), letting users on the machine access the virtual machine's desktop directly over the network, no matter what network configuration you set up for the virtual machine. This makes VirtualBox suitable for servers without a GUI.
To enable what the manufacturer refers to as the Remote Display, you first need to specify the port number VirtualBox will use to offer the service on the host. To avoid the virtual machine's desktop being open to public viewing, it also makes sense to specify an authentication method.
External means that users must log on to the host using the host's standard method; Guest means logging on to the guest system. Null completely disables authentication.
After saving the new settings, restart the virtual machine at the command line by typing VBoxVRDP -startvm. Users can then launch rdesktop or any other RDP client to view the virtual machine's desktop at their workplaces.
All three connection types that VirtualBox offers for networking the virtual machine have advantages and disadvantages, and the optimum solution really depends on circumstances.
If you just need to access the Internet from the virtual machine, NAT mode is a useful option, but one that makes remote access impossible. For a server in a sandbox, your only option is the complex host interface configuration with bridging tools.
Because the GUI does not currently support this, implementation of all network settings in the GUI is the major point I would add to the wish list for Innotek. This said, Innotek's competitors haven't done a better job. Setting up networking on Xen is equally complex, and VMware only offers a command-line tool called vmware-config.pl for virtual networks, although the tool can set up multiple NAT, host-only, and bridged-mode networks with just a few prompts.
A solution might be just around the corner: Rumor has it that Innotek is working hard on the network configuration. If you prefer not to wait, you will be well rewarded for the work you put in. After you have the VirtualBox set up properly, you can look forward to fast and stable virtual systems.
| INFO |
|
[1] VirtualBox homepage: http://www.virtualbox.org
[2] Open Source edition: http://www.virtualbox.org/download/1.5.2/VirtualBox-1.5.2_OSE.tar.bz2 [3] User manual: http://www.virtualbox.org/wiki/End-user_documentation |
| THE AUTHOR |
|
Tim Schürmann is a self-employed computer scientist and currently is working as a freelance author. Tim has published books and articles in magazines and on Internet sites in countries worldwide. |