
By Bernhard Bablok
Mainframes commonly are regarded as being reliable, but also big, complicated, pricey, and outmoded in today's IT landscapes. Here, the Hercules mainframe editor, which emulates the CPU architecture, can help. Even if Linux is running in a production environment on a mainframe, Hercules still can provide a useful service for testing and development.
In this article, I will describe how to set up and configure Hercules and its virtual hardware, and then I will focus on installing zLinux on Hercules. Finally, I'll take a quick look at z/OS - the native mainframe operating system - and its freely available predecessor MVS.
Hercules 3.04 does not support current zLinux variants, which is why you should download the current source code for version 3.05 [1]. The RPM, also available from the homepage, will install but does not support network connections, making it unsuitable for the purposes of this article.
In a directory of your choice (e.g., /usr/local/src), unpack the sources, change to the /usr/local/src/hercules-3.05 directory, and enter configure as shown in Listing 1. After doing so, don't forget to check config.log, paying particular attention to whether Zlib support is available. If the zlib-devel package is not installed on SUSE, you will still be able to build and use Hercules, but you will not be able to use the typical Zlib compressed virtual hard disks.
| Listing 1: Building Hercules: Configure Arguments |
01 #!/bin/bash 02 03 PREFIX=/usr/local 04 05 ./configure --prefix=$PREFIX \ 06 --enable-cckd-bzip2 \ 07 --enable-optimization=yes \ 08 --disable-external-gui \ 09 --enable-setuid-hercifc |
After completing the configuration phase, follow the normal make and su -c "make install" procedure. Now Hercules is installed, but some manual finishing work is necessary. The HTML-formatted documentation is available in /usr/local/share/hercules, with links to additional resources on the Internet; if you run into difficulty, try the mailing list.
If you will be using TCP/IP networking with a Hercules guest system, it is important to configure the host system correctly. First, you need to modify the privileges for the /usr/local/bin/hercifc script, which configures the Tun/Tap network device when Hercules starts up. Just as for any direct device access, you need root privileges for this. The --enable-setuid-hercifc configure option (see Listing 1, line 9) sets the SUID bit, but the installation script sets group ownership for the file to root, making it impossible to execute the script as a non-privileged user. The following lines will set the permissions correctly:
# chgrp users /usr/local/bin/hercifc
# chmod 4750 /usr/local/bin/hercifc
The following sections only apply to openSUSE systems; some details will vary for other operating systems. For the network connection, Hercules uses the Tun/Tap device; on a normal system, the device is owned by root:root and has permissions of 0600. Again, this rules out access by normal users. However, changing the permissions manually will not do you much good because the original status is restored when you reboot.
Udev is used for device management on today's systems, which is why you will need to modify the corresponding Udev rule. On an openSUSE system, the /etc/udev/rules.d/50-udev-default.rules file controls this, and you must add:
KERNEL=="tun", GROUP="users", NAME="net/%k",MODE="0660"
To give /dev/net/tun the right permissions, type rm /dev/net/tun and modprobe tun. If the device still has incorrect permissions after a reboot, don't worry. At system launch time, /etc/init.d/boot.udev copies a number of devices from /lib/udev/devices to /dev, so you will need to delete the Tun device in this directory or modify its permissions:
chgrp users /lib/udev/devices/net/tun
chmod 660 /lib/udev/devices/net/tun
The Tun/Tap device supports a point-to-point connection between the host and the guest, which other virtualization solutions call host-only networking. If you want to grant the guest system access to the local network - or even the Internet - you also will need to set up NAT. To do so, first enable IP forwarding, either permanently in /etc/sysconfig/sysctl (IP_FORWARD=yes) or manually:
echo "1" > /proc/sys/net/ipv4/ip_forward
Then use iptables to define two rules:
iptables -t nat -A POSTROUTING -o eth0 -j MASQUERADE
iptables -A FORWARD -i tun0 -j ACCEPT
This completes preparation of the host system. Next comes creating and configuring the virtual hardware.
Hercules supports a whole bunch of virtual hardware components, but you just need some hard disks and a network connection for zLinux. Because this is a high-end server system, video, audio, and USB support are irrelevant. Although Hercules supports emulated printers, there are no Linux drivers for the old, line-oriented 1403 printer (Figure 1). However, this is not a major drawback; you can print over the network to the host's CUPS server or to any other print server available on the network.

The virtual hardware is defined in a configuration file (Listing 2), which is passed in to the emulator with the -f option when it's launched. Hercules does not impose any restrictions with respect to the name and directory structure. Depending on your personal preferences, you can store all your files in a single directory or organize them in subdirectories by file type.
Virtual hard disks are normal files, as with any other emulator. In IBM speak, hard disks are referred to as DASDs (for direct-access storage devices). To create hard disks for your zLinux installation, enter:
dasdinit -z -lfs dasd/sys1.dasd 3390-3 SYS1
dasdinit -z -lfs dasd/sys2.dasd 3390-3 SYS2
The -z option configures Zlib compression. Alternatively, you could select -bz2 for Bzip2 compression; note that the method is slower, and thus means performance hits without giving you major disk space savings. The -lfs option refers to large file support; that is, dasdinit will not split up the hard disk into 2GB chunks. Depending on your DASD size, you might want to omit this option so you can store files on DVD media.
The file names (dasd/sys?.dasd) are arbitrary. The hard disk type (3390-3) defines the size, which is about 2.7GB in my example. The Hercules documentation gives you a list of available types and their respective sizes [2].
The last parameter for dasdinit, the VOLSER name (the disk label), really is not necessary for Linux, but the installation writes the label anyway. As a final step, the administrator needs to add the disks to the Hercules configuration file (Listing 2, lines 29-30), thereby assigning the device addresses for Linux to reference the disks.
| Listing 2: Hercules Configuration for CentOS 4.5 |
01 #
02 # Configuration file for Hercules & CentOS 4.5 s390
03 #
04
05 MODPATH ${MODPATH_HERCULES:=/usr/local/lib/hercules}
06
07 CPUSERIAL 002623
08 CPUMODEL  2096
09 MAINSIZE  780
10 XPNDSIZE  0             # Expanded storage size in megabytes
11 CNSLPORT  3270          # TCP port number to which consoles connect
12 HTTPROOT  ${HTTPROOT_HERCULES:=/usr/local/share/hercules/}
13 HTTPPORT  9091          # HTTP server
14 NUMCPU    1             # Number of CPUs
15 NUMVEC    1             # Vector facilities emulated
16 SYSEPOCH  1900
17 TZOFFSET  +0000
18 OSTAILOR  LINUX         # OS tailoring
19 PANRATE   SLOW          # Panel refresh rate
20 ARCHMODE  ESAME         # Architecture mode S/370, ESA/390 or ESAME
21 PGMPRDOS  RESTRICTED
22
23
24 # Device list
25 # ---    ----    --------------------
26
27 # DASD
28
29 0A01 3390    dasd/sys1.dasd
30 0A02 3390    dasd/sys2.dasd
31
32 # Channel to channel: CTCI  ip-linux-guest ip-linux-host
33
34 0cc0.2 3088 CTCI 192.168.2.2 192.168.2.1
|
Hercules emulates various types of network connections. The easiest type to configure is the channel-to-channel (CTC) connection. To configure two type-3088 CTC devices at the addresses 0cc0 and 0cc1, you just need to add one line to the configuration file (Listing 2, line 34), and assign an address of 192.168.2.2 to the guest and 192.168.2.1 to the host. The HTML documentation explains the syntax for the device addresses in particular.
To launch Hercules, type the command:
hercules -f conf/ centos45.conf > hercules.log
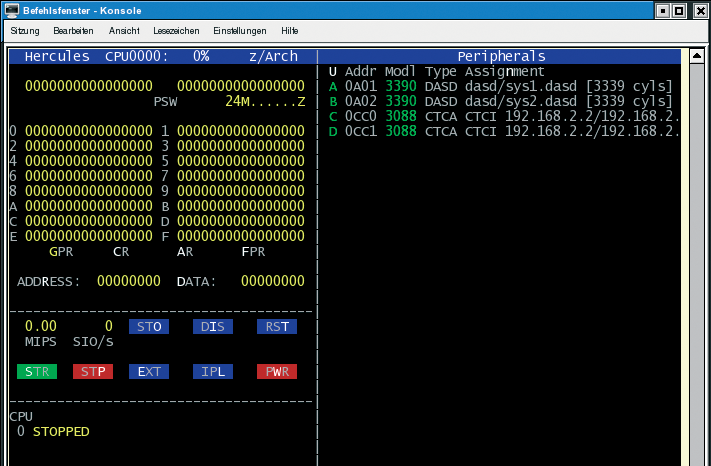
Figure 2 shows the initial output at the Hercules console. Here, the critical message is HHCCT073I, which tells me that the tun0 network device is open. Unfortunately, the message isn't completely reliable because it depends on the permissions for hercifc; to be certain, you have to check the output from route -n and ifconfig (Listing 3).

Both the routing table (line 4ff.) and the network configuration (lines 29-35) must have entries for the tun0 device.
| Listing 3: Verifying the Network Configuration |
01 [root@sirius:~] # route -n 02 Kernel IP routing table 03 Destination Gateway Genmask Flags Metric Ref Use Iface 04 192.168.2.2 0.0.0.0 255.255.255.255 UH 0 0 0 tun0 05 ... 06 127.0.0.0 0.0.0.0 255.0.0.0 U 0 0 0 lo 07 [root@sirius:~] # ifconfig 08 eth0 ... 09 10 lo ... 11 12 tun0 Link encap:UNSPEC HWaddr 00-00-00-00-00-00-00-00-00-00-00-00-00-00-00-00 13 inet addr:192.168.2.1 P-t-P:192.168.2.2 Mask:255.255.255.255 14 UP POINTOPOINT RUNNING MTU:1500 Metric:1 15 RX packets:0 errors:0 dropped:0 overruns:0 frame:0 16 TX packets:0 errors:0 dropped:0 overruns:0 carrier:0 17 collisions:0 txqueuelen:500 18 RX bytes:0 (0.0 b) TX bytes:0 (0.0 b) |
The Hercules console is used to control the system. Hercules supports a large number of commands, the most important of which is ipl (initial program load), which initiates the boot process. The maxrates command is useful, too; it outputs the performance in MIPS (million instructions per second).
Hercules supports alternate consoles. Pressing the Esc key toggles between the line-oriented console shown in Figure 1 and the semi-graphic console shown in Figure 3. This view gives you the current performance data, and you can see the register values flash past.
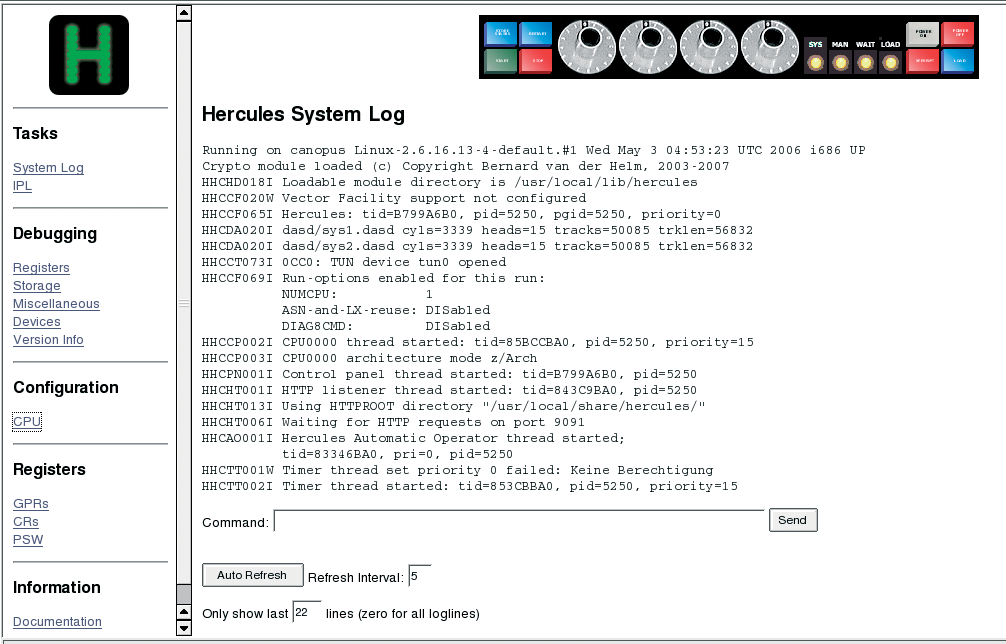
To run Hercules remotely, you also can use an http console (Figure 4), which the administrator must set up in the configuration file (Listing 2, lines 12-13). Also, you can set up username- and password-based authentication, but this does not change the fact that the http connection is insecure.
Mainframes support two system architectures: zLinux with 31 bits (s390) and zLinux with 64 bits (s390x). Only the addressing is 31 bits for the 31-bit variant; the data itself uses the full 32 bits.
If you are looking for a free 64-bit zLinux, you can go for either the ThinkBlue/64 Linux [3] or the newer CentOS 4.5 [4], which is the distribution I used for this article.
Debian offers a good alternative; the 31-bit architecture is maintained throughout the Debian releases. I will not cover the differences between the Debian and CentOS installations.
Installation of CentOS on the mainframe can be done across the wire. Because mainframes and Hercules do not support CD drives, it is necessary to export the mounted DVD via NFS or copy the content of the DVD to an exported directory. Typing ipl /cdrom/generic.ins boots the system at the Hercules console.
Going forward, you should see normal Linux boot messages flash across your screen. Launching the network configuration program, which prompts you for the information required to set up a connection, comes next. Listing 4 shows the messages and responses. Note that the Hercules console passes commands that start with a dot through to the running system.
After completing this phase, the message shown in line 32 will appear. Now you can establish an SSH connection to the guest address, which takes you to the CentOS standard installation tool, Anaconda. After changing a few settings and mounting the installation source via NFS, everything should fall into place. Because the virtual network connection is not very fast, you can expect the system to be busy configuring itself for the next hour or so.
With a real mainframe, on which you can opt between HMC (hardware management console) and bootable tapes or prepare a volume for zLinux z/OS-side, this process looks very different.
| Listing 4: Installation of zLinux: First Phase |
001 Which kind of network device do you intend to use: 002 .ctc 003 Enter the bus ID and the device number of your CCW devices. 004 CTC/ESCON and LCS need two subchannels: 005 (e.g. "0.0.0600,0.0.0601" will configure the CTC or ESCON interface 006 with the subchannels 0x600 and 0x601) 007 QETH needs three subchannels p.e. 0.0.0300,0.0.0301,0.0.0302 008 .0.0.0cc0,0.0.0cc1 009 Enter the FQDN of your new Linux guest (e.g. s390.redhat.com): 010 .emu-guest.bablokb-local.de 011 Enter the IP address of your new Linux guest: 012 .192.168.2.2 013 Enter the network address of the new Linux guest: 014 .192.168.2.0 015 Enter the IP of your CTC / ESCON / IUCV point-to-point partner: 016 .192.168.2.1 017 Select which protocol should be used for the CTC interface 018 0 for compatibility with p.e. VM TCP service machine (default) 019 1 for enhanced package checking for Linux peers 020 3 for compatibility with OS/390 or z/OS peers 021 .0 022 Enter your DNS server(s), separated by colons (:): 023 .10.173.112.250 024 Enter your DNS search domain(s) (if any), separated by colons (:): 025 . 026 Enter DASD range (e.g. 200-203 or 200,201,202,203) 027 Press <Enter> for autoprobing (not recommended): 028 .0a01-0a02 029 030 Starting telnetd and sshd to allow login over the network. 031 032 Connect now to 192.168.2.2 to start the installation. |
The ipl command will boot an installed system on Hercules. As a parameter, Hercules expects the boot volume address (ipl 0a01, in my example). After IPL, a grub-style boot menu appears, although the system automatically will boot after waiting 15 seconds. The console shows typical startup messages for a (Red Hat) Linux system up until the login prompt. Working directly at the console is impractical because it means typing a dot in front of every command and because some programs will not run at the console. The use of an SSH connection from a different machine makes more sense.
| The Mainframe Principle |
|
Although Linux still relies on various schedulers to ensure fair and optimum resource usage, the mainframe world has gone its own way. On a mainframe, users specify the resources they need, which enables the system to decide whether the program should run now, later, or not at all. Listing 5, a classic copying program, looks fairly complicated compared with the cp command, but complexity has both disadvantages and advantages. Jobs on a mainframe are not much more than a stack of punch cards shifted to a file. The job printed here starts with a job card that specifies the memory, run time, and job class, which makes it fairly easy to prioritize. Next comes the copying program, IEBGENER, and its parameters. Host programs use logical filenames to access files; for IEBGENER, these names - defined by DD (data definition) cards - are SYSUT1 and SYSUT2. SYSUT1 (line 5), the input file, is designated as "OLD" - which means that you need the file exclusively. If another job is processing this file, your job will have to wait. An alternative to this is DISP=SHR, which allows shared (read) access (and might be a more realistic alternative for a copying program). Note the specification of the target file in lines 6-9. (NEW,CATLG) stipulates that the file must not exist and that it should be cataloged after successful processing. If the file exists, the job will not run. The other details specify the space requirements (primary 5 cylinder, additionally up to 15 times 2 cylinders) and the physical file format. On Linux, a rogue program can completely fill up the filesystem; on a mainframe, the program is stopped if it oversteps its space assignment. Optimization entails additional effort. In the past, when mainframes were much smaller, this kind of safeguard was more important, whereas today's mainframes include options that simplify the process. The goal of maximizing use has not changed. Utilization values of 90 percent for 24x7 operations are possible, and they make financial sense. The protocol that mainframe terminals use to communicate with the host provides another example of maximum resource utilization. Physical terminals no longer exist; programs such as x3270 emulate the protocol. In contrast to Unix keyboard drivers, which process every single key press, the user of a 3270 terminal fills out all the fields on the screen and then transmits everything at once. This reduces the number of processing steps, at the cost of making programs such as Vi or Emacs impossible to run. |
| Listing 5: Copying a File with IEBGENER |
01 //MYJOB JOB (COPY),'COPY',CLASS=A,MSGCLASS=A,REGION=256K, 02 // TIME=5,MSGLEVEL=(1,1),NOTIFY=HERC04 03 //COPY EXEC PGM=IEBGENER 04 //SYSPRINT DD SYSOUT=* 05 //SYSUT1 DD DISP=OLD,DSN=HERC04.DATEI2 06 //SYSUT2 DD DSN=HERC04.FILE2.BAK,DISP=(NEW,CATLG), 07 // UNIT=SYSDA,VOL=SER=PUB002, 08 // SPACE=(CYL,(5,2,0)), 09 // DCB=(RECFM=FB,LRECL=80,BLKSIZE=4096,DSORG=PS) 10 //SYSIN DD DUMMY |
In principle, zLinux is no different from Linux on any other platform, except for the way it handles hardware. The following example mounts another disk in /home on the system, but first you must generate the new disk (file dasd/home.dasd). Hercules emulates a high-availability system; the administrator does not shut down zLinux but does use the Hercules console to introduce the new device:
attach 0a03 3390 dasd/home.dasd
On the zLinux page, typing lsdasd -s -a shows a list of available DASD devices; you can see that a new device is available, but offline. Whereas a mainframe operator would now type vary online, root would do this:
echo 1 > /sys/bus/ccw/drivers/dasd-eckd/0.0.0a03/online
A quick check with lsdasd and a peek at the /dev directory show that a dasdc now exists.
Now you need to low-level format and partition the device: dasdfmt handles the first of these tasks, and fdasd handles the second:
dasdfmt -p -v -l HOME01 -b 4096 -d cdl -f /dev/dasdc
fdasd -a /dev/dasdc
mke2fs -j /dev/dasdc
mount /dev/dasdc /home
If you are setting up multiple partitions, you need to call fdasd without the -a parameter, which takes you to an fdisk-style partitioning menu.
In the example, you will be using the whole volume as a large partition; however, the new device is lost on rebooting. To prevent this, you need to add a line for the device to the Hercules configuration file and add a mount entry in /etc/fstab.
The dasd_mod kernel module expects the available devices as a start option; a change to /etc/modprobe.conf takes care of this:
options dasd_mod dasd=0a01-0a03
To start the system, you need a new Initrd. If you want to be on the safe side, you might want to copy the existing Initrd and add an entry to the boot menu in /etc/zipl.conf, to be able to launch the previous version in case of an error:
cd /boot
mv initrd-2.6.9-55.EL.img initrd-2.6.9-55.EL.img.orig
mkinitrd -v initrd-2.6.9-55.EL.img 2.6.9-55.EL
vi /etc/zipl.conf
# -> Modify to load the original initrd
zipl -V
This procedure is something like the legacy Linux bootloader, lilo, in which you needed to launch the lilo program after modifying the configuration file.
Hercules does not use snapshots like other virtualization programs, but it does implement shadow files, which can be put to similar use. To use a shadow file, you need to change the lines with the hard disk configuration slightly (Listing 2, line 29ff.):
0A01 3390 dasd/sys1.dasd ro sf=shadow/sys1_*.dasd
0A02 3390 dasd/sys2.dasd ro sf=shadow/sys2_*.dasd
After starting, Hercules automatically writes the shadow/sys?_1.dasd files. The sf+ * command at the Hercules console creates a new set of shadow files, up to a maximum of eight files. sf- * merge or sf- * nomerge accepts or discards the changes to the current shadow step. Accepting means that sf- merge writes the changes from, for example, sys1_2.dasd to sys1_1.dasd. To write changes to the original files, you must specify sf- * force (or omit the read-only option ro).
The Hercules suspend and resume commands save and restore the complete system state; however, this mechanism does not work reliably - zLinux will not work after you use it.
From a Linux perspective, the mainframe is just one architecture out of many, so it makes sense to look at the operating systems that normally run on mainframes. On the current crop of systems, the operating system is z/OS 1.x. (Version 1.9 was released in September 2007.)
Unfortunately, z/OS is not free. Although there is an "ADCD" package for developers and a z/OS demo package, you at least need to lease an IBM machine to use it legally. This just leaves the granddaddy of today's z/OS, MVS (version 3.8), as an alternative for experimenting at home.
MVS (Multiple Virtual Storage) was developed from earlier IBM operating systems; its direct predecessor is the OS/360 MVT (Multitasking with a Variable number of Tasks) variant. MVS then became the operating system for the next generation of hardware, the System/370 computer, which supported virtual memory as of 1972.
Interestingly, the older S/360-67 models did support virtual memory, but at the time, batch processing was regarded as far more important and hardware support for memory virtualization was thus omitted from the S/370 series.
MVS was released in 1974 and led directly via MVS/XA, MVS/ESA, and OS/390 to z/OS. Now MVS is freely available because operating systems at the time were distributed openly.
A "turnkey" MVS system is available for Hercules: the MVS Turnkey System [7][8]. The only additional software you need is a 3270 terminal emulator; Linux users can install the x3270 package that comes with their distributions.
If you think you can set up a mainframe system quickly and start using it, you will be disappointed. Although you can boot and down the system using the "Cookbook" [8], it will not help you much if you do not have any previous mainframe experience. If you are seriously interested in immersing yourself in this material and working your way through the available documentation - including the current z/OS documentation, which is freely available from IBM - you will enjoy the experience of your own mainframe.
Hercules offers a stable emulator for mainframe architecture. Running on a powerful midrange system, the performance should be sufficient to replace a zLinux test LPAR. If you are thinking of porting your software to zLinux, you can use Hercules or the Community Development System for Linux (LCDS), a service provided by IBM [9].
| INFO |
|
[1] Hercules: http://www.hercules-390.org
[2] Conversion table for DASD sizes: http://www.sdisw.com/vm/dasd_capacity.html [3] ThinkBlue/64 Linux for zSeries: http://linux.zseries.org [4] CentOS: http://www.centos.org [5] MacIsaac, Michael, Ronald Annuss, Wolfgang Engel, et al. Linux for IBM eServer zSeries and S/390: Distributions. Redbooks, 2001: http://www.redbooks.ibm.com/redbooks/pdfs/sg246264.pdf [6] Linux Redbook portal: http://www.redbooks.ibm.com/Redbooks.nsf/portals/Linux [7] The MVS 3.8j Turnkey System: http://www.ibiblio.org/jmaynard/turnkey-mvs-3.zip [8] Information about the MVS Turnkey System: http://www.bsp-gmbh.com/turnkey/index.html [9] Community Development System for Linux (LCDS): http://www-03.ibm.com/systems/z/os/linux/lcds |