
By Florian Effenberger
Email communication has become an indispensable part of our daily lives. In addition to private correspondence, it is standard to send business messages by electronic mail. Of course, this means sending all kinds of confidential information across the wire, but you will be hard pressed to find anybody who really worries about the security of this medium, even though messages typically are transmitted in the clear to the recipient. This said, encryption is not exactly rocket science; in fact, thanks to modern software, it is quite simple and convenient.
Enigmail is an add-on for the Thunderbird email client and takes most of the responsibility off the user's shoulders. To do so, the add-on relies on the widespread GnuPG encryption software, which enjoys an reputation for security and supports the OpenPGP standard.
In this article, I will show you how to set up Enigmail and GnuPG and how to use the combination of these two programs to encrypt and sign email under the Ubuntu 7.10 distribution. However, the approach is almost identical for most Linux distributions.
Three components are required for the encrypting functionality: the Thunderbird email client [1], the GnuPG cryptography program [2], and the Enigmail Thunderbird add-on [3].
Any major distribution should give you the option of setting up all three easily via the package-management system. Alternatively, you can download the programs separately and install them manually. On Ubuntu, you would need to run the commands in Listing 1 to install the software.
| Listing 1: Ubuntu Install |
01 $ sudo su 02 # apt-get install thunderbird 03 # apt-get install gnupg 04 # apt-get install enigmail |
The next step is to create a key pair comprising a public key and a private key. The public key is used by other people to check your identity and to encrypt messages they want to send to you. With the private key, you can sign messages and encrypt messages sent to you. As the name suggests, the public key is intended for public use and you can pass it on to anybody. In contrast, it is important to keep your private key out of the hands of third parties.
Creating a key pair is quite easy. To create a DSA+Elgamal key, give the gpg --gen-key command in a terminal and press Enter to confirm. After the prompt, press Enter again to accept the default key length of 2,048 bits.
Also, you need to specify when you want the keys to expire. After the expiration, your key will be tagged irreversibly as invalid and you will need to replace it with a new one.
Normally it doesn't make much sense for users to design keys to expire because you can revoke the keys at any time. Pressing Enter and then typing Y to keep the key from expiring confirms your selection.
Then GnuPG will prompt you to enter your first name and family name in the way you want it to appear in the key and then enter the email address to be used for encryption. Later, you can add more email addresses and names.
Leave the comment field, which is often used to add a qualifier such as "office" or "private," blank. When you are done, press F to finish.
The next step is to think of a passphrase, which you will need later to sign and encrypt email. Try to find something secure and avoid using unsafe passwords like your date of birth or phone number because anyone who guesses your password can encrypt email with your credentials.
GnuPG collects some data for the random number generator and might ask you to move the mouse until it has enough data. After a short wait, GnuPG finishes creating the key and displays the details. In Listing 2, you can see a key created on December 5, 2007, for a user called Tux Testaccount, email address tux.testaccount@tux.local, with 2,048-bit encryption. Also, notice two critical identification features of the new key, which you will need later - your fingerprint (AF84 9339 ...) and the key ID (90690901 for 2,048 bits and 6FF89B27 for 1,024 bits).
| Listing 2: Key Details |
01 gpg: Checking "Trust-DB" 02 gpg: 3 marginal-needed, 1 complete-needed, PGP trust model 03 gpg: Depth: 0 valid: 1 signed: 0 trust: 0-, 0q, 0n, 0m, 0f, 1u 04 pub 1024D/6FF89B27 2007-12-05 05 key fingerprint = AF84 9339 AC60 8A35 4206 093C F4DC E5A7 6FF8 9B27 06 uid Tux Testaccount <tux.testaccount@tux.local> 07 sub 2048g/90690901 2007-12-05 |
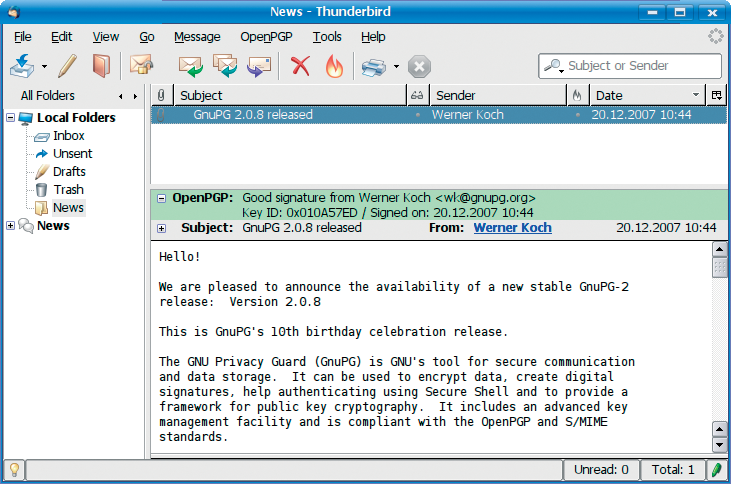
After creating the key pair, the next step is to configure Enigmail. To do so, first launch Thunderbird. Experienced Thunderbird users will notice a new menu item, OpenPGP, which lets you access the Enigmail add-on functionality (see Figure 1).
If you used your distribution's tools to set up the components, you do not need to configure anything now. The OpenPGP | Preferences... box looks fairly spartan (see Figure 2). If you have multiple installations or Enigmail fails to find the installation, just set the right path to GnuPG here.
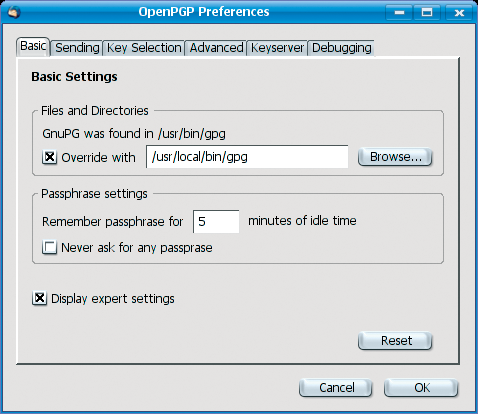
Also, you need to say how Enigmail should store your passphrase. For security reasons, it makes sense not to save the passphrase permanently.
The default value of five minutes is a useful compromise between convenience and security and keeps Enigmail from asking you for the passphrase for each mail.
Clicking on Display Expert Settings takes you to the advanced configuration, which gives you some interesting - and perhaps some unnecessary - options. In the Sending tab, you can enable Add my own key to the recipients list so you can decrypt messages that you send later. In the Advanced tab, you might also want to enable the Encrypt replies to encrypted messages to avoid forgetting to encrypt a confidential exchange. Also, you should enable `--` is a signal separator and Use `<` and `>` to specify email addresses. When you are done, you can close the settings dialog.
Finally, you need to enable OpenPGP support for the account (Figure 3). To do so, click Edit (or Tools) | Accounts..., select OpenPGP security for your account, and choose Enable OpenPGP support for this identity. Also, you will need to enable the option Sign encrypted messages by default.

This completes the configuration. Don't be surprised when you open OpenPGP again; some menu items are added after enabling the expert settings.
Enigmail has three basic modes: sign, encrypt, and sign and encrypt simultaneously. When you sign an email, the add-on will use your private key to sign the text.
If the recipient uses Enigmail or a similar solution, they will be able to detect manipulation easily. At the same time, the signature lets you verify that an email really is from the person who claims to have sent it. However, this mode does not encrypt messages; they are sent in the clear.
In encrypt mode, Enigmail will not sign the message, but it will encrypt the message with the recipient's public key to make sure that only the intended recipient can read the message. Of course, encryption does not let the recipient verify the identity of the sender.
For the best of both worlds, you would want to let Enigmail encrypt the message with the recipient's public key while signing it with your own private key. This mode is a must for confidential messages.
To test your setup, try sending a message to yourself. In Thunderbird, compose a new message: Enter your own email address as the recipient, add a subject line, and add body text. To encrypt and sign the message at the same time, which hopefully is the configuration you have chosen, select OpenPGP | Encrypt message and send the message. At this time, you will be prompted to enter your passphrase.
In a few seconds, you should receive a message. If your password is still in memory (five-minute limit), Enigmail automatically will decrypt; if not, it will prompt you for your password. Thunderbird will tell you that the message was correctly signed and decrypted and that the signer's key has been correctly identified. An email that is not correctly encrypted is useless to the recipient.
To encrypt a message for another recipient, the procedure is basically the same as in the previous example: Compose an email in the normal way and select the corresponding menu item to tell Enigmail to encrypt, or sign, or both. A correspondent might send you an encrypted message, too. But where does the key enter into this?
To sign the message, you do not need the recipient's key. In the worst case, the recipient might not use GnuPG-compatible encryption and will wonder what the signature in the message means, but this will not prevent them reading the message. However, this does not apply to encryption.
To read an encrypted message, the recipient needs GnuPG or a compatible solution, and you must know the recipient's public key.
To exchange encrypted messages with a contact, both of you need each other's public keys.
Previously, I looked at two critical identifying characteristics of a key: its ID (this is 90690901 for the 2,048-bit version in the example), and its fingerprint (AF84 9339 ... in the example). Among the various approaches, you can exchange keys personally (i.e., by email or USB stick.)
To send a public key by email, create a message and click Attach my public key in the OpenPGP menu, which tells Thunderbird to add an attachment with your key to the mail. Then send the email with a text explaining the attachment to the recipient.
In addition to this, there are key servers that do nothing but keep public keys that anybody can retrieve. Publishing your own public key on a key server makes sense.
To do so, open the OpenPGP menu in the Thunderbird mail view and select Key Management.... This takes you to the Key Manager dialog, which shows you a list of keys (your key ring) - your own key and keys belonging to people with whom you exchange messages. Right click your own key and select Upload public keys to key server....
In the dialog that appears, press OK to confirm the default key server - most key servers replicate their data anyway - then OK again to tell Enigmail to upload the key to the key server.
Downloading third-party keys is just as easy. If you receive a signed message but do not have a local copy of the matching key, Enigmail will tell you that the key is missing. To retrieve the key from a key server, you can click the letter icon on the right of the window. Also, you can search for a key manually via OpenPGP | Key Management... | Key server | Find key... and store the key locally. Search for the user's name, the key ID, or the email address.
If you receive a key as an email attachment - that is, if somebody you correspond with sends you a key - right click the attachment and select Import OpenPGP key. After both of you have done this, you can exchange encrypted messages. But how do you make sure that the key is from the person the sender claims to be? The fingerprint I previously referred to gives you this ability. In the Key Manager (menu OpenPGP | Key Management...) you can double click a key to display its properties.
The fingerprint lets you verify a key's identity. If you want to be certain that the key really is from the person who claims to have sent it, you should use some other method to contact them. Phone the key owner, for example, and compare fingerprints on the phone. If the fingerprints match, you can safely assume that you have the right key and the right person. Now there really is nothing to stop you from exchanging encrypted messages.
GnuPG in combination with Enigmail offers users many more features; for example, you can validate other people's keys, link multiple identities to a key pair, or revoke your key. Many of these functions are launched directly in Enigmail, whereas others require a detour to the command line. See the GnuPG documentation for a command and option reference [4].
| INFO |
|
[1] Thunderbird: http://en.www.mozilla.com/en/thunderbird/
[2] GnuPG: http://www.gnupg.org [3] Enigmail: http://enigmail.mozdev.org [4] GnuPG documentation: http://www.gnupg.org/documentation/ |
| THE AUTHOR |
|
Florian Effenberger has been an open source software evangelist for many years. He is the international Marketing Project Co-Lead and the Marketing contact for the German-language versions of OpenOffice.org. Additionally, Florian focuses on designing and managing open source-based school networks. |