
By Heike Jurzik
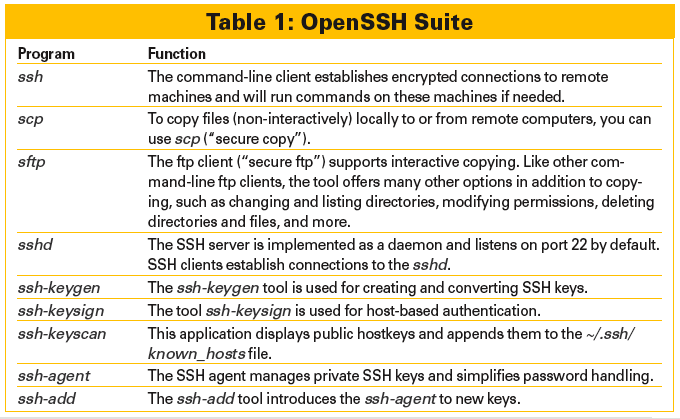
SSH stands for "secure shell" and refers to both the protocol and the program itself. The OpenSSH [1] program suite, developed by the OpenBSD project, offers users a free SSH alternative with everything necessary to use encrypted connections on many operating systems: command-line tools for working on remote machines, the ability to execute programs remotely (including graphical applications via X11 forwarding) or to tunnel Internet services via SSH (and thus secure a connection against sniffing), tools for secure file copying, and more. Table 1 gives you an overview of the major applications.
OpenSSH is a mainstay of any recent Linux distribution, so installation is quite straightforward. Most systems offer separate packages for the client and the server. Although the client typically is pre-installed, setting up the server often is necessary if you want to access your Linux computer via SSH from another machine. Searching for openssh in your package manager should reveal the correct package.
In this article, I will investigate the use of hostkeys, how to verify hostkey fingerprints, how to manage private keys with the SSH agent (including temporary management), how to tunnel SSH connections with the integrated SOCKS proxy, and how to transfer data interactively via secure ftp.
On first establishing contact, the other end of the connection reveals its public hostkey fingerprint (Figure 1). When warned that the authenticity of the machine has not been verified, you need to say yes, and then you will be prompted to enter the password.

The remote system's hostkeys are stored in the ~/.ssh/known_hosts file. The next time you log in to the machine, SSH will check to see whether the key is unchanged and, if not, will refuse to cooperate: WARNING: REMOTE HOST IDENTIFICATION HAS CHANGED!. This example could be a deliberate attempt at a man-in-the-middle attack, but a changed hostkey often has a more harmless explanation: The administrator changed the key or reinstalled the system. If you are sure that the explanation is harmless, you can launch a text editor, open the ~/.ssh/known_hosts file, and delete the entry in question.
The /etc/ssh directory stores both the private and public hostkeys. If an administrator has published the public key fingerprint (/etc/ssh/ssh_host_rsa_key.pub), you can verify the fingerprint on initial contact before accepting the connection. The ssh-keygen tool helps verify the fingerprint. Set the -l option to display the fingerprint for the public key that you are prompted to specify.
If, for example, a user called petronella wants to log in from a machine called samesame (Figure 1), and the administrator - on a machine called macnugget - wants to verify the hostkey fingerprint, the administrator would follow the steps in Listing 1.
| Listing 1: Verify Hostkey Fingerprint |
01 nonumber 02 # ssh-keygen -l 03 Enter file in which the key is (/root/.ssh/id_rsa): /etc/ssh/ssh_host_rsa_key 04 2048 a0:0a:aa:3b:d3:08:f1:90:45:4f:48:c9:f6:cb:92:37 /etc/ssh/ssh_host_rsa_key.pub |
Creating an SSH key, and thus supporting authentication without entering a password, might save typing but could also compromise security. Local, private keys are not safeguarded, which opens up the gates to an attacker should keys go astray.
By managing your private keys, the ssh-agent program gives you a more sensible approach. At the start of an ssh-agent session, you only need to enter your password once per key.
The versatile agent will run in the background as a daemon or you can call it like any normal program. Using the -t option, you can set a timer for the ssh-agent as an extra security feature. After the preset period has elapsed, the agent will forget any keywords it has stored; just specify the password lifetime with the -t parameter. ssh-agent understands various units: no unit or s means seconds, m minutes, h hours, d days, and w weeks.
To launch the agent as an independent daemon and configure the agent to forget any keys you have added after two days, enter:
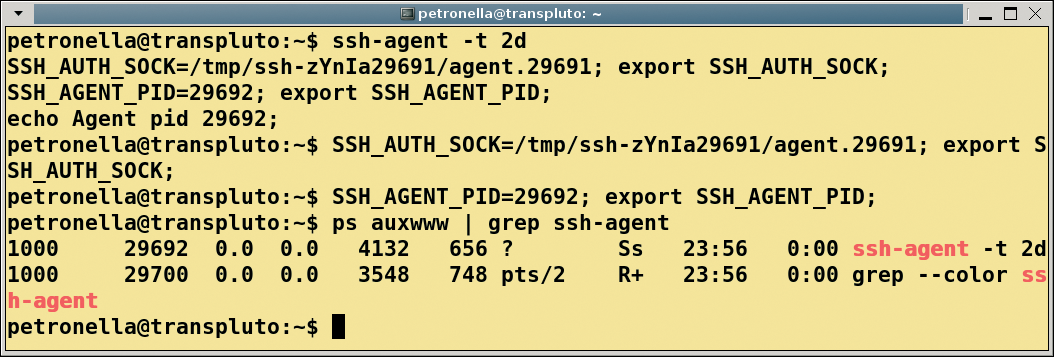
ssh-agent -t 2d
The output shows what values to set for the environment variables $SSH_AUTH_SOCK and $SSH_AGENT_PID for ssh-agent to work properly. To evaluate the output, you can either copy the program output and paste it or use eval when you launch the program:
$ eval $(ssh-agent -t 2d)
On launch, the program reveals its process ID, as confirmed by the subsequent call to ps (Figure 2). Even if you close the shell, the agent will not terminate on its own.
To terminate the program, you need to call ssh-agent -k in the shell in which you launched ssh-agent. If you can't do so - because the calling shell is no longer running, for example - your only option is the kill command:
$ kill 29692
To run ssh-agent with an application - such as a terminal program - rather than as a daemon, specify the name of the executable at the command line,
$ ssh-agent gnome-terminal &
which restricts the agent to this application and any programs launched in it. If you quit the terminal, this automatically terminates the ssh-agent and removes any key information it used.
Be aware that some distributions, including the current crop of Debian versions, launches the ssh-agent program with the X environment. Calling ps | grep, as shown in Figure 2, is the best way to check for this. Loading keys into the agent without time restrictions and then forgetting to lock the screen can mean security exposure. To rid your system of this bad habit, you might want to modify your /etc/X11/Xsession.options file and comment out the line
use-ssh-agent
by inserting a pound sign (#) at the start of the line.
After launching the agent, you need to add your private keys. The ssh-add program takes care of this. Without any additional parameters, you can call the tool and let it automatically search the ~/.ssh directory for private keys and request an identity for the password, or you can pass in a key file:
$ ssh-add ~/.ssh/id_dsa
By typing the matching password, the agent will output a success message (Listing 2).
| Listing 2: Matching Password |
01 Enter passphrase for /home/petronella/.ssh/id_dsa: 02 Identity added: /home/petronella/.ssh/id_dsa (/home/petronella/.ssh/id_dsa) |
Again, an option (-t) can provide more security. Just as when starting (ssh-agent), you can use this parameter to specify how long the agent should keep the keys. The command in line 1 of Listing 3 sets the timer to 10 minutes. The -l option returns a list of private keys managed by the agent (line 5).
| Listing 3: Remove the Key |
01 donumber 02 $ ssh-add -t 10m ~/.ssh/id_dsa 03 Enter passphrase for /home/petronella/.ssh/id_dsa: 04 Identity added: /home/petronella/.ssh/id_dsa (/home/petronella/.ssh/id_dsa) 05 Lifetime set to 600 seconds 06 $ ssh-add -l 07 1024 f3:c9:b6:5d:23:3a:9d:61:50:19:63:3c:e8:22:7c:86 /home/petronella/.ssh/id_dsa (DSA) 08 $ ssh-add -d /home/petronella/.ssh/id_dsa 09 Identity removed: /home/petronella/.ssh/id_dsa (/home/petronella/.ssh/id_dsa.pub) |
The output shows the size (1,024 bits) and the fingerprint for the key you just added. Now you can launch SSH sessions from this shell (and from other sessions by setting the two environmental variables $SSH_AUTH_SOCK and $SSH_AGENT_PID) and log in to target machines without entering a password. The -d option, in combination with the key file name, removes the key (Listing 3, line 7). To remove all identities in one fell swoop, specify the -D option instead.
The secure shell gives you an option for securing other Internet services against sniffing via tunneling. To secure an otherwise-unencrypted protocol (such as POP3), forwarding TCP/IP connections to a remote machine by means of an encrypted protocol makes sense. The use of SSH as a SOCKS proxy is another elegant application that lets users transfer encrypted data via a web browser. Setting up a tunnel to a proxy also avoids web content censorship, which is a useful feature in countries that block some websites. If you have a shell account on a machine in a less restrictive country, this approach can give you unimpeded web access.
To start, enable the proxy with the SSH -D option, and at the same time pass in a freely selectable port number. In this scenario, the -f and -N parameters also are useful. The former pushes ssh into the background after logging in and before executing commands, and the latter tells ssh that no commands are to follow; for example:
$ ssh -fN -D 1080 <i>Proxy<i>
After entering the password, the prompt reappears and the shell is ready to accept further instructions. That's all there is to it - the SOCKS proxy is waiting for something to do.
The next step is to set up the SSH client as a SOCKS proxy in the network configuration for the program in question. If this is the Firefox web browser, you can select Edit | Preferences and go to General | Network.
In Connection, click Settings, enable the manual proxy configuration, enter the IP address 127.0.0.1 and the port you previously selected in the SOCKS Host field. SOCKS versions 4 and 5 are available; when in doubt, check the ssh man page to see which version your SSH installation supports. After accepting these changes in Firefox, you can type an address in your browser's address box to verify the connection: http://www.myipaddress.com/; you should see the IP for the remote machine.
In contrast to scp, users work interactively with sftp, just as in any "normal" ftp session. Secure ftp does not expect an ftp server at the other end of the connection, but rather an SSH daemon and, thus, a shell account. As with SSH, set up a connection to the target computer at the command line:
$ sftp huhn@macnugget
After entering your password, you will see the sftp> prompt, which tells you that the program is ready and waiting for further input.
The sftp program is not much different from those used by other shell-based ftp clients; however, you can't set the transfer mode (ASCII or binary) before transferring data because files are sent as-is across the network.
Secure ftp also has some advanced functions for modifying file permissions and ownership. For a comprehensive overview of the available commands, see the help command.
Some practical command-line options facilitate working with sftp. For example, the -C parameter for enabling data compression not only is available for ssh and scp, but also for sftp. The -b <file> option lets you pass in a batch file with the commands you want to run to sftp; however, this will work only if you do not need to enter a password to log in.
If you are interested in a graphical client for sftp, the answer is quite simple: Both KDE's Konqueror and Gnome's Nautilus support sftp perfectly. Just enter the following in the address line of either application,
sftp://user@rechner
and then authenticate with the correct password to use sftp, just like your local file manager.
| INFO |
|
[1] Free SSH implementation, OpenSSH: http://openssh.org
|
| THE AUTHOR |
|
Heike Jurzik studied German, Computer Science and English at the University of Cologne, Germany. She discovered Linux in 1996 and has been fascinated with the scope of the Linux command line ever since. In her leisure time you might find Heike hanging out at Irish folk sessions or visiting Ireland. |