
By Juliet Kemp
Public key cryptography means that the traffic is secured and that if you verify keys correctly, it isn't vulnerable to man-in-the-middle attacks. Exploits are occasionally found, but they are quickly fixed. However, your system could still be vulnerable to brute-force attacks. If you have only a small number of user accounts, if your usernames are unusual, and if your passwords are carefully crafted, this might not be an issue. But if you have multiple users on a system, it becomes harder to ensure that all passwords really are secure. One solution is to run a password-guessing system such as John the Ripper [1], which can discover a poor password before anyone with nefarious intentions has time to exploit it.
Also, you can create firewall rules that establish a maximum number of connection attempts from the same IP address, either indefinitely or for the next few minutes. (The latter option is preferable to avoid problems for real users, who do occasionally mistype their password several times.)
Another alternative is port knocking. In a traditional port-knocking configuration, all ports on the server are closed by default. To the outsider, the network seems inaccessible. A remote user who wants access attempts to initiate a series of connections to a specific sequence of (closed) ports. These connections are not successful, but they are logged by the server. After the appropriate sequence of connection attempts ("knocks"), a daemon running on the server edits the firewall rules to allow a connection from the IP address that has originated the "knock" sequence. The user can then log in normally.
The SSH port is thus opened only in certain circumstances (when a user has demonstrated that they're legitimate), rather than being open all the time. A password is usually required for login once the port is opened, providing an additional layer of security.
Port knocking has a few benefits:
However, traditional port knocking also has some disadvantages. First, a client program needs to do the knocking. Depending on your users' tolerance for such things - and your own ability to manage the remote client configuration - this could be problematic. Also, it might not be possible to run such a program from some locations (e.g., from a library or network cafe). If the server side of the process goes wrong, no one (including you!) will be able to connect to the machine.
Port knocking also increases network traffic, although if the port-knocking configuration reduces the overall traffic because of scanning and brute-force attempts, this reduction could more than balance out the increased traffic for the knocking process. Another problem is that traditional port knocking isn't exactly unbeatable: It might be possible for an attacker to monitor traffic and detect the knocking sequence.
A more recent version of the same basic idea - running a server that appears closed until the proper "secret knock" is detected - is Single-Packet Authorization (SPA). In contrast to traditional port knocking, which requires a sequence of several knocks, SPA requires, as its name suggests, only a single encrypted packet to communicate all the information necessary.
An SSH session can occur only after a valid encrypted packet is detected, and as with port knocking, if you are looking at the firewall/server from outside. you can't tell that sshd (or any other service) is listening.
The major advantage of SPA is that its packets are not replayable, whereas with traditional port knocking, it is possible - at least in theory - for an attacker who discovers the sequence to replay it. In addition, SPA is faster and harder to detect because it requires only a single packet.
The best tool for implementing SPA is fwknop, available at the CipherDyne website [2], which is operated by the security researcher Michael Rash. Even though fwknop can also perform traditional port knocking, its authors strongly recommend that you use SPA solution instead.
To start, you'll need to install the libpcap-dev package (on Debian), or whichever package your distro uses to provide the PCAP development libraries. Then, download the most up-to-date fwknop tarball [3]. To unzip and install the software, enter:
$ tar zxf fwknop-1.9.1.tar.gz
$ cd fwknop-1.9.1
$ ./install.pl
During the install process, select server for the local execution mode, then pcap for the data acquisition method. Choose your network interface when asked (probably eth0), and set the access alert email address you want to use (this is the address that will receive an alert when the server is accessed or when access is turned off again). You probably want to choose yes for fwknop to run at boot time.
To ensure that fwknop will run correctly on your system, run the test suite after install: test/fwknop_test.pl from the fwknop install directory.
Now you need to complete the configuration by editing the file /etc/fwknop/access.conf, but you shouldn't need to edit the config settings in /etc/fwknop/fwknop.conf: All the access rules are set in access.conf. The sample access.conf file allows SSH access for 30 seconds after the specified key is sent successfully, which is a reasonable default. The only line you actually need to edit is the one that begins with KEY - alter the key to a password of your choice.
Before starting fwknop, you need to set up your iptables config so that existing connections and loopback are allowed but all other connections are dropped. Be very careful when setting up iptables rules. It is entirely possible to lock yourself out of your server if you get things wrong.
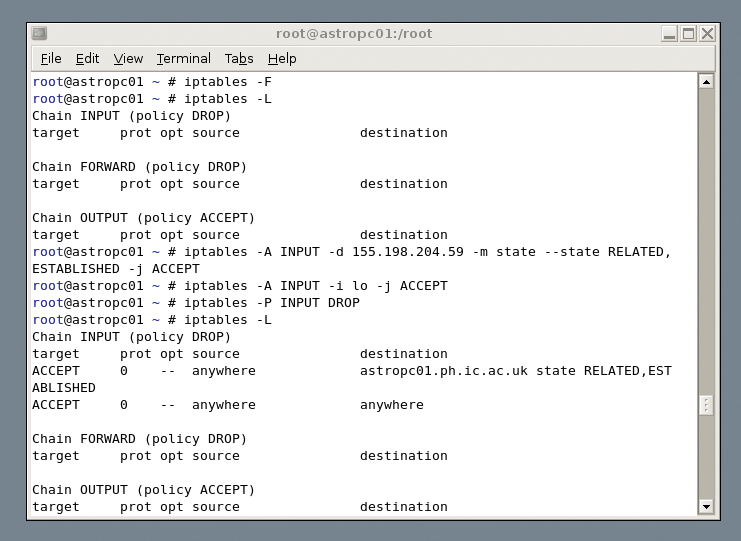
If you already have iptables running, type iptables -F to flush all the rules; then. set rules for the INPUT chain as follows,
iptables -A INPUT -d 1.2.3.4 -m state --state RELATED,ESTABLISHED -j ACCEPT
iptables -A INPUT -i lo -j ACCEPT
iptables -P INPUT DROP
and replace 1.2.3.4 with the IP address of your server.
This configuration accepts packets from established connections (first line) and from loopback connections (second line), but it drops all other packets (third line). The OUTPUT and FORWARD chains are not affected - this code just changes the rules about which inbound packets are accepted. Now start fwknop with /etc/init.d/fwknop start.
To test your setup, you need a client as well as a server. Again, you will need to install libpcap-dev on the client machine and then install fwknop as above; however, answer client during the installation process.
For an initial test, confirm that you cannot log in to your server via SSH:
$ ssh username@example.com
Although you should get no response, if you do, check your iptables setup on the server with iptables -L to list the rules.
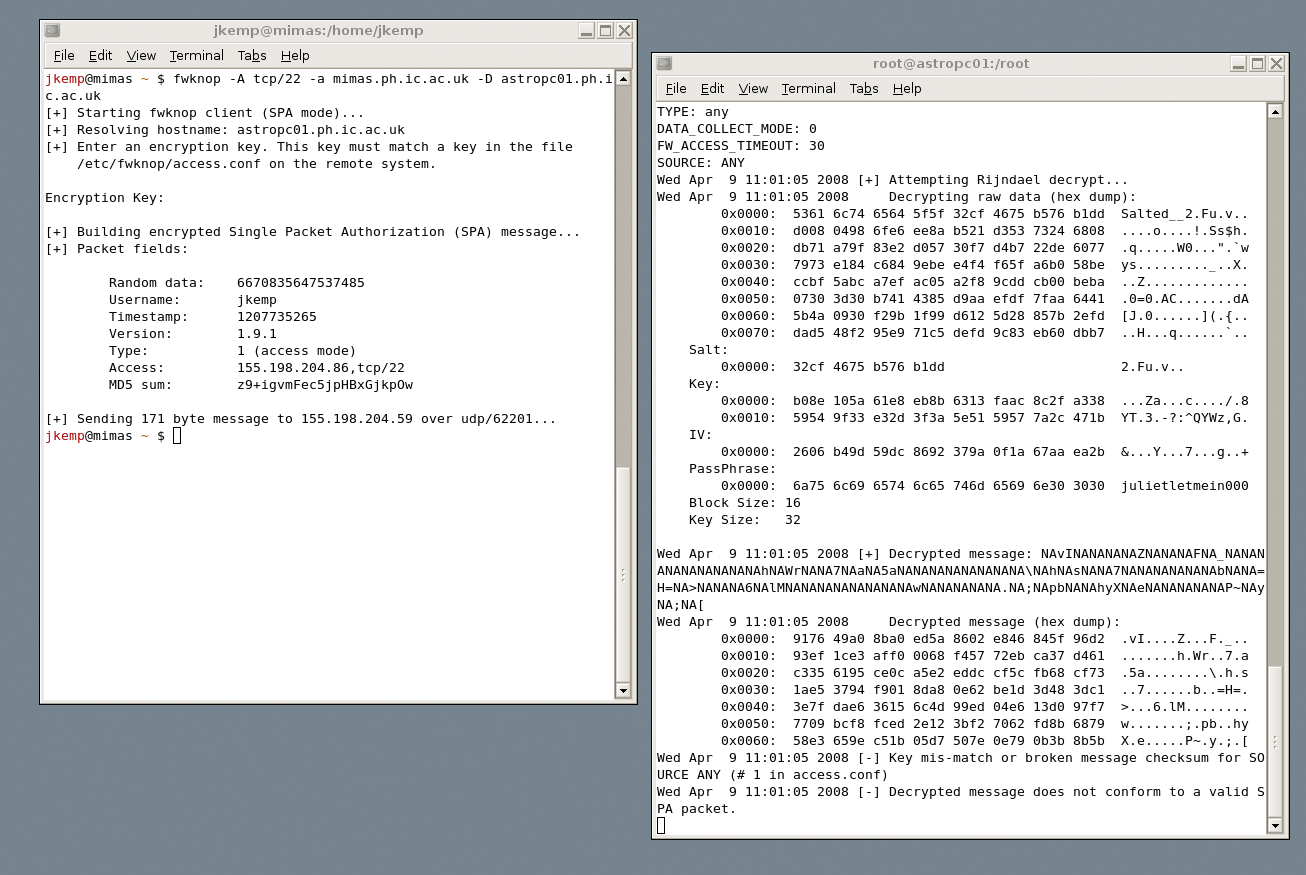
Next, try sending the "knock" packet:
$ fwknop -A tcp/22 -a client.example.com -D server.example.com
-A specifies which port on the server you want to access - and with which protocol. The -a specifies the machine (or IP address) that fwknop should allow to connect.
This option is useful in preventing a man-in-the-middle attack by ensuring that the source address is duplicated within the encrypted packet, so that if an attacker fakes the packet headers, they will not be successful (because the faked header would not match the encrypted packet). -D specifies the server to connect to.
After you are challenged for and have provided the passphrase that you set in access.conf on the server, you will see that a packet is sent to the server. After the packet is sent, you have 30 seconds to connect to the server with the use of a standard SSH connection (ssh username@server.example.com). The 30-second time limit is the default. As with the passphrase, you can change this in access.conf on the server. If the test does not succeed, it is possible that the setup packet was sent over a high-value UDP port.
If your client and server are on different networks with an external firewall between them that blocks these ports, your "knock" packet will not get through. If this is the case, you can edit the PCAP_FILTER value in /etc/fwknop/fwknop.conf on the server to set a port value that is allowed through, and then use the --Server-port <port> switch with the client fwknop command:
$ fwknop -A tcp/22 --Server-port 330 -a client.example.com -k server.example.com
To get more information on what is happening, you can run the daemon on the server in debug or verbose mode: fwknopd -d -v . With this, you should see connection attempts being logged and the firewall being opened.
Note that the FWKNOP_INPUT chain in iptables will not be set up until the first connection attempt occurs - so it is not a problem when you do not see that chain initially. By opening a new terminal window and issuing the command watch -n1 iptables -L -n, you can watch the changes in iptables as a connection occurs.
A plaintext key might not be the ideal form of authentication. Fwknop also supports GPG authorization, but you probably don't want to use your regular GPG key on the server end, since the password for decrypting it must be stored in /etc/fwknop/access.conf. However, you can use an existing GPG key on the client end if you have one.
In this example, I will assume you don't have one, and I'll go through the steps to set up a new key at both ends.
To create the server key, use:
$ gpg --gen-key
$ gpg --list-keys
The default options for the first command (DSA and Elgamal key, 2,048-bit key size, and no key expiry) are fine. Because the key needs to fit in a single packet, you shouldn't use a key larger than 2,048 bits.
Give an appropriate name and email address for the server (e.g., server.example.com fwknop and fwknop@example.com) and make a note of your passphrase. The key generation will take a few seconds. GPG will suggest that you do things on the keyboard to generate entropy while you're waiting, so go browse the Internet and check your email for a while! The output from the second command will look a bit like:
pub  1024D/AAAAAAAA 2008-03-07
uid        server.example.com fwknop <username@example.com>
sub  2048g/BBBBBBBB 2008-03-07
Now you need to export that key to ASCII with the command
$ gpg -a --export AAAAAAAA > server.asc
and go through the same process on the client to create and export the key:
$ gpg --gen-key
$ gpg --list-keys
pub   1024D/CCCCCCCC 2008-03-07
uid    test fwknop <username-test@example.com>
sub   2048g/DDDDDDDD 2008-03-07
$ gpg -a --export CCCCCCCC > client.asc
Now you need to transfer the client.asc and server.asc files, each to the other machine (using any secure transfer method you fancy).
Remember that if you've already set up fwknop as above on the server, you'll need to knock appropriately for an SCP or SFTP transfer to succeed! (Or, you could turn fwknop off and change the iptables setup back to normal for this transfer.)
Next, import and sign each key. On the client, use
$ gpg --import server.asc
$ gpg --edit-key fwknop
Command> sign
Command> save
and replace fwknop in the second line with whatever user ID you have given your key or with the hexadecimal key ID - AAAAAAAA in this example.
Then, repeat this on the server with the client key. Now edit your /etc/fwknop/access.conf on the server:
SOURCE: ANY;
OPEN_PORTS: tcp/22;
DATA_COLLECT_MODE: PCAP;
FW_ACCESS_TIMEOUT: 30;
GPG_HOME_DIR: /root/.gnupg;
GPG_DECRYPT_ID: AAAAAAAA;
GPG_DECRYPT_PW: myGpgPassword;
GPG_REMOTE_ID: CCCCCCCC;
__GPG_DECRYPT_ID__ is the server GPG key id, and __GPG_DECRYPT_PW__ is the password for that key. The characters after __GPG_REMOTE_ID__ compose the client GPG key id.
Restart fwknop and test it. The command line you need from the client is:
fwknop -A tcp/22 --gpg-recip AAAAAAAA --gpg-sign CCCCCCCC -w -D server.example.com
The server key id is --gpg-recip, and the client key id is --gpg-sign. After a challenge for your GPG passphrase, you'll see a message that a message has been sent to the server. Then, if you type ssh username@server.example.com, you should be able to log on again.
As this stands, only one key, and thus one individual, can access the server. The addition of more
GPG_REMOTE_ID: xxxxxxxx;
lines in access.conf permits as many keys as you want to access the server.
However, each key that is permitted to access the server must be imported and signed on the server. (In addition, the server key must be imported and signed by the client/user wanting to access the server.) This might be a bit much in a regular multi-user setup, although it would probably be acceptable with only a small number of admins needing to connect to the server (or, of course, if it's a single-user machine!).
Also, you can add the requirement to use a particular username when connecting, with the directive
REQUIRE_USERNAME: username
in the /etc/fwknop/access.conf file. Similarly, you can require a particular operating system or source address; or, you can change the time that fwknopd will keep the port open. Check the man page for details of all of these.
Although it is possible to use fwknop in port-knocking mode (which is called legacy port-knocking mode in the docs), this practice is not recommended; therefore, I won't cover it here.
With the --Server-cmd <cmd> switch for fwknop (client-side), you can send a command to the server to be executed as root. You must edit access.conf on the server to include the ENABLE_CMD_EXEC keyword, and you can restrict what commands are permitted with the CMD_REGEX keyword. This feature could be useful for running certain admin commands from a distance or, perhaps, for backup purposes.
If you intend to implement SPA (or another form of port knocking) across several machines with multiple users, you will probably come across resistance to the idea from your users, particularly if they are accustomed to being able to transparently use programs such as PuTTY. Being able to explain the benefits will be helpful, as will being able to provide an easy way to use appropriate scripts in practice. Using a plaintext password rather than GPG keys might be easier in this case, although obviously the more people know such a password, the less secure it is.
Alternatively, it might make more sense to implement port knocking only on certain machines. For example, you could create a setup in which certain user machines allow external (outside your LAN) access, but your servers both do not allow external access and require SPA for internal access. This means that a nefarious individual who breaks into one of your user machines cannot access your servers without also breaking the SPA protection.
Port knocking as a principle, and in particular SPA, is a very neat way of further restricting access to vulnerable machines and increasing security. It might not be suitable for all setups, but it is a useful technique to have available for situations in which you need or want to be particularly security conscious.
| INFO |
|
[1] John the Ripper: http://www.openwall.com/john/
[2] CipherDyne: http://www.cipherdyne.org/fwknop/ [3] Fwknop download: http://www.cipherdyne.org/fwknop/download/ |