
By Charly Kühnast
Sshutout [1] is a daemon written in C that checks a logfile for invalid SSH logins at frequent intervals. If Sshutout discovers a pattern of failed login attempts by a client, it blocks the client according to iptables rules. After a configurable delay, the penalty is automatically revoked.
All it takes to install the 32KB tarball is the usual make; make install.
The daemon is located in /usr/local/sbin after the install, and its configuration file is /etc/sshutout.conf.
The configuration file lets you configure a number of parameters. It is extremely important to specify the right name for the logfile that you want Sshutout to monitor. The name defaults to /var/log/messages, but many distributions write login information to other logfiles. On Ubuntu, for example, you would need this setting:
sshd_log_file = /var/log/auth.log
The threshold option specifies the LOS value (LOS = level of stupidity). In other words, it defines how many invalid login attempts a client can make before it is temporarily blocked. If you have a large number of passwords or a poor memory, you might want to increase this threshold (default = 4).
The lock-out time is related to the threshold value. On the one hand, you need to prevent brute-force attacks as effectively as possible; on the other, it is not a good idea to lock out your users for hours on end just because they have difficulty remembering their passwords after a night on the town. The default value, five minutes, is a useful compromise: delay_penalty = 300.
This will give users enough time to drink a cup of coffee and refresh their memories. Alternatively, you can exclude known password forgetters from the outset. The configuration file has a whitelist line on which to enter names or IP addresses of hosts you don't want to lock out.
Sshutout also does some autonomous whitelisting. When launched, it outputs an overview of the current settings, including the following lines:
Whitelist:
    213.133.98.97
    10.0.0.254
    10.0.0.214
This means that Sshutout's whitelist automatically excludes its own IP address, the default gateway address, and the name server. This shouldn't be too dangerous, but more cautious admins might want to change this behavior by specifying auto_whitelist = no.
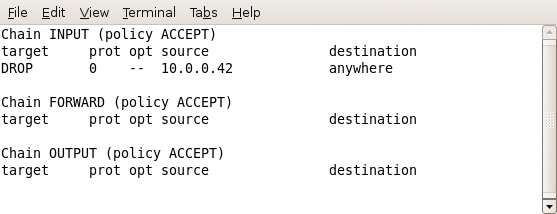
Sshutout also logs its own activities in /var/log/sshutout.log by default. If a client is blocked, an entry for the client is written to the file:
10.0.0.42 blocked on Sat Feb 02 15:32:32 2008
iptables -L lets you view the underlying firewall rule (Figure 1). Finally, an exception handling function deals with cases in which a client initiates an SSH connection but does not make an entry, which commonly occurs in cases of denial-of-service attacks. Sshutout ignores these kinds of connections by default. The illegal_user = yes entry tells Sshutout to treat these like any other failed login attempt.
Fail2ban [2] basically takes the same approach as Sshutout; however, it is not restricted to SSH. In fact, it can protect more or less any service that requires users to log in. Fail2ban makes its decisions on the basis of logfile entries, although it uses a different technical approach.
The tool is split into two components: a server and a client. The server monitors the logfiles and iptables rules. The administrator can use the client to issue commands to the server to change, for example, the logging level.
The jail.conf configuration file defines a number of services that Fail2ban can protect, with ssh heading the list:
[ssh]

  enabled = true
  port   = ssh,sftp
  filter  = sshd
  logpath  = /var/log/auth.log
  maxretry = 6
The sections that follow contain parameters for other services. Each of these sections is a "jail" in Fail2ban-speak. The filter = sshd entry is equivalent to a file in the /etc/fail2ban/filter.d directory. The file contains a regular expression that the Fail2ban server searches for in the logfile. At this point you can't configure the duration of a lock-out because this value is set to 600 seconds in a global section, [DEFAULT]. If this is too long for your liking, you can add a bantime = 300 entry in the [ssh] section.
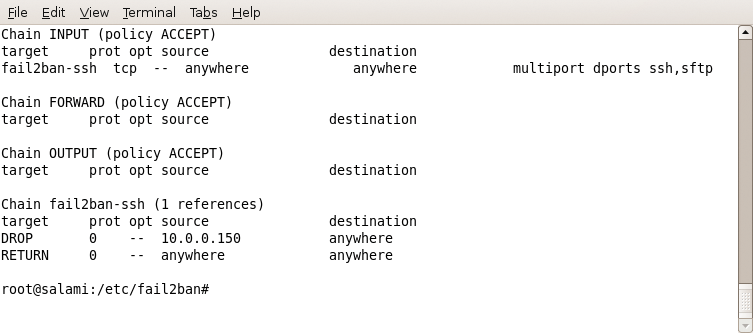
SSH has two jails: the one just mentioned and sshd-ddos. This jail is not designed to prevent attempts to guess passwords, but to counter denial-of-service (DoS) attacks that open connections to the SSH daemon without entering a password.The logfile contains messages like this in case of a DoS attack:
sshd: Did not receive identification string from 10.0.0.150
Although you could configure multiple regular expressions per jail, many admins will prefer to assign different ban times for distributed DoS (DDoS) attacks as opposed to failed login attempts. That is, splitting this into the SSH and sshd-ddos categories makes a lot of sense.
The SSH jail is the only one set to enabled = true by default; all other jails - including sshd-ddos - have to be enabled manually.
If a user enters the wrong password multiple times, the results are similar to the Sshutout results: An iptables rule is triggered and locks out all connections from the offending computer for the next five minutes (Figure 2).
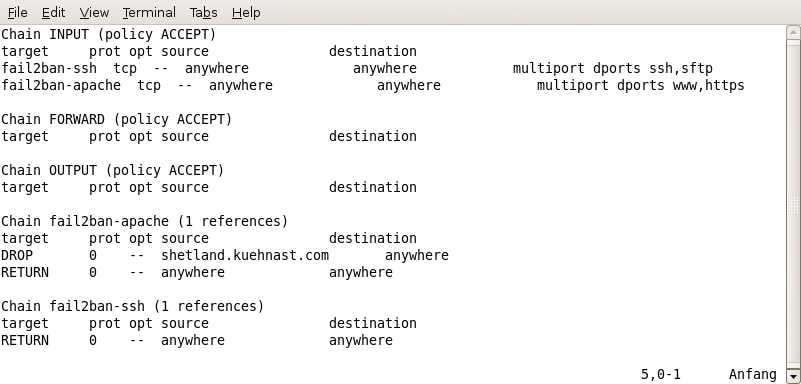
Protection for other services follows the same pattern (Figure 3). If you have a number of login-protected web pages on your Apache web server, Fail2ban will give you a jail to match,
[apache]

  enabled = false
  port = http,https
  filter = apache-auth
  logpath = /var/log/apache*/*access.log
  maxretry = 3
which you need to modify slightly. The Apache version that I run writes error messages to a separate error.log file, and not to access.log. After setting enabled = true, you can enable the jail.
Tip: A more elegant approach than simply restarting the Fail2ban daemon, which could mean disabling active iptables rules, is to send the following command from the Fail2ban client to the server:
fail2ban-client start apache
This command tells the server to add the [apache] entry to the list of active jails. To try this out, I entered a number of invalid passwords, and a new iptables rule was activated.
| INFO |
|
[1] Sshutout: http://www.techfinesse.com/sshutout/sshutout.html
[2] Fail2ban: http://www.fail2ban.org |