
By Dmitri Popov
When you are out and about, the right set of tools on your laptop can make a huge difference. That's why stocking your laptop with useful utilities and applications is as important as remembering to pack an extra pair of socks and a toothbrush. In this article, I will suggest some useful tools to pack when traveling with your Linux laptop.
When you are on the move, you are often limited to a relatively slow and expensive modem or GPRS Internet connection. Even if you are lucky enough to have a faster 3G plan, the bandwidth costs still remain a major issue. Although you can reduce the amount of data you shift through your connection link several ways, perhaps none of them are as effective as the Adblock Plus extension for Firefox [1]. This nifty tool scrubs the websites you visit for advertisements. By removing ads, Adblock Plus makes more space for the page content, which can be extremely helpful if you are using a laptop with a smaller screen, such as Asus Eee PC. This tool also makes the pages load faster, which is a boon if you are using a slow connection. More importantly, by cutting ads off, Adblock Plus significantly reduces the amount of data transferred.

To weed out ads, Adblock Plus uses a constantly updated filter list that you subscribe to when you install the extension. If, for some reason, Adblock Plus fails to remove an ad on a page, you have two options: You can click on the Block tab next to the ad to remove it and add a new filter to the filter list, or you can write a custom filter. To write a custom filter, see the directions on the Adblock Plus website [2].
Imagine you are at a conference and need to send another user a file from your Eee PC. Suddenly, you realize that you left your USB stick at the hotel, and your laptop has neither an infrared port nor Bluetooth. What do you do? You resort to woof [3], a Python script that uses a tiny built-in server to serve a single file. To use woof, make sure that Python is installed on your machine. Then download the script, make it executable with chmod +x woof, and you are ready to go. To share a file with woof, use
woof -i [ipaddress] -p [port] [file]
where ipaddress refers to the IP address of your laptop, and port specifies the port though which woof serves the file. Therefore, the actual woof command might be:
woof -i 192.168.0.5 -p 8888 loremipsum.txt
When you run the command, the recipient can download the file by simply pointing the browser to the specified IP address (in this case, http://192.168.0.5:888). Once the file is downloaded, the woof server quits.
If you need to share a file with several users, you can use the -c option, which specifies how many times a particular file can be downloaded. For example, if you want to share the file with three users, you can use the command:
woof -i 192.168.0.5 -p 8888 -c 3 loremipsum.txt
With woof, you can also share a directory. To do this, specify the folder you want to share followed by a slash:
woof -i 192.168.0.5 -p 8888 my_documents/
To speed up the transfer, woof creates a .tar archive of the directory and compresses it with gzip, so the recipient receives it as a my_documents.tar.gz file.
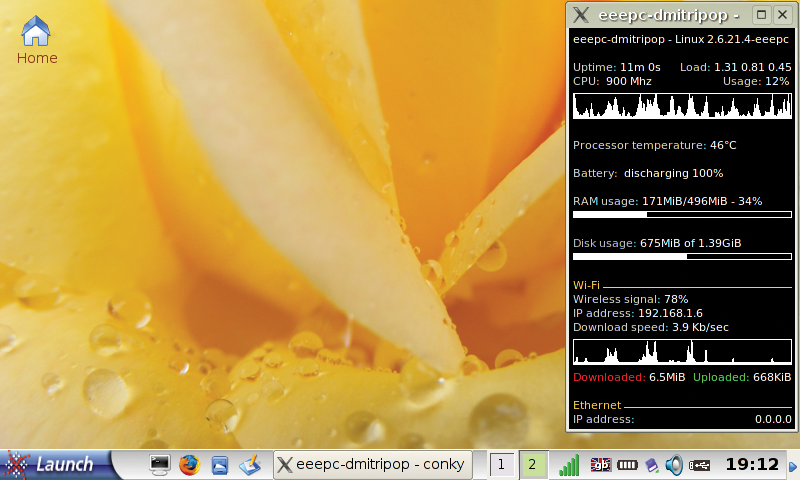
Although the Conky [4] system monitor tool isn't designed exclusively for laptops, it can provide you with vital information about your machine, including CPU load, RAM usage, battery level, wireless connection quality, and much more. To configure Conky, you have to write a .conkyrc file containing all the configuration settings. Although it is not possible to cover all Conky's configuration options in this discussion, you can study a sample .conkyrc file in Listing 1, which you can use as-is or tweak to your liking.
| Listing 1: Sample Configuration File |
01 # .conkyrc
02 update_interval 1.0
03 double_buffer yes
04 own_window yes
05 use_xft yes
06 xftfont Bitstream Vera Sans:size=8
07 maximum_width 270
08 alignment top_right
09 default_color white
10 uppercase no
11
12 TEXT
13 $nodename - $sysname $kernel
14 ${color lightgrey}Uptime:$color $uptime $alignr${color lightgrey}Load:$color $loadavg
15 ${color lightgrey}CPU: $color ${freq} Mhz $alignr${color lightgrey} Usage:$color $cpu%
16 $color${cpugraph}
17
18 ${color lightgrey}Processor temperature: $color${acpitemp}°C
19
20 ${color lightgrey}Battery: $color${battery}
21
22 ${color lightgrey}RAM usage:$color $mem/$memmax - $memperc%
23 ${membar}
24
25 ${color grey}Disk usage: $color${fs_free /} of ${fs_size /}
26 ${fs_bar 6 /}
27
28 ${color #ffcb48}Wi-Fi ${hr 1}
29 ${color lightgrey}Wireless signal: $color${linkstatus ath0}% $alignr$color${addr ath0}
30 ${color lightgrey}Download speed: $color${downspeedf wifi0} Kb/sec
31 ${downspeedgraph wifi0}
32 ${color lightgrey}Upload speed: $color${upspeedf wifi0} Kb/sec
33 ${color red}Downloaded: $color${totaldown wifi0} $alignr ${color green}Uploaded: $color${totalup wifi0}
|
Using the sample configuration file, you can monitor the laptop's most important parameters, such as CPU usage (cpu and cpugraph variables), processor temperature (acpitemp), and battery status (battery), as well as various aspects of the wireless connection (linkstatus, downspeedgraph, and totaldown). The addr variable can be particularly useful if you are using woof to share files because it displays your laptop's IP address. The totaldown and totalup variables can also come in rather handy because they allow you to monitor the total amount of traffic going through a specified network interface.
The TrueCrypt encryption suite [5] can help you to protect your sensitive data with minimum fuss. TrueCrypt can encrypt a hard disk partition or an entire disk, or you can use it to create an encrypted file-based volume. The latter looks like a regular file, but it can be mounted as a conventional directory.

TrueCrypt sports a graphical interface, which provides easy access to all of its features. Thanks to the Volume Creation Wizard, you can set up an encrypted volume in a matter of minutes by simply selecting the desired options. After you choose volume size, encryption algorithm, and password, the wizard takes care of the rest.
TrueCrypt also allows you to create encrypted volumes on an external device, such as a USB stick. Better yet, you can install a portable version of TrueCrypt for Windows (so-called Traveler Mode) on the same USB stick, so you can access the encrypted volume on any Windows machine.
Once the encrypted volume has been created, you can mount it using TrueCrypt's interface, and you can work with the mounted directory as with any folder on your system.
To speed up the mounting process, you can "bookmark" the currently mounted volumes by choosing Favorites | Add Selected Volume. This saves the location of the encrypted volume and its mount point, so entering the correct password is all you have to do to mount the bookmarked volume.
Losing all the work you've done while waiting for your plane, would be a disaster, which is why you shouldn't leave home without a simple and reliable backup solution on your laptop. Fortunately, every decent Linux distribution comes with rsync [6], a versatile, incremental file transfer utility. Using a wide range of options, you can create a backup command or script that takes care of your files and documents. The following rsync command, for example, backs up all files and folders in the laptop_documents directory to a mounted USB stick:
rsync --verbose --progress --recursive --times --perms --compress --delete /home/dmpop/ laptop_documents /media/usbstick/backup/
If using the command line is not your cup of tea, you might want to try Grsync [7], a graphical front end to rsync.
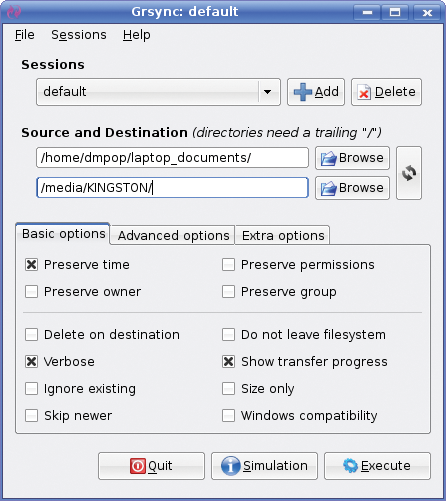
With Grsync, you can create a backup profile by specifying the source and target directories and ticking the right checkboxes.
What makes Grsync even more useful is its ability to manage multiple backup profiles called sessions. For example, you can set up one profile to back up files on your laptop to a USB stick and another to back up the files to a remote server.
To create a new profile, press the program's Add button, give the profile a name, and press OK. Then you can enter the paths to the source and destination directories and specify the desired options by ticking checkboxes. If you are not sure what each checkbox does, hover the mouse over it to see a pop-up window with a brief explanation.
| INFO |
|
[1] Adblock Plus: adblockplus.org/
[2] Writing Adblock Plus filters: adblockplus.org/en/filters [3] Woof: www.home.unix-ag.org/simon/woof.html [4] Conky: conky.sourceforge.net [5] TrueCrypt: www.truecrypt.org [6] Rsync: samba.anu.edu.au/rsync/ [7] Grsync: www.opbyte.it/grsync/ |
| THE AUTHOR |
|
Dmitri Popov holds a degree in Russian language and computer linguistics. He has been working as a technical translator and freelancer contributor for several years. He has published over 500 articles in Danish, British, US, and Russian magazines and websites. |