By Thomas Pelkmann
Creating images with a drawing program is accomplished in two ways. The first involves creating an image from individual pixels, as with digital photos. The pixels can be seen by zooming in on a picture, but trying to draw pixel images manually would be a painstaking process. The second method involves compiling geometric shapes: lines, ellipses, or polygons.
Typical programs for each of these approaches are GIMP, for pixel-based graphics, and Inkscape, for vector graphics. The Inkscape [1] developers just released the latest version, 0.45.1, offering numerous new features and enhancements, which I will demonstrate here with reference to practical examples.
Installing Inkscape on Ubuntu is simple, assuming you have Internet access: Just type the following command at the command line:
# sudo apt-get update && apt-get install inkscape
If you want to launch the installation over the network, you will be prompted for your administrator password.
All graphical objects in vector drawings are composed of shapes that can be described by geometric formulas. The advantage of this is that vector drawings scale arbitrarily without affecting quality. Elegant shapes are created with the use of what are known as Bézier curves, which are completely smooth in contrast to the jagged diagonal lines or curves in pixel graphics. Additionally, graphics of this kind need far less storage space.
Vector graphics are used in many areas - for example, in designing logos, background graphics for games, or book illustrations. The only limits to a vector drawing program like Inkscape are the user's imagination. In version 0.45.1 the program comes fairly close to Adobe Illustrator, although the functional scope of the open source variant cannot currently compete with that of the incredibly expensive commercial program. This said, Inkscape is definitely ready for production, as is demonstrated by a special page on Wikimedia with numerous examples [3].
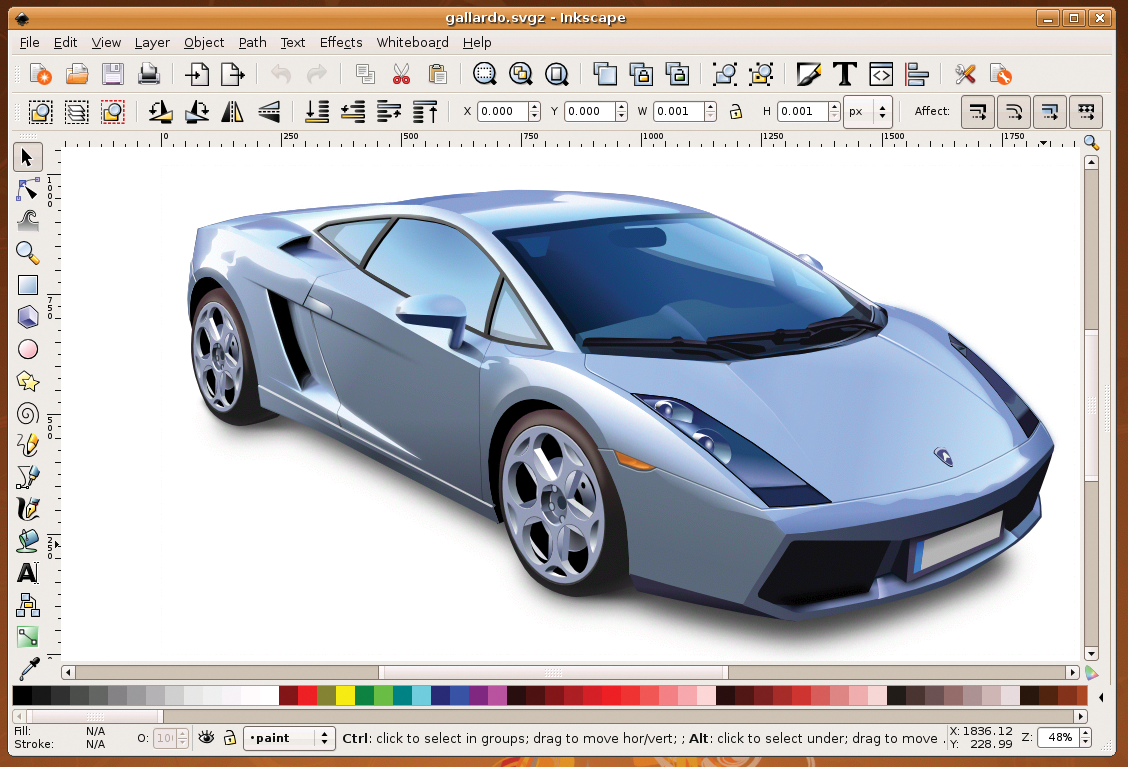
Here, I will introducing the new version, which approaches a commercial solution, although the release date for version 1.00 of Inkscape is still a matter of speculation. The developers have focused on improving the details of numerous functions and enhancing the screen display, besides the normal bug fixes, in preparation for the giant leap to version 1.00 [4]. All told, Inkscape is a fairly mature vector drawing program, as Figure 1 shows.
The developers have added a Gaussian blur filter to the latest version of Inkscape. To apply the filter, select Object | Fill and Stroke or press Shift+Ctrl+F. This takes you to the Blur slider, which you can use to manipulate the selected object. It is useful to know that you can undo the effect at any time simply by pushing the slider back to 0.0. At the same time, you can continue work on a blurred object - again, this is an advantage of vector drawing compared with pixel graphics.
The blur filter quality is defined in the Inkscape settings below the Filter tab; press Shift+Ctrl+P to access the tab. The idea is to find a balance between quality and speed of work.
One of the most popular applications for this effect is object shadows. For example, start by drawing a star and pressing Ctrl+D to duplicate; then, assign the color black to the new object, along with a blurred contour via the Gaussian blur filter. Now move the object behind the original object by selecting Object | Lower to bottom and displace it slightly: This gives you a great shadow effect.
The comprehensive Undo history in the Edit menu is another new feature in Inkscape. The program records all of your actions after launch (Figure 2), and you can go to any point in the list and restart drawing from that point. Note that any actions after this point are deleted.
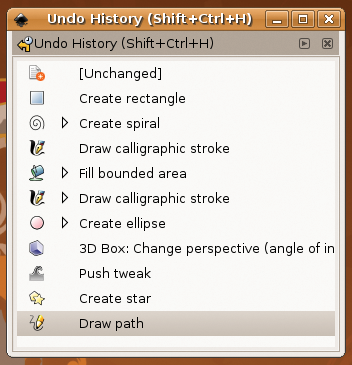
In practical terms, this means that you can try individual functions to your heart's desire without permanently damaging a complex object. The history lets you return to the starting point of your experiment and start down another path.
Every closed shape basically comprises a ingle line. The points at which the direction taken by the line changes are called nodes in Inkscape. A square has exactly four nodes, and a circle is defined as having an infinite number. All of these nodes can be edited. This lets you create arbitrarily complex objects in Inkscape from simple shapes; interestingly, the complex polygons are still made from a single line.
To try this function, create any object in Inkscape - a star, for example. To enable the node tool, press F2. Two nodes on the object are now visible: One controls the outer contour and the other the inner contour. By dragging just these handles, you can manipulate the object. Try it and see what happens when you drag the two nodes.
For this experiment, select the Outset function in Path. Now you can see how many nodes compose your graphic. Dragging each of these nodes with the mouse radically changes the shape of the object. Positioning the mouse over a node (the node turns red) and pushing the mouse wheel creates additional handles that let you further modify the shape. Moving the mouse wheel back reduces the number of nodes.
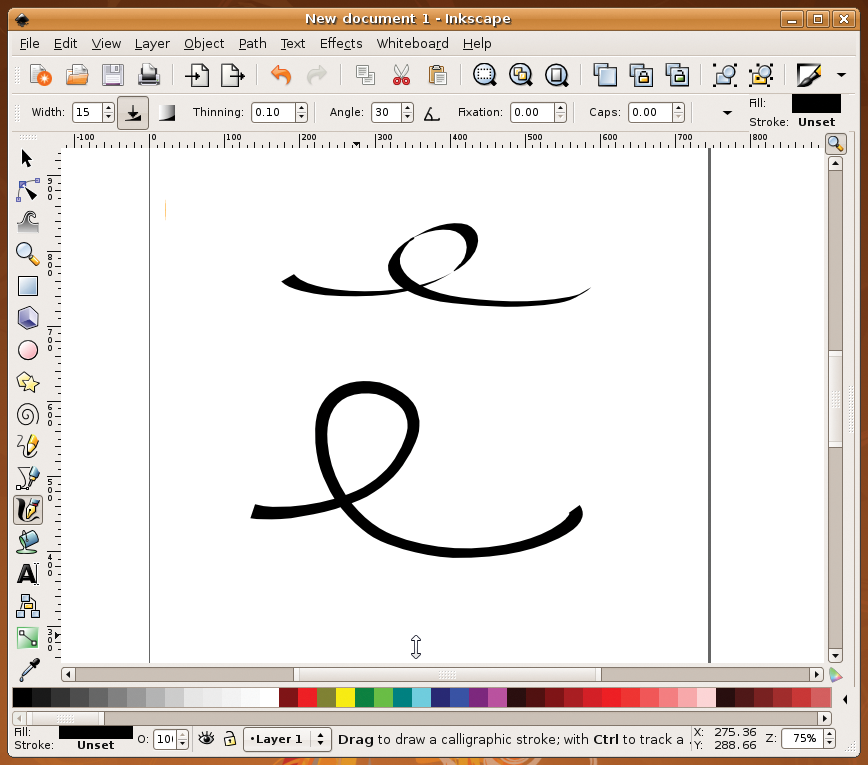
Although it might not seem to make sense, your computer can help you with calligraphy, the art of neat handwriting [5]. Pressing Ctrl+F6 takes you to the matching tool. The parameters that define the shape and behavior of curved lines are shown in the tool settings below the menu bar. Thinning gives you different line thicknesses when you move the mouse at different speeds over the "paper," for example. Angle defines the attack angle of the (virtual) pen and is one of the most important parameters in calligraphic work. Fixation specifies how the pen reacts on drawing: A value of 1.00 means that it keeps to the same angle, whereas 0.00 means that it rotates to reflect the angle. This has a very visible effect on the stroke, as Figure 3 shows.
Stroke tremor adds a human aspect to the stroke by simulating an unsteady hand, but use this feature sparingly to avoid making your beautiful handwriting look like a seismogram from the last big quake.
The only really new feature with the calligraphy tool is the end-of-line setting. A value of 0 means that the line is flat ended. A value of 1 adds a small semi-circular bob at the end. The maximum value, 5, extends the semi-circle to an extended ellipse.
Data input options have also changed: Instead of just using arrow keys, you can now right-click a field with a value, and Inkscape will prompt you with defaults for the stroke aspect.
Normally, the objects you manipulate in Inkscape will have visible strokes and fills - if for no other reason than to let you at least see what you are doing. If you are working with multiple objects, this view can be a nuisance because it prevents you from seeing shape borders. In this case, Inkscape offers an Outline View mode, which you can enable in the View menu or by pressing the keyboard shortcut Ctrl+Num-5. In this mode, Inkscape displays objects as outlines independent of their actual properties. If you have defined an object without fill and stroke attributes to cover a specific area of your drawing, you can use this mode to see the object, which is a big help if you need to move or edit it. But outlines have another advantage: If you are working with complex graphics and color gradients, this view will definitely speed up the screen refresh.
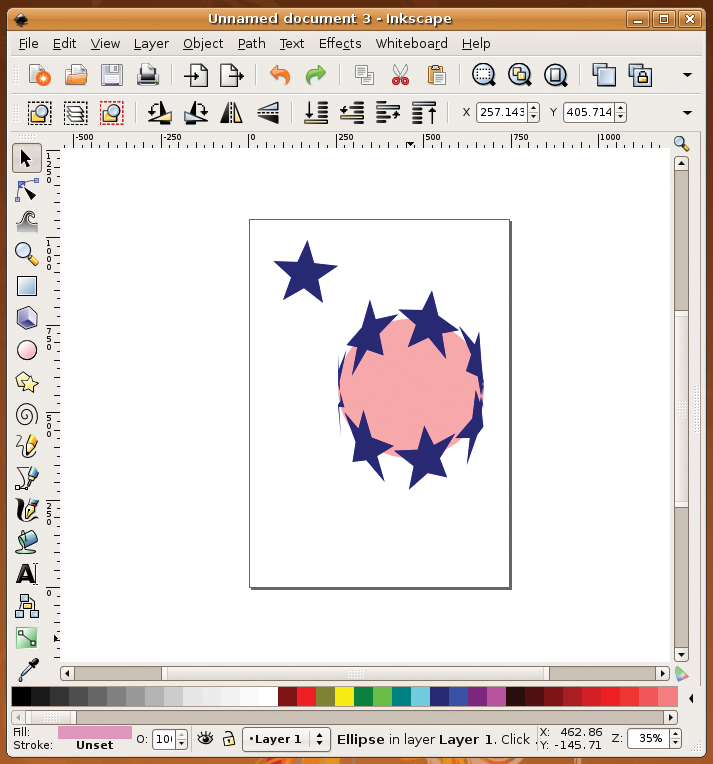
The new Pattern along path function, which you will find at Effects | Generate from path, gives users a bunch of new options. It lets you align an object (a star in Figure 4) along another object (the sphere). For copies with this effect, select the Repeated pattern and the Ribbon deformation type. As a result, you can create an impressive star cluster from a single star. The order in which you mark the objects is important: The object you select first is aligned along the second object. If you change the order, the object references change too.
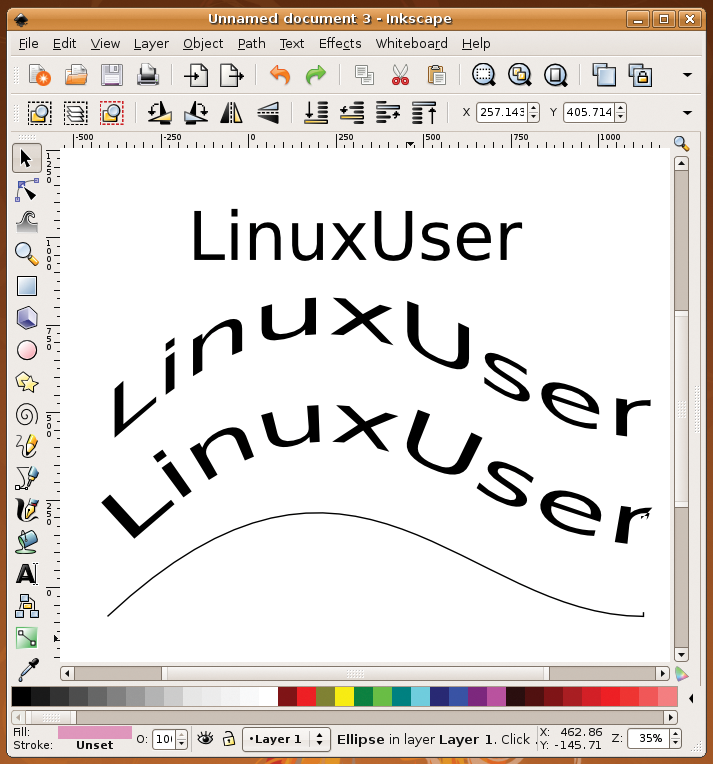
Alignment along paths also works with groups of objects, which you need to group via Object | Group or by pressing Ctrl+G. It is also interesting to note that type can be aligned along paths. To do this, create a piece of text and select Path | Object to Path to convert. Then create a nice curve by first enabling the Bézier tool (Shift+F6). On the workspace, left-click once, holding down the mouse button, and press Shift+Ctrl to create a straight horizontal line. While continuing to hold the mouse button down, drag the line up, release the mouse button, and double-click the end. Pressing F2 opens the line-editing tool. Now select one of the endpoints, which will turn from red to blue. Keeping the left mouse button held down, drag the line until you have a curve. Then you can use the handles to optimize the shape of the curve.
Now select the text, followed by the curve, then select Effects | Generate from path | Pattern along path. If you set the option Single stretched, Inkscape will just create a single copy the same length as the curve. The Ribbon option sets the letters upright on the line; the Snake option modifies the text baseline so that it is flush with the curve (Figure 5).
Color effects are also new to Inkscape 0.45.1; you will find them in the Effects | Color menu. The effects let you change fills, strokes, and patterns with very little effort and provide a plethora of options (Figure 6).
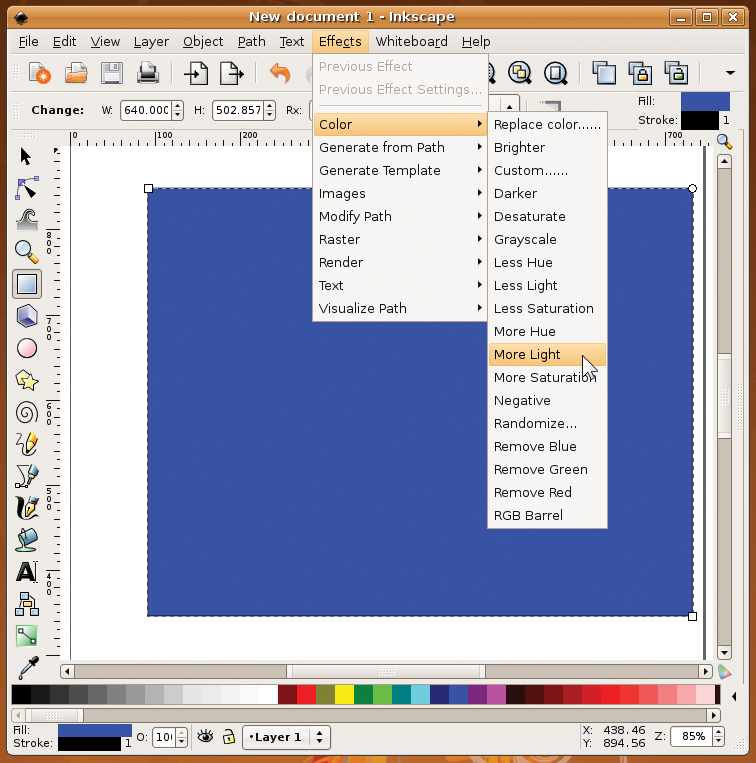
Inkscape changes the hue, brightness, and saturation of colors in steps of five percent. If you select Lighter or Darker, the scale is 10 percent instead. All other effects do exactly what the doctor ordered; for example, Remove blue, or Negative to convert an object to its complementary colors.
| Quick Workshop in Complex Shapes |
|
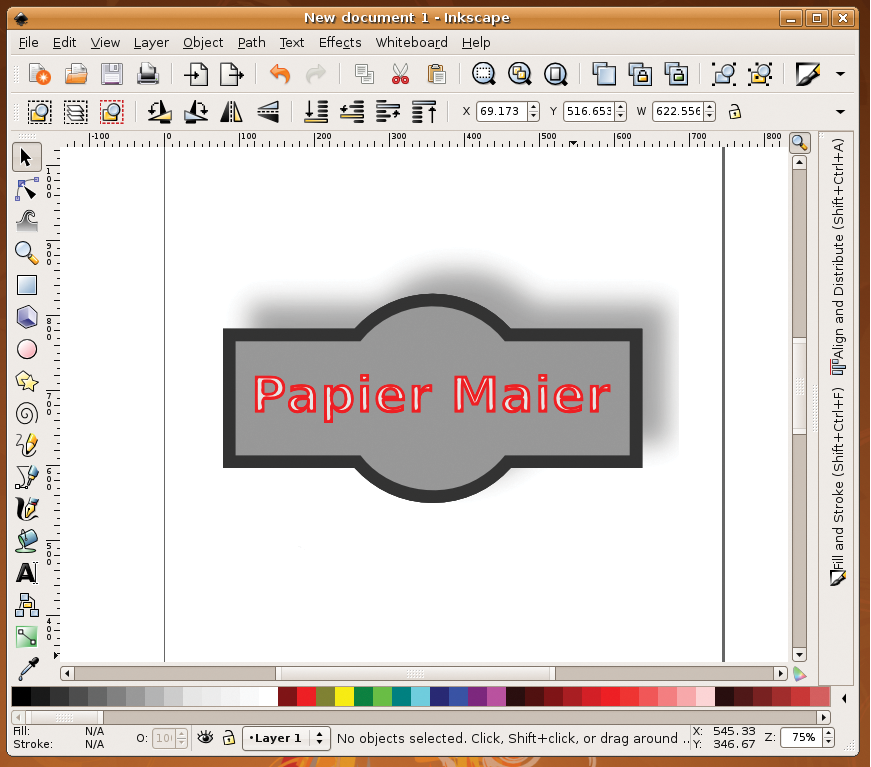
One of the strengths of vector programs is their ability to create complex shapes. Already you have seen how to do this with nodes and handles in Inkscape in the section "Inserting and Editing Nodes". Now, with the method described here, I will show you a second easy approach that produced the label in Figure 7. To start, draw a gray square with the mouse. In the toolbar, set the width W to 600 and the height H to 200. Fill the square by pressing on the button at the bottom of the window with 80% gray. Next, create a perfect circle. To do so, press F5 to select the ellipse tool, hold down Shift+Ctrl, and drag the mouse to draw a circle somewhere on the workspace. Now select the circle and set the width and height to 300 in the toolbar. To align the two objects with each other, press Ctrl+A - this selects all the objects on the page - then select Object and the function Align and distribute. When you have done so, click the icons for centering vertically and horizontally - the tool tips that appear when you place the cursor over the icons will help you find the right functions. Finally, Close the dialog box. Now merge the two autonomous objects by selecting Path | Union. This leaves you with just one object, which you duplicate by pressing Ctrl+D. Because the new shape is exactly on top of the old one, you will not see it unless you assign it a different color (e.g., 10% gray). In the Path menu, select Outset to reduce the size of the top object, centering and fitting it perfectly to leave just a small border. Repeat this step until the border fits proportionately. According to the menu entry, you can press Ctrl+) for this function, but it did not work in our lab. The rest is up to you: I duplicated the dark background shape first by pressing Ctrl+D and then displaced it slightly with respect to the original before applying a Gaussian blur, which blurred the object and added semi-transparency. This gave me the shadow effect I wanted. Next, I added text in red, duplicated it, added a lighter color, and again applied the Outset function (see the results in Figure 7). |
The Inkscape vector drawing program is pleasingly functional and versatile. Although it does not currently have the full functional scope of its commercial competitors, it is still worthy for most tasks in professional graphic arts. The changes in version 0.45.1 are useful additions to the application and contribute to the fun factor of using Inkscape. And do not forget that development is still in full swing: Version 0.46 is just around the corner.
| INFO |
|
[1] Inkscape website: http://www.inkscape.org/
[2] RPM PBone search: http://rpm.pbone.net [3] Inkscape productivity: http://commons.wikimedia.org/wiki/Category:Created_with_Inkscape [4] Details on changes in version 0.45.1: http://wiki.inkscape.org/wiki/index.php/ReleaseNotes045 [5] Wikipedia on calligraphy: http://en.wikipedia.org/wiki/calligraphy |