
By Leandro Melo de Sales
Over the past few years, developers have unveiled a new generation of network applications that transmit and receive multimedia content over the Internet. New multimedia applications based on technologies such as Voice over IP, Internet radio, online gaming, and video conferencing are becoming increasingly popular thanks to the availability of development libraries and the abundance of high-speed networks.
In the past, most Internet applications have used either the Transmission Control Protocol (TCP) or the User Datagram Protocol (UDP) to manage communication at the Transport layer of the TCP/IP protocol stack, but multimedia developers now have an alternative to TCP and UDP. IETF recently standardized the Datagram Congestion Control Protocol (DCCP) (RFC4340) [1], a new transport protocol designed to transmit congestion-controlled multimedia content. DCCP is becoming very popular for multimedia data transmission, mainly because it is more effective than UDP at sharing the available bandwidth.
In this article, I examine the DCCP protocol and show how to enable DCCP in Linux. Also, I will explain how to use the GStreamer DCCP plugin to create a simple client-server DCCP application.
DCCP was first introduced by Kohler et al. in July 2001 at the IETF transport group. The DCCP protocol provides specific features designed to address some of the problems developers have faced writing multimedia applications with TCP and UDP, such as delay and jitter caused by network congestion. DCCP offers a connection-oriented transport layer for congestion-controlled but unreliable data transmission. Also, DCCP provides a framework that enables the addition of new congestion-control mechanisms, either added during the connection handshake or negotiated during an established connection. DCCP also provides a mechanism for getting connection statistics, a congestion-control mechanism with Explicit Congestion Notification (ECN) support, and a method for Path Maximum Transmission Unit (PMTU) discovery.
DCCP inherits the connection-oriented and congestion-control features from TCP, and, from UDP, DCCP inherits unreliable transmission.
In addition to connection-oriented and congestion-control features, TCP provides reliable data transfer. This reliability feature limits the transmission rate for a given connection. When packets are lost, TCP decreases its transmission rate, and it increases the transmission rate again when it sends packets successfully. To implement reliable data transfer, when TCP loses packets, it retransmits them. In this case, new data generated by the application is queued until all lost packets are sent. Because of this way of implementing reliable data transfer, TCP might lead to a high level flow delay. Consequently, the user might experience interruptions in multimedia content.
On the other hand, UDP is a simple protocol, implementing minimal functions to transport data from one computer to another. It is a connectionless protocol and does not care about data packet delivery or network congestion control. Also, UDP does not provide packet reordering on the receiver end. Because of the lack of any type of congestion control, UDP might lead to network congestion collapse. Hence, a UDP application can send data as much as it wants, but much of this data might be lost or discarded by the routers because of network congestion.
Before DCCP, multimedia application developers had to choose between TCP and UDP. If they used TCP, end users might experience high streaming delays because of packet retransmission. If they used UDP, the result might be a network collapse or bad streaming quality. DCCP puts together the best features of TCP and UDP to provide higher quality multimedia data streaming and better sharing of bandwidth [2].
DCCP offers two congestion-control algorithms, called CCIDs (Congestion Control IDentifiers). The CCIDs are the components responsible for providing congestion control for a DCCP connection. In Linux, CCIDs are kernel modules working on top of the DCCP core implementation. Because they are kernel modules, the CCIDs can be loaded or unloaded at any time, and applications can select a CCID appropriate for the task. For instance, a Voice over IP (VoIP) application is characterized by bursts of small packets followed by periods of silence, whereas a Video on Demand (VoD) application generally transmits multimedia content at a constant bit rate. In this case, it is better for a VoIP application to use a congestion-control technique tailored to VoIP.
Currently there are two standardized CCIDs: CCID-2 and CCID-3. CCID-2 (RFC 4341) [3] is better for applications that use the maximum bandwidth available at the network, but it can easily be adapted to sudden bandwidth changes. It is similar to TCP congestion control, which is based on the congestion window concept. The congestion window size dictates how many packets the sender is allowed to transmit over the network. This means that the bigger the congestion window size, the more packets TCP sends over the network. When DCCP CCID-2 detects a packet loss, it halves the congestion window, which is an abrupt change in the transmission rate, especially for multimedia applications.
In the initial transmission state, the congestion window size increases in an exponential fashion as the sent packets are acknowledged, until it reaches the congestion-avoidance phase. At this point, CCID-2 increases the congestion window size by 1 when the receiver acknowledges a packet.
On the other hand, CCID-3 (RFC 4342) [4] implements a receiver-based congestion control algorithm in which the sender is rate-limited by the receiver. Periodically, the receiver sends feedback packets to the sender containing lost event information and other connection statistics that are plugged into the TCP-Friendly Rate Control equation (TFRC) (RFC 3448) [5].
TFRC is reasonably fair when competing for bandwidth with TCP flows, but it has a lower variation of throughput over time compared with other TCP congestion-control mechanisms, making it more suitable for applications such as telephony or streaming media, for which a relatively smooth sending rate is important.
To start exploring the world of DCCP on Linux, you first need to enable DCCP in the Linux kernel and then install some applications to test your environment.Because DCCP is a new protocol, it is in constant development. If you want the latest available changes for the DCCP implementation in the Linux kernel, you must fetch the kernel from the DCCP git test tree repository [6], which is managed by the git tool, a version control system used by kernel developers. After you have installed git - it is available from package managers such as emerge, apt-get, and urpmi - you can fetch the entire kernel source tree, including the DCCP source subtree, as follows:
git-clone git://eden-feed.erg.abdn.ac.uk/dccp_exp my_dccp
The my_dccp argument is the directory where git will put the fetched Linux kernel source code. This directory must not exist. If you have a fairly recent git kernel source, you can speed up the fetching process by passing to the git-clone command the directory as a reference:
git-clone --reference old_git_kernel git://eden-feed.erg.abdn.ac.uk/dccp_exp my_dccp
In both cases, git-clone will take a while to fetch the kernel source from over the network. While you wait for the end of the fetch process, you can read about DCCP on Linux wiki [7] to learn more about DCCP. Once git has downloaded the Linux kernel containing the latest available version of DCCP, enter in the newly created directory (in my example, the my_dccp directory) and check out the DCCP branch:
git-checkout --track -b dccp origin/dccp
This command will effectively give you the latest changes of the DCCP source code. For future updates of the DCCP source code, run the following command in the source folder:
git-pull git://eden-feed.erg.abdn.ac.uk/dccp_exp dccp
The dccp argument is not a folder; it is the branch previously created with git-checkout.
Now that you have the Linux kernel source code with the latest changes of the DCCP subtree, you'll need to set up the kernel according to your machine architecture. Inside the kernel source directory, the Linux kernel configuration is described in the .config file. You can change this configuration both from make menuconfig or by directly editing the .config file. To determine what Linux modules are up, use lsmod, and use lspci to get a list of devices. Additionally, look in your hardware documents and vendor support. For more on compiling the kernel, refer to the Linux kernel documentation [8].
If you are familiar with the Linux kernel compilation process, use the menuconfig mechanism to specify the Linux kernel options; DCCP is enabled under the Networking option as follows:
Networking -->
   Network options -->
      The DCCP Protocol -->
Inside this option, you can specify the CCIDs and some other DCCP options. After you select everything you need, just compile the kernel using instructions specified in the documentation [8]. After you load your new compiled kernel, you can switch between the CCIDs and change the sequence window number by running the following commands:
sudo sysctl -w net.dccp.default.seq_window=1000
sudo sysctl -w net.dccp.default.rx_ccid=2
sudo sysctl -w net.dccp.default.tx_ccid=2
This set specifies 1000 as the sequence window and CCID-2 in both directions for all connections started by DCCP. Note that you also can specify these parameters through a programming language using the setsockopt socket function.
IPerf is a network measurement tool that was originally designed to work over TCP and UDP. But thanks to a patchset provided by Gerrit Renker, it also supports the DCCP protocol, wherein you can run it as a DCCP client or a server. To use IPerf with DCCP support, first download and install IPerf [9]. If you are lucky, the process of compiling and installing is straightforward with the make and make install procedures. The site also provides useful information on IPerf with DCCP.
To test DCCP, set a server with the following arguments:
iperf -s -d -l 1424 -i 1
This command tells IPerf to open a DCCP connection (-d option) and to act as a server (-s option). The server will transmit data packets of size 1424 bytes (-l 1424), and it will output reports about the transmission every one second. To run an IPerf client that will connect to the specified server, execute the following command:
iperf -c SERVER_IP -d -l 1424 -i 1 -t 100
The -c option specifies the server IP, and -t specifies the duration of the transmission, in seconds. For a quick introduction to DCCP, consider a simple Python application that sends hello world to a remote application. The Python DCCP server code is shown in Listing 1, and the Python DCCP client is in Listing 2.
| Listing 1: Python DCCP Server (dccp_server.py) |
01 import socket 02 03 socket.SOCK_DCCP = 6 04 socket.IPPROTO_DCCP = 33 05 address = (socket.gethostname(),12345) 06 07 server = socket.socket(socket.AF_INET, socket.SOCK_DCCP, socket.IPPROTO_DCCP) 08 09 server.bind(address) 10 server.listen(1) 11 s,a = server.accept() 12 print s.recv(1024) |
In line 7 of Listing 1, the socket instantiation is done using the values of socket.SOCK_DCCP and socket.IPPROTO_DCCP. socket.IPPROTO_DCCP is equal to 33, which is the number allocated to the DCCP protocol by IANA (Internet Assigned Numbers Authority). The other lines are very similar to an implementation of a TCP socket connection. The client in Listing 2 connects to the DCCP server implemented in Listing 1.
| Listing 2: Python DCCP Client (dccp_client.py) |
01  import socket
02
03 socket.SOCK_DCCP = 6
04  socket.IPPROTO_DCCP = 33
05  address = (socket.gethostname(),12345)
06
07 client = socket.socket(socket.AF_INET, socket.SOCK_DCCP, socket.IPPROTO_DCCP)
08
09 client.connect(address)
10 client.send("Hello World")
|
Now that the server and client are communicating, it is time to add some additional multimedia features through the GStreamer framework.
GStreamer is an open source multimedia framework that allows the programmer to write many types of streaming multimedia applications [10]. Many well-know applications use GStreamer, such as Kaffeine, Amarok, Phonon, Rhythmbox, and Totem. The GStreamer framework facilitates the process of writing multimedia applications, ranging from audio and video playback to streaming multimedia content.
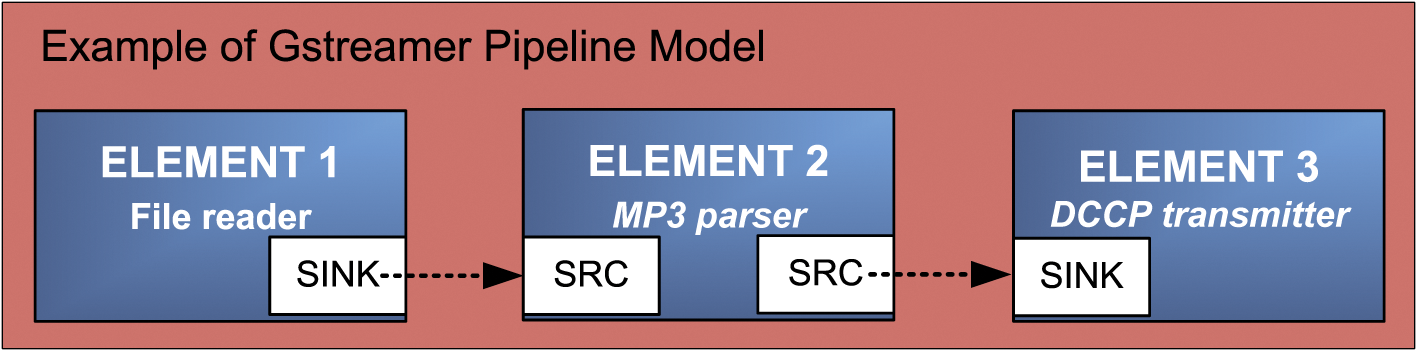
GStreamer is a plugin-based framework, and each plugin contains elements. Each of these elements provides a specific function - such as encoding, displaying, or rendering data - as well as the ability to read from or write to files. By combining and linking those elements, the programmer can build a pipeline for performing more complex functions. For example, it is possible to create a pipeline for reading from an MP3 file, decoding its contents, and playing the MP3.
Figure 1 represents a GStreamer pipeline composed by three elements. Data flows from Element 1 to Element 2 and finally to Element 3. Element 1 is the source element, which is responsible for providing data to the pipeline, whereas Element 3 is responsible for consuming data from the pipeline. Between the source element and the sink element, the pipeline is permitted to use other elements, such as Element 2 (shown in Figure 1). These intermediary elements are responsible for processing and modifying the content as the data passes along the pipeline.
We developed the DCCP plugin for GStreamer to deal with data transmission using the DCCP protocol. This plug-in has four elements: dccpserversrc, dccpserversink, dccpclientsrc, and dccpclientsink.
The source elements (dccpserversrc and dccpclientsrc) are responsible for reading data from a DCCP socket and pushing it into the pipeline, and the sink elements (dccpserversink and dccpclientsink) are responsible for receiving data from the pipeline and writing it to a DCCP socket.
The dccpserversrc and the dccpserversink elements behave as the server, but only dccpserversink can transmit and only dccpserversrc can receive data. When the server element is initialized, it stays in a wait mode, which means the plugin is able to accept a new connection from a client element. The dccpclientsink element can connect to dccp-serversrc, and dccpclientsrc can connect to dccpserversink.
If you want to send data from the server to the client, you need to use dccpclientsrc and dccpserversink elements. To send data from the client to server, you need to use the dccpclientsink and dccpserversrc elements.
GStreamer's gst-launch command supports the creation of pipelines, and it is also used to debug plugins.
The basic syntax is:
gst-launch <gst-launch parameters> <element> <element parameters> ! <element> <element parameters> ! <element> <element parameters> ...
Note the ! character that links the plug-in elements, which is similar to the character "|" in the Linux shell prompt. This means that the output of an element is the input to the next specified plugin element.
As an example of the gst-launch command, consider two pipelines to transmit an MP3 stream over the network with DCCP: One works as a DCCP server that streams an MP3 audio file, and the second pipeline is associated with a DCCP client that connects to the remote DCCP server and reproduces the audio content transmitted by the server.
To make the example work, you must install GStreamer. In this case, you need the GStreamer-Core, Gst-Base-Plugins, and Gst-Ugly-Plugins packages. Do not worry about the GStreamer installation; GStreamer is a widely used framework available in many Linux package systems for a variety of distributions, such as Debian, Gentoo, Mandriva, Red Hat, and Ubuntu. Once you perform the GStreamer installation, the last step is to compile and install the DCCP Plugin for GStreamer (see the box titled "Installing the GStreamer DCCP Plugin").
The following gst-launch example runs a server accepting DCCP connections. Once a client connects, the server starts to stream the audio file named yourmusic.mp3. Note that you can specify the CCID with the ccid parameter.
gst-launch -v filesrc location=yourmusic.mp3 ! mp3parse ! dccpserversink port=9011 ccid=2
This pipeline initializes the server in DCCP port 9011. The server will be waiting for a client to connect to it. When the connection occurs, the server starts to transmit the MP3 stream using CCID-2. The mp3parse element is responsible for transmitting a stream. To see more information about mp3parse and the other parameters that are available, run gst-inspect dccpserversink.
Next, start the corresponding client:
gst-launch -v dccpclientsrc host=localhost port=9011 ccid=2 ! decodebin ! alsasink
This GStreamer pipeline initializes the client and connects to the host localhost in port 9011. Once connected, the client starts to receive the MP3 stream, decodes the stream using the decodebin element, and pipes the stream to the alsasink element, which reproduces the multimedia content in the default audio output device.
| Installing the GStreamer DCCP Plugin |
|
The DCCP plugin for GStreamer is part of the DCCP and E-Phone project for the Nokia maemo platform [11]. After you have downloaded the plugin [12], run the following commands: ./autogen --prefix=/usr make make install |
Now it is time to write a complete multimedia application using the DCCP plug-in. The next example is for readers who want to use a programming language and embed the DCCP plugin into their applications. I'll create the pipeline shown in the previous examples, but this time through the C programming language and GObject, a programming library available for GStreamer application and plugin development.
Start by initializing the GStreamer settings, as shown in Listing 3. Note that Listing 3 also defines GstElements filesrc, mp3parse, and dccpserversink.
The next step is to instantiate a bus callback function to listen to GStreamer pipeline events. A bus is a system that takes care of forwarding messages from the pipeline to the application. The idea is to set up a message handler on the bus that leads the application to control the pipeline when necessary. Put the function shown in Listing 4 above the main function defined in Listing 3.
| Listing 3: Initializing (gst_dccp_server.c) |
01  #include <string.h>
02  #include <math.h>
03  #include <gst/gst.h>
04
05 int main (int argc, char **argv) {
06      GMainLoop *loop;
07      GstElement *pipeline, *filesrc, *mp3parse, *dccpserversink;
08      GstBus *bus;
09
10     /* initialize GStreamer */
11      gst_init (&argc, &argv);
12      loop = g_main_loop_new (NULL, FALSE);
13
14     /* check input arguments */
15      if (argc != 3) {
16          g_print ("Usage: %s port mp3file_location\n", argv[0]);
17          return -1;
18      }
19      return 0;
20  }
|
| Listing 4: GStreamer Bus (gst_dccp_server.c) |
01 static gboolean bus_event_callback (GstBus *bus, GstMessage *msg, gpointer data){
02
03      GMainLoop *loop = (GMainLoop *) data;
04
05     switch (GST_MESSAGE_TYPE (msg)) {
06      case GST_MESSAGE_EOS:
07          g_print ("End-of-stream\n");
08          g_main_loop_quit (loop);
09          break;
10      case GST_MESSAGE_ERROR: {
11          gchar *debug;
12          GError *err;
13          gst_message_parse_error (msg, &err, &debug);
14          g_free (debug);
15          g_print ("Error: %s\n", err->message);
16          g_error_free (err);
17          g_main_loop_quit (loop);
18          break;
19      }
20      default:
21          break;
22      }
23
24     return TRUE;
25  }
|
Every time an event occurs in the pipeline, GStreamer calls the gboolean bus_call function. For example, if you implement a GUI interface for your application, you can show a message announcing the end of the stream or deactivate the GUI stop button when the type of the GStreamer bus message is GST_MESSAGE_EOS. Now comes the most important part of this example - defining the elements and building the GStreamer pipeline. Insert the code shown in Listing 5 into the main function (after checking the parameter count).
| Listing 5: GStreamer Elements |
01      /* defining elements */
02      pipeline = gst_pipeline_new ("dccp-audio-sender");
03      filesrc = gst_element_factory_make ("filesrc", "file-source");
04      mp3parse = gst_element_factory_make ("mp3parse", "mp3parse");
05      dccpserversink = gst_element_factory_make ("dccpserversink", "server-sink");
|
Listing 5 first instantiates a new pipeline, dccp-audio-sender, which can be used for future references in the code. Then the code instantiates the filesrc element with the name file-source. This element will be used to read the specified MP3 file as an argument of the application. Use the same process to instantiate the elements mp3parse and dccpserversink. Once all the necessary elements are instantiated, certify that all are properly loaded. For this case, proceed as shown in Listing 6.
| Listing 6: Verifying Elements |
01      if (!pipeline || !filesrc || !mp3parse || !dccpserversink) {
02          g_print ("One or more elements could not be instantiated\n");
03          return -1;
04      }
|
The next step is to set the respective element parameters, as shown in Listing 7. For this application, we need to set two parameters: the port, where the server will listen and accept client connection from, and the audio file path, represented by the parameter location.
| Listing 7: Setting Parameters |
01 g_object_set (G_OBJECT (dccpserversink), "port", atoi(argv[1]), NULL); 02 g_object_set (G_OBJECT (filesrc), "location", argv[2], NULL); |
Once all the elements are instantiated and the parameters are defined, it is time to attach the bus callback defined in Listing 4 to the bus of the pipeline. Also, you need to add the elements to the pipeline and link them (Listing 8). Listing 9 shows how to execute the pipeline. Note that GStreamer runs in a main loop (line 5). This means that when this main loop finishes - for example, when the user types Ctrl+C - it is necessary to do some clean up (lines 9 and 11). The easiest part is to compile the server application - just run the following command, which will link the GStreamer libs with the example application:
gcc -Wall $(pkg-config --cflags --libs gstreamer-0.10) gst_dccp_server.c -o gst_dccp_server
To run the gst_dccp_server application, enter the following command:
./gst_dccp_server 9011 yourmusic.mp3
Note that the example uses port 9011, which the server will use to open the DCCP socket and transmit the stream through the network to the remote DCCP client.
| Listing 8: Attaching bus_event_callback |
01 bus = gst_pipeline_get_bus (GST_PIPELINE (pipeline)); 02 gst_bus_add_watch (bus, bus_event_callback, loop); 03 gst_object_unref (bus); 04 05 gst_bin_add_many (GST_BIN (pipeline), filesrc, mp3parse, dccpserversink, NULL); 06 /* Link the elements at the pipeline */ 07 gst_element_link_many (filesrc, mp3parse, dccpserversink, NULL); |
| Listing 9: Executing the Pipeline |
01      /* Now set to playing and iterate. */
02      g_print ("Setting to PLAYING\n");
03      gst_element_set_state (pipeline, GST_STATE_PLAYING);
04      g_print ("Running\n");
05      g_main_loop_run (loop); // start the GStreamer main loop
06
07     /* clean up nicely */
08      g_print ("Returned, stopping playback\n");
09      gst_element_set_state (pipeline, GST_STATE_NULL);
10      g_print ("Deleting pipeline\n");
11      gst_object_unref (GST_OBJECT (pipeline));
|
Now it is time to build a corresponding client application that acts just like the gst-launch client command discussed previously. The DCCP client application is similar to the server application (Listing 10). Basically, you must initialize GStreamer, check command-line parameters, instantiate the necessary elements, and link them to build the GStreamer pipeline.
| Listing 10: DCCP Client Application |
01  #include <string.h>
02  #include <math.h>
03  #include <gst/gst.h>
04
05 static gboolean bus_event_callback (GstBus *bus, GstMessage *msg, gpointer data){
06
07      GMainLoop *loop = (GMainLoop *) data;
08
09     switch (GST_MESSAGE_TYPE (msg)) {
10      case GST_MESSAGE_EOS:
11          g_print ("End-of-stream\n");
12          g_main_loop_quit (loop);
13          break;
14      case GST_MESSAGE_ERROR: {
15          gchar *debug;
16          GError *err;
17          gst_message_parse_error (msg, &err, &debug);
18          g_free (debug);
19          g_print ("Error: %s\n", err->message);
20          g_error_free (err);
21          g_main_loop_quit (loop);
22          break;
23      }
24      default:
25          break;
26      }
27
28     return TRUE;
29  }
30
31 int main (int argc, char *argv) {
32      GMainLoop *loop;
33      GstElement *pipeline, *dccpclientsrc, *decodebin, *alsasink;
34      GstBus *bus;
35
36     /* initialize GStreamer */
37      gst_init (&argc, &argv);
38      loop = g_main_loop_new (NULL, FALSE);
39
40     /* check input arguments */
41      if (argc != 3) {
42          g_print ("Usage: %s serverHost serverPort\n", argv[0]);
43          return -1;
44      }
45
46     /* create elements */
47      pipeline = gst_pipeline_new ("audio-sender");
48      dccpclientsrc = gst_element_factory_make ("dccpclientsrc", "client-source");
49      decodebin = gst_element_factory_make ("decodebin", "decodebin");
50      alsasink = gst_element_factory_make ("alsasink", "alsa-sink");
51
52     if (!pipeline || !alsasink || !decodebin || !dccpclientsrc) {
53          g_print ("One or more elements could not be instantiated\n");
54          return -1;
55      }
56
57     // set the host and the port where the server is listening
58      g_object_set (G_OBJECT (dccpclientsrc), "host", argv[1], NULL);
59      g_object_set (G_OBJECT (dccpclientsrc), "port", atoi(argv[2]), NULL);
60
61     /* put all elements in a bin */
62      gst_bin_add_many (GST_BIN (pipeline), dccpclientsrc, decodebin, alsasink, NULL);
63
64     gst_element_link_many (dccpclientsrc, decodebin, alsasink, NULL);
65
66     bus = gst_pipeline_get_bus (GST_PIPELINE (pipeline));
67      gst_bus_add_watch (bus, bus_event_callback, loop);
68      gst_object_unref (bus);
69
70     /* Now set to playing and iterate. */
71      g_print ("Setting to PLAYING\n");
72      gst_element_set_state (pipeline, GST_STATE_PLAYING);
73      g_print ("Running\n");
74      g_main_loop_run (loop);
75
76     /* clean up nicely */
77      g_print ("Returned, stopping playback\n");
78      gst_element_set_state (pipeline, GST_STATE_NULL);
79      g_print ("Deleting pipeline\n");
80      gst_object_unref (GST_OBJECT (pipeline));
81
82     return 0;
83  }
|
Finally, to compile and run the client application, enter the following command:
gcc -Wall $(pkg-config --cflags --libs gstreamer-0.10) gst_dccp_client.c -o gst_dccp_client ./<applicationName> localhost 9011
I've presented the basic concepts of DCCP - how to enable DCCP in Linux, and how to build a DCCP-based application using the GStreamer DCCP plugin. Network analysis and testing applications, such as TTCP, tcpdump, and Wireshark already provide support for the DCCP protocol, and multimedia tools such as the open source VLC player accommodate DCCP streaming. As multimedia developers become aware of its benefits, you can expect to hear more about DCCP in the coming years.
| INFO |
|
[1] RFC 4340: Datagram Congestion Control Protocol (DCCP)
[2] Leandro M. Sales, Hyggo O. Almeida, Angelo Perkusich and Marcello Sales Jr: "On the Performance of TCP, UDP, and DCCP over 802.11g Networks." In Proceedings of the SAC 2008 23rd ACM Symposium on Applied Computing Fortaleza, CE, Brazil, pages 2074-2080, 1 2008. [3] RFC 4341: "Profile for Datagram Congestion Control Protocol (DCCP) Congestion Control ID 2: TCP-like Congestion Control" [4] RFC 4342: "Profile for Datagram Congestion Control Protocol (DCCP) Congestion Control ID 3: TCP-Friendly Rate Control (TFRC)" [5] RFC 3448: "TCP Friendly Rate Control (TFRC): Protocol Specification" [6] DCCP Git Repository: git://eden-feed.erg.abdn.ac.uk/dccp_exp [7] DCCP on Linux wiki: http://www.linux-foundation.org/en/Net:DCCP [8] Linux kernel documentation: http://www.kernel.org/doc/ [9] IPerf: http://www.erg.abdn.ac.uk/users/gerrit/dccp/apps/#iperf [10] GStreamer: http://gstreamer.freedesktop.org/ [11] Maemo: http://www.maemo.org/ [12] DCCP plugin for GStreamer: https://garage.maemo.org/frs/?group_id=297 |
| THE AUTHOR |
|
Leandro Melo de Sales has enjoyed Linux since 1997 and has contributed to DCCP in Linux since 2006, focusing mainly on embedded devices. He maintains DCCP for the Nokia maemo platform and is working on DCCP CCID-4 congestion control and a DCCP-based VoIP client. Leandro works at the Embedded Systems and Pervasive Computing Lab/UFCG, which is supported by Nokia Institute of Technology, Brazil. Thanks to the other authors who contributed: Angelo Perkusich, Arnaldo Carvalho, Erivaldo Xavier, Felipe Coutinho, Hyggo Almeida , Marcello Júnior, and Thiago Santos. |