
By Dmitri Popov
Wouldn't it be nice if OpenOffice.org had a bookmarking feature? With one of these, you could bookmark your favorite documents and access them with a couple of mouse clicks instead of wading through directories on your hard disk.
Although you can access previously opened files via the File | Recent documents menu, this feature is too limited to be of real use. Fortunately, you have at least two ways to solve this problem: Either you can use the Bookmarks Menu extension (Figure 1) or you can create your own bookmarking tool using OpenOffice.org Basic.
As the name suggests, the Bookmarks Menu [1] extension allows you to bookmark documents, as well as apply a couple of other tricks, which makes it a really nifty helper tool.
As with most OpenOffice.org extensions, installing Bookmarks Menu is not particularly difficult. Just download the latest version of the extension, then use the Extension Manager in OpenOffice.org (Tools | Extension Manager) to install the downloaded .oxt package.
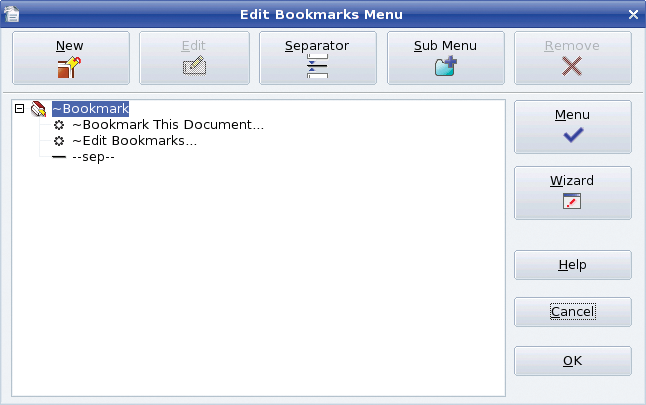
After installing the Bookmarks Menu extension, you must enable it. To do so, choose Tools | Add-ons | Bookmarks Menu. This adds the menu to the main toolbar and opens the Edit Bookmarks Menu dialog, from which you can add bookmarks and configure menu items.
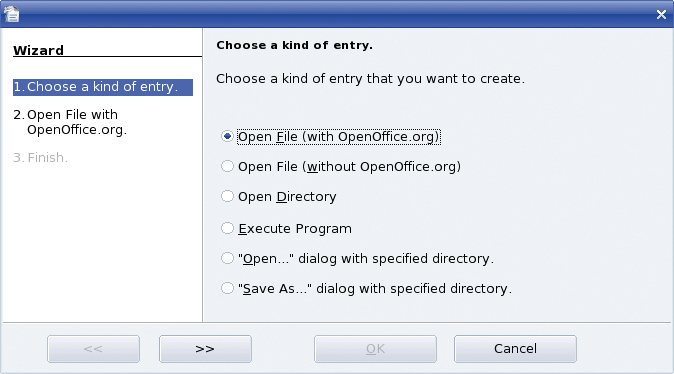
If you are not familiar with Bookmarks Menu, the easiest way to add a bookmark is to use a wizard, which you can launch by pressing the Wizard button.
When you run the wizard, you'll notice that it allows you to bookmark not only documents but also directories and even commands and applications (see Figure 2). To create a bookmark for an application or a command, choose the Execute command option and press the >> button. In the next window, specify the desired command and an optional argument. For example, if you want to bookmark the Firefox browser, enter firefox in the appropriate field.
Additionally, you can specify a URL as an input argument (e.g., http://en.wikipedia.org/wiki/Main_Page). This way, the bookmark opens the Firefox browser that then navigates to the Wikipedia page.
Give the bookmark a descriptive name by entering it in the Label field, and press >>. In the next window, press the Test button to make sure the specified bookmark works properly, then press OK. Now you can launch Firefox by choosing the newly created bookmark from the Bookmark menu.
Instead of using the wizard, you can press the New button in the Edit Bookmarks Menu dialog, which gives you access to more advanced features, such as the ability to bookmark macros. This makes Bookmarks Menu a much better alternative for accessing macros than OpenOffice.org's own Tools | Customize feature.
To bookmark a macro, choose Edit Bookmarks from the Bookmark menu and press the New button. Then give the bookmark a name, select Macro from the Type drop-down list, press the Open button, and select the macro you want. To save the new bookmark, press OK, and then you are done.
The Edit Bookmarks Menu window also contains a few tools that can help you to keep tabs on your bookmarks. With the Sub Menu button, you can group your bookmarks into submenus, whereas the Separator button lets you insert a separator line between bookmarks. The Menu button offers the Import Settings and Export Settings commands. As you might have guessed, the latter allows you to export your settings and bookmarks, so you can then import them into the Bookmarks Menu extension on another machine.
If you have a lot of bookmarks and you want to use them on multiple installations of OpenOffice.org, this feature can come in particularly handy.
Although Bookmarks Menu sports a few clever features, this shouldn't stop you from creating your own bookmarking solution. Going the do-it-yourself way allows you to build a custom bookmark manager that neatly fits your specific needs. Moreover, this provides you with a good opportunity to learn a couple of OpenOffice.org Basic tricks.
In this example, I'll explain how to create a bookmark that uses two macros. The BookmarkDocument macro (see Listing 1) lets you pick the document you want to bookmark and saves its name and path in an OpenOffice.org Base database.
| Listing 1: BookmarkDocument macro |
01 Sub BookmarkDocument()
02 FilePicker=createUnoService("com.sun.star.ui.dialogs.FilePicker")
03 With FilePicker
04   .appendFilter("ODF Text Document", "*.odt;")
05   .appendFilter("Microsoft Word 97/2000/XP", "*.doc;")
06   .CurrentFilter = "ODF Text Document"
07 End With
08 FilePicker.execute
09 FilePath()=FilePicker.Files
10 DispDir=FilePicker.DisplayDirectory
11 If GetGUIType=1 Then
12    FileName = Right(FilePath(0),Len(FilePath(0))-Len(DispDir))
13   Else
14    FileName = Right(FilePath(0),Len(FilePath(0))-Len(DispDir & "/"))
15 End If
16 DBContext=createUnoService("com.sun.star.sdb.DatabaseContext")
17 DataSource=DBContext.getByName("BookmarkDB")
18 ConnectToDatabase=DataSource.GetConnection ("","")
19 SQLQuery="INSERT INTO ""files"" " + "(""FileName"", ""FilePath"") VALUES "_
20 + "('" + FileName + "','" + ConvertToURL(FilePath(0)) + "')"
21 SQLStatement=Database.createStatement
22 Result=SQLStatement.executeQuery (SQLQuery)
23 Database.close
24 Database.dispose()
25 End Sub
|
The OpenBookmarks macro (see Listing 2) displays a list of bookmarked documents, and you can open the desired document by selecting it from the list and pressing the Open button. To keep things simple, the bookmark manager handles only word processing documents (.odt and .doc) and opens them in OpenOffice.org Writer, but you can tweak it to include other formats easily.
| Listing 2: OpenBookmarks macro |
01 Sub OpenBookmarks()
02 DBContext=createUnoService("com.sun.star.sdb.DatabaseContext")
03 DataSource=DBContext.getByName("BookmarkDB")
04 ConnectToDatabase=DataSource.GetConnection ("","")
05 SQLResult=createUnoService("com.sun.star.sdb.RowSet")
06 SQLQuery="SELECT ""FileName"" FROM ""files"""
07 SQLResult.activeConnection = Database
08 SQLResult.Command = SQLQuery
09 SQLResult.execute
10 exitOK=com.sun.star.ui.dialogs.ExecutableDialogResults.OK
11 OpenDialog("BookmarkDialog")
12 Dialog=CreateUnoDialog(TheDialog)
13 DialogField=Dialog.GetControl("ListBox1")
14 While SQLResult.next
15   ListBoxItem = SQLResult.getString(1)
16   DialogField.additem(ListBoxItem, DialogField.ItemCount)
17 Wend
18 If Dialog.Execute=exitOK Then
19   CurrentItemName=DialogField.SelectedItem
20 End If
21 SQLQuery="SELECT ""FilePath"" FROM ""files"" WHERE ""FileName""=" & "'" & CurrentItemName &"'"
22 SQLResult=Database.createStatement()
23 QueryResult=SQLResult.executeQuery(SQLQuery)
24 QueryResult.next
25 FileToOpen=QueryResult.getString(1)
26 Shell("swriter",1, FileToOpen)
27 Database.close
28 Database.dispose()
29 End Sub
|
Before you can start working on the macros, you must create a database containing the "files" table and two text fields: FileName and FilePath. Then save the database as a BookmarkDB.odb file and register it as a data source in OpenOffice.org.
To do the latter, launch OpenOffice.org and choose Tools | Options. Next, select OpenOffice.org Base | Databases and press the New button. Then select the BookmarkDB.odb database and give the new connection the "BookmarkDB" name. After pressing OK twice and creating a dialog called BookmarkDialog (consisting of a listbox and an OK button), you are done.
Next comes the BookmarkDocument macro. OpenOffice.org Basic comes with the FilePicker service that can do the heavy lifting for you. This service displays a file picker dialog, which allows the user to select a document. To initiate and execute the service, you need only two lines of code:
FilePicker=createUnoService("com.sun.star.ui.dialogs.FilePicker")
FilePicker.execute
Because the bookmark manager handles only word processing documents, it's a good idea to add a filter to it so the user won't be allowed to choose files in other formats, which is exactly what the With ... End With code block does.
After the user has selected a file, the macro extracts the file's name. To do this, the macro uses the DisplayDirectory property to obtain the file's path and the Right and Len string routines to extract the file's name from the path.
Next, the macro establishes a connection to the BookmarkDB database and inserts the obtained file name and path in the appropriate fields in the files table with the INSERT INTO SQL statement.
The OpenDocument macro starts by establishing the connection to the BookmarkDB database and uses an SQL query to obtain all the records (bookmarks) from the files table. Then the macro calls the BookmarkDialog dialog and populates the listbox in it with the file names.
When the user selects a file from the list and presses the Open button, the macro uses the file name as part of the following query to find the appropriate record:
SQLQuery="SELECT ""FilePath"" FROM ""files"" WHERE ""FileName""=" & "'" & CurrentItemName &"'"
Finally, the macro passes the obtained file path to the Shell statement, which opens it with OpenOffice.org Writer.
One major advantage of this DIY bookmark manager is that you can tweak it any way you want. For example, you can add an input box to the BookmarkDocument macro that prompts you to enter tags for the selected document. Then you can modify the OpenDocument macro to display only bookmarks matching a specific tag.
With a few simple tweaks, the bookmark manager can be used to launch applications. In other words, with the basic bookmark manager in place, there are virtually no limits to what you can do with it.
| INFO |
|
[1] OpenOffice.org Bookmarks Menu extension: extensions.services.openoffice.org/project/bookmarksmenu
|
| THE AUTHOR |
|
Dmitri Popov holds a degree in Russian language and computer linguistics. He has been writing exclusively about Linux and open source software for several years, and his articles have appeared in Danish, British, North American, German, and Russian magazines and websites. |