
By Eric Amberg
In the old days, Linux pioneers were expected to install new hardware manually, but Linux now offers automatic hardware detection at system boot time, as well as on-the-fly configuration of pluggable devices - whether the device is a USB stick, a digital camera, or a Bluetooth phone.
The Udev subsystem takes the pain out of accessing new devices, and a pair of components known as the Hardware Abstraction Layer (HAL) and D-Bus provide an interface from the hardware to desktop applications.
Udev [1], which runs in the background as the udevd daemon, creates dynamic device files under /dev whenever it identifies a new device. The Udev daemon finds the devices at system boot time, and it also sets up new devices that are plugged in while the system is running - a feature that is commonly called hot plugging. The program might also create symbolic links for mass storage media such as disks or USB sticks under /dev/disk to point to the physical device files under /dev.
The Udev system makes sure device files are only created for existing devices. The kernel monitors the USB bus and detects the device you just plugged in. It generates a Uevent to report its findings to the Udev daemon. The Udev system processes the information by retrieving the data for the device from the kernel device database, Sysfs. The Udev rules specify what Udev does with the new device. The rules, which are located under /etc/udev/rules.d/, comprise a number of individual files that define actions for various events.
As Listing 1 shows, rule file names start with numbers. The idea behind the numerical approach is to specify the processing order because some dependencies might need to be resolved to complete the configuration.
| Listing 1: The Rules File |
01 # ls /etc/udev/rules.d/ 02 05-udev-early.rules 64-md-raid.rules 03 40-alsa.rules 70-kpartx.rules 04 40-bluetooth.rules 70-persistent-cd.rules 05 50-udev-default.rules 70-persistent-net.rules 06 55-hpmud.rules 75-cd-aliases-generator.rules 07 55-libsane.rules 75-persistent-net-generator.rules 08 56-idedma.rules 77-network.rules 09 60-cdrom_id.rules 79-yast2-drivers.rules 10 60-persistent-input.rules 80-drivers.rules 11 60-persistent-storage.rules 90-hal.rules 12 64-device-mapper.rules 95-udev-late.rules |
If you are interested in more detail on creating Udev rules, check out the article at kernel.org [1].
If you are interested, you can watch Udev working. The Udevmonitor tool gives you this option. Udevmonitor shows you the kernel Uevents that occur when you plug in a device (say, a USB stick) along with the matching Udev responses (Listing 2).
| Listing 2: Udevmonitor Output |
01 # udevmonitor 02 udevmonitor will print the received events for: 03 UDEV the event which udev sends out after rule processing 04 UEVENT the kernel uevent 05 UDEV [1212504262.814732] add /devices/pci0000:00/0000:00:1d.7/usb3/3-1 (usb) 06 UDEV [1212504262.814934] add /devices/pci0000:00/0000:00:1d.7/usb3/3-1/usb_endpoint/usbdev3.7_ep00 (usb_endpoint) 07 UDEV [1212504262.815017] add /devices/pci0000:00/0000:00:1d.7/usb3/3-1/3-1:1.0 (usb) 08 UDEV [1212504262.815086] add /class/scsi_host/host5 (scsi_host) 09 UDEV [1212504262.815146] add /devices/pci0000:00/0000:00:1d.7/usb3/3-1/3-1:1.0/usb_endpoint/usbdev3.7_ep01 (usb_endpoint) 10 UDEV [1212504262.815193] add /devices/pci0000:00/0000:00:1d.7/usb3/3-1/3-1:1.0/usb_endpoint/usbdev3.7_ep81 (usb_endpoint) 11 UEVENT[1212504263.666057] add /devices/pci0000:00/0000:00:1d.7/usb3/3-1/3-1:1.0/host5/target5:0:0/5:0:0:0 (scsi) 12 UEVENT[1212504263.666112] add /class/scsi_disk/5:0:0:0 (scsi_disk) 13 UEVENT[1212504263.673463] add /block/sdb (block) 14 UEVENT[1212504263.673511] add /block/sdb/sdb1 (block) 15 UEVENT[1212504263.673538] add /class/scsi_device/5:0:0:0 (scsi_device) 16 UEVENT[1212504263.673565] add /class/scsi_generic/sg2 (scsi_generic) 17 UDEV [1212504263.716085] add /devices/pci0000:00/0000:00:1d.7/usb3/3-1/3-1:1.0/host5/target5:0:0/5:0:0:0 (scsi) 18 UDEV [1212504263.733094] add /class/scsi_disk/5:0:0:0 (scsi_disk) 19 UDEV [1212504263.793736] add /class/scsi_device/5:0:0:0 (scsi_device) 20 UDEV [1212504263.823559] add /class/scsi_generic/sg2 (scsi_generic) 21 UDEV [1212504263.831015] add /block/sdb (block) 22 UDEV [1212504263.900340] add /block/sdb/sdb1 (block) |
All the lines starting with UEVENT relate to kernel messages, whereas the lines that start with UDEV identify Udev actions. The new device is accessible via the /dev/sdb1 device file, as you can see from the last line in Listing 2. A quick glance at /dev/disk/by-label reveals a link with the name the USB stick used to register with the system. The matching symbolic link for the stick in this example is DISK_IMG, which points to /dev/sdb1, matching the Udevmonitor output.
In this case, the system just used the name.
Many, but not all, devices register with their model designations, or at least with their manufacturers' names. In this example, DISK_IMG is not very helpful.
In the case of USB devices, you can redefine the label for a device you plug in by issuing the lsusb command, as shown in Listing 3. The example here shows a Hewlett Packard keyboard and a digital camera, both of which are registered with their full device designations.
| Listing 3: lsusb |
01 # lsusb 02 Bus 001 Device 005: ID 03f0:0024 Hewlett-Packard 03 Bus 001 Device 001: ID 0000:0000 04 Bus 005 Device 001: ID 0000:0000 05 Bus 004 Device 001: ID 0000:0000 06 Bus 002 Device 002: ID 04a9:3073 Canon, Inc. PowerShot A70 (ptp) 07 Bus 002 Device 001: ID 0000:0000 08 Bus 003 Device 001: ID 0000:0000 |
After Udev has completed its chores, the Hardware Abstraction Layer (HAL) [2] makes its contribution. The idea behind HAL is that applications should be able to access hardware without the need to know anything about the details. HAL acts as an interface between the hardware and the applications.
To allow this to happen, HAL draws information from several sources. For one thing, it listens directly to system buses, for another, it retrieves information from Udev, the kernel, and certain other global and user-specific configuration files.
More information is stored in XML-formatted FDI files under /usr/share/hal/fdi/information/. The FDI files contain long lists of information on devices by individual vendors, such as CD/DVD writers or digital cameras. HAL can draw on this resource to provide detailed information on the hardware.
If you want to view this information, you can either use lshal at the command line or launch a graphical front end, such as the HAL Device Manager (Figure 1), Gnome Device Manager, or KDE HAL Device Manager.
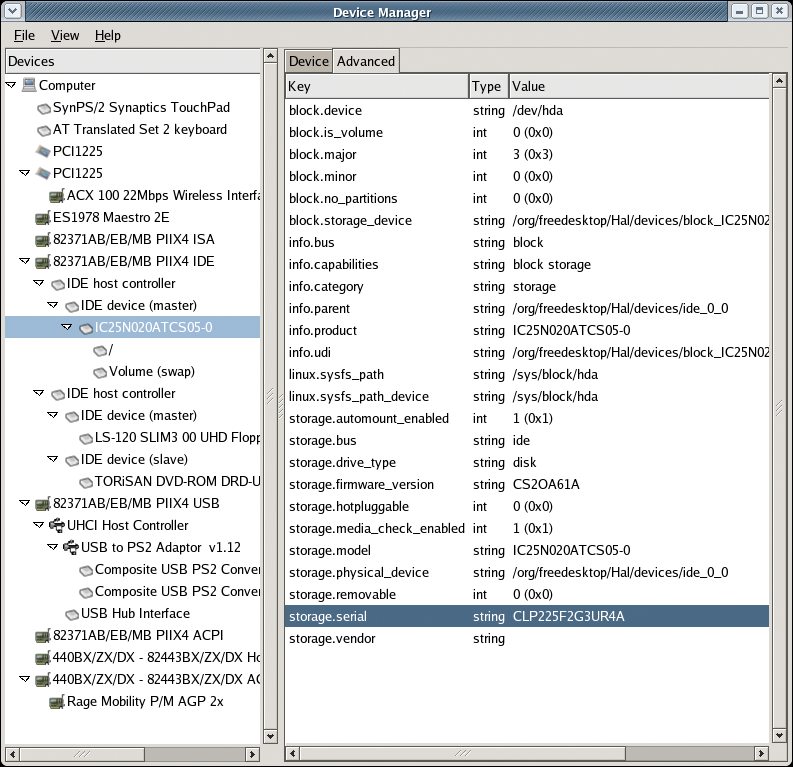
HAL, which is developed by the Freedesktop.org project [3], runs in the background in the form of the hald daemon. On top of this, it launches some auxiliary services when necessary. The services typically appear as entries starting with hald-addon- in the process list. A service typically monitors the status of a device.
If you find an entry for hald-addon-storage: polling /dev/hda, this means the device that follows /dev/hda is currently being polled; it is a CD/DVD drive in this example.
Although HAL provides device information for applications, it does not communicate directly with them. This is the domain of D-Bus [4], which is also maintained by the Freedesktop.org project and interacts very closely with HAL. D-Bus is an IPC framework geared to the needs of desktop applications, and it is part of nearly any Linux distribution today.
D-Bus is used for communication between desktop applications within the same desktop session, as well as communication between the operating system and its components.
The idea behind the IPC framework has been around for some time. Both major desktops - Gnome and KDE - made heavy use of completely different approaches in the past, with Gnome mainly relying on Corba [5] and KDE using DCOP [6]. Windows, which also has IPC services, relies on the proprietary DCOM [7]. Other IPC mechanisms also exist on Linux, however, they are restricted to specific tasks.
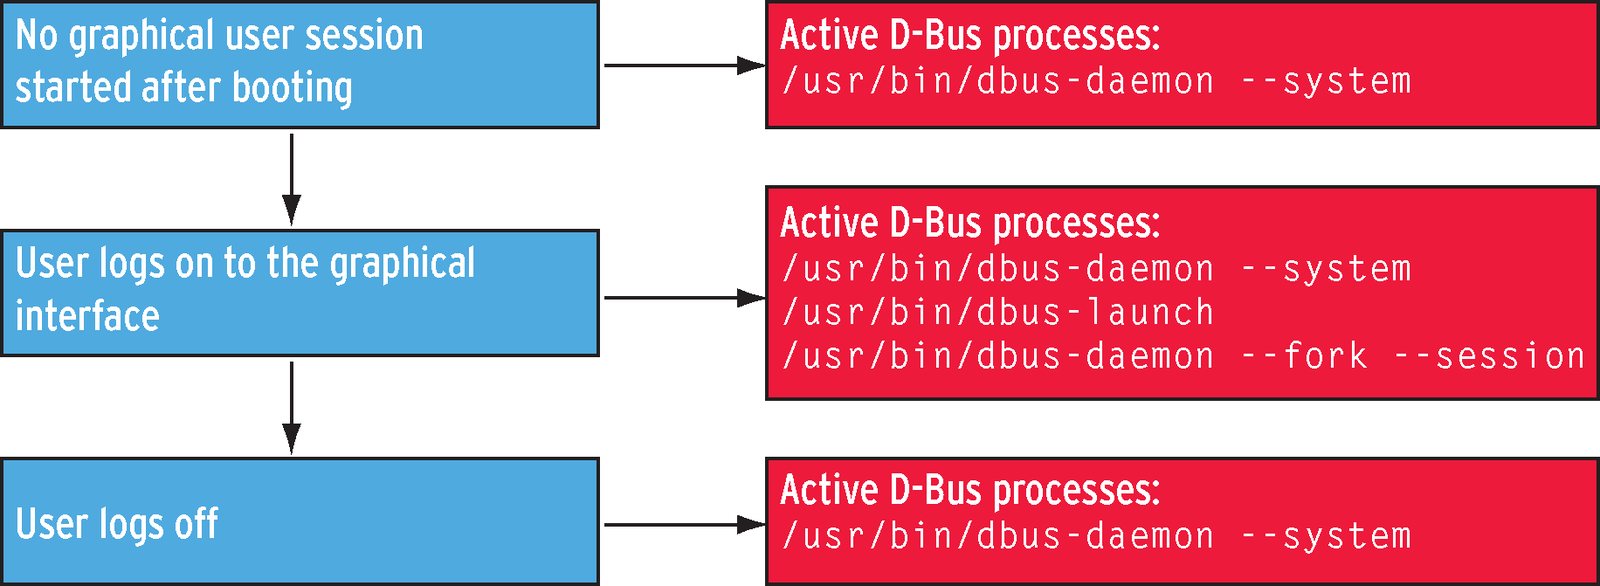
D-Bus also runs as a daemon and provides two communications channels or buses. The system bus is launched at boot time and is available whether the user logs on to the GUI system or not; that is, it runs all the time.
If a user logs on to the graphical interface, a second bus is launched: the session bus. The daemon process, dbus-daemon, has two options for this: --system and --session.
Whereas the daemon process for the system bus reads its configuration parameters from the /etc/dbus-1/system.conf file, the session bus parses /etc/dbus-1/session.conf. Incidentally, the dbus-launch program is used to launch the daemon.
Dbus-launch runs permanently as a daemon during a graphical user session, just in case it needs to launch further session bus processes.
After the user logs off, dbus-launch and the corresponding session bus terminate, leaving the system bus running. Figures 2 and 3 show the interrelationships.
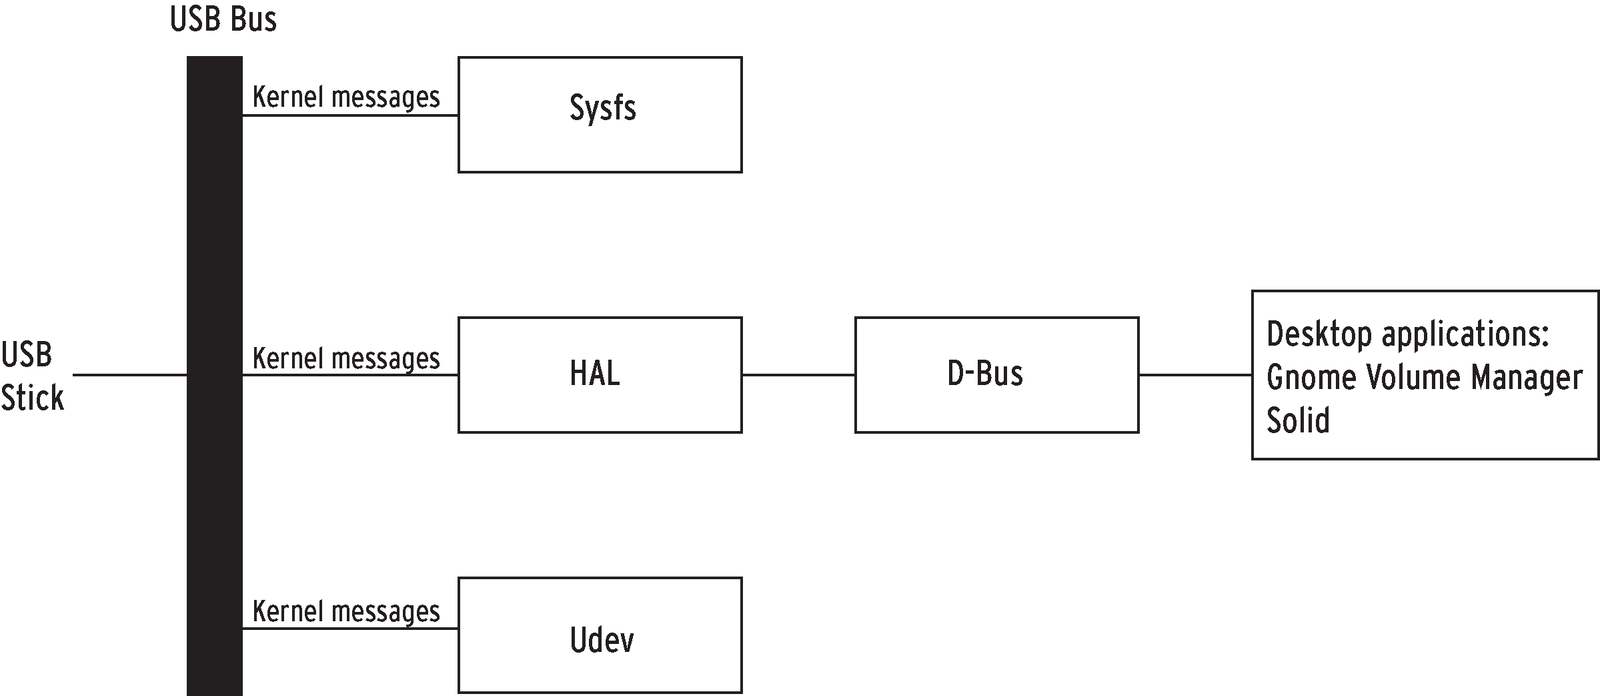
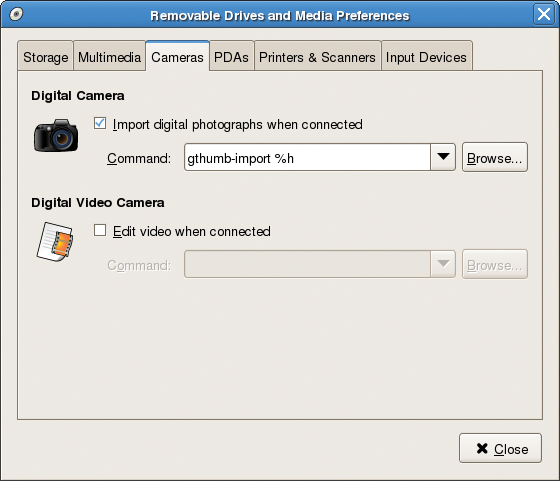
If an application requests a specific device class (such as camera, or storage) HAL uses D-Bus to notify the program as soon as the status of a device in this class changes. For example, the Gnome Volume Manager launches the gthumb-import import tool when you connect a camera (Figure 4).
KDE 4 has an applet in the form of a laptop icon labeled Device Monitor. The applet collaborates with D-Bus to display new hardware you plug in.
At the same time, it lets you launch a specific action depending on the device. For example, you could launch the Dolphin file manager to display the content of any USB sticks you plug in.
KDE's Solid framework is configured via the system preferences. So far, hardware detection has only been implemented for HAL management, the network, and Bluetooth.
| Hot-Wired |
|
In the past, users had to manually mount devices such as CDs or DVDs, but Gnome systems now handle this task through the Gnome Volume Manager. The manager dynamically creates an icon on your desktop, which you can then click to access the CD or DVD. Other external mass memory devices, such as USB sticks, are also mounted automatically by the software. The Gnome Volume Manager creates a matching subdirectory under /media, where it mounts the device. The directory is named after the name the device uses to register with the system. Depending on your configuration, the manager might also launch a matching application. In the case of mass storage devices such as CD/DVDs, USB sticks, or USB hard disks, you can launch the file browser to display the contents below the mount point for the dynamically mounted device (Figure 5). If you connect a digital camera, the Gnome Volume Manager will launch an image viewer or the import routine associated with an image viewer. The Gnome volume manager has a number of configuration options. Gnome Volume Properties dialog, which you can launch by popping up a terminal window in Gnome, handles the options (Figure 6). For each device class, such as digital cameras, mass storage, printers, and scanners, you can define a specific response. This means that you can configure the system to, say, auto-detect and set up new printers. KDE has a similar framework. Whereas KDE formerly experimented with home-cooked solutions like Corba or DCOP, the developers moved to Udev/HAL/D-Bus some time ago. Both major desktop environments now use the same underpinnings for device management. KDE version 4 and later relies on the Solid program package to offer functionality similar to Gnome Volume Manager. |
Just a couple of years ago, configuring new hardware on Linux was a daunting task and just one more reason for newcomers to keep clear. Now, Linux offers convenient device management that provides trouble-free, dynamic handling of devices plugged in at run time - including WLAN sticks, digital cameras, and even camcorders. Linux can listen on interfaces such as Bluetooth and Firewire and, if necessary, not only integrate a device you plug in, but launch the matching application as well.
Fortunately, the trend in recent months has been toward standardizing the underlying technologies. Udev has already clearly ousted its predecessor, Devfs, and found its way into the Linux kernel. Now the Freedesktop.org-sponsored team of HAL and D-Bus is establishing itself in the face of competition from the previous Gnome and KDE favorites, Corba and DCOP.
This merge has greatly improved communications between the two desktop environments. Gnome already has a mature front end for dynamic device management with Gnome Volume Manager and related tools. KDE is following suit after considerable restructuring of its libraries in version 4.
The KDE Solid hardware library adds a new and powerful framework to make hardware management on KDE easier than ever. In the months to come, you can look forward to more dynamic device management fireworks.
| INFO |
|
[1] Udev: http://www.kernel.org/pub/linux/utils/kernel/hotplug/udev.html
[2] HAL: http://www.freedesktop.org/wiki/Software/hal [3] Freedesktop.org: http://www.freedesktop.org/wiki [4] D-Bus: http://www.freedesktop.org/wiki/Software/dbus [5] Corba: http://de.wikipedia.org/wiki/CORBA [6] DCOP: http://developer.kde.org/documentation/other/dcop.html [7] DCOM for programmers: http://msdn.microsoft.com/en-us/library/ms809311.aspx |
| THE AUTHOR |
|
Eric Amberg has worked for many years as a System Engineer for IT networks, specializing in Linux and network security for large corporations. On top of this, he has published books and articles on Linux. His latest book, Linux Servers with Debian GNU/Linux (German) was published in June 2007. |